" height="9.18705px" id="AiyYyR90G" transform="translate(3.406 3.406)" width="9.18685px"/></svg>)
" height="1.90314px" id="wtDTm6bEW" transform="translate(26.225 0)" width="2.4723000000000006px"/><path d="M 0.557 0 L 1.438 0 C 1.746 0 1.995 0.25 1.995 0.559 L 1.995 1.344 C 1.995 1.653 1.746 1.903 1.438 1.903 L 0.557 1.903 C 0.25 1.903 0 1.653 0 1.344 L 0 0.559 C 0 0.25 0.25 0 0.557 0 Z" fill="rgb(29, 28, 27)" height="1.9031500000000001px" id="GnmDnNra_" transform="translate(36.408 2.728)" width="1.9953000000000003px"/><path d="M 6.224 0 L 0.558 0 C 0.25 0 0 0.25 0 0.559 L 0 1.344 C 0 1.653 0.25 1.903 0.558 1.903 L 6.224 1.903 C 6.531 1.903 6.781 1.653 6.781 1.344 L 6.781 0.559 C 6.781 0.25 6.531 0 6.224 0 Z" fill="rgb(29, 28, 27)" height="1.9031500000000001px" id="hKTQ3dbw4" transform="translate(34.261 5.456)" width="6.781100000000002px"/><path d="M 6.955 0 L 0.558 0 C 0.25 0 0 0.25 0 0.559 L 0 1.344 C 0 1.653 0.25 1.903 0.558 1.903 L 6.955 1.903 C 7.263 1.903 7.513 1.653 7.513 1.344 L 7.513 0.559 C 7.513 0.25 7.263 0 6.955 0 Z" fill="rgb(29, 28, 27)" height="1.9031500000000001px" id="G1Zzk9CUU" transform="translate(28.298 8.243)" width="7.513100000000001px"/><path d="M 7.123 0 L 0.558 0 C 0.25 0 0 0.25 0 0.559 L 0 1.344 C 0 1.653 0.25 1.903 0.558 1.903 L 7.123 1.903 C 7.431 1.903 7.681 1.653 7.681 1.344 L 7.681 0.559 C 7.681 0.25 7.431 0 7.123 0 Z" fill="rgb(29, 28, 27)" height="1.9030999999999985px" id="fm7cHxIfJ" transform="translate(0 10.972)" width="7.68067px"/><path d="M 13.447 0 L 0.558 0 C 0.25 0 0 0.25 0 0.559 L 0 1.344 C 0 1.653 0.25 1.903 0.558 1.903 L 13.447 1.903 C 13.755 1.903 14.004 1.653 14.004 1.344 L 14.004 0.559 C 14.004 0.25 13.755 0 13.447 0 Z" fill="rgb(29, 28, 27)" height="1.9030999999999985px" id="LowSwDrtg" transform="translate(9.552 10.972)" width="14.0044px"/><path d="M 0.558 0 L 8.212 0 C 8.52 0 8.77 0.25 8.77 0.559 L 8.77 1.344 C 8.77 1.653 8.52 1.903 8.212 1.903 L 0.558 1.903 C 0.25 1.903 0 1.653 0 1.344 L 0 0.559 C 0 0.25 0.25 0 0.558 0 Z" fill="rgb(29, 28, 27)" height="1.9030999999999985px" id="xRiKc2od7" transform="translate(27.041 10.972)" width="8.769900000000003px"/><path d="M 0.557 0 L 5.4 0 C 5.708 0 5.958 0.25 5.958 0.559 L 5.958 1.344 C 5.958 1.653 5.708 1.903 5.4 1.903 L 0.557 1.903 C 0.25 1.903 0 1.653 0 1.344 L 0 0.559 C 0 0.25 0.25 0 0.557 0 Z" fill="rgb(29, 28, 27)" height="1.9031500000000001px" id="JWdNVicde" transform="translate(36.796 8.243)" width="5.957599999999999px"/><path d="M 1.438 0 L 0.558 0 C 0.25 0 0 0.25 0 0.559 L 0 1.344 C 0 1.653 0.25 1.903 0.558 1.903 L 1.438 1.903 C 1.746 1.903 1.995 1.653 1.995 1.344 L 1.995 0.559 C 1.995 0.25 1.746 0 1.438 0 Z" fill="rgb(29, 28, 27)" height="1.9031500000000001px" id="RfFYVCT_T" transform="translate(28.717 5.456)" width="1.9953000000000003px"/><path d="M 0.558 0 L 2.895 0 C 3.203 0 3.453 0.25 3.453 0.559 L 3.453 1.406 C 3.453 1.714 3.203 1.964 2.895 1.964 L 0.558 1.964 C 0.25 1.964 0 1.714 0 1.406 L 0 0.559 C 0 0.25 0.25 0 0.558 0 Z" fill="rgb(29, 28, 27)" height="1.964299999999998px" id="dngJ6MU2p" transform="translate(16.183 24.582)" width="3.4525000000000006px"/><path d="M 1.706 0 L 0.558 0 C 0.25 0 0 0.25 0 0.559 L 0 1.406 C 0 1.714 0.25 1.964 0.558 1.964 L 1.706 1.964 C 2.014 1.964 2.263 1.714 2.263 1.406 L 2.263 0.559 C 2.263 0.25 2.014 0 1.706 0 Z" fill="rgb(29, 28, 27)" height="1.964299999999998px" id="N_fstvKmR" transform="translate(22.18 24.582)" width="2.2631999999999977px"/><path d="M 0.558 0 L 5.544 0 C 5.852 0 6.101 0.25 6.101 0.559 L 6.101 1.406 C 6.101 1.714 5.852 1.964 5.544 1.964 L 0.558 1.964 C 0.25 1.964 0 1.714 0 1.406 L 0 0.559 C 0 0.25 0.25 0 0.558 0 Z" fill="rgb(29, 28, 27)" height="1.964299999999998px" id="t55XLYcgb" transform="translate(25.486 24.582)" width="6.101399999999998px"/><path d="M 1.976 0 L 0.558 0 C 0.25 0 0 0.25 0 0.559 L 0 1.406 C 0 1.714 0.25 1.964 0.558 1.964 L 1.976 1.964 C 2.284 1.964 2.533 1.714 2.533 1.406 L 2.533 0.559 C 2.533 0.25 2.284 0 1.976 0 Z" fill="rgb(29, 28, 27)" height="1.964299999999998px" id="ZrEKTVTAe" transform="translate(28.542 21.854)" width="2.5334000000000003px"/><path d="M 0.557 0 L 1.438 0 C 1.746 0 1.995 0.25 1.995 0.559 L 1.995 1.406 C 1.995 1.714 1.746 1.964 1.438 1.964 L 0.557 1.964 C 0.25 1.964 0 1.714 0 1.406 L 0 0.559 C 0 0.25 0.25 0 0.557 0 Z" fill="rgb(29, 28, 27)" height="1.964299999999998px" id="Z0fPTp9aR" transform="translate(11.425 24.582)" width="1.9953000000000003px"/><path d="M 0 0.559 C 0 0.251 0.251 0 0.558 0 L 1.438 0 C 1.745 0 1.995 0.251 1.995 0.559 L 1.995 1.405 C 1.995 1.713 1.745 1.964 1.438 1.964 L 0.558 1.964 C 0.251 1.964 0 1.713 0 1.405 Z" fill="rgb(29, 28, 27)" height="1.964299999999998px" id="Tj_PDHFDh" transform="translate(20.635 27.308)" width="1.9954px"/><path d="M 0.557 0 L 1.342 0 C 1.65 0 1.899 0.25 1.899 0.559 L 1.899 1.406 C 1.899 1.714 1.65 1.964 1.342 1.964 L 0.557 1.964 C 0.25 1.964 0 1.714 0 1.406 L 0 0.559 C 0 0.25 0.25 0 0.557 0 Z" fill="rgb(29, 28, 27)" height="1.9643000000000015px" id="AYq9dXkKz" transform="translate(18.686 30.036)" width="1.8994px"/><path d="M 0.558 0 L 5.768 0 C 6.076 0 6.326 0.25 6.326 0.559 L 6.326 1.344 C 6.326 1.653 6.076 1.903 5.768 1.903 L 0.558 1.903 C 0.25 1.903 0 1.653 0 1.344 L 0 0.559 C 0 0.25 0.25 0 0.558 0 Z" fill="rgb(29, 28, 27)" height="1.9031500000000001px" id="rspevfJcx" transform="translate(12.157 8.243)" width="6.325900000000001px"/><path d="M 3.285 0 L 0.558 0 C 0.25 0 0 0.25 0 0.559 L 0 1.344 C 0 1.653 0.25 1.903 0.558 1.903 L 3.285 1.903 C 3.593 1.903 3.842 1.653 3.842 1.344 L 3.842 0.559 C 3.842 0.25 3.593 0 3.285 0 Z" fill="rgb(29, 28, 27)" height="1.9031500000000001px" id="XRUAhGnph" transform="translate(23.887 2.728)" width="3.8424000000000014px"/><path d="M 0.558 0 L 5.644 0 C 5.952 0 6.202 0.25 6.202 0.559 L 6.202 1.344 C 6.202 1.653 5.952 1.903 5.644 1.903 L 0.558 1.903 C 0.25 1.903 0 1.653 0 1.344 L 0 0.559 C 0 0.25 0.25 0 0.558 0 Z" fill="rgb(29, 28, 27)" height="1.9031500000000001px" id="VsaVVIfke" transform="translate(21.528 5.456)" width="6.201600000000003px"/><path d="M 3.06 0 L 0.558 0 C 0.25 0 0 0.25 0 0.559 L 0 1.344 C 0 1.653 0.25 1.903 0.558 1.903 L 3.06 1.903 C 3.369 1.903 3.618 1.653 3.618 1.344 L 3.618 0.559 C 3.618 0.25 3.369 0 3.06 0 Z" fill="rgb(29, 28, 27)" height="1.9030999999999985px" id="wiAKEgyId" transform="translate(40.819 10.972)" width="3.6182000000000016px"/><path d="M 0.558 0 L 17.318 0 C 17.626 0 17.875 0.25 17.875 0.559 L 17.875 1.345 C 17.875 1.653 17.626 1.903 17.318 1.903 L 0.558 1.903 C 0.25 1.903 0 1.653 0 1.345 L 0 0.559 C 0 0.25 0.25 0 0.558 0 Z" fill="rgb(29, 28, 27)" height="1.9032px" id="FIE0ufK9m" transform="translate(6.666 13.7)" width="17.87506px"/><path d="M 6.426 0 L 0.558 0 C 0.25 0 0 0.25 0 0.559 L 0 1.345 C 0 1.653 0.25 1.903 0.558 1.903 L 6.426 1.903 C 6.734 1.903 6.984 1.653 6.984 1.345 L 6.984 0.559 C 6.984 0.25 6.734 0 6.426 0 Z" fill="rgb(29, 28, 27)" height="1.9032000000000018px" id="ut9UWny3L" transform="translate(22.892 19.156)" width="6.983599999999999px"/><path d="M 0.558 0 L 22.151 0 C 22.459 0 22.709 0.25 22.709 0.559 L 22.709 1.344 C 22.709 1.653 22.459 1.903 22.151 1.903 L 0.558 1.903 C 0.25 1.903 0 1.653 0 1.344 L 0 0.559 C 0 0.25 0.25 0 0.558 0 Z" fill="rgb(29, 28, 27)" height="1.9030999999999985px" id="VULnffgbk" transform="translate(9.552 16.428)" width="22.7089px"/><path d="M 7.886 0 L 0.558 0 C 0.25 0 0 0.25 0 0.559 L 0 1.345 C 0 1.653 0.25 1.903 0.558 1.903 L 7.886 1.903 C 8.194 1.903 8.443 1.653 8.443 1.345 L 8.443 0.559 C 8.443 0.25 8.194 0 7.886 0 Z" fill="rgb(29, 28, 27)" height="1.9032000000000018px" id="adZTYr4MR" transform="translate(6.078 19.156)" width="8.44303px"/><path d="M 0.558 0 L 2.211 0 C 2.519 0 2.769 0.25 2.769 0.559 L 2.769 1.406 C 2.769 1.714 2.519 1.964 2.211 1.964 L 0.558 1.964 C 0.25 1.964 0 1.714 0 1.406 L 0 0.559 C 0 0.25 0.25 0 0.558 0 Z" fill="rgb(29, 28, 27)" height="1.964299999999998px" id="bwdUdEmCH" transform="translate(13.784 21.854)" width="2.768600000000001px"/><path d="M 2.424 0 L 0.558 0 C 0.25 0 0 0.25 0 0.559 L 0 1.406 C 0 1.714 0.25 1.964 0.558 1.964 L 2.424 1.964 C 2.732 1.964 2.982 1.714 2.982 1.406 L 2.982 0.559 C 2.982 0.25 2.732 0 2.424 0 Z" fill="rgb(29, 28, 27)" height="1.964299999999998px" id="PUvesMJEj" transform="translate(23.556 21.854)" width="2.982199999999999px"/><path d="M 0.558 0 L 2.241 0 C 2.55 0 2.799 0.25 2.799 0.559 L 2.799 1.406 C 2.799 1.714 2.55 1.964 2.241 1.964 L 0.558 1.964 C 0.25 1.964 0 1.714 0 1.406 L 0 0.559 C 0 0.25 0.25 0 0.558 0 Z" fill="rgb(29, 28, 27)" height="1.964299999999998px" id="Wo2W7J3Zj" transform="translate(8.672 21.854)" width="2.799050000000001px"/><path d="M 6.661 0 L 0.558 0 C 0.25 0 0 0.25 0 0.559 L 0 1.345 C 0 1.653 0.25 1.903 0.558 1.903 L 6.661 1.903 C 6.969 1.903 7.219 1.653 7.219 1.345 L 7.219 0.559 C 7.219 0.25 6.969 0 6.661 0 Z" fill="rgb(29, 28, 27)" height="1.9032px" id="PpPVZXp9j" transform="translate(27.041 13.7)" width="7.218900000000001px"/><path d="M 0.621 1.905 C 0.218 1.905 0 1.687 0 1.283 L 0 0.622 C 0 0.218 0.218 0 0.621 0 L 11.225 0 C 11.628 0 11.846 0.218 11.846 0.622 L 11.846 1.283 C 11.846 1.687 11.628 1.905 11.225 1.905 L 6.934 1.905 L 6.934 14.926 C 6.934 15.33 6.716 15.548 6.313 15.548 L 5.537 15.548 C 5.134 15.548 4.916 15.33 4.916 14.926 L 4.916 1.905 Z" fill="rgb(29, 28, 27)" height="15.54825px" id="xr32fxeO6" transform="translate(52.177 8.243)" width="11.845599999999997px"/><path d="M 0.621 0 C 0.218 0 0 0.218 0 0.622 L 0 14.924 C 0 15.328 0.218 15.546 0.621 15.546 L 1.357 15.546 C 1.76 15.546 1.978 15.328 1.978 14.924 L 1.978 0.622 C 1.978 0.218 1.76 0 1.357 0 Z" fill="rgb(29, 28, 27)" height="15.546050000000001px" id="oSsO_UPVN" transform="translate(90.476 8.243)" width="1.9779000000000053px"/><path d="M 0.62 15.546 C 0.217 15.546 0 15.328 0 14.924 L 0 0.622 C 0 0.218 0.217 0 0.62 0 L 1.396 0 C 1.799 0 2.017 0.218 2.017 0.622 L 2.017 13.632 L 8.981 13.632 C 9.384 13.632 9.602 13.85 9.602 14.254 L 9.602 14.924 C 9.602 15.328 9.384 15.546 8.981 15.546 Z" fill="rgb(29, 28, 27)" height="15.546050000000001px" id="Sgj4z5osO" transform="translate(116.749 8.243)" width="9.602000000000004px"/><path d="M 1.974 14.924 C 1.974 15.328 1.756 15.546 1.353 15.546 L 0.621 15.546 C 0.218 15.546 0 15.328 0 14.924 L 0 0.622 C 0 0.218 0.218 0 0.621 0 L 1.357 0 C 1.76 0 1.978 0.218 1.978 0.622 L 1.978 5.747 C 2.634 4.721 3.806 4.079 5.309 4.079 C 8.18 4.079 10.356 6.358 10.356 9.948 C 10.356 13.538 8.18 15.817 5.309 15.817 C 3.801 15.817 2.627 15.175 1.971 14.145 L 1.971 14.922 Z M 8.36 9.95 C 8.36 7.362 6.881 5.928 5.121 5.928 C 3.361 5.928 1.863 7.362 1.863 9.95 C 1.863 12.539 3.361 13.972 5.121 13.972 C 6.881 13.972 8.36 12.539 8.36 9.95 Z" fill="rgb(29, 28, 27)" height="15.81665px" id="q13jjj7xd" transform="translate(138.401 8.243)" width="10.355999999999995px"/><path d="M 4.457 11.738 C 0.961 11.738 -0.019 9.872 0 8.318 C 0.005 7.929 0.253 7.735 0.645 7.735 L 1.344 7.735 C 1.748 7.735 1.922 7.949 1.961 8.352 C 2.063 9.315 2.693 9.907 4.433 9.907 C 6.174 9.907 7.012 9.269 7.012 8.289 C 7.012 7.425 6.522 7.108 5.305 6.899 L 3.209 6.539 C 1.453 6.238 0.29 5.247 0.29 3.468 C 0.29 1.467 1.774 0 4.518 0 C 7.263 0 8.838 1.491 8.814 3.23 C 8.81 3.614 8.553 3.808 8.165 3.808 L 7.457 3.808 C 7.054 3.808 6.908 3.595 6.851 3.202 C 6.749 2.477 6.159 1.818 4.518 1.818 C 2.878 1.818 2.249 2.508 2.249 3.403 C 2.249 4.175 2.695 4.516 3.81 4.714 L 5.906 5.083 C 7.72 5.404 8.98 6.292 8.98 8.198 C 8.98 9.976 7.908 11.74 4.455 11.74 Z" fill="rgb(29, 28, 27)" height="11.739799999999999px" id="tJ8syeWTW" transform="translate(150.024 12.325)" width="8.980269730401375px"/><path d="M 9.146 7.997 C 9.146 8.813 9.175 9.983 9.282 10.799 C 9.334 11.223 9.155 11.465 8.728 11.465 L 8.068 11.465 C 7.685 11.465 7.467 11.319 7.428 11.022 L 7.317 10.181 C 6.724 11.157 5.565 11.659 4.145 11.659 C 1.579 11.659 0 10.142 0 8.078 C 0 6.27 1.27 5.157 3.433 5.002 L 6.589 4.78 C 7.162 4.741 7.186 4.688 7.186 4.153 L 7.186 3.682 C 7.186 2.438 6.434 1.807 4.79 1.807 C 3.145 1.807 2.472 2.425 2.405 3.289 C 2.376 3.697 2.235 3.916 1.823 3.916 L 1.067 3.916 C 0.675 3.916 0.427 3.717 0.422 3.328 C 0.407 1.51 1.74 0 4.792 0 C 7.798 0 9.162 1.427 9.155 3.736 Z M 7.188 7.298 L 7.188 6.244 C 6.955 6.327 6.678 6.386 6.363 6.415 L 3.598 6.676 C 2.59 6.775 1.997 7.163 1.997 8.099 L 1.999 8.099 C 1.999 9.188 2.886 9.97 4.4 9.97 C 6.169 9.97 7.188 8.9 7.188 7.298 Z" fill="rgb(29, 28, 27)" height="11.658999999999999px" id="QPESIZvku" transform="translate(126.854 12.325)" width="9.290755130109668px"/><path d="M 5.224 0 C 8.313 0 10.295 2.255 10.295 5.456 L 10.295 5.694 C 10.295 6.098 10.077 6.316 9.674 6.316 L 1.998 6.316 C 2.168 8.547 3.447 9.898 5.407 9.898 C 6.768 9.898 7.598 9.363 7.934 8.431 C 8.06 8.078 8.243 7.892 8.618 7.892 L 9.33 7.892 C 9.746 7.892 9.994 8.125 9.923 8.538 C 9.598 10.433 7.834 11.74 5.409 11.74 L 5.407 11.738 C 2.168 11.738 0 9.424 0 5.797 C 0 2.169 2.135 0 5.224 0 Z M 5.222 1.74 C 3.494 1.74 2.405 2.818 2.074 4.64 L 8.282 4.64 C 8.054 2.842 6.949 1.74 5.222 1.74 Z" fill="rgb(29, 28, 27)" height="11.739799999999999px" id="PKmyQkwJE" transform="translate(104.541 12.325)" width="10.295000000000002px"/><path d="M 4.459 11.194 C 4.099 11.194 3.877 11.039 3.746 10.703 L 0.091 1.021 C -0.024 0.72 -0.031 0.511 0.076 0.297 C 0.178 0.094 0.381 0 0.732 0 L 1.274 0 C 1.633 0 1.86 0.155 1.986 0.495 L 4.958 8.503 L 5.123 9.018 L 5.289 8.503 L 8.262 0.495 C 8.388 0.155 8.615 0 8.974 0 L 9.517 0 C 9.865 0 10.07 0.092 10.172 0.297 C 10.279 0.511 10.275 0.72 10.157 1.021 L 6.502 10.703 C 6.371 11.039 6.149 11.194 5.79 11.194 Z" fill="rgb(29, 28, 27)" height="11.1941px" id="uUQr5Yl4B" transform="translate(93.807 12.595)" width="10.248961642504256px"/><path d="M 5.407 11.738 C 2.167 11.738 0 9.424 0 5.797 C 0 2.169 2.133 0 5.221 0 C 8.31 0 10.292 2.255 10.292 5.456 L 10.292 5.694 C 10.292 6.098 10.075 6.316 9.672 6.316 L 1.995 6.316 C 2.165 8.547 3.446 9.898 5.404 9.898 C 6.768 9.898 7.596 9.363 7.931 8.431 C 8.058 8.078 8.241 7.892 8.615 7.892 L 9.328 7.892 C 9.744 7.892 9.992 8.125 9.918 8.538 C 9.593 10.433 7.829 11.74 5.404 11.74 Z M 8.282 4.64 C 8.053 2.842 6.949 1.74 5.221 1.74 C 3.494 1.74 2.405 2.818 2.074 4.64 Z" fill="rgb(29, 28, 27)" height="11.739799999999999px" id="zo1nSBuSF" transform="translate(78.397 12.325)" width="10.29249999999999px"/><path d="M 3.057 10.677 C 3.163 11.026 3.392 11.192 3.756 11.192 L 3.749 11.194 L 4.987 11.194 C 5.35 11.194 5.579 11.028 5.69 10.679 L 8.173 2.654 L 8.237 2.401 L 8.3 2.654 L 10.787 10.679 C 10.894 11.028 11.123 11.194 11.487 11.194 L 12.733 11.194 C 13.096 11.194 13.325 11.028 13.432 10.679 L 16.418 1.006 C 16.516 0.7 16.512 0.498 16.41 0.288 C 16.307 0.089 16.109 0.002 15.76 0.002 L 15.218 0.002 C 14.848 0.002 14.626 0.168 14.519 0.522 L 12.094 8.547 L 12.046 8.761 L 11.999 8.542 L 9.506 0.517 C 9.4 0.168 9.171 0.002 8.807 0.002 L 7.683 0.002 C 7.319 0.002 7.091 0.168 6.984 0.517 L 4.492 8.542 L 4.449 8.745 L 4.405 8.551 L 1.98 0.519 C 1.874 0.166 1.649 0 1.281 0 L 0.728 0 C 0.38 0 0.181 0.087 0.079 0.286 C -0.021 0.493 -0.028 0.698 0.07 1.004 Z" fill="rgb(29, 28, 27)" height="11.194099999999999px" id="uboloLX99" transform="translate(61.282 12.598)" width="16.489163442184434px"/></svg>)
パートナーシップ
TwelveLabsとWeaviateを活用した、RAGによるビデオ処理時間の向上

ジェームズ・リー
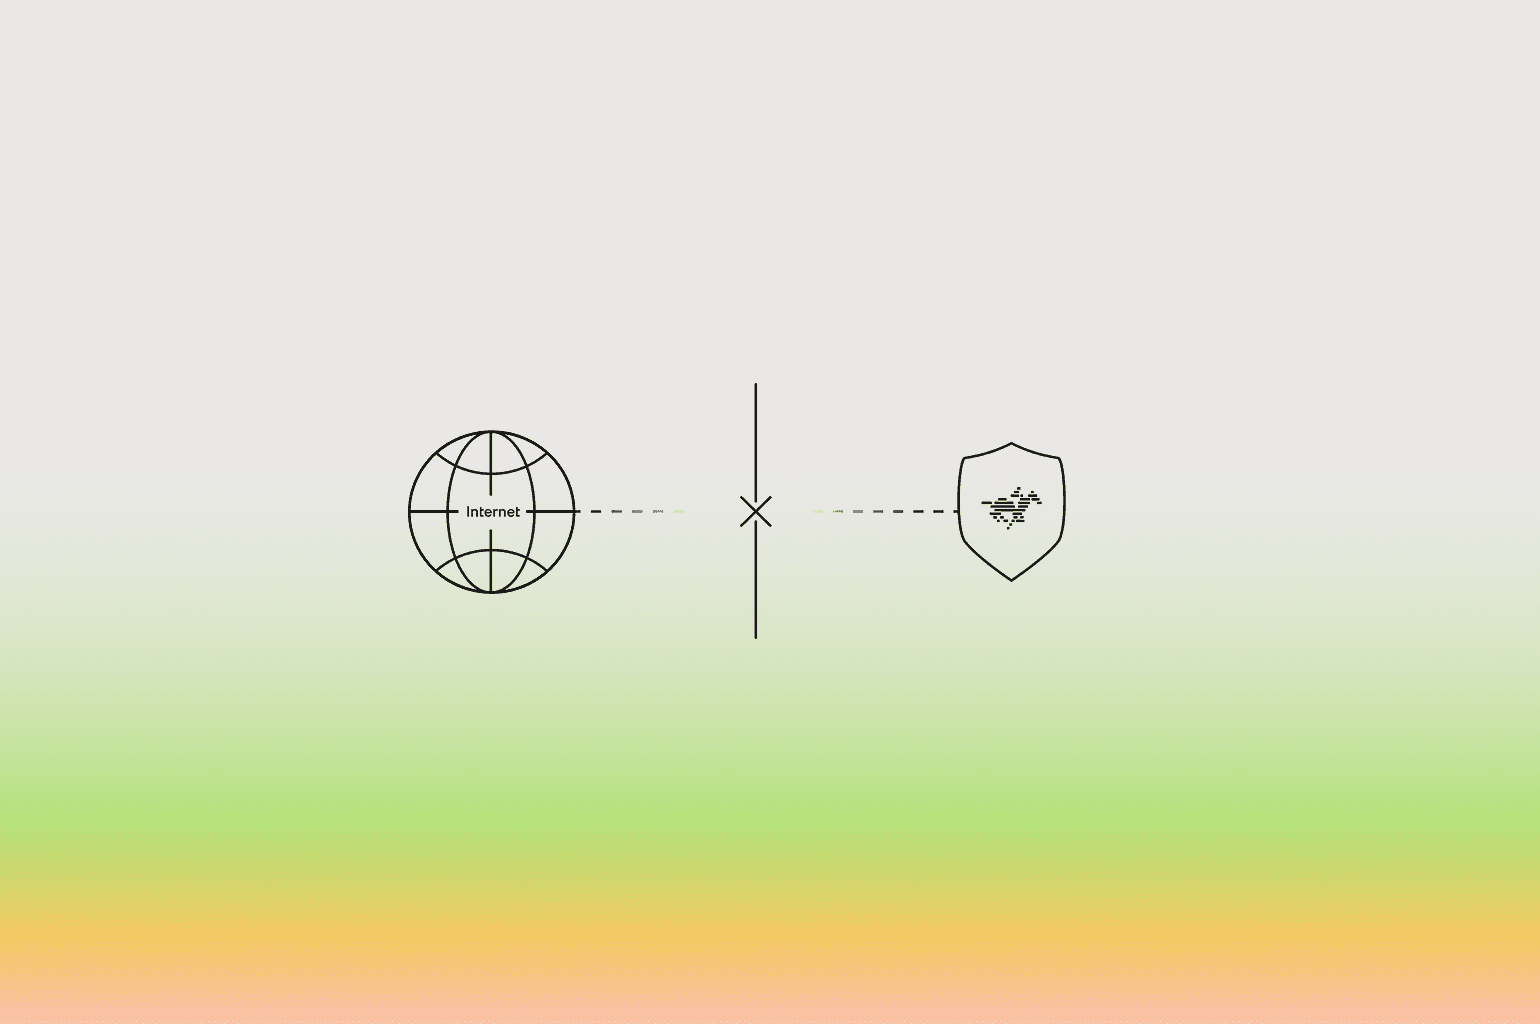
開発者は、Twelve LabsのEmbed APIとWeaviateを使用して、分析を実行する前に最も関連性の高いビデオセグメントのみを取得するビデオRAGシステムを構築できます。これにより、Pegasusによる回答の正確性を維持しながら、ビデオ全体をクエリする場合と比較して、処理時間を72秒から20秒に短縮できます。
開発者は、Twelve LabsのEmbed APIとWeaviateを使用して、分析を実行する前に最も関連性の高いビデオセグメントのみを取得するビデオRAGシステムを構築できます。これにより、Pegasusによる回答の正確性を維持しながら、ビデオ全体をクエリする場合と比較して、処理時間を72秒から20秒に短縮できます。

この記事の内容
No headings found on page
ニュースレターに登録する
ニュースレターに登録する
ビデオ理解に関する最新の技術進歩、チュートリアル、業界の動向をお届けします
ビデオ理解に関する最新の技術進歩、チュートリアル、業界の動向をお届けします
AIを活用してビデオを検索、分析、探索します。
2025/03/18
25分
記事へのリンクをコピー
草稿を確認してくれたWeaviateチームの Tuana Celik と Erika Cardenas に深く感謝します!
ビデオ処理は、特に長尺コンテンツを分析する場合、計算コストが高く時間がかかります。検索拡張生成(RAG)は、システムがビデオ全体ではなく最も関連性の高いビデオセグメントのみを処理できるようにすることで、この課題を解決します。この的を絞ったアプローチにより、応答の品質を維持または向上させながら、処理時間を大幅に削減できます。
この記事では、Twelve Labsのビデオ理解機能とWeaviateのベクトルデータベースを組み合わせて、ビデオコンテンツ用の効率的なRAGシステムを構築する方法を探ります。ビデオをセグメント化し、埋め込みを使用して分析に最も関連する部分のみを検索することで、精度を維持または向上させながら処理時間を大幅に改善できます。
私たちのアプローチは、いくつかの主要技術を活用しています:
ビデオの理解と埋め込み生成のためのTwelveLabs PegasusおよびMarengoモデル
ビデオセグメントを効率的に保存・収集するためのWeaviateベクトルデータベース
ビデオ分析の比較対象としてのオープンソースの LLaVA-NeXT-Video モデル
このRAGベースのアプローチにより、最も関連性の高いセグメントのみに焦点を当てることで、ビデオ処理の計算負荷を軽減し、より長いビデオを効率的に分析できるようになることを実証します。コンテンツモデレーション、スポーツ分析、または教育コンテンツ向けのアプリケーションのいずれを構築している場合でも、このアプローチは高品質な結果を維持しながらビデオ処理能力を拡張するのに役立ちます。
1 - TwelveLabsとWeaviateのセットアップ
TwelveLabs
まだTwelve Labsに登録していない場合は、こちらから登録できます。アカウントをセットアップしたら、Playgroundに移動し、画面右上隅のユーザーアイコンをクリックしてAPI Keyにアクセスします。
お使いのノートブックの左側にある鍵のアイコンをクリックし、この値をTL_API_KEYとしてシークレットを作成します。
Weaviate
Weaviateのアカウントをお持ちでない場合は、こちらからサインアップできます。アカウント作成後、クラウドダッシュボードに移動し、新しいクラスターを作成します。クラスターのセットアップが完了したら、ノートブックのシークレットセクションに2つの値を設定する必要があります。
REST Endpointの下にあるURLをWEAVIATE_URL変数として追加します。API Keysの下にあるAdminキーをコピーし、WEAVIATE_API_KEYに保存します。
2 - GPUランタイムの選択
LLaVA-NeXT-Videoモデルを実行するにはGPUが必要です。ノートブックでランタイム > ランタイムのタイプを変更に移動し、T4 GPUを選択します。
3 - 環境のセットアップ
依存関係のインストール
まず、TwelveLabsとWeaviateのSDKをインストールする必要があります:
!python -m pip install -U -q twelvelabs
!python -m pip install -U -q "weaviate-client>=4.0.0"
次に、残りの依存関係をインストールします。
!python -m pip install torch
!python -m pip install -q av
!python -m pip install --upgrade -q accelerate
!python -m pip install -U bitsandbytes
!python -m pip install git
!python -m pip install pillow
!python -m pip install sentencepiece
!python -m
TwelveLabsおよびWeaviate SDKのセットアップ
from google.colab import userdata

TL_API_KEY=userdata.get('TL_API_KEY')
weaviate_url = userdata.get("WEAVIATE_URL")
weaviate_api_key = userdata.get("WEAVIATE_API_KEY")
次に、TwelveLabsクライアントを初期化します。
from twelvelabs import TwelveLabs

# Initialize the Twelve Labs client
twelve_labs_client = TwelveLabs(api_key=TL_API_KEY)
最後に、Weaviateクライアントをセットアップし、Video_Embeddingsコレクションを初期化します。
import weaviate
from weaviate.classes.init import Auth

# Connect to Weaviate Cloud
weaviate_client = weaviate.connect_to_weaviate_cloud(
    cluster_url=weaviate_url,
    auth_credentials=Auth.api_key(weaviate_api_key),
)

# Get or create collection
try:
    collection = weaviate_client.collections.get("Video_Embeddings")
except:
    collection = weaviate_client.collections.create(name="Video_Embeddings")
ビデオデータのセットアップ
次に、埋め込み用のビデオデータを取得する必要があります。このリンクを使用して、Googleドライブのフォルダ内でビデオデータを見つけることができます。基本のGoogleドライブフォルダの中に 「TwelveLabs-Weaviate」 という名前のフォルダを作成し、そこへコピーします。以下のセルを使用してドライブをマウントし、ノートブックからビデオファイルにアクセスできるようにします。
from google.colab import drive
drive.mount('/content/drive')
base_folder_path = "/content/drive/MyDrive/TwelveLabs-Weaviate"
raw_video_dir = base_folder_path + "/sports_videos"

upscaled_video_dir = base_folder_path + "/upscaled_videos/"
video_segments_dir = base_folder_path + "/video_segments/"
ビデオのアップスケーリング
いくつかのビデオは、解像度が低すぎて埋め込みモデルで使用できません。これらを使用する前にアップスケーリングする必要があります。
ここでアップスケーリング関数を作成します。read_video_pyavは、LLaVa-NeXT-VideoのColabノートブックから直接引用したもので、推論に適した正しいnumpy表現にビデオをフォーマットします。
import av
import numpy as np

def upscale_video(input_file, output_file, target_width=1280, target_height=720):
    input_container = av.open(input_file)
    output_container = av.open(output_file, mode='w')

    input_stream = input_container.streams.video[0]
    output_stream = output_container.add_stream('libx264', rate=input_stream.average_rate)
    output_stream.width = target_width
    output_stream.height = target_height
    output_stream.pix_fmt = 'yuv420p'

    for frame in input_container.decode(input_stream):
        frame = frame.reformat(width=target_width, height=target_height)
        packet = output_stream.encode(frame)
        output_container.mux(packet)

    # Flush the encoder
    packet = output_stream.encode(None)
    output_container.mux(packet)

    # Close the containers
    input_container.close()
    output_container.close()

def read_video_pyav(container, indices):
    '''
    Decode the video with PyAV decoder.

    Args:
        container (av.container.input.InputContainer): PyAV container.
        indices (List[int]): List of frame indices to decode.

    Returns:
        np.ndarray: np array of decoded frames of shape (num_frames, height, width, 3).
    '''
    frames = []
    container.seek(0)
    start_index = indices[0]
    end_index = indices[-1]
    for i, frame in enumerate(container.decode(video=0)):
        if i > end_index:
            break
        if i >= start_index and i in indices:
            frames.append(frame)
    return np.stack([x.to_ndarray(format="rgb24") for x in frames])
raw_video_dirフォルダ内のビデオを取得し、アップスケーリングしてupscaled_video_dirフォルダに保存します。
# Create output directory if it doesn't exist
if not os.path.exists(upscaled_video_dir):
    os.makedirs(upscaled_video_dir)

# Iterate over all files in the raw video directory
for filename in os.listdir(raw_video_dir):

    # Check if the file is a video file
    if filename.endswith(".mp4"):
        print(filename)
        # Get the file name without extension
        input_file_no_ext = os.path.splitext(filename)[0]
        # Define the output file name
        output_file = f"{input_file_no_ext}_480.mp4"
        if output_file in os.listdir(upscaled_video_dir):
            continue
        # Define the full path for the input and output files
        input_file_path = os.path.join(raw_video_dir, filename)
        output_file_path = os.path.join(upscaled_video_dir, output_file)
        # Upscale the video
        upscale_video(input_file_path, output_file_path)
4 - 単一ビデオによるPegasusとLLaVa-NeXT-Videoの比較
Pegasus と LLaVa-NeXT-Video は、どちらもビデオを取り込んでそれについて質問できるビデオ理解モデルです。
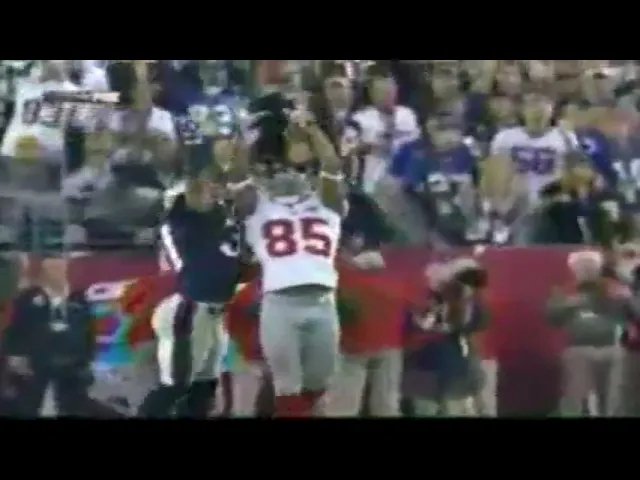
まず、ビデオコレクションから切り倒した単一のビデオでPegasusとLLaVa-NeXT-Videoを比較することから始めます。ビデオは、ニューヨーク・ジャイアンツがニューイングランド・ペイトリオッツと対戦する、第42回スーパーボウルのシーケンスを示しています。これは「ヘルメットキャッチ」と呼ばれる有名なレセプションで、ジャイアンツのクォーターバックであるイーライ・マニングがパスを投げ、これを受けたジャイアンツのワイドレシーバー、デビッド・タイリーが試合の残り2分で自身のヘルメットにボールを押し付けながらキャッチを見事に成功させたものです。
ビデオの背景を把握したところで、「このビデオで何が起きていますか?」と質問した際に、2つのモデルがビデオをどれだけ理解できるかを判定します。
Pegasusを使用してビデオと対話する
始める前に、ビデオをロードするためのPegasusインデックスをセットアップする必要があります。
models = [
        {
            "name": "pegasus1.2",
            "options": ["visual"]
        }
    ]

index_name = "sports_videos"
indices_list = twelve_labs_client.index.list(name=index_name)

if len(indices_list) == 0:
    index = twelve_labs_client.index.create(
        name=index_name,
        models=models

    )
    print(f"A new index has been created: id={index.id} name={index.name} models={index.models}")
else:
    index = indices_list[0]
    print(f"Index already exists: id={index.id} name={index.name} models={index.models}")
次に、インデックスにビデオをアップロードする関数を作成します。これにより、ビデオについて質問するために使用できるPegasusのビデオIDが返されます。
# Monitor the status of the video task
def on_task_update(task):
    print(f"  Status={task.status}")

def upload_video_to_twelve_labs_pegasus(video_path):
    task = twelve_labs_client.task.create(
        index_id=index.id,
        file = video_path
    )
    print(f"Task created: id={task.id} status={task.status}")

    task.wait_for_done(sleep_interval=5, callback=on_task_update)

    if task.status != "ready":
      raise RuntimeError(f"Indexing failed with status {task.status}")
    print(f"The unique identifer of your video is {task.video_id}.")
    return task.video_id
ビデオをアップロードし、PegasusビデオIDをsingle_video_idに保存します。
# Define the video file path
single_video_file = upscaled_video_dir + "football_480.mp4"

single_video_id = upload_video_to_twelve_labs_pegasus(single_video_file)
Pegasusがビデオを本当に理解しているかを確認するために、「このビデオで何が起きていますか?簡潔に答えてください。」と質問します。
single_video_query = "What is going on in this video? Please be concise."

res = twelve_labs_client.generate.text(
  video_id=single_video_id,
  prompt=single_video_query
)
print(f"{res.data}")
Pegasusから次の返答が届きました:
ビデオは、ニューヨーク・ジャイアンツとニューイングランド・ペイトリオッツのアメリカンフットボールの試合における極めて重要な瞬間を紹介しています。ジャイアンツのクォーターバックであるイーライ・マニングが投げたパスを、デビッド・タイリーがアウト・オブ・バウンズに倒れ込みながら、ボールをヘルメットに固定して見事なキャッチを決めました。複数のアングルがそのキャッチをリプレイし、その難しさと正確さを強調しています。プレイ後、タイリーは短く喜びを祝い、ビデオは彼と他のチームメイトがフィールドから立ち去るシーンで終了します。
この応答から、Pegasusがビデオを深く理解していることが分かります。これがジャイアンツとペイトリオッツのフットボールの試合であることを把握しています。また、イーライ・マニングがボールを投げ、デビッド・タイリーがそれを受け止めた、試合の勝負を分ける瞬間であることも理解しています。
Pegasusからはこれがスーパーボウルであることは言及されていなかったので、確認のためにさらに質問してみます。
res = twelve_labs_client.generate.text(
  video_id=single_video_id,
  prompt="What game is this?"
)
print(f"{res.data}")
Pegasusはこれは、第42回スーパーボウルの試合です。と答えました。これは正しい回答です。
次に、LLaVa-NeXT-Videoがどの程度ビデオを解釈できるかを見てみましょう。
LLaVa-NeXT-Videoを使用してビデオと対話する
LLaVa-NeXT-Videoでは、推論の前に特定の形式でビデオデータを準備する必要があります。モデルはビデオストリーム全体を一度に処理できないため、ビデオ全体から均一にフレームを抽出します。ここでは、各ビデオから40枚の均等に分散されたフレームを抽出するサンプリング関数を作成し、コンテンツ全体の重要な瞬間を逃さず捉えます。このサンプリング手法はLLaVA-NeXT-Videoの公式実装に準拠しています。サンプリング後、Hugging Face Hubからモデルをロードし、モデルの要件に適合するように入力を構成したうえで、質問に対する応答を生成するための推論を実行します。
def sample_video(video_path, num_samples=8):
    container = av.open(video_path)

    # sample uniformly num_samples frames from the video
    total_frames = container.streams.video[0].frames
    indices = np.arange(0, total_frames, total_frames / num_samples).astype(int)

    sampled_frames = read_video_pyav(container, indices)

    return sampled_frames

sampled_video = sample_video(single_video_file, num_samples=40)
ビデオのサンプリングが適切に行われたら、モデルをセットアップします。
from transformers import BitsAndBytesConfig, LlavaNextVideoForConditionalGeneration, LlavaNextVideoProcessor
import torch

quantization_config = BitsAndBytesConfig(
    load_in_4bit=True,
    bnb_4bit_compute_dtype=torch.float16
)

llava_next_processor = LlavaNextVideoProcessor.from_pretrained("llava-hf/LLaVA-NeXT-Video-7B-hf")
llava_next_model = LlavaNextVideoForConditionalGeneration.from_pretrained(
    "llava-hf/LLaVA-NeXT-Video-7B-hf",
    quantization_config=quantization_config,
    device_map='auto'
)
次に、モデルに対してクエリを実行する関数を作成します。
def query_llava_next(query,model,processor,sampled_video):

    # Each "content" is a list of dicts and you can add image/video/text modalities
    conversation = [
        {
            "role": "user",
            "content": [
                {"type": "text", "text": query},
                {"type": "video"},
                ],
        },
    ]

    prompt = processor.apply_chat_template(conversation, add_generation_prompt=True)
    # prompt_len = len(prompt)

    inputs = processor([prompt], videos=[sampled_video], padding=True, return_tensors="pt").to(model.device)

    generate_kwargs = {"max_new_tokens": 100, "do_sample": True, "top_p": 0.9}

    output = model.generate(**inputs, **generate_kwargs)
    generated_text = processor.batch_decode(output, skip_special_tokens=True)

    return generated_text[0]
最後に、同様の質問をしてPegasusとの出力を比較します。
llava_next_result = query_llava_next(single_video_query,llava_next_model,llava_next_processor,sampled_video)
print(llava_next_result)
次のような回答が返信されました:
USER: このビデオで何が起きていますか?簡潔に。 ASSISTANT: 進行中のフットボールの試合が映っており、フィールドには複数のプレイヤーがいます。一部の選手が着用しているジャージの番号や古いスタイルのヘルメットから判断すると、ニューヨーク・ジャイアンツとニューイングランド・ペイトリオッツの間の第3回スーパーボウルであるようです。1人の選手が空中姿勢でボールをキャッチしようとしており、他の選手にタックルされかけています。また、レフェリーはファーストダウンのシグナルを送っています。コーチ陣やその他の試合関係者も...
このモデルはジャイアンツとペイトリオッツのフットボールの試合であることを認識していますが、試合を第3回スーパーボウルと誤認しています。また、ビデオの最も重要な場面、すなわちヘルメットキャッチの箇所を明確に識別できていません。
先ほどと同じ「これはどの試合ですか?」という質問をしてみます。わずかに正確な内容に近づいているものの、正解には至っていません。
llava_next_result = query_llava_next("what game is this?",llava_next_model,llava_next_processor,sampled_video)
print(llava_next_result)
USER: what game is this? ASSISTANT: 提供された画像は、現在進行中のフットボールの試合、特に第41回スーパーボウルの一部です。これはニューイングランド・ペイトリオッツ対ニューヨーク・ジャイアンツの試合です。画像に写っているプレイヤーはジャイアンツとペイトリオッツの選手です。
5 - 単一ビデオにおけるセグメントレベル・クエリのためのRAG
比較結果により、Pegasusはビデオ全体を分析する際により優れた処理を提供し、処理時間を短縮しつつ、より正確で一貫性のある回答を返すことが分かりました。
しかしながら、モデルの注目範囲を最も関連性の高いビデオセグメントのみに絞り込むことで、さらにパフォーマンスを向上させる余地があります。これこそが検索拡張生成(RAG)の有用性が発揮される理由です。ビデオ全体を処理する代わりに、特定のクエリに関連する情報が格納されたセグメントのみを特定して分析することが可能となります。
このアプローチを実装するために、ビデオセグメントのセマンティック(意味的内容)を取得する高品質な埋め込みの作成を専門とする、TwelveLabsのMarengoモデルを活用します。これらの埋め込みによって以下が可能となります:
一度に、ビデオの各セグメントを個別にインデックス化する。
ユーザーのクエリに最も一致する関連セグメントを特定する。
特定の処理セグメントのみをビデオ理解モデルによって処理する。
まず、ビデオを各セグメントに分割し、Marengoモデルを使用してそれぞれに対して埋め込みを生成します。これらの埋め込みにより、RAGシステムの基盤が確立されます。
Marengoを使用して、フルビデオおよびビデオクリップの埋め込みを作成する
セグメントの長さをMarengoでサポートされる最大の長さである10秒に設定します。
# Define the video segment length
segment_length = 10
次に、Marengoを使用してビデオの埋め込み処理を行います。注意:Marengoがビデオ全体の埋め込みと、ビデオ内の各10秒のクリップの埋め込みの両方を確実に返すようにするため、video_embedding_scopes=["clip", "video"]およびvideo_clip_length=segment_lengthを設定します。
task = twelve_labs_client.embed.task.create(
    model_name="Marengo-retrieval-2.7",
    video_file=single_video_file,
    video_clip_length=segment_length,
    video_embedding_scopes=["clip", "video"]
)
print(
    f"Created task: id={task.id} model_name={task.model_name} status={task.status}"
)

# Monitor the status of the video embedding task
status = task.wait_for_done(
    sleep_interval=2,
    callback=on_task_update
)
print(f"Embedding done: {status}")
埋め込み処理が完了したら、必要に応じてそれらを抽出するためにMarengoのタスクIDを保存できます。後ほどWeaviateデータベースにデータを入力する際に使用できるよう、タスクIDをmarengo_task_idsに保持します。
single_video_task_id = task.id

marengo_task_ids = {}

single_video_file_name = single_video_file.split("/")[-1]
marengo_task_ids[single_video_file_name] = single_video_task_id
RAG用ビデオセグメントの準備
効率的なRAGパイプラインを構築するために、データベース内でPegasusビデオIDをMarengoタスクIDと関連付けます。これにより、ベクトル検索で対応するセグメントが返された際に、そのビデオセグメントについてチャットできるようになります。これを実行するために、各ビデオセグメントをインデックス構築用のPegasusにアップロードする必要があります。
まず、Pegasusにアップロードするための、ビデオを10秒に分割するsplit_video関数を作成します。同時に、各セグメントがPegasusでの最低要件である4秒を超えていることを保証する必要があります。最後のクリップが5秒未満の場合は、最後から2番目のクリップと一部を重複させることで、これを実現します。
import os
import subprocess
import json

def split_video(input_path, output_dir, segment_duration=10):
    """
    Split a video into segments of the specified duration.
    Regular segments will be exactly segment_duration seconds.
    The last segment will be at least 5 seconds long, potentially overlapping
    with the previous segment if needed.

    Args:
        input_path: Path to the input video file
        output_dir: Directory to save the output segments
        segment_duration: Duration of each segment in seconds (default: 10)
    """

    # Minimum length for the last segment
    min_last_segment_len = 5

    # Create output directory if it doesn't exist
    os.makedirs(output_dir, exist_ok=True)

    # Get base filename without extension
    base_name = os.path.splitext(os.path.basename(input_path))[0]

    # Get video duration using ffprobe
    probe_cmd = [
        "ffprobe", "-v", "quiet", "-print_format", "json",
        "-show_format", input_path
    ]

    try:
        probe_result = subprocess.run(probe_cmd, capture_output=True, text=True, check=True)
        video_info = json.loads(probe_result.stdout)
        duration = float(video_info["format"]["duration"])
    except Exception as e:
        print(f"Error getting video duration: {e}")
        return 0

    # Calculate number of full segments
    num_full_segments = int(duration / segment_duration)

    # Calculate remaining duration
    remaining_duration = duration - (num_full_segments * segment_duration)

    # Determine total number of segments and if we need to adjust the last segment
    if remaining_duration > 0:
        if remaining_duration < min_last_segment_len:
            # Last segment would be too short, so we'll adjust its start time
            num_segments = num_full_segments + 1
            needs_adjustment = True
        else:
            # Last segment is already long enough
            num_segments = num_full_segments + 1
            needs_adjustment = False
    else:
        # No remaining duration, all segments are complete
        num_segments = num_full_segments
        needs_adjustment = False

    print(f"Video {base_name} is {duration:.2f} seconds long")
    print(f"Creating {num_segments} segments")

    # Create each segment
    for i in range(num_segments):
        # For regular segments, start at the segment boundary
        if i < num_full_segments:
            start_time = i * segment_duration
            actual_duration = segment_duration
        else:
            # This is the last segment
            if needs_adjustment:
                # Start earlier to ensure it's at least min_last_segment_len seconds
                start_time = duration - min_last_segment_len
                actual_duration = min_last_segment_len
            else:
                # Last segment is already long enough
                start_time = i * segment_duration
                actual_duration = remaining_duration

        output_path = os.path.join(output_dir, f"{base_name}_segment_{i:03d}.mp4")

        # For all segments, use copy mode for speed
        cmd = [
            "ffmpeg", "-y",
            "-ss", str(start_time),
            "-i", input_path,
            "-t", str(actual_duration),
            "-c:v", "copy",
            "-c:a", "copy",
            output_path
        ]

        result = subprocess.run(cmd, capture_output=True, text=True)

        if result.returncode != 0:
            print(f"Error creating segment {i+1}: {result.stderr[:100]}...")
        else:
            end_time = start_time + actual_duration
            if i == num_segments - 1 and needs_adjustment:
                print(f"Created segment {i+1}/{num_segments}: {start_time:.1f}s to {end_time:.1f}s (adjusted to ensure at least {min_last_segment_len}s)")
            else:
                print(f"Created segment {i+1}/{num_segments}: {start_time:.1f}s to {end_time:.1f}s")

    print(f"Successfully split {base_name} into {num_segments} segments")
    return num_segments
新しく作成したvideo_segments_dirにビデオを保存します。
split_video(single_video_file, video_segments_dir,segment_length)
次に、pegasus_video_ids(ファイル名とPegasusビデオIDを関連付ける辞書)を作成し、元のビデオ全体のビデオIDを追加します。
pegasus_video_ids = {}

fname = single_video_file.split("/")[-1]
pegasus_video_ids[fname] = single_video_id
続いて、分割したビデオセグメントをPegasusにアップロードし、各ビデオIDをpegasus_video_idsに割り当てます。
segment_video_files = [f for f in os.listdir(video_segments_dir) if f.endswith(('.mp4'))]

# Process each video
for segment_video_file in segment_video_files:
    if segment_video_file in pegasus_video_ids:
        print("skip file",segment_video_file)
        continue
    print("processing file",segment_video_file)
    try:
        video_id = upload_video_to_twelve_labs_pegasus(video_segments_dir+segment_video_file)
        pegasus_video_ids[segment_video_file] = video_id
    except:
        print("error",segment_video_file)
        continue
最後に、LLaVa-NeXT-Videoモデルで効率的に処理できるよう、すべてのビデオをサンプリングします。
sampled_video_files = {}

for video_file in os.listdir(video_segments_dir):
    print(video_file)
    sampled_video = sample_video(video_segments_dir + video_file,num_samples=40)
    sampled_video_files[video_file] = sampled_video

for video_file in os.listdir(upscaled_video_dir):
    print(video_file)
    sampled_video = sample_video(upscaled_video_dir + video_file,num_samples=40)
    sampled_video_files[video_file] = sampled_video
Weaviateへの埋め込みデータのアップロード
Weaviateは、コレクションに登録する際にメタデータレコードと埋め込みベクトルが区別されていることを想定しています。MarengoタスクIDとPegasusビデオIDを取得し、アップロード用のrecords(レコード配列)とvectors(ベクトル配列)を準備するためのprepare_marengo_embeddings_for_weaviate関数を作成します。
def prepare_marengo_embeddings_for_weaviate(marengo_task_ids,pegasus_video_ids):

    # Prepare data for Weaviate upload
    records = []
    vectors = []

    for video_file_name in marengo_task_ids.keys():


        marengo_task_id = marengo_task_ids[video_file_name]

        # Retrieve marengo full video and clip embeddings
        marengo_embeddings_result = twelve_labs_client.embed.task.retrieve(marengo_task_id)


        #track segment number to match with fiel
        segment_number = 0

        for segment in marengo_embeddings_result.video_embedding.segments:
            # Determine if this is a video or clip segment
            is_video = segment.embedding_scope == "video"


            #Update the file name if segment
            updated_file_name = video_file_name
            if not is_video:
                updated_file_name = updated_file_name.replace(".mp4",f"_segment_{segment_number:03d}.mp4")
                segment_number += 1

            video_name = video_file_name.replace(".mp4","")

            pegasus_video_id = None
            if updated_file_name in pegasus_video_ids:
                pegasus_video_id = pegasus_video_ids[updated_file_name]

            record = {
                'video_name':video_name,
                'segment_number': 0 if is_video else segment_number,
                'video_file': updated_file_name,
                'start_time': getattr(segment, 'start_offset_sec', 0),
                'end_time': getattr(segment, 'end_offset_sec', 0),
                'type': 'video' if is_video else 'clip',
                'task_id': marengo_task_id,
                'pegasus_video_id': pegasus_video_id
            }

            # Get the embedding vector
            embedding_vector = [float(x) for x in segment.embeddings_float]

            # Add to our lists
            records.append(record)
            vectors.append(embedding_vector)

    # Print summary
    print(f"Prepared {len(records)} segments for upload to Weaviate")
    print(f"- Video embeddings: {sum(1 for r in records if r['type'] == 'video')}")
    print(f"- Clip embeddings: {sum(1 for r in records if r['type'] == 'clip')}")

    return records, vectors
作成した関数を使用して、Weaviateにアップロードするレコードとベクトルを取得します。
records, vectors = prepare_marengo_embeddings_for_weaviate(marengo_task_ids,pegasus_video_ids)

with collection.batch.dynamic() as batch:
    for i, record in enumerate(records):
        batch.add_object(
            properties=record,
            vector=vectors[i]
        )

print(f"Added {len(records)} embeddings to Weaviate")
ベクトル検索のテスト
すべてのデータがコレクションに揃ったので、Weaviateでのベクトル検索が正しいビデオを返すかテストできます。Weaviateのnear_vector検索を使用しているため、ビデオのベクトルで検索した場合は、同一オブジェクトとして距離が「0」として返出されます。
今回はコレクションから5番目のベクトル(インデックス5)を取り出して検索します。これにより、対応するビデオセグメントが距離「0」で返されます。
from weaviate.classes.query import MetadataQuery, Filter

# Use a specific vector for the query
query_vector = vectors[5]

# Perform vector search
response = collection.query.near_vector(
    near_vector=query_vector,
    limit=1,
    return_metadata=MetadataQuery(distance=True),
)

print(f"Found {len(response.objects)} results for vector search")
for obj in response.objects:
    print(f"Video: {obj.properties['video_file']}, Type: {obj.properties['type']}")
    if 'segment_id' in obj.properties:
        print(f"Segment: {obj.properties['segment_id']}")
    if 'text' in obj.properties and obj.properties['text']:
        print(f"Text: {obj.properties['text']}")
    print(f"Distance: {obj.metadata.distance}")
    print("-" * 50)
この出力結果は、埋め込みが正常に保存され、正しく検索可能であることを示しています。
RAG用の関連性の高いビデオセグメントの取得
RAGパイプラインの核となるのは、ユーザーの質問を最も関連性の高いビデオセグメントと一致させる能力です。このプロセスは3つの重要な手順で機能します:
TwelveLabsのMarengoモデルを使用して、ユーザーのテキストクエリをベクトル埋め込みに変換します。
Weaviateをスキャンし、クエリ埋め込みに最も類似しているビデオセグメントの埋め込みを特定します。
最も関連性の高いビデオセグメントが特定されたら、それに関連付けられたPegasusのビデオIDを使用して、そのセグメントに特化した正確な回答を生成します。
この対象を絞った処理方法により、ビデオコンテンツの最も関連性の高い部分だけを処理させ、効率と応答品質を両立して大幅に向上させます。
まず、Marengoを使用してテキストクエリを埋め込みベクトルに変換します。
sample_question = "What technique did David Tyree use to catch the ball?"

embedding = twelve_labs_client.embed.create(
    model_name="Marengo-retrieval-2.7",
    text=sample_question,
    text_truncate="start",
)

query_vector = embedding.text_embedding.segments[0].embeddings_float
次に、最も関連性の高いクリップを特定します。filters=(Filter.by_property("type").equal("clip"))を使用して、ビデオ全体の埋め込みを無視し、クリップの埋め込みのみが返されるようにします。
response = collection.query.near_vector(
    near_vector=query_vector,
    limit=1,
    return_metadata=MetadataQuery(distance=True),
    filters=(Filter.by_property("type").equal("clip"))
)

video_file = response.objects[0].properties.get("video_file")
print(video_file)
検索結果により、4番目のクリップ(インデックス3)であるfootball_480_segment_003.mp4が返されたことが確認できます。
抽出されたクリップを確認してみましょう:
import matplotlib.pyplot as plt
from matplotlib import animation
from IPython.display import HTML

video_file = response.objects[0].properties.get("video_file")
video = sampled_video_files[video_file]

fig = plt.figure()
im = plt.imshow(video[0,:,:,:])

plt.close() # this is required to not display the generated image

def init():
    im.set_data(video[0,:,:,:])

def animate(i):
    im.set_data(video[i,:,:,:])
    return im

anim = animation.FuncAnimation(fig, animate, init_func=init, frames=video.shape[0],
                               interval=100)
HTML(anim.to_html5_video())
この方法によって、ヘルメットキャッチが行われたまさにその瞬間が正確に特定されています。
適切なセグメントが抽出された状態となったため、PegasusとLLaVa-NeXT-Videoがこの短いクリップに対してどのような挙動を示すかを確認します。
ビデオセグメントとの対話:Pegasus 対 LLaVa-NeTX-Video
最初にPegasusがどのように応答するかを見てみましょう。
pegasus_video_id = response.objects[0].properties.get("pegasus_video_id")


print(sample_question)

res = twelve_labs_client.generate.text(
  video_id=pegasus_video_id,
  prompt=sample_question
)
print(f"{res.data}")
What technique did David Tyree use to catch the ball?
デビッド・タイリーは、ボールをヘルメットに押し付けてキャッチを確実にする技術を使用しました。これは、ニューヨーク・ジャイアンツがポゼッションを維持し、攻撃を継続することを可能にした極めて重要なプレーでした。
Pegasusが見事な回答を提供しました。ヘルメットキャッチのプレーと、それがジャイアンツにとって重要な推進力となった点に言及できています。
次に、LLaVa-NeTX-Videoが同じセグメントをスキャンした際に、より洗練された回答を返せるか確認します。
video_file = response.objects[0].properties.get("video_file")
sampled_video = sampled_video_files[video_file]
generated_text = query_llava_next(sample_question,llava_next_model,llava_next_processor,sampled_video)

print(generated_text)
USER: What technique did David Tyree use to catch the ball? ASSISTANT: キャッチに成功した選手は、両手で頭上に持ってくるキャッチング技術を使用しました。この技術は、ディフェンス陣に囲まれる中で確実にボールを手元に引き込むためのものです。意図した軌道からボールが偏向した場合にはリスクの高い技術ですが、混戦の中で空中のボールを鷲掴みするのに非常に効果的な方法です。デビッド・タイリーは...
頭上でのハンドキャッチという点に言及するものの、ヘルメットキャッチに成功したという詳細(最も特徴的な要素)を認識できていません。さらに、後半で同じ結論を繰り返し饒舌になっています。
6 - Marengo、Weaviate、およびPegasusを使用した複数ビデオRAG
単一のビデオから個々のクリップに対してMarengoの埋め込みがどのように動作するかを理解した上で、より実用的なRAGユースケースに向けて、複数のビデオにまたがる埋め込みを使用する方法を示します。
すべてのビデオについてMarengo埋め込みを取得する
まず、すべてのビデオ用のMarengoタスクIDを用いて、marengo_task_idsの辞書を更新します。
for video_file_name in os.listdir(upscaled_video_dir):

    if video_file_name in marengo_task_ids:
        print(f"skipping {video_file_name} because embeddings already exist")
        continue

    print(f"processing {video_file_name}")

    file_path = os.path.join(upscaled_video_dir, video_file_name)

    task = twelve_labs_client.embed.task.create(
        model_name="Marengo-retrieval-2.7",
        video_file=file_path,
        video_clip_length=segment_length,
        video_embedding_scopes=["clip", "video"]
    )
    print(
        f"Created task: id={task.id} model_name={task.model_name} status={task.status}"
    )

    # Monitor the status of the video embedding task
    status = task.wait_for_done(
        sleep_interval=2,
        callback=on_task_update
    )
    print(f"Embedding done: {status}")

    marengo_task_ids[video_file_name] = task.id
残りのビデオをセグメントに分割する
残りのビデオを以前と同様にいくつかの短いセグメントに分割します。
# Create output folder if it doesn't exist
os.makedirs(upscaled_video_dir, exist_ok=True)

# Get all video files
video_files = [f for f in os.listdir(upscaled_video_dir) if f.endswith(('.mp4', '.avi', '.mov'))]

# Process each video
for video_file in video_files:
    split_video(upscaled_video_dir + video_file,video_segments_dir,segment_length)
すべてのビデオおよびそのセグメントに対してPegasusビデオIDを取得する
次に、残りのセグメントと元動画すべてに対するPegasusビデオIDを抽出します。時間を節約するために、この処理を並行して実行します。
import concurrent.futures
import os
from tqdm import tqdm  # Use standard tqdm instead of tqdm.notebook

def process_video(video_path):
    video_file_name = video_path.split("/")[-1]
    try:
        video_id = upload_video_to_twelve_labs_pegasus(video_path)
        return video_file_name, video_id
    except Exception as e:
        print(f"Error processing {video_file_name}: {str(e)}")
        return video_file_name, None

# Filter out videos that are already processed
segment_video_files = [ video_segments_dir + f for f in os.listdir(video_segments_dir) if f.endswith('.mp4')]
full_video_files = [ upscaled_video_dir + f for f in os.listdir(upscaled_video_dir) if f.endswith('.mp4')]
all_video_files = segment_video_files + full_video_files

videos_to_process = [f for f in all_video_files if f.split("/")[-1] not in pegasus_video_ids]

print(f"Processing {len(videos_to_process)} videos in parallel...")

# Use ThreadPoolExecutor for I/O-bound operations like API calls
with concurrent.futures.ThreadPoolExecutor(max_workers=10) as executor:
    # Submit all tasks and create a dictionary mapping futures to their video files
    future_to_video = {executor.submit(process_video, video_path): video_path for video_path in videos_to_process}

    # Process results as they complete with a progress bar
    for future in tqdm(concurrent.futures.as_completed(future_to_video), total=len(videos_to_process)):
        video_file_name, video_id = future.result()
        if video_id:
            pegasus_video_ids[video_file_name] = video_id

print("All videos processed!")
print(f"Successfully processed {len([v for v in pegasus_video_ids.values() if v is not None])} videos")
Weaviateへのデータアップロード
残りの埋め込みデータをWeaviateにアップロードします。
records, vectors = prepare_marengo_embeddings_for_weaviate(marengo_task_ids,pegasus_video_ids)

with collection.batch.dynamic() as batch:
    for i, record in enumerate(records):
        if record["pegasus_video_id"] is None:
            continue
        batch.add_object(
            properties=record,
            vector=vectors[i]
        )

print(f"Added {len(records)} embeddings to Weaviate")
RAGパフォーマンス評価:クリップ 対 フルビデオ
Marengoの埋め込みとPegasusのビデオIDがWeaviateに正常にインデックス化されたので、このRAGシステムの有効性を評価します。この評価は以下の2つの重要な側面に焦点を当てます:
回答品質:クリップレベルの検索とビデオ全体の検索の違いによって、質問に対するシステムの応答の正確性はどのように変化するか?
処理効率:応答時間および計算リソースの消費量に関してどのような性能差異があるか?
この比較により、これら違いを定量的に測定可能にし、特により長尺なビデオや、ビデオ内の特定の瞬間を提示する複雑な質問に対して、最も適切な箇所だけに対象を動的に絞ることで、RAGが処理効率と品質を同時に向上させる仕組みを実証します。
まず、複数の異なるスポーツジャンルをカバーし、かつビデオに含まれる特定のイベントを解釈することを必要とする、様々なテスト用質問セットを定義します。
video_questions = [
    "In the American Football Video, what are the teams playing?",
    "What technique does David Tyree use to catch the ball?",
    "In the tennis match video, who is playing?",
    "What foot does Messi shoot at the goal with?",
    "When does Keri Strug hurt her foot?"
]
PegasusによるマルチビデオRAG
最初に、フルビデオを取得して質問した際の回答動作を測定します:
from weaviate.classes.query import MetadataQuery, Filter
import time

# Perform query using the whole video dataset
pegasus_full_video_answers = []

start_time = time.time()

for question in video_questions:

    embedding = twelve_labs_client.embed.create(
        model_name="Marengo-retrieval-2.7",
        text=question,
        text_truncate="start",
    )

    query_vector = embedding.text_embedding.segments[0].embeddings_float

    response = collection.query.near_vector(
        near_vector=query_vector,
        limit=1,
        return_metadata=MetadataQuery(distance=True),
        filters=(Filter.by_property("type").equal("video"))
    )

    selected_video_name = response.objects[0].properties["video_file"]
    selected_video_id = response.objects[0].properties["pegasus_video_id"]

    res = twelve_labs_client.generate.text(
        video_id=selected_video_id,
        prompt=question
    )

    pegasus_full_video_answers.append([question,selected_video_name,res.data])

end_time = time.time()
execution_time = end_time - start_time
print(f"Execution time: {int(execution_time)} seconds")
Execution time: 72 seconds
次に、これを10秒のセグメントクリップでの実行と比較します。
pegasus_clip_video_answers = []

start_time = time.time()

for question in video_questions:
    embedding = twelve_labs_client.embed.create(
        model_name="Marengo-retrieval-2.7",
        text=question,
        text_truncate="start",
    )

    query_vector = embedding.text_embedding.segments[0].embeddings_float

    response = collection.query.near_vector(
        near_vector=query_vector,
        limit=1,
        return_metadata=MetadataQuery(distance=True),
        filters=(Filter.by_property("type").equal("clip"))
    )

    selected_video_name = response.objects[0].properties["video_file"]
    selected_video_id = response.objects[0].properties["pegasus_video_id"]

    res = twelve_labs_client.generate.text(
        video_id=selected_video_id,
        prompt=question
    )

    pegasus_clip_video_answers.append([question,selected_video_name,res.data])

end_time = time.time()
execution_time = end_time - start_time
print(f"Execution time: {int(execution_time)} seconds")
Execution time: 20 seconds
抽出したセグメントクリップとフルビデオそれぞれの検索により生成された回答を比較します。
for clip_answer, full_answer in zip(pegasus_clip_video_answers, pegasus_full_video_answers):

    print("question",clip_answer[0])
    print("clip:  ",clip_answer[2])
    print("full:  ",full_answer[2])
    print("\n")
双方から十分に正確で一貫性の高い回答が得られたことが分かります。しかし、クリップを用いたアプローチがわずか20秒で完了したのに対して、ビデオ全体を毎回処理するアプローチは完了に72秒を要しました。
LLaVa-NeXT-VideoによるマルチビデオRAG
次に、LLaVa-NeXT-Videoモデルを使用して同様のテストを行います。ただし、まずは事前にすべてのビデオファイルをサンプリングする必要があります。
for video_file in os.listdir(video_segments_dir):
    print(video_file)
    sampled_video = sample_video(video_segments_dir + video_file,num_samples=40)
    sampled_video_files[video_file] = sampled_video
フルビデオの読み込みによる質問処理から開始します。
llava_full_video_answers = []

start_time = time.time()

for question in video_questions:
    embedding = twelve_labs_client.embed.create(
        model_name="Marengo-retrieval-2.7",
        text=question,
        text_truncate="start"
    )

    query_vector = embedding.text_embedding.segments[0].embeddings_float

    response = collection.query.near_vector(
        near_vector=query_vector,
        limit=1,
        return_metadata=MetadataQuery(distance=True),
        filters=(Filter.by_property("type").equal("video"))
    )

    selected_video_file = response.objects[0].properties["video_file"]
    selected_video_id = response.objects[0].properties["pegasus_video_id"]

    sampled_video = sampled_video_files[selected_video_file]
    generated_text = query_llava_next(question,llava_next_model,llava_next_processor,sampled_video)

    llava_full_video_answers.append([question,selected_video_name,generated_text])

end_time = time.time()
execution_time = end_time - start_time
print(f"Execution time: {int(execution_time)} seconds")
Execution time: 24 seconds
次に、これをセグメントクリップと比較します。
from weaviate.classes.query import MetadataQuery

import time

llava_clip_video_answers = []

start_time = time.time()

for question in video_questions:
    embedding = twelve_labs_client.embed.create(
        model_name="Marengo-retrieval-2.7",
        text=question,
        text_truncate="start"
    )

    query_vector = embedding.text_embedding.segments[0].embeddings_float

    response = collection.query.near_vector(
        near_vector=query_vector,
        limit=1,
        return_metadata=MetadataQuery(distance=True),
        filters=(Filter.by_property("type").equal("clip"))
    )

    selected_video_file = response.objects[0].properties["video_file"]
    selected_video_id = response.objects[0].properties["pegasus_video_id"]

    sampled_video = sampled_video_files[selected_video_file]
    generated_text = query_llava_next(question,llava_next_model,llava_next_processor,sampled_video)

    llava_clip_video_answers.append([question,selected_video_name,generated_text])

end_time = time.time()
execution_time = end_time - start_time
print(f"Execution time: {int(execution_time)} seconds")
Execution time: 24 seconds
各実行で全く同等の時間を要したことが分かります。これは、ビデオの秒数に関係なく、各項目から常に均等に40枚のフレームだけを抽出して評価するためです。
次に、LLaVa-NeXT-Videoが抽出したクリップとフルビデオに対してそれぞれ生成した返答内容を調査します。
for clip_answer, full_answer in zip(llava_clip_video_answers, llava_full_video_answers):

    print("question",clip_answer[0])
    print("clip:  ",clip_answer[2])
    print("full:  ",full_answer[2])
    print("\n")
今回のケースでは、セグメントクリップを処理した際に、LLaVa-NeXT-Videoは5問中2問で正しい解を導き出しました:
最初の質問において、ニューヨーク・ジャイアンツとニューイングランド・ペイトリオッツが対戦中である点を認識できており、また
3番目の質問において、テニスの試合がロジャー・フェデラーとノバク・ジョコビッチの間で行われている点を正確に見分けています。
7 - まとめ:TwelveLabsとWeaviateによる効率的なビデオ理解のためのRAGの活用
ビデオ処理における検索拡張生成(RAG)の調査は、効率と正確性の両面で大きな利点を示しました。TwelveLabsの高度なビデオ理解機能とWeaviateの強力なベクトルデータベースを組み合わせることで、ビデオ全体ではなく、最も関連性の高いビデオセグメントのみを論理的に処理するシステムを構築しました。
主な知見
パフォーマンスの改善:Weaviateを統合したRAGシステムにTwelveLabsのPegasusを適応すると、元ビデオを毎回全て読み込ませる代わりに、抽出されたクリップだけをクエリ処理することで、レスポンス速度を劇的に改善できました。
正確性の強化:LLaVa-NeXT-Videoなどのオープンソースモデルにおいて、注目箇所をあらかじめ切り分けたクリップセグメントに限定することで、ビデオ全体の処理に比べて回答の正確さが大きく向上することが示されました。
スケーラビリティを備えたアーキテクチャ:このRAGモデルの検証は、TwelveLabsの埋め込みモデル(Marengo)とWeaviateの高性能ベクトルデータベースの連携が、いかに強力な処理性能を提供するかを示しています。高次元の埋め込みデータを低遅延で検索して保存できるWeaviateの技術は、ビデオ理解などの複雑なタスクを実用的なアプリケーションに落とし込むための極めて重要なコアコンポーネントです。
ユースケース
TwelveLabsのビデオ理解機能とWeaviateのベクトルデータベースを組み合わせることで、多数の産業で強力なアプリケーションの構築が可能になります:
メディア&エンターテインメント:クリエイターは大規模なアーカイブから目的のシーンを瞬時に検索可能になり、編集作業の迅速化やSNS向け動画クリップの自動生成、アーカイブの効率的な再活用などが可能になります。
スポーツアナリティクス:コーチやアナリストは、ビデオを手動で早送り・巻き戻しして探すことなく、特定のアクション(例:『相手チームの裏に投げる短いパスのシーン』)をただテキストで定義するだけで、即座に関連クリップを全試合データから呼び出せるようになります。
小売・Eコマース:小売事業者は自社のチュートリアル動画を、ただ受動的に見せる一方向のコンテンツから、双方向で質問に答えるインタラクティブなショッピング体験にシフトさせることができます。例えば、顧客が『ストラップの調整方法を教えて』『バックパックに入れたときのサイズ感を見せて』と質問した際、説明動画の該当部分のみを自動で瞬時にカットして再生表示するといったことが容易に実現します。
TwelveLabsとWeaviateの組み合わせにより、膨大なビデオデータを扱う環境でも、情報抽出の効率化と高度な対話システムを同時に満たす、強力なVideo RAG基盤を構築できます。
草稿を確認してくれたWeaviateチームの Tuana Celik と Erika Cardenas に深く感謝します!
ビデオ処理は、特に長尺コンテンツを分析する場合、計算コストが高く時間がかかります。検索拡張生成(RAG)は、システムがビデオ全体ではなく最も関連性の高いビデオセグメントのみを処理できるようにすることで、この課題を解決します。この的を絞ったアプローチにより、応答の品質を維持または向上させながら、処理時間を大幅に削減できます。
この記事では、Twelve Labsのビデオ理解機能とWeaviateのベクトルデータベースを組み合わせて、ビデオコンテンツ用の効率的なRAGシステムを構築する方法を探ります。ビデオをセグメント化し、埋め込みを使用して分析に最も関連する部分のみを検索することで、精度を維持または向上させながら処理時間を大幅に改善できます。
私たちのアプローチは、いくつかの主要技術を活用しています:
ビデオの理解と埋め込み生成のためのTwelveLabs PegasusおよびMarengoモデル
ビデオセグメントを効率的に保存・収集するためのWeaviateベクトルデータベース
ビデオ分析の比較対象としてのオープンソースの LLaVA-NeXT-Video モデル
このRAGベースのアプローチにより、最も関連性の高いセグメントのみに焦点を当てることで、ビデオ処理の計算負荷を軽減し、より長いビデオを効率的に分析できるようになることを実証します。コンテンツモデレーション、スポーツ分析、または教育コンテンツ向けのアプリケーションのいずれを構築している場合でも、このアプローチは高品質な結果を維持しながらビデオ処理能力を拡張するのに役立ちます。
1 - TwelveLabsとWeaviateのセットアップ
TwelveLabs
まだTwelve Labsに登録していない場合は、こちらから登録できます。アカウントをセットアップしたら、Playgroundに移動し、画面右上隅のユーザーアイコンをクリックしてAPI Keyにアクセスします。
お使いのノートブックの左側にある鍵のアイコンをクリックし、この値をTL_API_KEYとしてシークレットを作成します。
Weaviate
Weaviateのアカウントをお持ちでない場合は、こちらからサインアップできます。アカウント作成後、クラウドダッシュボードに移動し、新しいクラスターを作成します。クラスターのセットアップが完了したら、ノートブックのシークレットセクションに2つの値を設定する必要があります。
REST Endpointの下にあるURLをWEAVIATE_URL変数として追加します。API Keysの下にあるAdminキーをコピーし、WEAVIATE_API_KEYに保存します。
2 - GPUランタイムの選択
LLaVA-NeXT-Videoモデルを実行するにはGPUが必要です。ノートブックでランタイム > ランタイムのタイプを変更に移動し、T4 GPUを選択します。
3 - 環境のセットアップ
依存関係のインストール
まず、TwelveLabsとWeaviateのSDKをインストールする必要があります:
!python -m pip install -U -q twelvelabs
!python -m pip install -U -q "weaviate-client>=4.0.0"
次に、残りの依存関係をインストールします。
!python -m pip install torch
!python -m pip install -q av
!python -m pip install --upgrade -q accelerate
!python -m pip install -U bitsandbytes
!python -m pip install git
!python -m pip install pillow
!python -m pip install sentencepiece
!python -m
TwelveLabsおよびWeaviate SDKのセットアップ
from google.colab import userdata

TL_API_KEY=userdata.get('TL_API_KEY')
weaviate_url = userdata.get("WEAVIATE_URL")
weaviate_api_key = userdata.get("WEAVIATE_API_KEY")
次に、TwelveLabsクライアントを初期化します。
from twelvelabs import TwelveLabs

# Initialize the Twelve Labs client
twelve_labs_client = TwelveLabs(api_key=TL_API_KEY)
最後に、Weaviateクライアントをセットアップし、Video_Embeddingsコレクションを初期化します。
import weaviate
from weaviate.classes.init import Auth

# Connect to Weaviate Cloud
weaviate_client = weaviate.connect_to_weaviate_cloud(
    cluster_url=weaviate_url,
    auth_credentials=Auth.api_key(weaviate_api_key),
)

# Get or create collection
try:
    collection = weaviate_client.collections.get("Video_Embeddings")
except:
    collection = weaviate_client.collections.create(name="Video_Embeddings")
ビデオデータのセットアップ
次に、埋め込み用のビデオデータを取得する必要があります。このリンクを使用して、Googleドライブのフォルダ内でビデオデータを見つけることができます。基本のGoogleドライブフォルダの中に 「TwelveLabs-Weaviate」 という名前のフォルダを作成し、そこへコピーします。以下のセルを使用してドライブをマウントし、ノートブックからビデオファイルにアクセスできるようにします。
from google.colab import drive
drive.mount('/content/drive')
base_folder_path = "/content/drive/MyDrive/TwelveLabs-Weaviate"
raw_video_dir = base_folder_path + "/sports_videos"

upscaled_video_dir = base_folder_path + "/upscaled_videos/"
video_segments_dir = base_folder_path + "/video_segments/"
ビデオのアップスケーリング
いくつかのビデオは、解像度が低すぎて埋め込みモデルで使用できません。これらを使用する前にアップスケーリングする必要があります。
ここでアップスケーリング関数を作成します。read_video_pyavは、LLaVa-NeXT-VideoのColabノートブックから直接引用したもので、推論に適した正しいnumpy表現にビデオをフォーマットします。
import av
import numpy as np

def upscale_video(input_file, output_file, target_width=1280, target_height=720):
    input_container = av.open(input_file)
    output_container = av.open(output_file, mode='w')

    input_stream = input_container.streams.video[0]
    output_stream = output_container.add_stream('libx264', rate=input_stream.average_rate)
    output_stream.width = target_width
    output_stream.height = target_height
    output_stream.pix_fmt = 'yuv420p'

    for frame in input_container.decode(input_stream):
        frame = frame.reformat(width=target_width, height=target_height)
        packet = output_stream.encode(frame)
        output_container.mux(packet)

    # Flush the encoder
    packet = output_stream.encode(None)
    output_container.mux(packet)

    # Close the containers
    input_container.close()
    output_container.close()

def read_video_pyav(container, indices):
    '''
    Decode the video with PyAV decoder.

    Args:
        container (av.container.input.InputContainer): PyAV container.
        indices (List[int]): List of frame indices to decode.

    Returns:
        np.ndarray: np array of decoded frames of shape (num_frames, height, width, 3).
    '''
    frames = []
    container.seek(0)
    start_index = indices[0]
    end_index = indices[-1]
    for i, frame in enumerate(container.decode(video=0)):
        if i > end_index:
            break
        if i >= start_index and i in indices:
            frames.append(frame)
    return np.stack([x.to_ndarray(format="rgb24") for x in frames])
raw_video_dirフォルダ内のビデオを取得し、アップスケーリングしてupscaled_video_dirフォルダに保存します。
# Create output directory if it doesn't exist
if not os.path.exists(upscaled_video_dir):
    os.makedirs(upscaled_video_dir)

# Iterate over all files in the raw video directory
for filename in os.listdir(raw_video_dir):

    # Check if the file is a video file
    if filename.endswith(".mp4"):
        print(filename)
        # Get the file name without extension
        input_file_no_ext = os.path.splitext(filename)[0]
        # Define the output file name
        output_file = f"{input_file_no_ext}_480.mp4"
        if output_file in os.listdir(upscaled_video_dir):
            continue
        # Define the full path for the input and output files
        input_file_path = os.path.join(raw_video_dir, filename)
        output_file_path = os.path.join(upscaled_video_dir, output_file)
        # Upscale the video
        upscale_video(input_file_path, output_file_path)
4 - 単一ビデオによるPegasusとLLaVa-NeXT-Videoの比較
Pegasus と LLaVa-NeXT-Video は、どちらもビデオを取り込んでそれについて質問できるビデオ理解モデルです。
まず、ビデオコレクションから切り倒した単一のビデオでPegasusとLLaVa-NeXT-Videoを比較することから始めます。ビデオは、ニューヨーク・ジャイアンツがニューイングランド・ペイトリオッツと対戦する、第42回スーパーボウルのシーケンスを示しています。これは「ヘルメットキャッチ」と呼ばれる有名なレセプションで、ジャイアンツのクォーターバックであるイーライ・マニングがパスを投げ、これを受けたジャイアンツのワイドレシーバー、デビッド・タイリーが試合の残り2分で自身のヘルメットにボールを押し付けながらキャッチを見事に成功させたものです。
ビデオの背景を把握したところで、「このビデオで何が起きていますか?」と質問した際に、2つのモデルがビデオをどれだけ理解できるかを判定します。
Pegasusを使用してビデオと対話する
始める前に、ビデオをロードするためのPegasusインデックスをセットアップする必要があります。
models = [
        {
            "name": "pegasus1.2",
            "options": ["visual"]
        }
    ]

index_name = "sports_videos"
indices_list = twelve_labs_client.index.list(name=index_name)

if len(indices_list) == 0:
    index = twelve_labs_client.index.create(
        name=index_name,
        models=models

    )
    print(f"A new index has been created: id={index.id} name={index.name} models={index.models}")
else:
    index = indices_list[0]
    print(f"Index already exists: id={index.id} name={index.name} models={index.models}")
次に、インデックスにビデオをアップロードする関数を作成します。これにより、ビデオについて質問するために使用できるPegasusのビデオIDが返されます。
# Monitor the status of the video task
def on_task_update(task):
    print(f"  Status={task.status}")

def upload_video_to_twelve_labs_pegasus(video_path):
    task = twelve_labs_client.task.create(
        index_id=index.id,
        file = video_path
    )
    print(f"Task created: id={task.id} status={task.status}")

    task.wait_for_done(sleep_interval=5, callback=on_task_update)

    if task.status != "ready":
      raise RuntimeError(f"Indexing failed with status {task.status}")
    print(f"The unique identifer of your video is {task.video_id}.")
    return task.video_id
ビデオをアップロードし、PegasusビデオIDをsingle_video_idに保存します。
# Define the video file path
single_video_file = upscaled_video_dir + "football_480.mp4"

single_video_id = upload_video_to_twelve_labs_pegasus(single_video_file)
Pegasusがビデオを本当に理解しているかを確認するために、「このビデオで何が起きていますか?簡潔に答えてください。」と質問します。
single_video_query = "What is going on in this video? Please be concise."

res = twelve_labs_client.generate.text(
  video_id=single_video_id,
  prompt=single_video_query
)
print(f"{res.data}")
Pegasusから次の返答が届きました:
ビデオは、ニューヨーク・ジャイアンツとニューイングランド・ペイトリオッツのアメリカンフットボールの試合における極めて重要な瞬間を紹介しています。ジャイアンツのクォーターバックであるイーライ・マニングが投げたパスを、デビッド・タイリーがアウト・オブ・バウンズに倒れ込みながら、ボールをヘルメットに固定して見事なキャッチを決めました。複数のアングルがそのキャッチをリプレイし、その難しさと正確さを強調しています。プレイ後、タイリーは短く喜びを祝い、ビデオは彼と他のチームメイトがフィールドから立ち去るシーンで終了します。
この応答から、Pegasusがビデオを深く理解していることが分かります。これがジャイアンツとペイトリオッツのフットボールの試合であることを把握しています。また、イーライ・マニングがボールを投げ、デビッド・タイリーがそれを受け止めた、試合の勝負を分ける瞬間であることも理解しています。
Pegasusからはこれがスーパーボウルであることは言及されていなかったので、確認のためにさらに質問してみます。
res = twelve_labs_client.generate.text(
  video_id=single_video_id,
  prompt="What game is this?"
)
print(f"{res.data}")
Pegasusはこれは、第42回スーパーボウルの試合です。と答えました。これは正しい回答です。
次に、LLaVa-NeXT-Videoがどの程度ビデオを解釈できるかを見てみましょう。
LLaVa-NeXT-Videoを使用してビデオと対話する
LLaVa-NeXT-Videoでは、推論の前に特定の形式でビデオデータを準備する必要があります。モデルはビデオストリーム全体を一度に処理できないため、ビデオ全体から均一にフレームを抽出します。ここでは、各ビデオから40枚の均等に分散されたフレームを抽出するサンプリング関数を作成し、コンテンツ全体の重要な瞬間を逃さず捉えます。このサンプリング手法はLLaVA-NeXT-Videoの公式実装に準拠しています。サンプリング後、Hugging Face Hubからモデルをロードし、モデルの要件に適合するように入力を構成したうえで、質問に対する応答を生成するための推論を実行します。
def sample_video(video_path, num_samples=8):
    container = av.open(video_path)

    # sample uniformly num_samples frames from the video
    total_frames = container.streams.video[0].frames
    indices = np.arange(0, total_frames, total_frames / num_samples).astype(int)

    sampled_frames = read_video_pyav(container, indices)

    return sampled_frames

sampled_video = sample_video(single_video_file, num_samples=40)
ビデオのサンプリングが適切に行われたら、モデルをセットアップします。
from transformers import BitsAndBytesConfig, LlavaNextVideoForConditionalGeneration, LlavaNextVideoProcessor
import torch

quantization_config = BitsAndBytesConfig(
    load_in_4bit=True,
    bnb_4bit_compute_dtype=torch.float16
)

llava_next_processor = LlavaNextVideoProcessor.from_pretrained("llava-hf/LLaVA-NeXT-Video-7B-hf")
llava_next_model = LlavaNextVideoForConditionalGeneration.from_pretrained(
    "llava-hf/LLaVA-NeXT-Video-7B-hf",
    quantization_config=quantization_config,
    device_map='auto'
)
次に、モデルに対してクエリを実行する関数を作成します。
def query_llava_next(query,model,processor,sampled_video):

    # Each "content" is a list of dicts and you can add image/video/text modalities
    conversation = [
        {
            "role": "user",
            "content": [
                {"type": "text", "text": query},
                {"type": "video"},
                ],
        },
    ]

    prompt = processor.apply_chat_template(conversation, add_generation_prompt=True)
    # prompt_len = len(prompt)

    inputs = processor([prompt], videos=[sampled_video], padding=True, return_tensors="pt").to(model.device)

    generate_kwargs = {"max_new_tokens": 100, "do_sample": True, "top_p": 0.9}

    output = model.generate(**inputs, **generate_kwargs)
    generated_text = processor.batch_decode(output, skip_special_tokens=True)

    return generated_text[0]
最後に、同様の質問をしてPegasusとの出力を比較します。
llava_next_result = query_llava_next(single_video_query,llava_next_model,llava_next_processor,sampled_video)
print(llava_next_result)
次のような回答が返信されました:
USER: このビデオで何が起きていますか?簡潔に。 ASSISTANT: 進行中のフットボールの試合が映っており、フィールドには複数のプレイヤーがいます。一部の選手が着用しているジャージの番号や古いスタイルのヘルメットから判断すると、ニューヨーク・ジャイアンツとニューイングランド・ペイトリオッツの間の第3回スーパーボウルであるようです。1人の選手が空中姿勢でボールをキャッチしようとしており、他の選手にタックルされかけています。また、レフェリーはファーストダウンのシグナルを送っています。コーチ陣やその他の試合関係者も...
このモデルはジャイアンツとペイトリオッツのフットボールの試合であることを認識していますが、試合を第3回スーパーボウルと誤認しています。また、ビデオの最も重要な場面、すなわちヘルメットキャッチの箇所を明確に識別できていません。
先ほどと同じ「これはどの試合ですか?」という質問をしてみます。わずかに正確な内容に近づいているものの、正解には至っていません。
llava_next_result = query_llava_next("what game is this?",llava_next_model,llava_next_processor,sampled_video)
print(llava_next_result)
USER: what game is this? ASSISTANT: 提供された画像は、現在進行中のフットボールの試合、特に第41回スーパーボウルの一部です。これはニューイングランド・ペイトリオッツ対ニューヨーク・ジャイアンツの試合です。画像に写っているプレイヤーはジャイアンツとペイトリオッツの選手です。
5 - 単一ビデオにおけるセグメントレベル・クエリのためのRAG
比較結果により、Pegasusはビデオ全体を分析する際により優れた処理を提供し、処理時間を短縮しつつ、より正確で一貫性のある回答を返すことが分かりました。
しかしながら、モデルの注目範囲を最も関連性の高いビデオセグメントのみに絞り込むことで、さらにパフォーマンスを向上させる余地があります。これこそが検索拡張生成(RAG)の有用性が発揮される理由です。ビデオ全体を処理する代わりに、特定のクエリに関連する情報が格納されたセグメントのみを特定して分析することが可能となります。
このアプローチを実装するために、ビデオセグメントのセマンティック(意味的内容)を取得する高品質な埋め込みの作成を専門とする、TwelveLabsのMarengoモデルを活用します。これらの埋め込みによって以下が可能となります:
一度に、ビデオの各セグメントを個別にインデックス化する。
ユーザーのクエリに最も一致する関連セグメントを特定する。
特定の処理セグメントのみをビデオ理解モデルによって処理する。
まず、ビデオを各セグメントに分割し、Marengoモデルを使用してそれぞれに対して埋め込みを生成します。これらの埋め込みにより、RAGシステムの基盤が確立されます。
Marengoを使用して、フルビデオおよびビデオクリップの埋め込みを作成する
セグメントの長さをMarengoでサポートされる最大の長さである10秒に設定します。
# Define the video segment length
segment_length = 10
次に、Marengoを使用してビデオの埋め込み処理を行います。注意:Marengoがビデオ全体の埋め込みと、ビデオ内の各10秒のクリップの埋め込みの両方を確実に返すようにするため、video_embedding_scopes=["clip", "video"]およびvideo_clip_length=segment_lengthを設定します。
task = twelve_labs_client.embed.task.create(
    model_name="Marengo-retrieval-2.7",
    video_file=single_video_file,
    video_clip_length=segment_length,
    video_embedding_scopes=["clip", "video"]
)
print(
    f"Created task: id={task.id} model_name={task.model_name} status={task.status}"
)

# Monitor the status of the video embedding task
status = task.wait_for_done(
    sleep_interval=2,
    callback=on_task_update
)
print(f"Embedding done: {status}")
埋め込み処理が完了したら、必要に応じてそれらを抽出するためにMarengoのタスクIDを保存できます。後ほどWeaviateデータベースにデータを入力する際に使用できるよう、タスクIDをmarengo_task_idsに保持します。
single_video_task_id = task.id

marengo_task_ids = {}

single_video_file_name = single_video_file.split("/")[-1]
marengo_task_ids[single_video_file_name] = single_video_task_id
RAG用ビデオセグメントの準備
効率的なRAGパイプラインを構築するために、データベース内でPegasusビデオIDをMarengoタスクIDと関連付けます。これにより、ベクトル検索で対応するセグメントが返された際に、そのビデオセグメントについてチャットできるようになります。これを実行するために、各ビデオセグメントをインデックス構築用のPegasusにアップロードする必要があります。
まず、Pegasusにアップロードするための、ビデオを10秒に分割するsplit_video関数を作成します。同時に、各セグメントがPegasusでの最低要件である4秒を超えていることを保証する必要があります。最後のクリップが5秒未満の場合は、最後から2番目のクリップと一部を重複させることで、これを実現します。
import os
import subprocess
import json

def split_video(input_path, output_dir, segment_duration=10):
    """
    Split a video into segments of the specified duration.
    Regular segments will be exactly segment_duration seconds.
    The last segment will be at least 5 seconds long, potentially overlapping
    with the previous segment if needed.

    Args:
        input_path: Path to the input video file
        output_dir: Directory to save the output segments
        segment_duration: Duration of each segment in seconds (default: 10)
    """

    # Minimum length for the last segment
    min_last_segment_len = 5

    # Create output directory if it doesn't exist
    os.makedirs(output_dir, exist_ok=True)

    # Get base filename without extension
    base_name = os.path.splitext(os.path.basename(input_path))[0]

    # Get video duration using ffprobe
    probe_cmd = [
        "ffprobe", "-v", "quiet", "-print_format", "json",
        "-show_format", input_path
    ]

    try:
        probe_result = subprocess.run(probe_cmd, capture_output=True, text=True, check=True)
        video_info = json.loads(probe_result.stdout)
        duration = float(video_info["format"]["duration"])
    except Exception as e:
        print(f"Error getting video duration: {e}")
        return 0

    # Calculate number of full segments
    num_full_segments = int(duration / segment_duration)

    # Calculate remaining duration
    remaining_duration = duration - (num_full_segments * segment_duration)

    # Determine total number of segments and if we need to adjust the last segment
    if remaining_duration > 0:
        if remaining_duration < min_last_segment_len:
            # Last segment would be too short, so we'll adjust its start time
            num_segments = num_full_segments + 1
            needs_adjustment = True
        else:
            # Last segment is already long enough
            num_segments = num_full_segments + 1
            needs_adjustment = False
    else:
        # No remaining duration, all segments are complete
        num_segments = num_full_segments
        needs_adjustment = False

    print(f"Video {base_name} is {duration:.2f} seconds long")
    print(f"Creating {num_segments} segments")

    # Create each segment
    for i in range(num_segments):
        # For regular segments, start at the segment boundary
        if i < num_full_segments:
            start_time = i * segment_duration
            actual_duration = segment_duration
        else:
            # This is the last segment
            if needs_adjustment:
                # Start earlier to ensure it's at least min_last_segment_len seconds
                start_time = duration - min_last_segment_len
                actual_duration = min_last_segment_len
            else:
                # Last segment is already long enough
                start_time = i * segment_duration
                actual_duration = remaining_duration

        output_path = os.path.join(output_dir, f"{base_name}_segment_{i:03d}.mp4")

        # For all segments, use copy mode for speed
        cmd = [
            "ffmpeg", "-y",
            "-ss", str(start_time),
            "-i", input_path,
            "-t", str(actual_duration),
            "-c:v", "copy",
            "-c:a", "copy",
            output_path
        ]

        result = subprocess.run(cmd, capture_output=True, text=True)

        if result.returncode != 0:
            print(f"Error creating segment {i+1}: {result.stderr[:100]}...")
        else:
            end_time = start_time + actual_duration
            if i == num_segments - 1 and needs_adjustment:
                print(f"Created segment {i+1}/{num_segments}: {start_time:.1f}s to {end_time:.1f}s (adjusted to ensure at least {min_last_segment_len}s)")
            else:
                print(f"Created segment {i+1}/{num_segments}: {start_time:.1f}s to {end_time:.1f}s")

    print(f"Successfully split {base_name} into {num_segments} segments")
    return num_segments
新しく作成したvideo_segments_dirにビデオを保存します。
split_video(single_video_file, video_segments_dir,segment_length)
次に、pegasus_video_ids(ファイル名とPegasusビデオIDを関連付ける辞書)を作成し、元のビデオ全体のビデオIDを追加します。
pegasus_video_ids = {}

fname = single_video_file.split("/")[-1]
pegasus_video_ids[fname] = single_video_id
続いて、分割したビデオセグメントをPegasusにアップロードし、各ビデオIDをpegasus_video_idsに割り当てます。
segment_video_files = [f for f in os.listdir(video_segments_dir) if f.endswith(('.mp4'))]

# Process each video
for segment_video_file in segment_video_files:
    if segment_video_file in pegasus_video_ids:
        print("skip file",segment_video_file)
        continue
    print("processing file",segment_video_file)
    try:
        video_id = upload_video_to_twelve_labs_pegasus(video_segments_dir+segment_video_file)
        pegasus_video_ids[segment_video_file] = video_id
    except:
        print("error",segment_video_file)
        continue
最後に、LLaVa-NeXT-Videoモデルで効率的に処理できるよう、すべてのビデオをサンプリングします。
sampled_video_files = {}

for video_file in os.listdir(video_segments_dir):
    print(video_file)
    sampled_video = sample_video(video_segments_dir + video_file,num_samples=40)
    sampled_video_files[video_file] = sampled_video

for video_file in os.listdir(upscaled_video_dir):
    print(video_file)
    sampled_video = sample_video(upscaled_video_dir + video_file,num_samples=40)
    sampled_video_files[video_file] = sampled_video
Weaviateへの埋め込みデータのアップロード
Weaviateは、コレクションに登録する際にメタデータレコードと埋め込みベクトルが区別されていることを想定しています。MarengoタスクIDとPegasusビデオIDを取得し、アップロード用のrecords(レコード配列)とvectors(ベクトル配列)を準備するためのprepare_marengo_embeddings_for_weaviate関数を作成します。
def prepare_marengo_embeddings_for_weaviate(marengo_task_ids,pegasus_video_ids):

    # Prepare data for Weaviate upload
    records = []
    vectors = []

    for video_file_name in marengo_task_ids.keys():


        marengo_task_id = marengo_task_ids[video_file_name]

        # Retrieve marengo full video and clip embeddings
        marengo_embeddings_result = twelve_labs_client.embed.task.retrieve(marengo_task_id)


        #track segment number to match with fiel
        segment_number = 0

        for segment in marengo_embeddings_result.video_embedding.segments:
            # Determine if this is a video or clip segment
            is_video = segment.embedding_scope == "video"


            #Update the file name if segment
            updated_file_name = video_file_name
            if not is_video:
                updated_file_name = updated_file_name.replace(".mp4",f"_segment_{segment_number:03d}.mp4")
                segment_number += 1

            video_name = video_file_name.replace(".mp4","")

            pegasus_video_id = None
            if updated_file_name in pegasus_video_ids:
                pegasus_video_id = pegasus_video_ids[updated_file_name]

            record = {
                'video_name':video_name,
                'segment_number': 0 if is_video else segment_number,
                'video_file': updated_file_name,
                'start_time': getattr(segment, 'start_offset_sec', 0),
                'end_time': getattr(segment, 'end_offset_sec', 0),
                'type': 'video' if is_video else 'clip',
                'task_id': marengo_task_id,
                'pegasus_video_id': pegasus_video_id
            }

            # Get the embedding vector
            embedding_vector = [float(x) for x in segment.embeddings_float]

            # Add to our lists
            records.append(record)
            vectors.append(embedding_vector)

    # Print summary
    print(f"Prepared {len(records)} segments for upload to Weaviate")
    print(f"- Video embeddings: {sum(1 for r in records if r['type'] == 'video')}")
    print(f"- Clip embeddings: {sum(1 for r in records if r['type'] == 'clip')}")

    return records, vectors
作成した関数を使用して、Weaviateにアップロードするレコードとベクトルを取得します。
records, vectors = prepare_marengo_embeddings_for_weaviate(marengo_task_ids,pegasus_video_ids)

with collection.batch.dynamic() as batch:
    for i, record in enumerate(records):
        batch.add_object(
            properties=record,
            vector=vectors[i]
        )

print(f"Added {len(records)} embeddings to Weaviate")
ベクトル検索のテスト
すべてのデータがコレクションに揃ったので、Weaviateでのベクトル検索が正しいビデオを返すかテストできます。Weaviateのnear_vector検索を使用しているため、ビデオのベクトルで検索した場合は、同一オブジェクトとして距離が「0」として返出されます。
今回はコレクションから5番目のベクトル(インデックス5)を取り出して検索します。これにより、対応するビデオセグメントが距離「0」で返されます。
from weaviate.classes.query import MetadataQuery, Filter

# Use a specific vector for the query
query_vector = vectors[5]

# Perform vector search
response = collection.query.near_vector(
    near_vector=query_vector,
    limit=1,
    return_metadata=MetadataQuery(distance=True),
)

print(f"Found {len(response.objects)} results for vector search")
for obj in response.objects:
    print(f"Video: {obj.properties['video_file']}, Type: {obj.properties['type']}")
    if 'segment_id' in obj.properties:
        print(f"Segment: {obj.properties['segment_id']}")
    if 'text' in obj.properties and obj.properties['text']:
        print(f"Text: {obj.properties['text']}")
    print(f"Distance: {obj.metadata.distance}")
    print("-" * 50)
この出力結果は、埋め込みが正常に保存され、正しく検索可能であることを示しています。
RAG用の関連性の高いビデオセグメントの取得
RAGパイプラインの核となるのは、ユーザーの質問を最も関連性の高いビデオセグメントと一致させる能力です。このプロセスは3つの重要な手順で機能します:
TwelveLabsのMarengoモデルを使用して、ユーザーのテキストクエリをベクトル埋め込みに変換します。
Weaviateをスキャンし、クエリ埋め込みに最も類似しているビデオセグメントの埋め込みを特定します。
最も関連性の高いビデオセグメントが特定されたら、それに関連付けられたPegasusのビデオIDを使用して、そのセグメントに特化した正確な回答を生成します。
この対象を絞った処理方法により、ビデオコンテンツの最も関連性の高い部分だけを処理させ、効率と応答品質を両立して大幅に向上させます。
まず、Marengoを使用してテキストクエリを埋め込みベクトルに変換します。
sample_question = "What technique did David Tyree use to catch the ball?"

embedding = twelve_labs_client.embed.create(
    model_name="Marengo-retrieval-2.7",
    text=sample_question,
    text_truncate="start",
)

query_vector = embedding.text_embedding.segments[0].embeddings_float
次に、最も関連性の高いクリップを特定します。filters=(Filter.by_property("type").equal("clip"))を使用して、ビデオ全体の埋め込みを無視し、クリップの埋め込みのみが返されるようにします。
response = collection.query.near_vector(
    near_vector=query_vector,
    limit=1,
    return_metadata=MetadataQuery(distance=True),
    filters=(Filter.by_property("type").equal("clip"))
)

video_file = response.objects[0].properties.get("video_file")
print(video_file)
検索結果により、4番目のクリップ(インデックス3)であるfootball_480_segment_003.mp4が返されたことが確認できます。
抽出されたクリップを確認してみましょう:
import matplotlib.pyplot as plt
from matplotlib import animation
from IPython.display import HTML

video_file = response.objects[0].properties.get("video_file")
video = sampled_video_files[video_file]

fig = plt.figure()
im = plt.imshow(video[0,:,:,:])

plt.close() # this is required to not display the generated image

def init():
    im.set_data(video[0,:,:,:])

def animate(i):
    im.set_data(video[i,:,:,:])
    return im

anim = animation.FuncAnimation(fig, animate, init_func=init, frames=video.shape[0],
                               interval=100)
HTML(anim.to_html5_video())
この方法によって、ヘルメットキャッチが行われたまさにその瞬間が正確に特定されています。
適切なセグメントが抽出された状態となったため、PegasusとLLaVa-NeXT-Videoがこの短いクリップに対してどのような挙動を示すかを確認します。
ビデオセグメントとの対話:Pegasus 対 LLaVa-NeTX-Video
最初にPegasusがどのように応答するかを見てみましょう。
pegasus_video_id = response.objects[0].properties.get("pegasus_video_id")


print(sample_question)

res = twelve_labs_client.generate.text(
  video_id=pegasus_video_id,
  prompt=sample_question
)
print(f"{res.data}")
What technique did David Tyree use to catch the ball?
デビッド・タイリーは、ボールをヘルメットに押し付けてキャッチを確実にする技術を使用しました。これは、ニューヨーク・ジャイアンツがポゼッションを維持し、攻撃を継続することを可能にした極めて重要なプレーでした。
Pegasusが見事な回答を提供しました。ヘルメットキャッチのプレーと、それがジャイアンツにとって重要な推進力となった点に言及できています。
次に、LLaVa-NeTX-Videoが同じセグメントをスキャンした際に、より洗練された回答を返せるか確認します。
video_file = response.objects[0].properties.get("video_file")
sampled_video = sampled_video_files[video_file]
generated_text = query_llava_next(sample_question,llava_next_model,llava_next_processor,sampled_video)

print(generated_text)
USER: What technique did David Tyree use to catch the ball? ASSISTANT: キャッチに成功した選手は、両手で頭上に持ってくるキャッチング技術を使用しました。この技術は、ディフェンス陣に囲まれる中で確実にボールを手元に引き込むためのものです。意図した軌道からボールが偏向した場合にはリスクの高い技術ですが、混戦の中で空中のボールを鷲掴みするのに非常に効果的な方法です。デビッド・タイリーは...
頭上でのハンドキャッチという点に言及するものの、ヘルメットキャッチに成功したという詳細(最も特徴的な要素)を認識できていません。さらに、後半で同じ結論を繰り返し饒舌になっています。
6 - Marengo、Weaviate、およびPegasusを使用した複数ビデオRAG
単一のビデオから個々のクリップに対してMarengoの埋め込みがどのように動作するかを理解した上で、より実用的なRAGユースケースに向けて、複数のビデオにまたがる埋め込みを使用する方法を示します。
すべてのビデオについてMarengo埋め込みを取得する
まず、すべてのビデオ用のMarengoタスクIDを用いて、marengo_task_idsの辞書を更新します。
for video_file_name in os.listdir(upscaled_video_dir):

    if video_file_name in marengo_task_ids:
        print(f"skipping {video_file_name} because embeddings already exist")
        continue

    print(f"processing {video_file_name}")

    file_path = os.path.join(upscaled_video_dir, video_file_name)

    task = twelve_labs_client.embed.task.create(
        model_name="Marengo-retrieval-2.7",
        video_file=file_path,
        video_clip_length=segment_length,
        video_embedding_scopes=["clip", "video"]
    )
    print(
        f"Created task: id={task.id} model_name={task.model_name} status={task.status}"
    )

    # Monitor the status of the video embedding task
    status = task.wait_for_done(
        sleep_interval=2,
        callback=on_task_update
    )
    print(f"Embedding done: {status}")

    marengo_task_ids[video_file_name] = task.id
残りのビデオをセグメントに分割する
残りのビデオを以前と同様にいくつかの短いセグメントに分割します。
# Create output folder if it doesn't exist
os.makedirs(upscaled_video_dir, exist_ok=True)

# Get all video files
video_files = [f for f in os.listdir(upscaled_video_dir) if f.endswith(('.mp4', '.avi', '.mov'))]

# Process each video
for video_file in video_files:
    split_video(upscaled_video_dir + video_file,video_segments_dir,segment_length)
すべてのビデオおよびそのセグメントに対してPegasusビデオIDを取得する
次に、残りのセグメントと元動画すべてに対するPegasusビデオIDを抽出します。時間を節約するために、この処理を並行して実行します。
import concurrent.futures
import os
from tqdm import tqdm  # Use standard tqdm instead of tqdm.notebook

def process_video(video_path):
    video_file_name = video_path.split("/")[-1]
    try:
        video_id = upload_video_to_twelve_labs_pegasus(video_path)
        return video_file_name, video_id
    except Exception as e:
        print(f"Error processing {video_file_name}: {str(e)}")
        return video_file_name, None

# Filter out videos that are already processed
segment_video_files = [ video_segments_dir + f for f in os.listdir(video_segments_dir) if f.endswith('.mp4')]
full_video_files = [ upscaled_video_dir + f for f in os.listdir(upscaled_video_dir) if f.endswith('.mp4')]
all_video_files = segment_video_files + full_video_files

videos_to_process = [f for f in all_video_files if f.split("/")[-1] not in pegasus_video_ids]

print(f"Processing {len(videos_to_process)} videos in parallel...")

# Use ThreadPoolExecutor for I/O-bound operations like API calls
with concurrent.futures.ThreadPoolExecutor(max_workers=10) as executor:
    # Submit all tasks and create a dictionary mapping futures to their video files
    future_to_video = {executor.submit(process_video, video_path): video_path for video_path in videos_to_process}

    # Process results as they complete with a progress bar
    for future in tqdm(concurrent.futures.as_completed(future_to_video), total=len(videos_to_process)):
        video_file_name, video_id = future.result()
        if video_id:
            pegasus_video_ids[video_file_name] = video_id

print("All videos processed!")
print(f"Successfully processed {len([v for v in pegasus_video_ids.values() if v is not None])} videos")
Weaviateへのデータアップロード
残りの埋め込みデータをWeaviateにアップロードします。
records, vectors = prepare_marengo_embeddings_for_weaviate(marengo_task_ids,pegasus_video_ids)

with collection.batch.dynamic() as batch:
    for i, record in enumerate(records):
        if record["pegasus_video_id"] is None:
            continue
        batch.add_object(
            properties=record,
            vector=vectors[i]
        )

print(f"Added {len(records)} embeddings to Weaviate")
RAGパフォーマンス評価:クリップ 対 フルビデオ
Marengoの埋め込みとPegasusのビデオIDがWeaviateに正常にインデックス化されたので、このRAGシステムの有効性を評価します。この評価は以下の2つの重要な側面に焦点を当てます:
回答品質:クリップレベルの検索とビデオ全体の検索の違いによって、質問に対するシステムの応答の正確性はどのように変化するか?
処理効率:応答時間および計算リソースの消費量に関してどのような性能差異があるか?
この比較により、これら違いを定量的に測定可能にし、特により長尺なビデオや、ビデオ内の特定の瞬間を提示する複雑な質問に対して、最も適切な箇所だけに対象を動的に絞ることで、RAGが処理効率と品質を同時に向上させる仕組みを実証します。
まず、複数の異なるスポーツジャンルをカバーし、かつビデオに含まれる特定のイベントを解釈することを必要とする、様々なテスト用質問セットを定義します。
video_questions = [
    "In the American Football Video, what are the teams playing?",
    "What technique does David Tyree use to catch the ball?",
    "In the tennis match video, who is playing?",
    "What foot does Messi shoot at the goal with?",
    "When does Keri Strug hurt her foot?"
]
PegasusによるマルチビデオRAG
最初に、フルビデオを取得して質問した際の回答動作を測定します:
from weaviate.classes.query import MetadataQuery, Filter
import time

# Perform query using the whole video dataset
pegasus_full_video_answers = []

start_time = time.time()

for question in video_questions:

    embedding = twelve_labs_client.embed.create(
        model_name="Marengo-retrieval-2.7",
        text=question,
        text_truncate="start",
    )

    query_vector = embedding.text_embedding.segments[0].embeddings_float

    response = collection.query.near_vector(
        near_vector=query_vector,
        limit=1,
        return_metadata=MetadataQuery(distance=True),
        filters=(Filter.by_property("type").equal("video"))
    )

    selected_video_name = response.objects[0].properties["video_file"]
    selected_video_id = response.objects[0].properties["pegasus_video_id"]

    res = twelve_labs_client.generate.text(
        video_id=selected_video_id,
        prompt=question
    )

    pegasus_full_video_answers.append([question,selected_video_name,res.data])

end_time = time.time()
execution_time = end_time - start_time
print(f"Execution time: {int(execution_time)} seconds")
Execution time: 72 seconds
次に、これを10秒のセグメントクリップでの実行と比較します。
pegasus_clip_video_answers = []

start_time = time.time()

for question in video_questions:
    embedding = twelve_labs_client.embed.create(
        model_name="Marengo-retrieval-2.7",
        text=question,
        text_truncate="start",
    )

    query_vector = embedding.text_embedding.segments[0].embeddings_float

    response = collection.query.near_vector(
        near_vector=query_vector,
        limit=1,
        return_metadata=MetadataQuery(distance=True),
        filters=(Filter.by_property("type").equal("clip"))
    )

    selected_video_name = response.objects[0].properties["video_file"]
    selected_video_id = response.objects[0].properties["pegasus_video_id"]

    res = twelve_labs_client.generate.text(
        video_id=selected_video_id,
        prompt=question
    )

    pegasus_clip_video_answers.append([question,selected_video_name,res.data])

end_time = time.time()
execution_time = end_time - start_time
print(f"Execution time: {int(execution_time)} seconds")
Execution time: 20 seconds
抽出したセグメントクリップとフルビデオそれぞれの検索により生成された回答を比較します。
for clip_answer, full_answer in zip(pegasus_clip_video_answers, pegasus_full_video_answers):

    print("question",clip_answer[0])
    print("clip:  ",clip_answer[2])
    print("full:  ",full_answer[2])
    print("\n")
双方から十分に正確で一貫性の高い回答が得られたことが分かります。しかし、クリップを用いたアプローチがわずか20秒で完了したのに対して、ビデオ全体を毎回処理するアプローチは完了に72秒を要しました。
LLaVa-NeXT-VideoによるマルチビデオRAG
次に、LLaVa-NeXT-Videoモデルを使用して同様のテストを行います。ただし、まずは事前にすべてのビデオファイルをサンプリングする必要があります。
for video_file in os.listdir(video_segments_dir):
    print(video_file)
    sampled_video = sample_video(video_segments_dir + video_file,num_samples=40)
    sampled_video_files[video_file] = sampled_video
フルビデオの読み込みによる質問処理から開始します。
llava_full_video_answers = []

start_time = time.time()

for question in video_questions:
    embedding = twelve_labs_client.embed.create(
        model_name="Marengo-retrieval-2.7",
        text=question,
        text_truncate="start"
    )

    query_vector = embedding.text_embedding.segments[0].embeddings_float

    response = collection.query.near_vector(
        near_vector=query_vector,
        limit=1,
        return_metadata=MetadataQuery(distance=True),
        filters=(Filter.by_property("type").equal("video"))
    )

    selected_video_file = response.objects[0].properties["video_file"]
    selected_video_id = response.objects[0].properties["pegasus_video_id"]

    sampled_video = sampled_video_files[selected_video_file]
    generated_text = query_llava_next(question,llava_next_model,llava_next_processor,sampled_video)

    llava_full_video_answers.append([question,selected_video_name,generated_text])

end_time = time.time()
execution_time = end_time - start_time
print(f"Execution time: {int(execution_time)} seconds")
Execution time: 24 seconds
次に、これをセグメントクリップと比較します。
from weaviate.classes.query import MetadataQuery

import time

llava_clip_video_answers = []

start_time = time.time()

for question in video_questions:
    embedding = twelve_labs_client.embed.create(
        model_name="Marengo-retrieval-2.7",
        text=question,
        text_truncate="start"
    )

    query_vector = embedding.text_embedding.segments[0].embeddings_float

    response = collection.query.near_vector(
        near_vector=query_vector,
        limit=1,
        return_metadata=MetadataQuery(distance=True),
        filters=(Filter.by_property("type").equal("clip"))
    )

    selected_video_file = response.objects[0].properties["video_file"]
    selected_video_id = response.objects[0].properties["pegasus_video_id"]

    sampled_video = sampled_video_files[selected_video_file]
    generated_text = query_llava_next(question,llava_next_model,llava_next_processor,sampled_video)

    llava_clip_video_answers.append([question,selected_video_name,generated_text])

end_time = time.time()
execution_time = end_time - start_time
print(f"Execution time: {int(execution_time)} seconds")
Execution time: 24 seconds
各実行で全く同等の時間を要したことが分かります。これは、ビデオの秒数に関係なく、各項目から常に均等に40枚のフレームだけを抽出して評価するためです。
次に、LLaVa-NeXT-Videoが抽出したクリップとフルビデオに対してそれぞれ生成した返答内容を調査します。
for clip_answer, full_answer in zip(llava_clip_video_answers, llava_full_video_answers):

    print("question",clip_answer[0])
    print("clip:  ",clip_answer[2])
    print("full:  ",full_answer[2])
    print("\n")
今回のケースでは、セグメントクリップを処理した際に、LLaVa-NeXT-Videoは5問中2問で正しい解を導き出しました:
最初の質問において、ニューヨーク・ジャイアンツとニューイングランド・ペイトリオッツが対戦中である点を認識できており、また
3番目の質問において、テニスの試合がロジャー・フェデラーとノバク・ジョコビッチの間で行われている点を正確に見分けています。
7 - まとめ:TwelveLabsとWeaviateによる効率的なビデオ理解のためのRAGの活用
ビデオ処理における検索拡張生成(RAG)の調査は、効率と正確性の両面で大きな利点を示しました。TwelveLabsの高度なビデオ理解機能とWeaviateの強力なベクトルデータベースを組み合わせることで、ビデオ全体ではなく、最も関連性の高いビデオセグメントのみを論理的に処理するシステムを構築しました。
主な知見
パフォーマンスの改善:Weaviateを統合したRAGシステムにTwelveLabsのPegasusを適応すると、元ビデオを毎回全て読み込ませる代わりに、抽出されたクリップだけをクエリ処理することで、レスポンス速度を劇的に改善できました。
正確性の強化:LLaVa-NeXT-Videoなどのオープンソースモデルにおいて、注目箇所をあらかじめ切り分けたクリップセグメントに限定することで、ビデオ全体の処理に比べて回答の正確さが大きく向上することが示されました。
スケーラビリティを備えたアーキテクチャ:このRAGモデルの検証は、TwelveLabsの埋め込みモデル(Marengo)とWeaviateの高性能ベクトルデータベースの連携が、いかに強力な処理性能を提供するかを示しています。高次元の埋め込みデータを低遅延で検索して保存できるWeaviateの技術は、ビデオ理解などの複雑なタスクを実用的なアプリケーションに落とし込むための極めて重要なコアコンポーネントです。
ユースケース
TwelveLabsのビデオ理解機能とWeaviateのベクトルデータベースを組み合わせることで、多数の産業で強力なアプリケーションの構築が可能になります:
メディア&エンターテインメント:クリエイターは大規模なアーカイブから目的のシーンを瞬時に検索可能になり、編集作業の迅速化やSNS向け動画クリップの自動生成、アーカイブの効率的な再活用などが可能になります。
スポーツアナリティクス:コーチやアナリストは、ビデオを手動で早送り・巻き戻しして探すことなく、特定のアクション(例:『相手チームの裏に投げる短いパスのシーン』)をただテキストで定義するだけで、即座に関連クリップを全試合データから呼び出せるようになります。
小売・Eコマース:小売事業者は自社のチュートリアル動画を、ただ受動的に見せる一方向のコンテンツから、双方向で質問に答えるインタラクティブなショッピング体験にシフトさせることができます。例えば、顧客が『ストラップの調整方法を教えて』『バックパックに入れたときのサイズ感を見せて』と質問した際、説明動画の該当部分のみを自動で瞬時にカットして再生表示するといったことが容易に実現します。
TwelveLabsとWeaviateの組み合わせにより、膨大なビデオデータを扱う環境でも、情報抽出の効率化と高度な対話システムを同時に満たす、強力なVideo RAG基盤を構築できます。