" height="1.90314px" id="wtDTm6bEW" transform="translate(26.225 0)" width="2.4723000000000006px"/><path d="M 0.557 0 L 1.438 0 C 1.746 0 1.995 0.25 1.995 0.559 L 1.995 1.344 C 1.995 1.653 1.746 1.903 1.438 1.903 L 0.557 1.903 C 0.25 1.903 0 1.653 0 1.344 L 0 0.559 C 0 0.25 0.25 0 0.557 0 Z" fill="rgb(29, 28, 27)" height="1.9031500000000001px" id="GnmDnNra_" transform="translate(36.408 2.728)" width="1.9953000000000003px"/><path d="M 6.224 0 L 0.558 0 C 0.25 0 0 0.25 0 0.559 L 0 1.344 C 0 1.653 0.25 1.903 0.558 1.903 L 6.224 1.903 C 6.531 1.903 6.781 1.653 6.781 1.344 L 6.781 0.559 C 6.781 0.25 6.531 0 6.224 0 Z" fill="rgb(29, 28, 27)" height="1.9031500000000001px" id="hKTQ3dbw4" transform="translate(34.261 5.456)" width="6.781100000000002px"/><path d="M 6.955 0 L 0.558 0 C 0.25 0 0 0.25 0 0.559 L 0 1.344 C 0 1.653 0.25 1.903 0.558 1.903 L 6.955 1.903 C 7.263 1.903 7.513 1.653 7.513 1.344 L 7.513 0.559 C 7.513 0.25 7.263 0 6.955 0 Z" fill="rgb(29, 28, 27)" height="1.9031500000000001px" id="G1Zzk9CUU" transform="translate(28.298 8.243)" width="7.513100000000001px"/><path d="M 7.123 0 L 0.558 0 C 0.25 0 0 0.25 0 0.559 L 0 1.344 C 0 1.653 0.25 1.903 0.558 1.903 L 7.123 1.903 C 7.431 1.903 7.681 1.653 7.681 1.344 L 7.681 0.559 C 7.681 0.25 7.431 0 7.123 0 Z" fill="rgb(29, 28, 27)" height="1.9030999999999985px" id="fm7cHxIfJ" transform="translate(0 10.972)" width="7.68067px"/><path d="M 13.447 0 L 0.558 0 C 0.25 0 0 0.25 0 0.559 L 0 1.344 C 0 1.653 0.25 1.903 0.558 1.903 L 13.447 1.903 C 13.755 1.903 14.004 1.653 14.004 1.344 L 14.004 0.559 C 14.004 0.25 13.755 0 13.447 0 Z" fill="rgb(29, 28, 27)" height="1.9030999999999985px" id="LowSwDrtg" transform="translate(9.552 10.972)" width="14.0044px"/><path d="M 0.558 0 L 8.212 0 C 8.52 0 8.77 0.25 8.77 0.559 L 8.77 1.344 C 8.77 1.653 8.52 1.903 8.212 1.903 L 0.558 1.903 C 0.25 1.903 0 1.653 0 1.344 L 0 0.559 C 0 0.25 0.25 0 0.558 0 Z" fill="rgb(29, 28, 27)" height="1.9030999999999985px" id="xRiKc2od7" transform="translate(27.041 10.972)" width="8.769900000000003px"/><path d="M 0.557 0 L 5.4 0 C 5.708 0 5.958 0.25 5.958 0.559 L 5.958 1.344 C 5.958 1.653 5.708 1.903 5.4 1.903 L 0.557 1.903 C 0.25 1.903 0 1.653 0 1.344 L 0 0.559 C 0 0.25 0.25 0 0.557 0 Z" fill="rgb(29, 28, 27)" height="1.9031500000000001px" id="JWdNVicde" transform="translate(36.796 8.243)" width="5.957599999999999px"/><path d="M 1.438 0 L 0.558 0 C 0.25 0 0 0.25 0 0.559 L 0 1.344 C 0 1.653 0.25 1.903 0.558 1.903 L 1.438 1.903 C 1.746 1.903 1.995 1.653 1.995 1.344 L 1.995 0.559 C 1.995 0.25 1.746 0 1.438 0 Z" fill="rgb(29, 28, 27)" height="1.9031500000000001px" id="RfFYVCT_T" transform="translate(28.717 5.456)" width="1.9953000000000003px"/><path d="M 0.558 0 L 2.895 0 C 3.203 0 3.453 0.25 3.453 0.559 L 3.453 1.406 C 3.453 1.714 3.203 1.964 2.895 1.964 L 0.558 1.964 C 0.25 1.964 0 1.714 0 1.406 L 0 0.559 C 0 0.25 0.25 0 0.558 0 Z" fill="rgb(29, 28, 27)" height="1.964299999999998px" id="dngJ6MU2p" transform="translate(16.183 24.582)" width="3.4525000000000006px"/><path d="M 1.706 0 L 0.558 0 C 0.25 0 0 0.25 0 0.559 L 0 1.406 C 0 1.714 0.25 1.964 0.558 1.964 L 1.706 1.964 C 2.014 1.964 2.263 1.714 2.263 1.406 L 2.263 0.559 C 2.263 0.25 2.014 0 1.706 0 Z" fill="rgb(29, 28, 27)" height="1.964299999999998px" id="N_fstvKmR" transform="translate(22.18 24.582)" width="2.2631999999999977px"/><path d="M 0.558 0 L 5.544 0 C 5.852 0 6.101 0.25 6.101 0.559 L 6.101 1.406 C 6.101 1.714 5.852 1.964 5.544 1.964 L 0.558 1.964 C 0.25 1.964 0 1.714 0 1.406 L 0 0.559 C 0 0.25 0.25 0 0.558 0 Z" fill="rgb(29, 28, 27)" height="1.964299999999998px" id="t55XLYcgb" transform="translate(25.486 24.582)" width="6.101399999999998px"/><path d="M 1.976 0 L 0.558 0 C 0.25 0 0 0.25 0 0.559 L 0 1.406 C 0 1.714 0.25 1.964 0.558 1.964 L 1.976 1.964 C 2.284 1.964 2.533 1.714 2.533 1.406 L 2.533 0.559 C 2.533 0.25 2.284 0 1.976 0 Z" fill="rgb(29, 28, 27)" height="1.964299999999998px" id="ZrEKTVTAe" transform="translate(28.542 21.854)" width="2.5334000000000003px"/><path d="M 0.557 0 L 1.438 0 C 1.746 0 1.995 0.25 1.995 0.559 L 1.995 1.406 C 1.995 1.714 1.746 1.964 1.438 1.964 L 0.557 1.964 C 0.25 1.964 0 1.714 0 1.406 L 0 0.559 C 0 0.25 0.25 0 0.557 0 Z" fill="rgb(29, 28, 27)" height="1.964299999999998px" id="Z0fPTp9aR" transform="translate(11.425 24.582)" width="1.9953000000000003px"/><path d="M 0 0.559 C 0 0.251 0.251 0 0.558 0 L 1.438 0 C 1.745 0 1.995 0.251 1.995 0.559 L 1.995 1.405 C 1.995 1.713 1.745 1.964 1.438 1.964 L 0.558 1.964 C 0.251 1.964 0 1.713 0 1.405 Z" fill="rgb(29, 28, 27)" height="1.964299999999998px" id="Tj_PDHFDh" transform="translate(20.635 27.308)" width="1.9954px"/><path d="M 0.557 0 L 1.342 0 C 1.65 0 1.899 0.25 1.899 0.559 L 1.899 1.406 C 1.899 1.714 1.65 1.964 1.342 1.964 L 0.557 1.964 C 0.25 1.964 0 1.714 0 1.406 L 0 0.559 C 0 0.25 0.25 0 0.557 0 Z" fill="rgb(29, 28, 27)" height="1.9643000000000015px" id="AYq9dXkKz" transform="translate(18.686 30.036)" width="1.8994px"/><path d="M 0.558 0 L 5.768 0 C 6.076 0 6.326 0.25 6.326 0.559 L 6.326 1.344 C 6.326 1.653 6.076 1.903 5.768 1.903 L 0.558 1.903 C 0.25 1.903 0 1.653 0 1.344 L 0 0.559 C 0 0.25 0.25 0 0.558 0 Z" fill="rgb(29, 28, 27)" height="1.9031500000000001px" id="rspevfJcx" transform="translate(12.157 8.243)" width="6.325900000000001px"/><path d="M 3.285 0 L 0.558 0 C 0.25 0 0 0.25 0 0.559 L 0 1.344 C 0 1.653 0.25 1.903 0.558 1.903 L 3.285 1.903 C 3.593 1.903 3.842 1.653 3.842 1.344 L 3.842 0.559 C 3.842 0.25 3.593 0 3.285 0 Z" fill="rgb(29, 28, 27)" height="1.9031500000000001px" id="XRUAhGnph" transform="translate(23.887 2.728)" width="3.8424000000000014px"/><path d="M 0.558 0 L 5.644 0 C 5.952 0 6.202 0.25 6.202 0.559 L 6.202 1.344 C 6.202 1.653 5.952 1.903 5.644 1.903 L 0.558 1.903 C 0.25 1.903 0 1.653 0 1.344 L 0 0.559 C 0 0.25 0.25 0 0.558 0 Z" fill="rgb(29, 28, 27)" height="1.9031500000000001px" id="VsaVVIfke" transform="translate(21.528 5.456)" width="6.201600000000003px"/><path d="M 3.06 0 L 0.558 0 C 0.25 0 0 0.25 0 0.559 L 0 1.344 C 0 1.653 0.25 1.903 0.558 1.903 L 3.06 1.903 C 3.369 1.903 3.618 1.653 3.618 1.344 L 3.618 0.559 C 3.618 0.25 3.369 0 3.06 0 Z" fill="rgb(29, 28, 27)" height="1.9030999999999985px" id="wiAKEgyId" transform="translate(40.819 10.972)" width="3.6182000000000016px"/><path d="M 0.558 0 L 17.318 0 C 17.626 0 17.875 0.25 17.875 0.559 L 17.875 1.345 C 17.875 1.653 17.626 1.903 17.318 1.903 L 0.558 1.903 C 0.25 1.903 0 1.653 0 1.345 L 0 0.559 C 0 0.25 0.25 0 0.558 0 Z" fill="rgb(29, 28, 27)" height="1.9032px" id="FIE0ufK9m" transform="translate(6.666 13.7)" width="17.87506px"/><path d="M 6.426 0 L 0.558 0 C 0.25 0 0 0.25 0 0.559 L 0 1.345 C 0 1.653 0.25 1.903 0.558 1.903 L 6.426 1.903 C 6.734 1.903 6.984 1.653 6.984 1.345 L 6.984 0.559 C 6.984 0.25 6.734 0 6.426 0 Z" fill="rgb(29, 28, 27)" height="1.9032000000000018px" id="ut9UWny3L" transform="translate(22.892 19.156)" width="6.983599999999999px"/><path d="M 0.558 0 L 22.151 0 C 22.459 0 22.709 0.25 22.709 0.559 L 22.709 1.344 C 22.709 1.653 22.459 1.903 22.151 1.903 L 0.558 1.903 C 0.25 1.903 0 1.653 0 1.344 L 0 0.559 C 0 0.25 0.25 0 0.558 0 Z" fill="rgb(29, 28, 27)" height="1.9030999999999985px" id="VULnffgbk" transform="translate(9.552 16.428)" width="22.7089px"/><path d="M 7.886 0 L 0.558 0 C 0.25 0 0 0.25 0 0.559 L 0 1.345 C 0 1.653 0.25 1.903 0.558 1.903 L 7.886 1.903 C 8.194 1.903 8.443 1.653 8.443 1.345 L 8.443 0.559 C 8.443 0.25 8.194 0 7.886 0 Z" fill="rgb(29, 28, 27)" height="1.9032000000000018px" id="adZTYr4MR" transform="translate(6.078 19.156)" width="8.44303px"/><path d="M 0.558 0 L 2.211 0 C 2.519 0 2.769 0.25 2.769 0.559 L 2.769 1.406 C 2.769 1.714 2.519 1.964 2.211 1.964 L 0.558 1.964 C 0.25 1.964 0 1.714 0 1.406 L 0 0.559 C 0 0.25 0.25 0 0.558 0 Z" fill="rgb(29, 28, 27)" height="1.964299999999998px" id="bwdUdEmCH" transform="translate(13.784 21.854)" width="2.768600000000001px"/><path d="M 2.424 0 L 0.558 0 C 0.25 0 0 0.25 0 0.559 L 0 1.406 C 0 1.714 0.25 1.964 0.558 1.964 L 2.424 1.964 C 2.732 1.964 2.982 1.714 2.982 1.406 L 2.982 0.559 C 2.982 0.25 2.732 0 2.424 0 Z" fill="rgb(29, 28, 27)" height="1.964299999999998px" id="PUvesMJEj" transform="translate(23.556 21.854)" width="2.982199999999999px"/><path d="M 0.558 0 L 2.241 0 C 2.55 0 2.799 0.25 2.799 0.559 L 2.799 1.406 C 2.799 1.714 2.55 1.964 2.241 1.964 L 0.558 1.964 C 0.25 1.964 0 1.714 0 1.406 L 0 0.559 C 0 0.25 0.25 0 0.558 0 Z" fill="rgb(29, 28, 27)" height="1.964299999999998px" id="Wo2W7J3Zj" transform="translate(8.672 21.854)" width="2.799050000000001px"/><path d="M 6.661 0 L 0.558 0 C 0.25 0 0 0.25 0 0.559 L 0 1.345 C 0 1.653 0.25 1.903 0.558 1.903 L 6.661 1.903 C 6.969 1.903 7.219 1.653 7.219 1.345 L 7.219 0.559 C 7.219 0.25 6.969 0 6.661 0 Z" fill="rgb(29, 28, 27)" height="1.9032px" id="PpPVZXp9j" transform="translate(27.041 13.7)" width="7.218900000000001px"/><path d="M 0.621 1.905 C 0.218 1.905 0 1.687 0 1.283 L 0 0.622 C 0 0.218 0.218 0 0.621 0 L 11.225 0 C 11.628 0 11.846 0.218 11.846 0.622 L 11.846 1.283 C 11.846 1.687 11.628 1.905 11.225 1.905 L 6.934 1.905 L 6.934 14.926 C 6.934 15.33 6.716 15.548 6.313 15.548 L 5.537 15.548 C 5.134 15.548 4.916 15.33 4.916 14.926 L 4.916 1.905 Z" fill="rgb(29, 28, 27)" height="15.54825px" id="xr32fxeO6" transform="translate(52.177 8.243)" width="11.845599999999997px"/><path d="M 0.621 0 C 0.218 0 0 0.218 0 0.622 L 0 14.924 C 0 15.328 0.218 15.546 0.621 15.546 L 1.357 15.546 C 1.76 15.546 1.978 15.328 1.978 14.924 L 1.978 0.622 C 1.978 0.218 1.76 0 1.357 0 Z" fill="rgb(29, 28, 27)" height="15.546050000000001px" id="oSsO_UPVN" transform="translate(90.476 8.243)" width="1.9779000000000053px"/><path d="M 0.62 15.546 C 0.217 15.546 0 15.328 0 14.924 L 0 0.622 C 0 0.218 0.217 0 0.62 0 L 1.396 0 C 1.799 0 2.017 0.218 2.017 0.622 L 2.017 13.632 L 8.981 13.632 C 9.384 13.632 9.602 13.85 9.602 14.254 L 9.602 14.924 C 9.602 15.328 9.384 15.546 8.981 15.546 Z" fill="rgb(29, 28, 27)" height="15.546050000000001px" id="Sgj4z5osO" transform="translate(116.749 8.243)" width="9.602000000000004px"/><path d="M 1.974 14.924 C 1.974 15.328 1.756 15.546 1.353 15.546 L 0.621 15.546 C 0.218 15.546 0 15.328 0 14.924 L 0 0.622 C 0 0.218 0.218 0 0.621 0 L 1.357 0 C 1.76 0 1.978 0.218 1.978 0.622 L 1.978 5.747 C 2.634 4.721 3.806 4.079 5.309 4.079 C 8.18 4.079 10.356 6.358 10.356 9.948 C 10.356 13.538 8.18 15.817 5.309 15.817 C 3.801 15.817 2.627 15.175 1.971 14.145 L 1.971 14.922 Z M 8.36 9.95 C 8.36 7.362 6.881 5.928 5.121 5.928 C 3.361 5.928 1.863 7.362 1.863 9.95 C 1.863 12.539 3.361 13.972 5.121 13.972 C 6.881 13.972 8.36 12.539 8.36 9.95 Z" fill="rgb(29, 28, 27)" height="15.81665px" id="q13jjj7xd" transform="translate(138.401 8.243)" width="10.355999999999995px"/><path d="M 4.457 11.738 C 0.961 11.738 -0.019 9.872 0 8.318 C 0.005 7.929 0.253 7.735 0.645 7.735 L 1.344 7.735 C 1.748 7.735 1.922 7.949 1.961 8.352 C 2.063 9.315 2.693 9.907 4.433 9.907 C 6.174 9.907 7.012 9.269 7.012 8.289 C 7.012 7.425 6.522 7.108 5.305 6.899 L 3.209 6.539 C 1.453 6.238 0.29 5.247 0.29 3.468 C 0.29 1.467 1.774 0 4.518 0 C 7.263 0 8.838 1.491 8.814 3.23 C 8.81 3.614 8.553 3.808 8.165 3.808 L 7.457 3.808 C 7.054 3.808 6.908 3.595 6.851 3.202 C 6.749 2.477 6.159 1.818 4.518 1.818 C 2.878 1.818 2.249 2.508 2.249 3.403 C 2.249 4.175 2.695 4.516 3.81 4.714 L 5.906 5.083 C 7.72 5.404 8.98 6.292 8.98 8.198 C 8.98 9.976 7.908 11.74 4.455 11.74 Z" fill="rgb(29, 28, 27)" height="11.739799999999999px" id="tJ8syeWTW" transform="translate(150.024 12.325)" width="8.980269730401375px"/><path d="M 9.146 7.997 C 9.146 8.813 9.175 9.983 9.282 10.799 C 9.334 11.223 9.155 11.465 8.728 11.465 L 8.068 11.465 C 7.685 11.465 7.467 11.319 7.428 11.022 L 7.317 10.181 C 6.724 11.157 5.565 11.659 4.145 11.659 C 1.579 11.659 0 10.142 0 8.078 C 0 6.27 1.27 5.157 3.433 5.002 L 6.589 4.78 C 7.162 4.741 7.186 4.688 7.186 4.153 L 7.186 3.682 C 7.186 2.438 6.434 1.807 4.79 1.807 C 3.145 1.807 2.472 2.425 2.405 3.289 C 2.376 3.697 2.235 3.916 1.823 3.916 L 1.067 3.916 C 0.675 3.916 0.427 3.717 0.422 3.328 C 0.407 1.51 1.74 0 4.792 0 C 7.798 0 9.162 1.427 9.155 3.736 Z M 7.188 7.298 L 7.188 6.244 C 6.955 6.327 6.678 6.386 6.363 6.415 L 3.598 6.676 C 2.59 6.775 1.997 7.163 1.997 8.099 L 1.999 8.099 C 1.999 9.188 2.886 9.97 4.4 9.97 C 6.169 9.97 7.188 8.9 7.188 7.298 Z" fill="rgb(29, 28, 27)" height="11.658999999999999px" id="QPESIZvku" transform="translate(126.854 12.325)" width="9.290755130109668px"/><path d="M 5.224 0 C 8.313 0 10.295 2.255 10.295 5.456 L 10.295 5.694 C 10.295 6.098 10.077 6.316 9.674 6.316 L 1.998 6.316 C 2.168 8.547 3.447 9.898 5.407 9.898 C 6.768 9.898 7.598 9.363 7.934 8.431 C 8.06 8.078 8.243 7.892 8.618 7.892 L 9.33 7.892 C 9.746 7.892 9.994 8.125 9.923 8.538 C 9.598 10.433 7.834 11.74 5.409 11.74 L 5.407 11.738 C 2.168 11.738 0 9.424 0 5.797 C 0 2.169 2.135 0 5.224 0 Z M 5.222 1.74 C 3.494 1.74 2.405 2.818 2.074 4.64 L 8.282 4.64 C 8.054 2.842 6.949 1.74 5.222 1.74 Z" fill="rgb(29, 28, 27)" height="11.739799999999999px" id="PKmyQkwJE" transform="translate(104.541 12.325)" width="10.295000000000002px"/><path d="M 4.459 11.194 C 4.099 11.194 3.877 11.039 3.746 10.703 L 0.091 1.021 C -0.024 0.72 -0.031 0.511 0.076 0.297 C 0.178 0.094 0.381 0 0.732 0 L 1.274 0 C 1.633 0 1.86 0.155 1.986 0.495 L 4.958 8.503 L 5.123 9.018 L 5.289 8.503 L 8.262 0.495 C 8.388 0.155 8.615 0 8.974 0 L 9.517 0 C 9.865 0 10.07 0.092 10.172 0.297 C 10.279 0.511 10.275 0.72 10.157 1.021 L 6.502 10.703 C 6.371 11.039 6.149 11.194 5.79 11.194 Z" fill="rgb(29, 28, 27)" height="11.1941px" id="uUQr5Yl4B" transform="translate(93.807 12.595)" width="10.248961642504256px"/><path d="M 5.407 11.738 C 2.167 11.738 0 9.424 0 5.797 C 0 2.169 2.133 0 5.221 0 C 8.31 0 10.292 2.255 10.292 5.456 L 10.292 5.694 C 10.292 6.098 10.075 6.316 9.672 6.316 L 1.995 6.316 C 2.165 8.547 3.446 9.898 5.404 9.898 C 6.768 9.898 7.596 9.363 7.931 8.431 C 8.058 8.078 8.241 7.892 8.615 7.892 L 9.328 7.892 C 9.744 7.892 9.992 8.125 9.918 8.538 C 9.593 10.433 7.829 11.74 5.404 11.74 Z M 8.282 4.64 C 8.053 2.842 6.949 1.74 5.221 1.74 C 3.494 1.74 2.405 2.818 2.074 4.64 Z" fill="rgb(29, 28, 27)" height="11.739799999999999px" id="zo1nSBuSF" transform="translate(78.397 12.325)" width="10.29249999999999px"/><path d="M 3.057 10.677 C 3.163 11.026 3.392 11.192 3.756 11.192 L 3.749 11.194 L 4.987 11.194 C 5.35 11.194 5.579 11.028 5.69 10.679 L 8.173 2.654 L 8.237 2.401 L 8.3 2.654 L 10.787 10.679 C 10.894 11.028 11.123 11.194 11.487 11.194 L 12.733 11.194 C 13.096 11.194 13.325 11.028 13.432 10.679 L 16.418 1.006 C 16.516 0.7 16.512 0.498 16.41 0.288 C 16.307 0.089 16.109 0.002 15.76 0.002 L 15.218 0.002 C 14.848 0.002 14.626 0.168 14.519 0.522 L 12.094 8.547 L 12.046 8.761 L 11.999 8.542 L 9.506 0.517 C 9.4 0.168 9.171 0.002 8.807 0.002 L 7.683 0.002 C 7.319 0.002 7.091 0.168 6.984 0.517 L 4.492 8.542 L 4.449 8.745 L 4.405 8.551 L 1.98 0.519 C 1.874 0.166 1.649 0 1.281 0 L 0.728 0 C 0.38 0 0.181 0.087 0.079 0.286 C -0.021 0.493 -0.028 0.698 0.07 1.004 Z" fill="rgb(29, 28, 27)" height="11.194099999999999px" id="uboloLX99" transform="translate(61.282 12.598)" width="16.489163442184434px"/></svg>)
チュートリアル
Twelve Labs APIを使用して、機械学習(ML)のトレーニング不要で簡単に動画を分類する方法!

アンキット・カレ
開発者は、機械学習モデルをトレーニングすることなく、Twelve Labs Classification APIを使用してビデオをカスタムカテゴリに分類できます。このチュートリアルでは、ビデオのアップロード、自然言語のプロンプトによるカスタム分類基準の定義、そして結果をFlaskアプリに表示する方法について説明します。
開発者は、機械学習モデルをトレーニングすることなく、Twelve Labs Classification APIを使用してビデオをカスタムカテゴリに分類できます。このチュートリアルでは、ビデオのアップロード、自然言語のプロンプトによるカスタム分類基準の定義、そして結果をFlaskアプリに表示する方法について説明します。

この記事の内容
Join our newsletter
Receive the latest advancements, tutorials, and industry insights in video understanding
AIを活用してビデオを検索、分析、探索します。
2023/05/09
14分
記事へのリンクをコピー
Video classification refers to the process of automatically assigning one or more predefined categories or labels to a video based on its content. This task involves analyzing the video's visual and sometimes audio information to recognize and understand the events, actions, objects, or other characteristics present in the video. Video classification is an important research area in computer vision and has numerous practical applications, such as video indexing, content-based video retrieval, video recommendation, video surveillance, and human activity recognition.
In the past, video classification was limited to predefined categories or labels, focusing on identifying events, actions, objects, and other features. Customizing classification criteria without retraining the model and updating criteria seemed like a distant dream. But, here's where Twelve Labs classification API enters the scene and saves the day by effortlessly and powerfully letting us classify videos based on our custom criteria, all in near real-time and without the fuss of training any models. Talk about a game-changer, yea!
Twelve Labs Classification API - Conceptual overview
Twelve Labs classification API is designed to label indexed videos based on the duration a class label occupies within each video. If the duration is less than 50%, the class label won't apply. Therefore, it's important to carefully design classes and their prompts, especially when uploading large videos. The API service can accommodate any number of classes, allowing you to add as many prompts within a class as you'd like.
For example, let's say you have a collection of hilarious videos featuring your dog, Bruno, and your cat, Karla, engaged in various antics. You can upload these videos to Twelve Labs' platform and create custom classification criteria tailored to the amusing escapades of your furry friends:
<pre><code class="json">"classes": [
      {
            "name": "Doge_Bruno",
            "prompts": [
                "playing with my dog",
                "my dog doing funny things",
                "dog playing with water"
            ]
        },
        {
            "name": "Kitty_Karla",
            "prompts": [
                "cat jumping",
                "cat playing with toys"
            ]
        }
  ]
  </code></pre>
With just one API call, you can classify your uploaded videos using the criteria you've created. If you happen to forget a few prompts or wish to introduce new classes, you can easily do so by adding more classes and prompts to your JSON. There's no need to train a new model or retrain an existing one, making the whole process hassle-free.

Classification Results
Quick Overview
Prerequisites: To smoothly navigate this tutorial, sign up for the Twelve Labs API suite and install the required packages. It's recommended to read the first and second tutorials to familiarize yourself with the basics 🤓.
Video Upload: Send your videos to the Twelve Labs platform, which effortlessly indexes them, enabling you to add custom classification criteria and manage your content on-the-fly! And guess what? You don't even need to train an ML model 😆😁😊.
Video Classification: Get ready for the real fun! We'll create our own custom classes and a range of prompts within each class. Once we've defined our criteria, we can use them right away to fetch the results. No delays, straight to the goodies! 🍿✌️🥳
Crafting a Demo App: We will create a Flask-based app to harness the results from the classification API, access videos stored in a local folder on our computer, and then render a custom-designed, sleek HTML page to stylishly showcase the classification results 🔍💻🎨.👨🎨
Prerequisites
In the first tutorial, I covered the basics of using simple natural language queries to find specific moments within your videos. To keep things simple, I uploaded only one video to the platform and covered essential concepts such as creating an index, configuring the index, defining task API, basic monitoring of video indexing tasks, and step-by-step explanations of creating a Flask-based demo app.
The second tutorial went a step further, exploring the combination of multiple search queries to create more precise and targeted searches. I uploaded multiple videos asynchronously, created multiple indexes, implemented additional code for monitoring video indexing tasks and fetching details like estimated time for task completion. I also configured the Flask app to accommodate multiple videos and display them using an HTML template.
Continuing on this streak, the current tutorial will cover synchronous video uploads using Python's built-in concurrent.futures library. We will monitor the indexing statuses of the videos and record them to a CSV file. Additionally, we will surface the input classification criteria and relevant classification API response fields in the HTML template, making it easier to interpret the results.
If you encounter any difficulties while reading this or any of the previous tutorials, don't hesitate to reach out for help! We pride ourselves on providing quick support through our Discord server with response times faster than a speeding train 🚅🏎️⚡️. Alternatively, you can also reach me via email. Twelve Labs is currently in Open Beta, so you can create a Twelve Labs account and access the API Dashboard to obtain your API key. With your free credits, you'll be able to classify up to 10 hours of your video content.
<pre><code class="python">%env API_KEY=<your_API_key>
%env API_URL=https://api.twelvelabs.io/v1.1

!pip install requests
!pip install flask

import os
import requests
import glob
from pprint import pprint


#Retrieve the URL of the API and the API key
API_URL = os.getenv("API_URL")
assert API_URL

API_KEY = os.getenv("API_KEY")
assert API_KEY
</code></pre>
Video Upload
Creating an index and configuring it for video upload:
<pre><code class="python"># Construct the URL of the `/indexes` endpoint
INDEXES_URL = f"{API_URL}/indexes"

# Set the header of the request
default_header = {
    "x-api-key": API_KEY
}

# Define a function to create an index with a given name
def create_index(index_name, index_options, engine):
    # Declare a dictionary named data
    data = {
        "engine_id": engine,
        "index_options": index_options,
        "index_name": index_name,
    }

    # Create an index
    response = requests.post(INDEXES_URL, headers=default_header, json=data)

    # Store the unique identifier of your index
    INDEX_ID = response.json().get('_id')

    # Check if the status code is 201 and print success
    if response.status_code == 201:
        print(f"Status code: {response.status_code} - The request was successful and a new index was created.")
    else:
        print(f"Status code: {response.status_code}")
    pprint(response.json())
    return INDEX_ID


# Create the indexes
index_id_content_classification = create_index(index_name = "insta+tiktok", index_options=["visual", "conversation", "text_in_video", "logo"], engine = "marengo2.5")

# Print the created index IDs
print(f"Created index IDs: {index_id_content_classification}")
</code></pre>
<pre><code class="bash">Status code: 201 - The request was successful and a new index was created.
{'_id': '64544b858b1dd6cde172af77'}
Created index IDs: 64544b858b1dd6cde172af77
</code></pre>
<pre><code class="bash">Status code: 201 - The request was successful and a new index was created.
{'_id': '64544b858b1dd6cde172af77'}
Created index IDs: 64544b858b1dd6cde172af77
</code></pre>
Writing the upload function
This time I've cooked up the code that automatically scoops up all videos from a designated folder, assigns them the same name as their video file, and uploads them to the platform – all while strutting its stuff synchronously using a Python library. Just pop all the videos you want to index into a single folder, and you're good to go! The whole indexing process will take about 40% of the longest video's duration. Need to add more videos to the same index later? Easy peasy! No need for a new folder, just toss them into the existing one. The code's got your back, it checks for any indexed videos with the same name or pending indexing tasks before starting the process. This way, you'll dodge any pesky duplicates – pretty convenient, huh? 😄
<pre><code class="python">import os
import requests
from concurrent.futures import ThreadPoolExecutor

TASKS_URL = f"{API_URL}/tasks"
TASK_ID_LIST = []
video_folder = 'classify'  # folder containing the video files
INDEX_ID = '64544b858b1dd6cde172af77'

def upload_video(file_name):
    # Validate if a video already exists in the index
    task_list_response = requests.get(
        TASKS_URL,
        headers=default_header,
        params={"index_id": INDEX_ID, "filename": file_name},
    )
    if "data" in task_list_response.json():
        task_list = task_list_response.json()["data"]
        if len(task_list) > 0:
            if task_list[0]['status'] == 'ready':
                print(f"Video '{file_name}' already exists in index {INDEX_ID}")
            else:
                print("task pending or validating")
            return

    # Proceed further to create a new task to index the current video if the video didn't exist in the index already
    print("Entering task creation code for the file: ", file_name)

    if file_name.endswith('.mp4'):  # Make sure the file is an MP4 video
        file_path = os.path.join(video_folder, file_name)  # Get the full path of the video file
        with open(file_path, "rb") as file_stream:
            data = {
                "index_id": INDEX_ID,
                "language": "en"
            }
            file_param = [
                ("video_file", (file_name, file_stream, "application/octet-stream")),] #The video will be indexed on the platform using the same name as the video file itself.
            response = requests.post(TASKS_URL, headers=default_header, data=data, files=file_param)
            TASK_ID = response.json().get("_id")
            TASK_ID_LIST.append(TASK_ID)
            # Check if the status code is 201 and print success
            if response.status_code == 201:
                print(f"Status code: {response.status_code} - The request was successful and a new resource was created.")
            else:
                print(f"Status code: {response.status_code}")
            print(f"File name: {file_name}")
            pprint(response.json())
            print("\n")

# Get list of video files
video_files = [f for f in os.listdir(video_folder) if f.endswith('.mp4')]

# Create a ThreadPoolExecutor
with ThreadPoolExecutor() as executor:
    # Use executor to run upload_video in parallel for all video files
    executor.map(upload_video, video_files)
</code></pre>
Monitoring the indexing process
Similar to the upload function, I've designed a monitoring function that keeps track of all tasks happening concurrently. It diligently records the estimated time remaining and the upload percentage for each video being indexed simultaneously in a tidy CSV file. This attentive function continues to execute until every video in your folder has been indexed. To cap it off, it displays the total time taken for the synchronous indexing process, conveniently measured in seconds. Pretty efficient, right?
<pre><code class="python">import time
import csv
from concurrent.futures import ThreadPoolExecutor, as_completed

def monitor_upload_status(task_id):
    TASK_STATUS_URL = f"{API_URL}/tasks/{task_id}"
    while True:
        response = requests.get(TASK_STATUS_URL, headers=default_header)
        STATUS = response.json().get("status")
        if STATUS == "ready":
            return task_id, STATUS
        remain_seconds = response.json().get('process', {}).get('remain_seconds', None)
        upload_percentage = response.json().get('process', {}).get('upload_percentage', None)
        if remain_seconds is not None:
            print(f"Task ID: {task_id}, Remaining seconds: {remain_seconds}, Upload Percentage: {upload_percentage}")
        else:
             print(f"Task ID: {task_id}, Status: {STATUS}")
        time.sleep(10)

# Define starting time
start = time.time()
print("Starting to monitor...")

# Monitor the indexing process for all tasks
with ThreadPoolExecutor() as executor:
    futures = {executor.submit(monitor_upload_status, task_id) for task_id in TASK_ID_LIST}
    with open('upload_status.csv', 'w', newline='') as file:
        writer = csv.writer(file)
        writer.writerow(["Task ID", "Status"])
        for future in as_completed(futures):
            task_id, status = future.result()
            writer.writerow([task_id, status])

# Define ending time
end = time.time()
print("Monitoring finished")
print("Time elapsed (in seconds): ", end - start)
</code></pre>
Output:
<pre><code class="language-plaintext">Starting to monitor...
Monitoring finished
Time elapsed (in seconds):  253.00311
</code></pre>
<pre><code class="language-plaintext">Starting to monitor...
Monitoring finished
Time elapsed (in seconds):  253.00311
</code></pre>
List all videos in the index:
To make sure we've got all the necessary videos indexed, let's do a thorough double-check by listing all the videos within the index. On top of that, we'll create a handy list containing all video IDs and their corresponding names. This list will come in useful later when we need to fetch the appropriate video names for video clips (those segments that match the classification criteria) returned by the classification API.
Just a heads-up, I've tweaked the page limit to 20, since we're dealing with 11 indexed videos. By default, the API returns 10 results per page, so if we don't update the limit, one sneaky result will slip onto page 2 and won't be included in the response_json we're using to create our video_id_name_list. So, let's keep it all on one page!
<pre><code class="python"># List all the videos in an index
INDEX_ID='64544b858b1dd6cde172af77'
default_header = {
    "x-api-key": API_KEY
}
# INDEX_ID='64502d238b1dd6cde172a9c5' #movies
# INDEX_ID= '64399bc25b65d57eaecafb35' #lex
INDEXES_VIDEOS_URL = f"{API_URL}/indexes/{INDEX_ID}/videos?page_limit=20"
response = requests.get(INDEXES_VIDEOS_URL, headers=default_header)

response_json = response.json()
pprint(response_json)

video_id_name_list = [{'video_id': video['_id'], 'video_name': video['metadata']['filename']} for video in response_json['data']]

pprint(video_id_name_list)
</code></pre>
Output:
<pre><code class="python">{'data': [{'_id': '64544bb486daab572f3494a0',
           'created_at': '2023-05-05T00:19:33Z',
           'metadata': {'duration': 507.5,
                        'engine_id': 'marengo2.5',
                        'filename': 'JetTila.mp4',
                        'fps': 30,
                        'height': 720,
                        'size': 44891944,
                        'width': 1280},
           'updated_at': '2023-05-05T00:20:04Z'},
          {'_id': '64544bad86daab572f34949f',
           'created_at': '2023-05-05T00:19:32Z',
           'metadata': {'duration': 516.682833,
                        'engine_id': 'marengo2.5',
                        'filename': 'Kylie.mp4',
                        'fps': 23.976023976023978,
                        'height': 720,
                        'size': 37594080,
                        'width': 1280},
           'updated_at': '2023-05-05T00:19:57Z'},
          {'_id': '64544b9286daab572f34949e',
           'created_at': '2023-05-05T00:19:27Z',
           'metadata': {'duration': 34.333333,
                        'engine_id': 'marengo2.5',
                        'filename': 'Oh_my.mp4',
                        'fps': 30,
                        'height': 1280,
                        'size': 10480126,
                        'width': 720},
           'updated_at': '2023-05-05T00:19:30Z'},
          .
					.
					.
					{'_id': '64544b8786daab572f349496',
           'created_at': '2023-05-05T00:19:18Z',
           'metadata': {'duration': 14.333333,
                        'engine_id': 'marengo2.5',
                        'filename': 'cats.mp4',
                        'fps': 30,
                        'height': 1280,
                        'size': 1304438,
                        'width': 720},
           'updated_at': '2023-05-05T00:19:19Z'}],
 'page_info': {'limit_per_page': 20,
               'page': 1,
               'total_duration': 1363.925599,
               'total_page': 1,
               'total_results': 11}}
[{'video_id': '64544bb486daab572f3494a0', 'video_name': 'JetTila.mp4'},
 {'video_id': '64544bad86daab572f34949f', 'video_name': 'Kylie.mp4'},
 {'video_id': '64544b9286daab572f34949e', 'video_name': 'Oh_my.mp4'},
 {'video_id': '64544b8e86daab572f34949c', 'video_name': 'Pitbull.mp4'},
 {'video_id': '64544b9286daab572f34949d', 'video_name': 'She.mp4'},
 {'video_id': '64544b8d86daab572f34949b', 'video_name': 'fun.mp4'},
 {'video_id': '64544b8986daab572f349497', 'video_name': 'Dance.mp4'},
 {'video_id': '64544b8986daab572f349498', 'video_name': 'Jennie.mp4'},
 {'video_id': '64544b8a86daab572f349499', 'video_name': 'McDonald.mp4'},
 {'video_id': '64544b8c86daab572f34949a', 'video_name': 'Orangutan.mp4'},
 {'video_id': '64544b8786daab572f349496', 'video_name': 'cats.mp4'}]
 </code></pre>
Video Classification
Before diving into the code, let's breeze through the theory behind it. Feel free to skim over and jump to the code if that's more your cup of tea. When it comes to classification, you can control how it works with the following parameters:
classes: An array of objects that outline the names and definitions of the entities or actions the platform needs to identify. Each object includes these fields:
name: A string that represents the name you want to assign to this class.
prompts: An array of strings that describe what the class contains. The platform relies on the values you provide here to classify your videos.
threshold: Utilize the threshold parameter to refine outcomes based on confidence levels aligned with the prompts outlined in your request. Ranging from 0 to 100, the default value of 75 applies when left unset. You can narrow the response you get by capturing only the most pertinent results using this parameter.
Let’s set our classification criteria and use the Twelve labs classify API to make a classification request, we will stick with the default threshold setting for this demo:
<pre><code class="python"># Construct the URL of the `/classify/bulk` endpoint
CLASSIFY_BULK_URL = f"{API_URL}/classify/bulk"

# Set the header of the request
headers = {
    "x-api-key": API_KEY
}

# Declare a dictionary named `data`
data =  {
  "conversation_option": "semantic",
  "options": ["visual", "conversation"],
  "index_id" : INDEX_ID,
  "include_clips": False,
  "classes": [
      {
            "name": "BeautyTok",
            "prompts": [
                "Makeup",
                "Skincare",
                "cosmetic products",
                "doing nails",
                "doing hair",
                "DanceTok",
                "dance tutorial",
                "dance competition",
                "dance challenge",
                "dance trend",
                "dancing with friends"
            ]
        },
        {
            "name": "CookTok",
            "prompts": [
                "cooking tutorial",
                "cooking utensils",
                "baking tutorials",
                "recipes",
                "restaurants",
                "food",
                "pasta"
            ]
        },
        {
            "name": "AnimalTok",
            "prompts": [
                "dog",
                "cat",
                "birds",
                "fish",
                "playing with pets",
                "pets doing funny things"
            ]
        },
        {
            "name": "ArtTok",
            "prompts": [
                "handicraft",
                "drawing",
                "graffiti",
                "sketching",
                "digital art",
                "coloring",
                "sketchbook",
                "artwork",
                "artists"
            ]
        }
  ]
}

# Make a classification request
response = requests.post(CLASSIFY_BULK_URL, headers=headers, json=data)
print (f'Status code: {response.status_code}')
pprint(response.json())
duration_data = response.json()
</code></pre>
Class labels are assigned to the overall video according to the prompts present within the class. To pinpoint the appropriate video segments (clips relating to the prompts) and achieve precise video labeling, it's vital to supply numerous relevant prompts. Keep in mind, a class label is assigned only if the video duration matching the class label surpasses 50% of the video's total length, and this duration is established by combining video clips that align with the prompts.
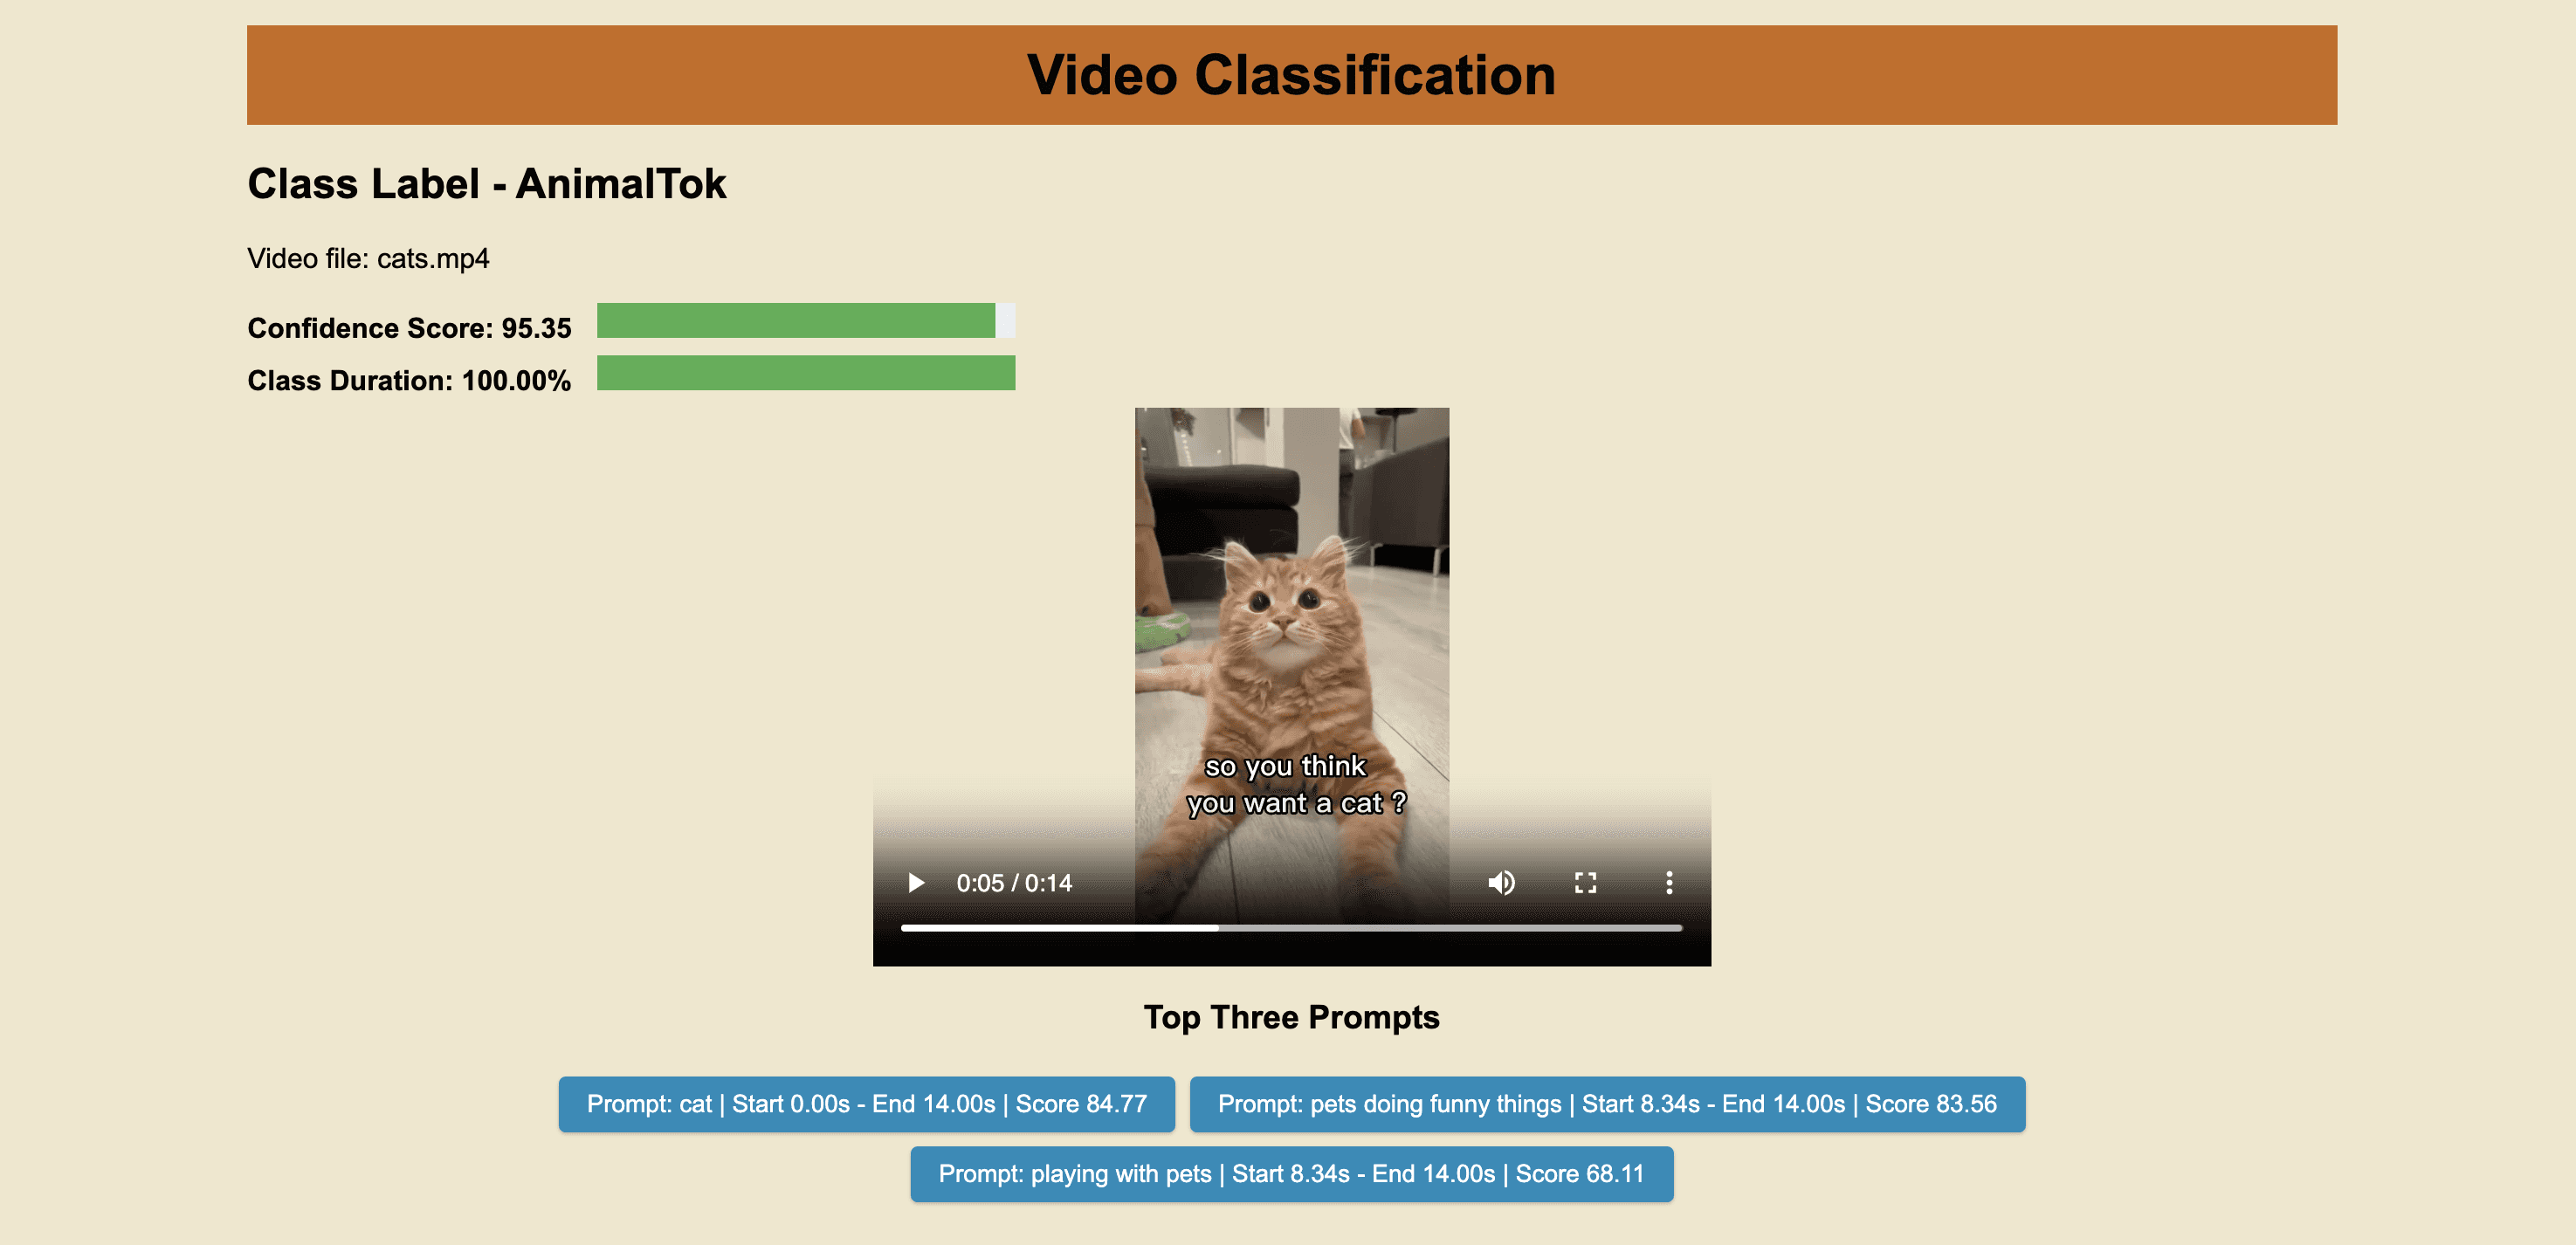
Here's the outcome of the classification API call we executed. The "duration ratio" represents the proportion of video segments to the entire video length, "score" indicates the model's confidence, "name" refers to the class label, and all matched videos are showcased in descending order based on their confidence scores:
<pre><code class="python">Status code: 200
{'data': [{'classes': [{'duration_ratio': 1,
                        'name': 'AnimalTok',
                        'score': 95.35111111111111}],
           'video_id': '64544b8786daab572f349496'},
          {'classes': [{'duration_ratio': 1,
                        'name': 'AnimalTok',
                        'score': 95.14666666666668}],
           'video_id': '64544b8e86daab572f34949c'},
          .
			.
			.
          {'classes': [{'duration_ratio': 0.8175611166393244,
                        'name': 'ArtTok',
                        'score': 89.45777777777778}],
           'video_id': '64544b9286daab572f34949d'}],
 'page_info': {'limit_per_page': 10,
               'next_page_token': '',
               'page_expired_at': '2023-05-05T17:37:30Z',
               'prev_page_token': '',
               'total_results': 10}}
 </code></pre>
Now let's rewrite the same code and call the classification API, but with a small twist: we'll set include_clips to True. By doing this, we'll fetch all the relevant video clips along with their metadata that match the prompts provided within our classes:
<pre><code class="python">
# Construct the URL of the `/classify/bulk` endpoint
CLASSIFY_BULK_URL = f"{API_URL}/classify/bulk"

# Set the header of the request
headers = {
    "x-api-key": API_KEY
}

# Declare a dictionary named `data`
data =  {
  "conversation_option": "semantic",
  "options": ["visual", "conversation"],
  "index_id" : INDEX_ID,
  "include_clips": True,
  "classes": [
      {
            "name": "BeautyTok",
            "prompts": [
                "Makeup",
                "Skincare",
                "cosmetic products",
                "doing nails",
                "doing hair",
                "DanceTok",
                "dance tutorial",
                "dance competition",
                "dance challenge",
                "dance trend",
                "dancing with friends"
            ]
        },
        {
            "name": "CookTok",
            "prompts": [
                "cooking tutorial",
                "cooking utensils",
                "baking tutorials",
                "recipes",
                "restaurants",
                "food",
                "pasta"
            ]
        },
        {
            "name": "AnimalTok",
            "prompts": [
                "dog",
                "cat",
                "birds",
                "fish",
                "playing with pets",
                "pets doing funny things"
            ]
        },
        {
            "name": "ArtTok",
            "prompts": [
                "handicraft",
                "drawing",
                "graffiti",
                "sketching",
                "digital art",
                "coloring",
                "sketchbook",
                "artwork",
                "artists"
            ]
        }
  ]
}

# Make a classification request
response = requests.post(CLASSIFY_BULK_URL, headers=headers, json=data)
print (f'Status code: {response.status_code}')
pprint(response.json())
duration_data = response.json()
</code></pre>
Output:
<pre><code class="python">{'data': [{'classes': [{'clips': [{'end': 14,
                                   'option': '',
                                   'prompt': 'cat',
                                   'score': 84.77,
                                   'start': 0},
                                  {'end': 14,
                                   'option': '',
                                   'prompt': 'pets doing funny things',
                                   'score': 83.56,
                                   'start': 8.34375},
                                  {'end': 14,
                                   'option': '',
                                   'prompt': 'playing with pets',
                                   'score': 68.11,
                                   'start': 8.34375},
                                  {'end': 8.34375,
                                   'option': '',
                                   'prompt': 'pets doing funny things',
                                   'score': 58.26,
                                   'start': 0}],
                        'duration_ratio': 1,
                        'name': 'AnimalTok',
                        'score': 95.35111111111111}],
			.
			.
			.
           'video_id': '64544b8786daab572f349496'},
          {'classes': [{'clips': [{'end': 49.189,
                                   'option': '',
                                   'prompt': 'artists',
                                   'score': 78.14,
                                   'start': 0.55},
                                  {'end': 23.659,
                                   'option': '',
                                   'prompt': 'sketching',
                                   'score': 58.85,
                                   'start': 0.55}],
                        'duration_ratio': 0.8175611166393244,
                        'name': 'ArtTok',
                        'score': 89.45777777777778}],
			.
			.
			.
			'video_id': '64544b9286daab572f34949d'}],
 'page_info': {'limit_per_page': 10,
               'next_page_token': '',
               'page_expired_at': '2023-05-05T17:37:30Z',
               'prev_page_token': '',
               'total_results': 10}}
               </code></pre>
To maintain succinctness, I've trimmed the output. Note how the output now displays the clip data for each video, including start and end timestamps, as well as the confidence score for the specific clip and its related prompt. We're diligently revamping the API endpoint to integrate the corresponding classification option tied to each prompt (e.g., visual and conversation, where visual represents an audio-visual match and conversation refers to a dialogue match).
Now it's time to store both the JSON results and serialize (pickle) them, along with the video_id_name_list we created earlier, into a file:
<pre><code class="python">import pickle

with open('video_id_name_list.pickle', 'wb') as handle:
    pickle.dump(video_id_name_list, handle, protocol=pickle.HIGHEST_PROTOCOL)

with open('duration_data.pickle', 'wb') as handle:
    pickle.dump(duration_data, handle, protocol=pickle.HIGHEST_PROTOCOL)

with open('clips_data.pickle', 'wb') as handle:
    pickle.dump(clips_data, handle, protocol=pickle.HIGHEST_PROTOCOL)
    </code></pre>
Crafting a demo app
As with our previous tutorials, we'll be crafting a Flask-based demo app that hosts a web page and makes use of the serialized data. By applying this data to the videos retrieved from our local drive, we'll create a visually appealing classification results web page. This way, we can experience firsthand how our video classification API can supercharge our applications and deliver impressive results.
The directory structure will look like this:
<pre><code class="markdown">my_flask_app/
│   app.py
│   sample_notebook.ipynb
└───templates/
│	│   index.html
└───classify/
	│   <your_video_1.mp4>
	│   <your_video_2.mp4>
	│   <your_video_3.mp4>
			.
			.
			.
</code></pre>
<pre><code class="markdown">my_flask_app/
│   app.py
│   sample_notebook.ipynb
└───templates/
│	│   index.html
└───classify/
	│   <your_video_1.mp4>
	│   <your_video_2.mp4>
	│   <your_video_3.mp4>
			.
			.
			.
</code></pre>
Flask app code
In this tutorial, a slight variation is introduced on how to serve video files from a local directory and play specific segments using the HTML5 video player. The serve_video function employed in the Flask application serves video files from the classify_try directory, which is in the same directory as your Flask application script. The url_for('serve_video', filename=video_mapping[video.video_id]) expression in the HTML template generates the URL for the served video file.
As you may have noticed from the output of the classification API when we set "include_clips" to True, the API returned numerous clips along with their metadata. For simplicity's sake and to demonstrate the results that include these clips, I included a get_top_clips function. This function finds three unique prompts and returns all the clip metadata associated with them, giving a more comprehensive view of the classification results.
Below is the code for the "app.py" file:
<pre><code class="python">from flask import Flask, render_template, send_from_directory
import pickle
import os
from collections import defaultdict

app = Flask(__name__)

# Replace the following dictionaries with your data
with open('video_id_name_list.pickle', 'rb') as handle:
    video_id_name_list = pickle.load(handle)

with open('duration_data.pickle', 'rb') as handle:
    duration_data = pickle.load(handle)

with open('clips_data.pickle', 'rb') as handle:
    clips_data = pickle.load(handle)

VIDEO_DIRECTORY = os.path.join(os.path.dirname(os.path.realpath(__file__)), "classify")

@app.route('/<path:filename>')
def serve_video(filename):
    print(VIDEO_DIRECTORY, filename)
    return send_from_directory(directory=VIDEO_DIRECTORY, path=filename)

def get_top_clips(clips_data, num_clips=3):
    top_clips = defaultdict(list)
    for video in clips_data['data']:
        video_id = video['video_id']
        unique_prompts = set()
        for clip_class in video['classes']:
            for clip in clip_class['clips']:
                if clip['prompt'] not in unique_prompts and len(unique_prompts) < num_clips:
                    top_clips[video_id].append(clip)
                    unique_prompts.add(clip['prompt'])
    return top_clips

@app.route('/')
def home():
    video_id_name_dict = {video['video_id']: video['video_name'] for video in video_id_name_list}
    top_clips = get_top_clips(clips_data)
    return render_template('index.html', video_mapping=video_id_name_dict, duration_data=duration_data, top_clips=top_clips)


if __name__ == '__main__':
    app.run(debug=True)
</code></pre>
HTML template
Here's a sample Jinja2-based HTML template that integrates code within the HTML file to iterate using fields from the serialized data we prepared and passed earlier. This template fetches the required videos from the local drive and displays the results in response to our classification criteria:
<pre><code class="language-html"><!doctype html>
<html lang="en">
<head>
    <link rel="shortcut icon" href="#" />
    <meta charset="utf-8">
    <meta name="viewport" content="width=device-width, initial-scale=1">
    <title>Classification Output</title>
    <style>
        body {
            background-color: #f0e7cc;
            font-family: Arial, sans-serif;
        }
        .container {
            width: 80%;
            margin: 0 auto;
            padding-bottom: 30px;
        }
        video {
            display: block;
            margin: 0 auto;
        }
        .progress-bar {
            width: 20%;
            height: 20px;
            background-color: #f0f0f0;
            margin-bottom: 10px;
            display: inline-block;
            vertical-align: middle;
            margin-left: 10px;
        }
        .progress {
            height: 100%;
            background-color: #4caf50;
        }
        .score {
            display: inline-block;
            vertical-align: middle;
            font-weight: bold;
        }
        .video-category {
            padding-bottom: 30px;
            margin-bottom: 20px;
        }
        button {
            background-color: #008CBA;
            border: none;
            color: white;
            padding: 8px 16px;
            text-align: center;
            text-decoration: none;
            display: inline-block;
            font-size: 14px;
            margin: 4px 2px;
            cursor: pointer;
            border-radius: 4px;
            box-shadow: 0 1px 2px rgba(0,0,0,0.2);
            transition: background-color 0.2s ease;
        }
        button:hover {
            background-color: #006494;
        }
        h1 {
            color: #070707;
            text-align: center;
            background-color: #cb6a16; /* Change the background color to your desired color */
            padding: 10px;
            margin-bottom: 20px;
        }
        .clips-container {
            text-align: center;
        }

    </style>
    <script>
        function playClip(videoPlayer, start, end) {
            videoPlayer.currentTime = start;
            videoPlayer.play();
            videoPlayer.ontimeupdate = function () {
                if (videoPlayer.currentTime >= end) {
                    videoPlayer.pause();
                }
            };
        }
    </script>
</head>
<body>
    <div class="container">
        <h1>Video Classification</h1>
        {% for video in duration_data.data %}
            {% set video_id = video.video_id %}
            {% set video_path = video_mapping[video_id] %}
            <div class="video-category">
                <h2>{{ video.classes[0].name }}</h2>
                <p>Video file: {{video_path}}</p>
                <div>
                    <span class="score">Score: {{ '%.2f'|format(video.classes[0].score) }}</span>
                    <div class="progress-bar">
                        <div class="progress" style="width: {{ video.classes[0].score }}%;"></div>
                    </div>
                </div>
                <div>
                    <span class="score">Duration: {{ '%.2f%%'|format(video.classes[0].duration_ratio * 100) }}</span>
                    <div class="progress-bar">
                        <div class="progress" style="width: {{ video.classes[0].duration_ratio * 100 }}%;"></div>
                    </div>
                </div>
                <video id="video-{{ video_id }}" width="480" height="320" controls>
                    <source src="{{ url_for('serve_video', filename=video_path) }}" type="video/mp4">
                    Your browser does not support the video tag.
                </video>
                <div class="clips-container">
                    <h3>Sample Clips</h3>
                    {% for clip in top_clips[video_id] %}
                    <button onclick="playClip(document.getElementById('video-{{ video_id }}'), {{ clip.start }}, {{ clip.end }})">Clip: {{ clip.prompt }} | Start {{ '%.2f'|format(clip.start) }}s - End {{ '%.2f'|format(clip.end) }}s - Score {{ '%.2f'|format(clip.score) }}</button>
                    {% endfor %}
            </div>
            <br /><br />
        {% endfor %}
    </div>
</body>
</html>
</code></pre>
Running the Flask app
Awesome! let’s just run the last cell of our Jupyter notebook to launch our Flask app:
<pre><code class="python">%run app.py
</code></pre>
<pre><code class="python">%run app.py
</code></pre>
You should see an output similar to the one below, confirming that everything went as anticipated 😊:

After clicking on the URL link http://127.0.0.1:5000, you should be greeted with the following output:
Here's the Jupyter Notebook containing the complete code that we've put together throughout this tutorial - https://tinyurl.com/classifyNotebook
Ready to take the fun to the next level?
Here are some exciting ideas to try out:
Implement pagination and lazy loading to display all clips instead of picking three distinct prompts. This way, you could explore a broader range of classified clips and get a more comprehensive view of the video classification results.
Experiment with short, medium and long tail prompts, fine-tune thresholds, and share your analysis with fellow multimodal enthusiasts on our Discord channel.
Outro
Stay tuned for the forthcoming excitement! If you haven’t joined already I invite you to join our vibrant Discord community where you can connect with other like-minded individuals who are passionate about multimodal AI.
Video classification refers to the process of automatically assigning one or more predefined categories or labels to a video based on its content. This task involves analyzing the video's visual and sometimes audio information to recognize and understand the events, actions, objects, or other characteristics present in the video. Video classification is an important research area in computer vision and has numerous practical applications, such as video indexing, content-based video retrieval, video recommendation, video surveillance, and human activity recognition.
In the past, video classification was limited to predefined categories or labels, focusing on identifying events, actions, objects, and other features. Customizing classification criteria without retraining the model and updating criteria seemed like a distant dream. But, here's where Twelve Labs classification API enters the scene and saves the day by effortlessly and powerfully letting us classify videos based on our custom criteria, all in near real-time and without the fuss of training any models. Talk about a game-changer, yea!
Twelve Labs Classification API - Conceptual overview
Twelve Labs classification API is designed to label indexed videos based on the duration a class label occupies within each video. If the duration is less than 50%, the class label won't apply. Therefore, it's important to carefully design classes and their prompts, especially when uploading large videos. The API service can accommodate any number of classes, allowing you to add as many prompts within a class as you'd like.
For example, let's say you have a collection of hilarious videos featuring your dog, Bruno, and your cat, Karla, engaged in various antics. You can upload these videos to Twelve Labs' platform and create custom classification criteria tailored to the amusing escapades of your furry friends:
<pre><code class="json">"classes": [
      {
            "name": "Doge_Bruno",
            "prompts": [
                "playing with my dog",
                "my dog doing funny things",
                "dog playing with water"
            ]
        },
        {
            "name": "Kitty_Karla",
            "prompts": [
                "cat jumping",
                "cat playing with toys"
            ]
        }
  ]
  </code></pre>
With just one API call, you can classify your uploaded videos using the criteria you've created. If you happen to forget a few prompts or wish to introduce new classes, you can easily do so by adding more classes and prompts to your JSON. There's no need to train a new model or retrain an existing one, making the whole process hassle-free.
Classification Results
Quick Overview
Prerequisites: To smoothly navigate this tutorial, sign up for the Twelve Labs API suite and install the required packages. It's recommended to read the first and second tutorials to familiarize yourself with the basics 🤓.
Video Upload: Send your videos to the Twelve Labs platform, which effortlessly indexes them, enabling you to add custom classification criteria and manage your content on-the-fly! And guess what? You don't even need to train an ML model 😆😁😊.
Video Classification: Get ready for the real fun! We'll create our own custom classes and a range of prompts within each class. Once we've defined our criteria, we can use them right away to fetch the results. No delays, straight to the goodies! 🍿✌️🥳
Crafting a Demo App: We will create a Flask-based app to harness the results from the classification API, access videos stored in a local folder on our computer, and then render a custom-designed, sleek HTML page to stylishly showcase the classification results 🔍💻🎨.👨🎨
Prerequisites
In the first tutorial, I covered the basics of using simple natural language queries to find specific moments within your videos. To keep things simple, I uploaded only one video to the platform and covered essential concepts such as creating an index, configuring the index, defining task API, basic monitoring of video indexing tasks, and step-by-step explanations of creating a Flask-based demo app.
The second tutorial went a step further, exploring the combination of multiple search queries to create more precise and targeted searches. I uploaded multiple videos asynchronously, created multiple indexes, implemented additional code for monitoring video indexing tasks and fetching details like estimated time for task completion. I also configured the Flask app to accommodate multiple videos and display them using an HTML template.
Continuing on this streak, the current tutorial will cover synchronous video uploads using Python's built-in concurrent.futures library. We will monitor the indexing statuses of the videos and record them to a CSV file. Additionally, we will surface the input classification criteria and relevant classification API response fields in the HTML template, making it easier to interpret the results.
If you encounter any difficulties while reading this or any of the previous tutorials, don't hesitate to reach out for help! We pride ourselves on providing quick support through our Discord server with response times faster than a speeding train 🚅🏎️⚡️. Alternatively, you can also reach me via email. Twelve Labs is currently in Open Beta, so you can create a Twelve Labs account and access the API Dashboard to obtain your API key. With your free credits, you'll be able to classify up to 10 hours of your video content.
<pre><code class="python">%env API_KEY=<your_API_key>
%env API_URL=https://api.twelvelabs.io/v1.1

!pip install requests
!pip install flask

import os
import requests
import glob
from pprint import pprint


#Retrieve the URL of the API and the API key
API_URL = os.getenv("API_URL")
assert API_URL

API_KEY = os.getenv("API_KEY")
assert API_KEY
</code></pre>
Video Upload
Creating an index and configuring it for video upload:
<pre><code class="python"># Construct the URL of the `/indexes` endpoint
INDEXES_URL = f"{API_URL}/indexes"

# Set the header of the request
default_header = {
    "x-api-key": API_KEY
}

# Define a function to create an index with a given name
def create_index(index_name, index_options, engine):
    # Declare a dictionary named data
    data = {
        "engine_id": engine,
        "index_options": index_options,
        "index_name": index_name,
    }

    # Create an index
    response = requests.post(INDEXES_URL, headers=default_header, json=data)

    # Store the unique identifier of your index
    INDEX_ID = response.json().get('_id')

    # Check if the status code is 201 and print success
    if response.status_code == 201:
        print(f"Status code: {response.status_code} - The request was successful and a new index was created.")
    else:
        print(f"Status code: {response.status_code}")
    pprint(response.json())
    return INDEX_ID


# Create the indexes
index_id_content_classification = create_index(index_name = "insta+tiktok", index_options=["visual", "conversation", "text_in_video", "logo"], engine = "marengo2.5")

# Print the created index IDs
print(f"Created index IDs: {index_id_content_classification}")
</code></pre>
<pre><code class="bash">Status code: 201 - The request was successful and a new index was created.
{'_id': '64544b858b1dd6cde172af77'}
Created index IDs: 64544b858b1dd6cde172af77
</code></pre>
Writing the upload function
This time I've cooked up the code that automatically scoops up all videos from a designated folder, assigns them the same name as their video file, and uploads them to the platform – all while strutting its stuff synchronously using a Python library. Just pop all the videos you want to index into a single folder, and you're good to go! The whole indexing process will take about 40% of the longest video's duration. Need to add more videos to the same index later? Easy peasy! No need for a new folder, just toss them into the existing one. The code's got your back, it checks for any indexed videos with the same name or pending indexing tasks before starting the process. This way, you'll dodge any pesky duplicates – pretty convenient, huh? 😄
<pre><code class="python">import os
import requests
from concurrent.futures import ThreadPoolExecutor

TASKS_URL = f"{API_URL}/tasks"
TASK_ID_LIST = []
video_folder = 'classify'  # folder containing the video files
INDEX_ID = '64544b858b1dd6cde172af77'

def upload_video(file_name):
    # Validate if a video already exists in the index
    task_list_response = requests.get(
        TASKS_URL,
        headers=default_header,
        params={"index_id": INDEX_ID, "filename": file_name},
    )
    if "data" in task_list_response.json():
        task_list = task_list_response.json()["data"]
        if len(task_list) > 0:
            if task_list[0]['status'] == 'ready':
                print(f"Video '{file_name}' already exists in index {INDEX_ID}")
            else:
                print("task pending or validating")
            return

    # Proceed further to create a new task to index the current video if the video didn't exist in the index already
    print("Entering task creation code for the file: ", file_name)

    if file_name.endswith('.mp4'):  # Make sure the file is an MP4 video
        file_path = os.path.join(video_folder, file_name)  # Get the full path of the video file
        with open(file_path, "rb") as file_stream:
            data = {
                "index_id": INDEX_ID,
                "language": "en"
            }
            file_param = [
                ("video_file", (file_name, file_stream, "application/octet-stream")),] #The video will be indexed on the platform using the same name as the video file itself.
            response = requests.post(TASKS_URL, headers=default_header, data=data, files=file_param)
            TASK_ID = response.json().get("_id")
            TASK_ID_LIST.append(TASK_ID)
            # Check if the status code is 201 and print success
            if response.status_code == 201:
                print(f"Status code: {response.status_code} - The request was successful and a new resource was created.")
            else:
                print(f"Status code: {response.status_code}")
            print(f"File name: {file_name}")
            pprint(response.json())
            print("\n")

# Get list of video files
video_files = [f for f in os.listdir(video_folder) if f.endswith('.mp4')]

# Create a ThreadPoolExecutor
with ThreadPoolExecutor() as executor:
    # Use executor to run upload_video in parallel for all video files
    executor.map(upload_video, video_files)
</code></pre>
Monitoring the indexing process
Similar to the upload function, I've designed a monitoring function that keeps track of all tasks happening concurrently. It diligently records the estimated time remaining and the upload percentage for each video being indexed simultaneously in a tidy CSV file. This attentive function continues to execute until every video in your folder has been indexed. To cap it off, it displays the total time taken for the synchronous indexing process, conveniently measured in seconds. Pretty efficient, right?
<pre><code class="python">import time
import csv
from concurrent.futures import ThreadPoolExecutor, as_completed

def monitor_upload_status(task_id):
    TASK_STATUS_URL = f"{API_URL}/tasks/{task_id}"
    while True:
        response = requests.get(TASK_STATUS_URL, headers=default_header)
        STATUS = response.json().get("status")
        if STATUS == "ready":
            return task_id, STATUS
        remain_seconds = response.json().get('process', {}).get('remain_seconds', None)
        upload_percentage = response.json().get('process', {}).get('upload_percentage', None)
        if remain_seconds is not None:
            print(f"Task ID: {task_id}, Remaining seconds: {remain_seconds}, Upload Percentage: {upload_percentage}")
        else:
             print(f"Task ID: {task_id}, Status: {STATUS}")
        time.sleep(10)

# Define starting time
start = time.time()
print("Starting to monitor...")

# Monitor the indexing process for all tasks
with ThreadPoolExecutor() as executor:
    futures = {executor.submit(monitor_upload_status, task_id) for task_id in TASK_ID_LIST}
    with open('upload_status.csv', 'w', newline='') as file:
        writer = csv.writer(file)
        writer.writerow(["Task ID", "Status"])
        for future in as_completed(futures):
            task_id, status = future.result()
            writer.writerow([task_id, status])

# Define ending time
end = time.time()
print("Monitoring finished")
print("Time elapsed (in seconds): ", end - start)
</code></pre>
Output:
<pre><code class="language-plaintext">Starting to monitor...
Monitoring finished
Time elapsed (in seconds):  253.00311
</code></pre>
List all videos in the index:
To make sure we've got all the necessary videos indexed, let's do a thorough double-check by listing all the videos within the index. On top of that, we'll create a handy list containing all video IDs and their corresponding names. This list will come in useful later when we need to fetch the appropriate video names for video clips (those segments that match the classification criteria) returned by the classification API.
Just a heads-up, I've tweaked the page limit to 20, since we're dealing with 11 indexed videos. By default, the API returns 10 results per page, so if we don't update the limit, one sneaky result will slip onto page 2 and won't be included in the response_json we're using to create our video_id_name_list. So, let's keep it all on one page!
<pre><code class="python"># List all the videos in an index
INDEX_ID='64544b858b1dd6cde172af77'
default_header = {
    "x-api-key": API_KEY
}
# INDEX_ID='64502d238b1dd6cde172a9c5' #movies
# INDEX_ID= '64399bc25b65d57eaecafb35' #lex
INDEXES_VIDEOS_URL = f"{API_URL}/indexes/{INDEX_ID}/videos?page_limit=20"
response = requests.get(INDEXES_VIDEOS_URL, headers=default_header)

response_json = response.json()
pprint(response_json)

video_id_name_list = [{'video_id': video['_id'], 'video_name': video['metadata']['filename']} for video in response_json['data']]

pprint(video_id_name_list)
</code></pre>
Output:
<pre><code class="python">{'data': [{'_id': '64544bb486daab572f3494a0',
           'created_at': '2023-05-05T00:19:33Z',
           'metadata': {'duration': 507.5,
                        'engine_id': 'marengo2.5',
                        'filename': 'JetTila.mp4',
                        'fps': 30,
                        'height': 720,
                        'size': 44891944,
                        'width': 1280},
           'updated_at': '2023-05-05T00:20:04Z'},
          {'_id': '64544bad86daab572f34949f',
           'created_at': '2023-05-05T00:19:32Z',
           'metadata': {'duration': 516.682833,
                        'engine_id': 'marengo2.5',
                        'filename': 'Kylie.mp4',
                        'fps': 23.976023976023978,
                        'height': 720,
                        'size': 37594080,
                        'width': 1280},
           'updated_at': '2023-05-05T00:19:57Z'},
          {'_id': '64544b9286daab572f34949e',
           'created_at': '2023-05-05T00:19:27Z',
           'metadata': {'duration': 34.333333,
                        'engine_id': 'marengo2.5',
                        'filename': 'Oh_my.mp4',
                        'fps': 30,
                        'height': 1280,
                        'size': 10480126,
                        'width': 720},
           'updated_at': '2023-05-05T00:19:30Z'},
          .
					.
					.
					{'_id': '64544b8786daab572f349496',
           'created_at': '2023-05-05T00:19:18Z',
           'metadata': {'duration': 14.333333,
                        'engine_id': 'marengo2.5',
                        'filename': 'cats.mp4',
                        'fps': 30,
                        'height': 1280,
                        'size': 1304438,
                        'width': 720},
           'updated_at': '2023-05-05T00:19:19Z'}],
 'page_info': {'limit_per_page': 20,
               'page': 1,
               'total_duration': 1363.925599,
               'total_page': 1,
               'total_results': 11}}
[{'video_id': '64544bb486daab572f3494a0', 'video_name': 'JetTila.mp4'},
 {'video_id': '64544bad86daab572f34949f', 'video_name': 'Kylie.mp4'},
 {'video_id': '64544b9286daab572f34949e', 'video_name': 'Oh_my.mp4'},
 {'video_id': '64544b8e86daab572f34949c', 'video_name': 'Pitbull.mp4'},
 {'video_id': '64544b9286daab572f34949d', 'video_name': 'She.mp4'},
 {'video_id': '64544b8d86daab572f34949b', 'video_name': 'fun.mp4'},
 {'video_id': '64544b8986daab572f349497', 'video_name': 'Dance.mp4'},
 {'video_id': '64544b8986daab572f349498', 'video_name': 'Jennie.mp4'},
 {'video_id': '64544b8a86daab572f349499', 'video_name': 'McDonald.mp4'},
 {'video_id': '64544b8c86daab572f34949a', 'video_name': 'Orangutan.mp4'},
 {'video_id': '64544b8786daab572f349496', 'video_name': 'cats.mp4'}]
 </code></pre>
Video Classification
Before diving into the code, let's breeze through the theory behind it. Feel free to skim over and jump to the code if that's more your cup of tea. When it comes to classification, you can control how it works with the following parameters:
classes: An array of objects that outline the names and definitions of the entities or actions the platform needs to identify. Each object includes these fields:
name: A string that represents the name you want to assign to this class.
prompts: An array of strings that describe what the class contains. The platform relies on the values you provide here to classify your videos.
threshold: Utilize the threshold parameter to refine outcomes based on confidence levels aligned with the prompts outlined in your request. Ranging from 0 to 100, the default value of 75 applies when left unset. You can narrow the response you get by capturing only the most pertinent results using this parameter.
Let’s set our classification criteria and use the Twelve labs classify API to make a classification request, we will stick with the default threshold setting for this demo:
<pre><code class="python"># Construct the URL of the `/classify/bulk` endpoint
CLASSIFY_BULK_URL = f"{API_URL}/classify/bulk"

# Set the header of the request
headers = {
    "x-api-key": API_KEY
}

# Declare a dictionary named `data`
data =  {
  "conversation_option": "semantic",
  "options": ["visual", "conversation"],
  "index_id" : INDEX_ID,
  "include_clips": False,
  "classes": [
      {
            "name": "BeautyTok",
            "prompts": [
                "Makeup",
                "Skincare",
                "cosmetic products",
                "doing nails",
                "doing hair",
                "DanceTok",
                "dance tutorial",
                "dance competition",
                "dance challenge",
                "dance trend",
                "dancing with friends"
            ]
        },
        {
            "name": "CookTok",
            "prompts": [
                "cooking tutorial",
                "cooking utensils",
                "baking tutorials",
                "recipes",
                "restaurants",
                "food",
                "pasta"
            ]
        },
        {
            "name": "AnimalTok",
            "prompts": [
                "dog",
                "cat",
                "birds",
                "fish",
                "playing with pets",
                "pets doing funny things"
            ]
        },
        {
            "name": "ArtTok",
            "prompts": [
                "handicraft",
                "drawing",
                "graffiti",
                "sketching",
                "digital art",
                "coloring",
                "sketchbook",
                "artwork",
                "artists"
            ]
        }
  ]
}

# Make a classification request
response = requests.post(CLASSIFY_BULK_URL, headers=headers, json=data)
print (f'Status code: {response.status_code}')
pprint(response.json())
duration_data = response.json()
</code></pre>
Class labels are assigned to the overall video according to the prompts present within the class. To pinpoint the appropriate video segments (clips relating to the prompts) and achieve precise video labeling, it's vital to supply numerous relevant prompts. Keep in mind, a class label is assigned only if the video duration matching the class label surpasses 50% of the video's total length, and this duration is established by combining video clips that align with the prompts.
Here's the outcome of the classification API call we executed. The "duration ratio" represents the proportion of video segments to the entire video length, "score" indicates the model's confidence, "name" refers to the class label, and all matched videos are showcased in descending order based on their confidence scores:
<pre><code class="python">Status code: 200
{'data': [{'classes': [{'duration_ratio': 1,
                        'name': 'AnimalTok',
                        'score': 95.35111111111111}],
           'video_id': '64544b8786daab572f349496'},
          {'classes': [{'duration_ratio': 1,
                        'name': 'AnimalTok',
                        'score': 95.14666666666668}],
           'video_id': '64544b8e86daab572f34949c'},
          .
			.
			.
          {'classes': [{'duration_ratio': 0.8175611166393244,
                        'name': 'ArtTok',
                        'score': 89.45777777777778}],
           'video_id': '64544b9286daab572f34949d'}],
 'page_info': {'limit_per_page': 10,
               'next_page_token': '',
               'page_expired_at': '2023-05-05T17:37:30Z',
               'prev_page_token': '',
               'total_results': 10}}
 </code></pre>
Now let's rewrite the same code and call the classification API, but with a small twist: we'll set include_clips to True. By doing this, we'll fetch all the relevant video clips along with their metadata that match the prompts provided within our classes:
<pre><code class="python">
# Construct the URL of the `/classify/bulk` endpoint
CLASSIFY_BULK_URL = f"{API_URL}/classify/bulk"

# Set the header of the request
headers = {
    "x-api-key": API_KEY
}

# Declare a dictionary named `data`
data =  {
  "conversation_option": "semantic",
  "options": ["visual", "conversation"],
  "index_id" : INDEX_ID,
  "include_clips": True,
  "classes": [
      {
            "name": "BeautyTok",
            "prompts": [
                "Makeup",
                "Skincare",
                "cosmetic products",
                "doing nails",
                "doing hair",
                "DanceTok",
                "dance tutorial",
                "dance competition",
                "dance challenge",
                "dance trend",
                "dancing with friends"
            ]
        },
        {
            "name": "CookTok",
            "prompts": [
                "cooking tutorial",
                "cooking utensils",
                "baking tutorials",
                "recipes",
                "restaurants",
                "food",
                "pasta"
            ]
        },
        {
            "name": "AnimalTok",
            "prompts": [
                "dog",
                "cat",
                "birds",
                "fish",
                "playing with pets",
                "pets doing funny things"
            ]
        },
        {
            "name": "ArtTok",
            "prompts": [
                "handicraft",
                "drawing",
                "graffiti",
                "sketching",
                "digital art",
                "coloring",
                "sketchbook",
                "artwork",
                "artists"
            ]
        }
  ]
}

# Make a classification request
response = requests.post(CLASSIFY_BULK_URL, headers=headers, json=data)
print (f'Status code: {response.status_code}')
pprint(response.json())
duration_data = response.json()
</code></pre>
Output:
<pre><code class="python">{'data': [{'classes': [{'clips': [{'end': 14,
                                   'option': '',
                                   'prompt': 'cat',
                                   'score': 84.77,
                                   'start': 0},
                                  {'end': 14,
                                   'option': '',
                                   'prompt': 'pets doing funny things',
                                   'score': 83.56,
                                   'start': 8.34375},
                                  {'end': 14,
                                   'option': '',
                                   'prompt': 'playing with pets',
                                   'score': 68.11,
                                   'start': 8.34375},
                                  {'end': 8.34375,
                                   'option': '',
                                   'prompt': 'pets doing funny things',
                                   'score': 58.26,
                                   'start': 0}],
                        'duration_ratio': 1,
                        'name': 'AnimalTok',
                        'score': 95.35111111111111}],
			.
			.
			.
           'video_id': '64544b8786daab572f349496'},
          {'classes': [{'clips': [{'end': 49.189,
                                   'option': '',
                                   'prompt': 'artists',
                                   'score': 78.14,
                                   'start': 0.55},
                                  {'end': 23.659,
                                   'option': '',
                                   'prompt': 'sketching',
                                   'score': 58.85,
                                   'start': 0.55}],
                        'duration_ratio': 0.8175611166393244,
                        'name': 'ArtTok',
                        'score': 89.45777777777778}],
			.
			.
			.
			'video_id': '64544b9286daab572f34949d'}],
 'page_info': {'limit_per_page': 10,
               'next_page_token': '',
               'page_expired_at': '2023-05-05T17:37:30Z',
               'prev_page_token': '',
               'total_results': 10}}
               </code></pre>
To maintain succinctness, I've trimmed the output. Note how the output now displays the clip data for each video, including start and end timestamps, as well as the confidence score for the specific clip and its related prompt. We're diligently revamping the API endpoint to integrate the corresponding classification option tied to each prompt (e.g., visual and conversation, where visual represents an audio-visual match and conversation refers to a dialogue match).
Now it's time to store both the JSON results and serialize (pickle) them, along with the video_id_name_list we created earlier, into a file:
<pre><code class="python">import pickle

with open('video_id_name_list.pickle', 'wb') as handle:
    pickle.dump(video_id_name_list, handle, protocol=pickle.HIGHEST_PROTOCOL)

with open('duration_data.pickle', 'wb') as handle:
    pickle.dump(duration_data, handle, protocol=pickle.HIGHEST_PROTOCOL)

with open('clips_data.pickle', 'wb') as handle:
    pickle.dump(clips_data, handle, protocol=pickle.HIGHEST_PROTOCOL)
    </code></pre>
Crafting a demo app
As with our previous tutorials, we'll be crafting a Flask-based demo app that hosts a web page and makes use of the serialized data. By applying this data to the videos retrieved from our local drive, we'll create a visually appealing classification results web page. This way, we can experience firsthand how our video classification API can supercharge our applications and deliver impressive results.
The directory structure will look like this:
<pre><code class="markdown">my_flask_app/
│   app.py
│   sample_notebook.ipynb
└───templates/
│	│   index.html
└───classify/
	│   <your_video_1.mp4>
	│   <your_video_2.mp4>
	│   <your_video_3.mp4>
			.
			.
			.
</code></pre>
Flask app code
In this tutorial, a slight variation is introduced on how to serve video files from a local directory and play specific segments using the HTML5 video player. The serve_video function employed in the Flask application serves video files from the classify_try directory, which is in the same directory as your Flask application script. The url_for('serve_video', filename=video_mapping[video.video_id]) expression in the HTML template generates the URL for the served video file.
As you may have noticed from the output of the classification API when we set "include_clips" to True, the API returned numerous clips along with their metadata. For simplicity's sake and to demonstrate the results that include these clips, I included a get_top_clips function. This function finds three unique prompts and returns all the clip metadata associated with them, giving a more comprehensive view of the classification results.
Below is the code for the "app.py" file:
<pre><code class="python">from flask import Flask, render_template, send_from_directory
import pickle
import os
from collections import defaultdict

app = Flask(__name__)

# Replace the following dictionaries with your data
with open('video_id_name_list.pickle', 'rb') as handle:
    video_id_name_list = pickle.load(handle)

with open('duration_data.pickle', 'rb') as handle:
    duration_data = pickle.load(handle)

with open('clips_data.pickle', 'rb') as handle:
    clips_data = pickle.load(handle)

VIDEO_DIRECTORY = os.path.join(os.path.dirname(os.path.realpath(__file__)), "classify")

@app.route('/<path:filename>')
def serve_video(filename):
    print(VIDEO_DIRECTORY, filename)
    return send_from_directory(directory=VIDEO_DIRECTORY, path=filename)

def get_top_clips(clips_data, num_clips=3):
    top_clips = defaultdict(list)
    for video in clips_data['data']:
        video_id = video['video_id']
        unique_prompts = set()
        for clip_class in video['classes']:
            for clip in clip_class['clips']:
                if clip['prompt'] not in unique_prompts and len(unique_prompts) < num_clips:
                    top_clips[video_id].append(clip)
                    unique_prompts.add(clip['prompt'])
    return top_clips

@app.route('/')
def home():
    video_id_name_dict = {video['video_id']: video['video_name'] for video in video_id_name_list}
    top_clips = get_top_clips(clips_data)
    return render_template('index.html', video_mapping=video_id_name_dict, duration_data=duration_data, top_clips=top_clips)


if __name__ == '__main__':
    app.run(debug=True)
</code></pre>
HTML template
Here's a sample Jinja2-based HTML template that integrates code within the HTML file to iterate using fields from the serialized data we prepared and passed earlier. This template fetches the required videos from the local drive and displays the results in response to our classification criteria:
<pre><code class="language-html"><!doctype html>
<html lang="en">
<head>
    <link rel="shortcut icon" href="#" />
    <meta charset="utf-8">
    <meta name="viewport" content="width=device-width, initial-scale=1">
    <title>Classification Output</title>
    <style>
        body {
            background-color: #f0e7cc;
            font-family: Arial, sans-serif;
        }
        .container {
            width: 80%;
            margin: 0 auto;
            padding-bottom: 30px;
        }
        video {
            display: block;
            margin: 0 auto;
        }
        .progress-bar {
            width: 20%;
            height: 20px;
            background-color: #f0f0f0;
            margin-bottom: 10px;
            display: inline-block;
            vertical-align: middle;
            margin-left: 10px;
        }
        .progress {
            height: 100%;
            background-color: #4caf50;
        }
        .score {
            display: inline-block;
            vertical-align: middle;
            font-weight: bold;
        }
        .video-category {
            padding-bottom: 30px;
            margin-bottom: 20px;
        }
        button {
            background-color: #008CBA;
            border: none;
            color: white;
            padding: 8px 16px;
            text-align: center;
            text-decoration: none;
            display: inline-block;
            font-size: 14px;
            margin: 4px 2px;
            cursor: pointer;
            border-radius: 4px;
            box-shadow: 0 1px 2px rgba(0,0,0,0.2);
            transition: background-color 0.2s ease;
        }
        button:hover {
            background-color: #006494;
        }
        h1 {
            color: #070707;
            text-align: center;
            background-color: #cb6a16; /* Change the background color to your desired color */
            padding: 10px;
            margin-bottom: 20px;
        }
        .clips-container {
            text-align: center;
        }

    </style>
    <script>
        function playClip(videoPlayer, start, end) {
            videoPlayer.currentTime = start;
            videoPlayer.play();
            videoPlayer.ontimeupdate = function () {
                if (videoPlayer.currentTime >= end) {
                    videoPlayer.pause();
                }
            };
        }
    </script>
</head>
<body>
    <div class="container">
        <h1>Video Classification</h1>
        {% for video in duration_data.data %}
            {% set video_id = video.video_id %}
            {% set video_path = video_mapping[video_id] %}
            <div class="video-category">
                <h2>{{ video.classes[0].name }}</h2>
                <p>Video file: {{video_path}}</p>
                <div>
                    <span class="score">Score: {{ '%.2f'|format(video.classes[0].score) }}</span>
                    <div class="progress-bar">
                        <div class="progress" style="width: {{ video.classes[0].score }}%;"></div>
                    </div>
                </div>
                <div>
                    <span class="score">Duration: {{ '%.2f%%'|format(video.classes[0].duration_ratio * 100) }}</span>
                    <div class="progress-bar">
                        <div class="progress" style="width: {{ video.classes[0].duration_ratio * 100 }}%;"></div>
                    </div>
                </div>
                <video id="video-{{ video_id }}" width="480" height="320" controls>
                    <source src="{{ url_for('serve_video', filename=video_path) }}" type="video/mp4">
                    Your browser does not support the video tag.
                </video>
                <div class="clips-container">
                    <h3>Sample Clips</h3>
                    {% for clip in top_clips[video_id] %}
                    <button onclick="playClip(document.getElementById('video-{{ video_id }}'), {{ clip.start }}, {{ clip.end }})">Clip: {{ clip.prompt }} | Start {{ '%.2f'|format(clip.start) }}s - End {{ '%.2f'|format(clip.end) }}s - Score {{ '%.2f'|format(clip.score) }}</button>
                    {% endfor %}
            </div>
            <br /><br />
        {% endfor %}
    </div>
</body>
</html>
</code></pre>
Running the Flask app
Awesome! let’s just run the last cell of our Jupyter notebook to launch our Flask app:
<pre><code class="python">%run app.py
</code></pre>
You should see an output similar to the one below, confirming that everything went as anticipated 😊:
After clicking on the URL link http://127.0.0.1:5000, you should be greeted with the following output:
Here's the Jupyter Notebook containing the complete code that we've put together throughout this tutorial - https://tinyurl.com/classifyNotebook
Ready to take the fun to the next level?
Here are some exciting ideas to try out:
Implement pagination and lazy loading to display all clips instead of picking three distinct prompts. This way, you could explore a broader range of classified clips and get a more comprehensive view of the video classification results.
Experiment with short, medium and long tail prompts, fine-tune thresholds, and share your analysis with fellow multimodal enthusiasts on our Discord channel.
Outro
Stay tuned for the forthcoming excitement! If you haven’t joined already I invite you to join our vibrant Discord community where you can connect with other like-minded individuals who are passionate about multimodal AI.


プラットフォーム
©
2026年
TwelveLabs, Inc. All Rights Reserved.

プラットフォーム
©
2026年
TwelveLabs, Inc. All Rights Reserved.

プラットフォーム
©
2026年
TwelveLabs, Inc. All Rights Reserved.