" height="9.18705px" id="AiyYyR90G" transform="translate(3.406 3.406)" width="9.18685px"/></svg>)

" height="1.90314px" id="wtDTm6bEW" transform="translate(26.225 0)" width="2.4723000000000006px"/><path d="M 0.557 0 L 1.438 0 C 1.746 0 1.995 0.25 1.995 0.559 L 1.995 1.344 C 1.995 1.653 1.746 1.903 1.438 1.903 L 0.557 1.903 C 0.25 1.903 0 1.653 0 1.344 L 0 0.559 C 0 0.25 0.25 0 0.557 0 Z" fill="rgb(29, 28, 27)" height="1.9031500000000001px" id="GnmDnNra_" transform="translate(36.408 2.728)" width="1.9953000000000003px"/><path d="M 6.224 0 L 0.558 0 C 0.25 0 0 0.25 0 0.559 L 0 1.344 C 0 1.653 0.25 1.903 0.558 1.903 L 6.224 1.903 C 6.531 1.903 6.781 1.653 6.781 1.344 L 6.781 0.559 C 6.781 0.25 6.531 0 6.224 0 Z" fill="rgb(29, 28, 27)" height="1.9031500000000001px" id="hKTQ3dbw4" transform="translate(34.261 5.456)" width="6.781100000000002px"/><path d="M 6.955 0 L 0.558 0 C 0.25 0 0 0.25 0 0.559 L 0 1.344 C 0 1.653 0.25 1.903 0.558 1.903 L 6.955 1.903 C 7.263 1.903 7.513 1.653 7.513 1.344 L 7.513 0.559 C 7.513 0.25 7.263 0 6.955 0 Z" fill="rgb(29, 28, 27)" height="1.9031500000000001px" id="G1Zzk9CUU" transform="translate(28.298 8.243)" width="7.513100000000001px"/><path d="M 7.123 0 L 0.558 0 C 0.25 0 0 0.25 0 0.559 L 0 1.344 C 0 1.653 0.25 1.903 0.558 1.903 L 7.123 1.903 C 7.431 1.903 7.681 1.653 7.681 1.344 L 7.681 0.559 C 7.681 0.25 7.431 0 7.123 0 Z" fill="rgb(29, 28, 27)" height="1.9030999999999985px" id="fm7cHxIfJ" transform="translate(0 10.972)" width="7.68067px"/><path d="M 13.447 0 L 0.558 0 C 0.25 0 0 0.25 0 0.559 L 0 1.344 C 0 1.653 0.25 1.903 0.558 1.903 L 13.447 1.903 C 13.755 1.903 14.004 1.653 14.004 1.344 L 14.004 0.559 C 14.004 0.25 13.755 0 13.447 0 Z" fill="rgb(29, 28, 27)" height="1.9030999999999985px" id="LowSwDrtg" transform="translate(9.552 10.972)" width="14.0044px"/><path d="M 0.558 0 L 8.212 0 C 8.52 0 8.77 0.25 8.77 0.559 L 8.77 1.344 C 8.77 1.653 8.52 1.903 8.212 1.903 L 0.558 1.903 C 0.25 1.903 0 1.653 0 1.344 L 0 0.559 C 0 0.25 0.25 0 0.558 0 Z" fill="rgb(29, 28, 27)" height="1.9030999999999985px" id="xRiKc2od7" transform="translate(27.041 10.972)" width="8.769900000000003px"/><path d="M 0.557 0 L 5.4 0 C 5.708 0 5.958 0.25 5.958 0.559 L 5.958 1.344 C 5.958 1.653 5.708 1.903 5.4 1.903 L 0.557 1.903 C 0.25 1.903 0 1.653 0 1.344 L 0 0.559 C 0 0.25 0.25 0 0.557 0 Z" fill="rgb(29, 28, 27)" height="1.9031500000000001px" id="JWdNVicde" transform="translate(36.796 8.243)" width="5.957599999999999px"/><path d="M 1.438 0 L 0.558 0 C 0.25 0 0 0.25 0 0.559 L 0 1.344 C 0 1.653 0.25 1.903 0.558 1.903 L 1.438 1.903 C 1.746 1.903 1.995 1.653 1.995 1.344 L 1.995 0.559 C 1.995 0.25 1.746 0 1.438 0 Z" fill="rgb(29, 28, 27)" height="1.9031500000000001px" id="RfFYVCT_T" transform="translate(28.717 5.456)" width="1.9953000000000003px"/><path d="M 0.558 0 L 2.895 0 C 3.203 0 3.453 0.25 3.453 0.559 L 3.453 1.406 C 3.453 1.714 3.203 1.964 2.895 1.964 L 0.558 1.964 C 0.25 1.964 0 1.714 0 1.406 L 0 0.559 C 0 0.25 0.25 0 0.558 0 Z" fill="rgb(29, 28, 27)" height="1.964299999999998px" id="dngJ6MU2p" transform="translate(16.183 24.582)" width="3.4525000000000006px"/><path d="M 1.706 0 L 0.558 0 C 0.25 0 0 0.25 0 0.559 L 0 1.406 C 0 1.714 0.25 1.964 0.558 1.964 L 1.706 1.964 C 2.014 1.964 2.263 1.714 2.263 1.406 L 2.263 0.559 C 2.263 0.25 2.014 0 1.706 0 Z" fill="rgb(29, 28, 27)" height="1.964299999999998px" id="N_fstvKmR" transform="translate(22.18 24.582)" width="2.2631999999999977px"/><path d="M 0.558 0 L 5.544 0 C 5.852 0 6.101 0.25 6.101 0.559 L 6.101 1.406 C 6.101 1.714 5.852 1.964 5.544 1.964 L 0.558 1.964 C 0.25 1.964 0 1.714 0 1.406 L 0 0.559 C 0 0.25 0.25 0 0.558 0 Z" fill="rgb(29, 28, 27)" height="1.964299999999998px" id="t55XLYcgb" transform="translate(25.486 24.582)" width="6.101399999999998px"/><path d="M 1.976 0 L 0.558 0 C 0.25 0 0 0.25 0 0.559 L 0 1.406 C 0 1.714 0.25 1.964 0.558 1.964 L 1.976 1.964 C 2.284 1.964 2.533 1.714 2.533 1.406 L 2.533 0.559 C 2.533 0.25 2.284 0 1.976 0 Z" fill="rgb(29, 28, 27)" height="1.964299999999998px" id="ZrEKTVTAe" transform="translate(28.542 21.854)" width="2.5334000000000003px"/><path d="M 0.557 0 L 1.438 0 C 1.746 0 1.995 0.25 1.995 0.559 L 1.995 1.406 C 1.995 1.714 1.746 1.964 1.438 1.964 L 0.557 1.964 C 0.25 1.964 0 1.714 0 1.406 L 0 0.559 C 0 0.25 0.25 0 0.557 0 Z" fill="rgb(29, 28, 27)" height="1.964299999999998px" id="Z0fPTp9aR" transform="translate(11.425 24.582)" width="1.9953000000000003px"/><path d="M 0 0.559 C 0 0.251 0.251 0 0.558 0 L 1.438 0 C 1.745 0 1.995 0.251 1.995 0.559 L 1.995 1.405 C 1.995 1.713 1.745 1.964 1.438 1.964 L 0.558 1.964 C 0.251 1.964 0 1.713 0 1.405 Z" fill="rgb(29, 28, 27)" height="1.964299999999998px" id="Tj_PDHFDh" transform="translate(20.635 27.308)" width="1.9954px"/><path d="M 0.557 0 L 1.342 0 C 1.65 0 1.899 0.25 1.899 0.559 L 1.899 1.406 C 1.899 1.714 1.65 1.964 1.342 1.964 L 0.557 1.964 C 0.25 1.964 0 1.714 0 1.406 L 0 0.559 C 0 0.25 0.25 0 0.557 0 Z" fill="rgb(29, 28, 27)" height="1.9643000000000015px" id="AYq9dXkKz" transform="translate(18.686 30.036)" width="1.8994px"/><path d="M 0.558 0 L 5.768 0 C 6.076 0 6.326 0.25 6.326 0.559 L 6.326 1.344 C 6.326 1.653 6.076 1.903 5.768 1.903 L 0.558 1.903 C 0.25 1.903 0 1.653 0 1.344 L 0 0.559 C 0 0.25 0.25 0 0.558 0 Z" fill="rgb(29, 28, 27)" height="1.9031500000000001px" id="rspevfJcx" transform="translate(12.157 8.243)" width="6.325900000000001px"/><path d="M 3.285 0 L 0.558 0 C 0.25 0 0 0.25 0 0.559 L 0 1.344 C 0 1.653 0.25 1.903 0.558 1.903 L 3.285 1.903 C 3.593 1.903 3.842 1.653 3.842 1.344 L 3.842 0.559 C 3.842 0.25 3.593 0 3.285 0 Z" fill="rgb(29, 28, 27)" height="1.9031500000000001px" id="XRUAhGnph" transform="translate(23.887 2.728)" width="3.8424000000000014px"/><path d="M 0.558 0 L 5.644 0 C 5.952 0 6.202 0.25 6.202 0.559 L 6.202 1.344 C 6.202 1.653 5.952 1.903 5.644 1.903 L 0.558 1.903 C 0.25 1.903 0 1.653 0 1.344 L 0 0.559 C 0 0.25 0.25 0 0.558 0 Z" fill="rgb(29, 28, 27)" height="1.9031500000000001px" id="VsaVVIfke" transform="translate(21.528 5.456)" width="6.201600000000003px"/><path d="M 3.06 0 L 0.558 0 C 0.25 0 0 0.25 0 0.559 L 0 1.344 C 0 1.653 0.25 1.903 0.558 1.903 L 3.06 1.903 C 3.369 1.903 3.618 1.653 3.618 1.344 L 3.618 0.559 C 3.618 0.25 3.369 0 3.06 0 Z" fill="rgb(29, 28, 27)" height="1.9030999999999985px" id="wiAKEgyId" transform="translate(40.819 10.972)" width="3.6182000000000016px"/><path d="M 0.558 0 L 17.318 0 C 17.626 0 17.875 0.25 17.875 0.559 L 17.875 1.345 C 17.875 1.653 17.626 1.903 17.318 1.903 L 0.558 1.903 C 0.25 1.903 0 1.653 0 1.345 L 0 0.559 C 0 0.25 0.25 0 0.558 0 Z" fill="rgb(29, 28, 27)" height="1.9032px" id="FIE0ufK9m" transform="translate(6.666 13.7)" width="17.87506px"/><path d="M 6.426 0 L 0.558 0 C 0.25 0 0 0.25 0 0.559 L 0 1.345 C 0 1.653 0.25 1.903 0.558 1.903 L 6.426 1.903 C 6.734 1.903 6.984 1.653 6.984 1.345 L 6.984 0.559 C 6.984 0.25 6.734 0 6.426 0 Z" fill="rgb(29, 28, 27)" height="1.9032000000000018px" id="ut9UWny3L" transform="translate(22.892 19.156)" width="6.983599999999999px"/><path d="M 0.558 0 L 22.151 0 C 22.459 0 22.709 0.25 22.709 0.559 L 22.709 1.344 C 22.709 1.653 22.459 1.903 22.151 1.903 L 0.558 1.903 C 0.25 1.903 0 1.653 0 1.344 L 0 0.559 C 0 0.25 0.25 0 0.558 0 Z" fill="rgb(29, 28, 27)" height="1.9030999999999985px" id="VULnffgbk" transform="translate(9.552 16.428)" width="22.7089px"/><path d="M 7.886 0 L 0.558 0 C 0.25 0 0 0.25 0 0.559 L 0 1.345 C 0 1.653 0.25 1.903 0.558 1.903 L 7.886 1.903 C 8.194 1.903 8.443 1.653 8.443 1.345 L 8.443 0.559 C 8.443 0.25 8.194 0 7.886 0 Z" fill="rgb(29, 28, 27)" height="1.9032000000000018px" id="adZTYr4MR" transform="translate(6.078 19.156)" width="8.44303px"/><path d="M 0.558 0 L 2.211 0 C 2.519 0 2.769 0.25 2.769 0.559 L 2.769 1.406 C 2.769 1.714 2.519 1.964 2.211 1.964 L 0.558 1.964 C 0.25 1.964 0 1.714 0 1.406 L 0 0.559 C 0 0.25 0.25 0 0.558 0 Z" fill="rgb(29, 28, 27)" height="1.964299999999998px" id="bwdUdEmCH" transform="translate(13.784 21.854)" width="2.768600000000001px"/><path d="M 2.424 0 L 0.558 0 C 0.25 0 0 0.25 0 0.559 L 0 1.406 C 0 1.714 0.25 1.964 0.558 1.964 L 2.424 1.964 C 2.732 1.964 2.982 1.714 2.982 1.406 L 2.982 0.559 C 2.982 0.25 2.732 0 2.424 0 Z" fill="rgb(29, 28, 27)" height="1.964299999999998px" id="PUvesMJEj" transform="translate(23.556 21.854)" width="2.982199999999999px"/><path d="M 0.558 0 L 2.241 0 C 2.55 0 2.799 0.25 2.799 0.559 L 2.799 1.406 C 2.799 1.714 2.55 1.964 2.241 1.964 L 0.558 1.964 C 0.25 1.964 0 1.714 0 1.406 L 0 0.559 C 0 0.25 0.25 0 0.558 0 Z" fill="rgb(29, 28, 27)" height="1.964299999999998px" id="Wo2W7J3Zj" transform="translate(8.672 21.854)" width="2.799050000000001px"/><path d="M 6.661 0 L 0.558 0 C 0.25 0 0 0.25 0 0.559 L 0 1.345 C 0 1.653 0.25 1.903 0.558 1.903 L 6.661 1.903 C 6.969 1.903 7.219 1.653 7.219 1.345 L 7.219 0.559 C 7.219 0.25 6.969 0 6.661 0 Z" fill="rgb(29, 28, 27)" height="1.9032px" id="PpPVZXp9j" transform="translate(27.041 13.7)" width="7.218900000000001px"/><path d="M 0.621 1.905 C 0.218 1.905 0 1.687 0 1.283 L 0 0.622 C 0 0.218 0.218 0 0.621 0 L 11.225 0 C 11.628 0 11.846 0.218 11.846 0.622 L 11.846 1.283 C 11.846 1.687 11.628 1.905 11.225 1.905 L 6.934 1.905 L 6.934 14.926 C 6.934 15.33 6.716 15.548 6.313 15.548 L 5.537 15.548 C 5.134 15.548 4.916 15.33 4.916 14.926 L 4.916 1.905 Z" fill="rgb(29, 28, 27)" height="15.54825px" id="xr32fxeO6" transform="translate(52.177 8.243)" width="11.845599999999997px"/><path d="M 0.621 0 C 0.218 0 0 0.218 0 0.622 L 0 14.924 C 0 15.328 0.218 15.546 0.621 15.546 L 1.357 15.546 C 1.76 15.546 1.978 15.328 1.978 14.924 L 1.978 0.622 C 1.978 0.218 1.76 0 1.357 0 Z" fill="rgb(29, 28, 27)" height="15.546050000000001px" id="oSsO_UPVN" transform="translate(90.476 8.243)" width="1.9779000000000053px"/><path d="M 0.62 15.546 C 0.217 15.546 0 15.328 0 14.924 L 0 0.622 C 0 0.218 0.217 0 0.62 0 L 1.396 0 C 1.799 0 2.017 0.218 2.017 0.622 L 2.017 13.632 L 8.981 13.632 C 9.384 13.632 9.602 13.85 9.602 14.254 L 9.602 14.924 C 9.602 15.328 9.384 15.546 8.981 15.546 Z" fill="rgb(29, 28, 27)" height="15.546050000000001px" id="Sgj4z5osO" transform="translate(116.749 8.243)" width="9.602000000000004px"/><path d="M 1.974 14.924 C 1.974 15.328 1.756 15.546 1.353 15.546 L 0.621 15.546 C 0.218 15.546 0 15.328 0 14.924 L 0 0.622 C 0 0.218 0.218 0 0.621 0 L 1.357 0 C 1.76 0 1.978 0.218 1.978 0.622 L 1.978 5.747 C 2.634 4.721 3.806 4.079 5.309 4.079 C 8.18 4.079 10.356 6.358 10.356 9.948 C 10.356 13.538 8.18 15.817 5.309 15.817 C 3.801 15.817 2.627 15.175 1.971 14.145 L 1.971 14.922 Z M 8.36 9.95 C 8.36 7.362 6.881 5.928 5.121 5.928 C 3.361 5.928 1.863 7.362 1.863 9.95 C 1.863 12.539 3.361 13.972 5.121 13.972 C 6.881 13.972 8.36 12.539 8.36 9.95 Z" fill="rgb(29, 28, 27)" height="15.81665px" id="q13jjj7xd" transform="translate(138.401 8.243)" width="10.355999999999995px"/><path d="M 4.457 11.738 C 0.961 11.738 -0.019 9.872 0 8.318 C 0.005 7.929 0.253 7.735 0.645 7.735 L 1.344 7.735 C 1.748 7.735 1.922 7.949 1.961 8.352 C 2.063 9.315 2.693 9.907 4.433 9.907 C 6.174 9.907 7.012 9.269 7.012 8.289 C 7.012 7.425 6.522 7.108 5.305 6.899 L 3.209 6.539 C 1.453 6.238 0.29 5.247 0.29 3.468 C 0.29 1.467 1.774 0 4.518 0 C 7.263 0 8.838 1.491 8.814 3.23 C 8.81 3.614 8.553 3.808 8.165 3.808 L 7.457 3.808 C 7.054 3.808 6.908 3.595 6.851 3.202 C 6.749 2.477 6.159 1.818 4.518 1.818 C 2.878 1.818 2.249 2.508 2.249 3.403 C 2.249 4.175 2.695 4.516 3.81 4.714 L 5.906 5.083 C 7.72 5.404 8.98 6.292 8.98 8.198 C 8.98 9.976 7.908 11.74 4.455 11.74 Z" fill="rgb(29, 28, 27)" height="11.739799999999999px" id="tJ8syeWTW" transform="translate(150.024 12.325)" width="8.980269730401375px"/><path d="M 9.146 7.997 C 9.146 8.813 9.175 9.983 9.282 10.799 C 9.334 11.223 9.155 11.465 8.728 11.465 L 8.068 11.465 C 7.685 11.465 7.467 11.319 7.428 11.022 L 7.317 10.181 C 6.724 11.157 5.565 11.659 4.145 11.659 C 1.579 11.659 0 10.142 0 8.078 C 0 6.27 1.27 5.157 3.433 5.002 L 6.589 4.78 C 7.162 4.741 7.186 4.688 7.186 4.153 L 7.186 3.682 C 7.186 2.438 6.434 1.807 4.79 1.807 C 3.145 1.807 2.472 2.425 2.405 3.289 C 2.376 3.697 2.235 3.916 1.823 3.916 L 1.067 3.916 C 0.675 3.916 0.427 3.717 0.422 3.328 C 0.407 1.51 1.74 0 4.792 0 C 7.798 0 9.162 1.427 9.155 3.736 Z M 7.188 7.298 L 7.188 6.244 C 6.955 6.327 6.678 6.386 6.363 6.415 L 3.598 6.676 C 2.59 6.775 1.997 7.163 1.997 8.099 L 1.999 8.099 C 1.999 9.188 2.886 9.97 4.4 9.97 C 6.169 9.97 7.188 8.9 7.188 7.298 Z" fill="rgb(29, 28, 27)" height="11.658999999999999px" id="QPESIZvku" transform="translate(126.854 12.325)" width="9.290755130109668px"/><path d="M 5.224 0 C 8.313 0 10.295 2.255 10.295 5.456 L 10.295 5.694 C 10.295 6.098 10.077 6.316 9.674 6.316 L 1.998 6.316 C 2.168 8.547 3.447 9.898 5.407 9.898 C 6.768 9.898 7.598 9.363 7.934 8.431 C 8.06 8.078 8.243 7.892 8.618 7.892 L 9.33 7.892 C 9.746 7.892 9.994 8.125 9.923 8.538 C 9.598 10.433 7.834 11.74 5.409 11.74 L 5.407 11.738 C 2.168 11.738 0 9.424 0 5.797 C 0 2.169 2.135 0 5.224 0 Z M 5.222 1.74 C 3.494 1.74 2.405 2.818 2.074 4.64 L 8.282 4.64 C 8.054 2.842 6.949 1.74 5.222 1.74 Z" fill="rgb(29, 28, 27)" height="11.739799999999999px" id="PKmyQkwJE" transform="translate(104.541 12.325)" width="10.295000000000002px"/><path d="M 4.459 11.194 C 4.099 11.194 3.877 11.039 3.746 10.703 L 0.091 1.021 C -0.024 0.72 -0.031 0.511 0.076 0.297 C 0.178 0.094 0.381 0 0.732 0 L 1.274 0 C 1.633 0 1.86 0.155 1.986 0.495 L 4.958 8.503 L 5.123 9.018 L 5.289 8.503 L 8.262 0.495 C 8.388 0.155 8.615 0 8.974 0 L 9.517 0 C 9.865 0 10.07 0.092 10.172 0.297 C 10.279 0.511 10.275 0.72 10.157 1.021 L 6.502 10.703 C 6.371 11.039 6.149 11.194 5.79 11.194 Z" fill="rgb(29, 28, 27)" height="11.1941px" id="uUQr5Yl4B" transform="translate(93.807 12.595)" width="10.248961642504256px"/><path d="M 5.407 11.738 C 2.167 11.738 0 9.424 0 5.797 C 0 2.169 2.133 0 5.221 0 C 8.31 0 10.292 2.255 10.292 5.456 L 10.292 5.694 C 10.292 6.098 10.075 6.316 9.672 6.316 L 1.995 6.316 C 2.165 8.547 3.446 9.898 5.404 9.898 C 6.768 9.898 7.596 9.363 7.931 8.431 C 8.058 8.078 8.241 7.892 8.615 7.892 L 9.328 7.892 C 9.744 7.892 9.992 8.125 9.918 8.538 C 9.593 10.433 7.829 11.74 5.404 11.74 Z M 8.282 4.64 C 8.053 2.842 6.949 1.74 5.221 1.74 C 3.494 1.74 2.405 2.818 2.074 4.64 Z" fill="rgb(29, 28, 27)" height="11.739799999999999px" id="zo1nSBuSF" transform="translate(78.397 12.325)" width="10.29249999999999px"/><path d="M 3.057 10.677 C 3.163 11.026 3.392 11.192 3.756 11.192 L 3.749 11.194 L 4.987 11.194 C 5.35 11.194 5.579 11.028 5.69 10.679 L 8.173 2.654 L 8.237 2.401 L 8.3 2.654 L 10.787 10.679 C 10.894 11.028 11.123 11.194 11.487 11.194 L 12.733 11.194 C 13.096 11.194 13.325 11.028 13.432 10.679 L 16.418 1.006 C 16.516 0.7 16.512 0.498 16.41 0.288 C 16.307 0.089 16.109 0.002 15.76 0.002 L 15.218 0.002 C 14.848 0.002 14.626 0.168 14.519 0.522 L 12.094 8.547 L 12.046 8.761 L 11.999 8.542 L 9.506 0.517 C 9.4 0.168 9.171 0.002 8.807 0.002 L 7.683 0.002 C 7.319 0.002 7.091 0.168 6.984 0.517 L 4.492 8.542 L 4.449 8.745 L 4.405 8.551 L 1.98 0.519 C 1.874 0.166 1.649 0 1.281 0 L 0.728 0 C 0.38 0 0.181 0.087 0.079 0.286 C -0.021 0.493 -0.028 0.698 0.07 1.004 Z" fill="rgb(29, 28, 27)" height="11.194099999999999px" id="uboloLX99" transform="translate(61.282 12.598)" width="16.489163442184434px"/></svg>)
Tutorials
Search precisely within videos: combining queries with Twelve Labs API

Ankit Khare
Combined Queries using Twelve Labs API - An Overview
Combined Queries using Twelve Labs API - An Overview

In this article
No headings found on page
뉴스레터 구독하기
뉴스레터 구독하기
영상 이해 분야의 최신 기술 업데이트, 튜토리얼 및 인사이트를 받아보세요.
영상 이해 분야의 최신 기술 업데이트, 튜토리얼 및 인사이트를 받아보세요.
AI로 영상을 검색하고, 분석하고, 탐색하세요.
2023. 4. 18.
16 min
링크 복사하기
Premise
As a movie aficionado 🎬🍿 and content creator 🎨🖌️✍️, I have created my own Plex server to house my cherished film collection. Often, I like to use movie scenes as anecdotes to enhance my storytelling and create more engaging content. For example, when making a video about motivation, willpower, and overcoming odds, I might showcase relevant moments from a favorite anime, such as the exhilarating Super Saiyan transformation scenes from the Dragon Ball Super saga, or a workout and training scene from one of my favorite movies, like Never Back Down. Alternatively, directors or writers who are developing new movie scripts may want to analyze a set of similar movies to identify common themes or patterns, such as the number of comedy scenes, their duration, the occurrence of drift races, or the frequency of muscle cars being shown. Finding particular scenes within a vast array of movies or even within a single movie can be quite challenging, even for those with impressive memory skills. This is where video understanding comes to the rescue 🛟⛑️.
Twelve Labs Search API offers a flexible video search solution that enables users to write simple natural language queries and combine them ingeniously, helping to uncover the relevant video segments. For instance, one could craft a combined query to reveal the specific drift scenes where the lead actor drives a red Mitsubishi. Alternatively, users might search for the thrilling moment when their favorite Formula One car crosses the finish line victoriously 🏁✌️.
Search result from the indexed Tokyo Drift movie for the combined query - 'drift' (search option: visual) AND 'Mitsubishi' (search option: logo) 😎
Introduction
In the first part of this tutorial series, we explored how to perform searches within videos using simple search, where we only used one query at a time in our search requests. To make the most of this follow-up tutorial, I highly recommend reviewing the previous one to understand the basics of the Twelve Labs Search API. Assuming you have a good grasp on the basics, this tutorial will introduce more advanced concepts. We'll dive into the combined queries feature offered by the Twelve Labs API, which enables us to flexibly and conveniently locate specific moments of interest within indexed videos. To showcase this, I will create two separate indexes: one for Formula One races, and another for a full-length well-known movie, “Tokyo Drift” from the Fast and the Furious franchise. I'll then demonstrate how to use various operators to combine search queries, allowing us to identify the intriguing moments we're looking for. With that said, let's proceed to the tutorial overview and concretely outline what you can expect to learn throughout this guide.
Quick overview
Prerequisites: Sign up for the Twelve Labs API suite and install the required packages to breeze through this tutorial. Don't forget to check out the first tutorial!
Video Upload: Send your videos over to the Twelve Labs platform and watch how it effortlessly indexes them, so you can throw in your complex combined queries and fetch those moments you're after!
Combined Queries: This is where the real excitement begins! Combined queries can be succinctly defined as two or more simple search queries merged together to form a single, unified query using operators such as "or", "and", "not", and "then". We'll briefly review the theoretical aspects of these operators, and then dive into some practical examples of using them to effectively combine two or more natural language queries, aiding us in finding top moments within the indexed videos that semantically match the combined query.
Crafting a Demo App: Craft a nifty Flask-based app to harness the results from the search API, access the videos stored in a local folder on your computer, and then render a custom-designed sleek HTML page to showcase the search results in style.
💡 By the way, if you're reading this article and you're not a developer, fear not! I've included a link to a ready-made Jupyter notebook. You can easily tweak the queries and operators, then run the entire process to obtain the results 😄. Enjoy!
Prerequisites
The previous tutorial is the only prerequisite to this one. If you hit any snags while reading this or the previous one, don't hesitate to give me a shout for help! We have super quick response times 🚅🏎️⚡️ on our Discord server. If Discord isn't your vibe, feel free to reach out to me via email. After creating a Twelve Labs account, you can access the API Dashboard and obtain your API key. For the purpose of this demo, I'll be using my existing account:
<pre><code class="bash">%env API_KEY=<your_API_key>
%env API_URL=https://api.twelvelabs.io/v1.1
</code></pre>
<pre><code class="python">!pip install requests
!pip install flask

import os
import requests
import glob
from pprint import pprint

# Retrieve the URL of the API and my API key
API_URL = os.getenv("API_URL")
assert API_URL

API_KEY = os.getenv("API_KEY")
assert API_KEY
</code></pre>
Video upload
This is the initial step, where I'll create two indexes using our latest state-of-the-art video understanding engine, "Marengo 2.5," but with distinct indexing options. For the index focused on Formula One racing, besides visual and conversation, enabling text-in-video and logo options is beneficial because Formula One events are abundant with logos on vehicles, tracks, fences, and a significant amount of on-screen text during the award distribution. However, for the Tokyo Drift movie index, enabling text-in-video option may not provide any value. This is where the flexibility of creating indexes with different options comes into play. By customizing the indexing options to suit your specific needs, you can optimize the use of compute resources and ultimately save on costs.
<pre><code class="python"># Construct the URL of the `/indexes` endpoint
INDEXES_URL = f"{API_URL}/indexes"

# Set the header of the request
default_header = {
    "x-api-key": API_KEY
}

# Define a function to create an index with a given name
def create_index(index_name, index_options, engine):
    # Declare a dictionary named data
    data = {
        "engine_id": engine,
        "index_options": index_options,
        "index_name": index_name,
    }

    # Create an index
    response = requests.post(INDEXES_URL, headers=default_header, json=data)

    # Store the unique identifier of your index
    INDEX_ID = response.json().get('_id')

    # Check if the status code is 201 and print success
    if response.status_code == 201:
        print(f"Status code: {response.status_code} - The request was successful and a new index was created.")
    else:
        print(f"Status code: {response.status_code}")
    pprint(response.json())
    return INDEX_ID

# Specify the names of the indexes
index_names = ["formula_one", "tokyo_drift"]

# Create the indexes
index_id_formula_one = create_index(index_name = "formula_one", index_options=["visual", "conversation", "text_in_video", "logo"], engine = "marengo2.5")
index_id_tokyo_drift = create_index(index_name = "tokyo_drift", index_options=["visual", "conversation", "logo"], engine = "marengo2.5")

# Print the created index IDs
print(f"Created index IDs: {index_id_formula_one}, {index_id_tokyo_drift}")
</code></pre>
Output:
<pre><code class="language-plaintext">Status code: 201 - The request was successful and a new resource was created.
{'_id': '##38fb695b65d57eaecaf8##'}
Status code: 201 - The request was successful and a new resource was created.
{'_id': '##38fb695b65d57eaecaf8##'}
Created index IDs: ##38fb695b65d57eaecaf8##, ##38fb695b65d57eaecaf8##
</code></pre>
Initiating video indexing tasks
I've set up the code to automatically take in all videos from a specific folder, assign them the same name as the video file itself, and upload them to the platform asynchronously. Just make sure to place all the videos you want to include in an index within a single folder. The total indexing time will be approximately 40% of the longest video's duration since, even if you upload videos using a 'for' loop asynchronously without creating a thread for parallel uploads, the system will index them synchronously (simultaneously). If you want to index more videos within the same index later, no problem! There's no need to create a new folder for new video files. Just add them to the existing folder, and the code will check if there's already an indexed video with the same name or a pending indexing task for a video with the same name before initiating indexing. This way, you can avoid duplicates – pretty cool, right? 😄
<pre><code class="python">TASKS_URL = f"{API_URL}/tasks"
TASK_ID_LIST = []
video_folder = 'static'  # folder containing the video files
INDEX_ID = index_id_tom  # change this to the other index id while creating the index for lex fridman podcast videos
# INDEX_ID = '##38d9c4e4225d1c0eb1e8##'

# Iterate through all the video files in the folder
for file_name in os.listdir(video_folder):
    # Validate if a video already exists in the index
    task_list_response = requests.get(
        TASKS_URL,
        headers=default_header,
        params={"index_id": INDEX_ID, "filename": file_name},
    )
    if "data" in task_list_response.json():
        task_list = task_list_response.json()["data"]
        if len(task_list) > 0:
            if task_list[0]['status'] == 'ready':
                print(f"Video '{file_name}' already exists in index {INDEX_ID}")
            else:
                print("task pending or validating")
            continue

    #Proceed further to create a new task to index the current video if the video didn't exist in the index already
    print("Entering task creation code for the file: ", file_name)

    if file_name.endswith('.mp4'):  # Make sure the file is an MP4 video
        file_path = os.path.join(video_folder, file_name)  # Get the full path of the video file
        with open(file_path, "rb") as file_stream:
            data = {
                "index_id": INDEX_ID,
                "language": "en"
            }
            file_param = [
                ("video_file", (file_name, file_stream, "application/octet-stream")),] # The video will be indexed on the platform using the same name as the video file itself.

            response = requests.post(TASKS_URL, headers=default_header, data=data, files=file_param)
            TASK_ID = response.json().get("_id")
            TASK_ID_LIST.append(TASK_ID)
            # Check if the status code is 201 and print success
            if response.status_code == 201:
                print(f"Status code: {response.status_code} - The request was successful and a new resource was created.")
            else:
                print(f"Status code: {response.status_code}")
            print(f"File name: {file_name}")
            pprint(response.json())
            print("\n")
</code></pre>
Output:
<pre><code class="language-plaintext">Entering task creation code for the file:  20211113T190000Z.mp4
Status code: 201 - The request was successful and a new resource was created.
File name: 20211113T190000Z.mp4
{'_id': '6438fb6e5b65d57eaecaf8bc'}


Entering task creation code for the file:  20211113T193300Z.mp4
Status code: 201 - The request was successful and a new resource was created.
File name: 20211113T193300Z.mp4
{'_id': '##38fb755b65d57eaecaf8##'}
</code></pre>
Monitoring the indexing process
I designed the monitoring function to display the estimated time remaining for the current video being indexed. Once the indexing task is complete, the monitoring process moves on to the next video indexing task, which is already in progress due to the system's parallel indexing approach. This continues until all the videos within your folder are indexed. Finally, the total time taken to perform this synchronous indexing is presented in seconds.
<pre><code class="python">import time

def monitor_upload_status(task_id):
    TASK_STATUS_URL = f"{API_URL}/tasks/{task_id}"
    while True:
        response = requests.get(TASK_STATUS_URL, headers=default_header)
        STATUS = response.json().get("status")
        if STATUS == "ready":
            print(f"Task ID: {task_id}, Status code: {STATUS}")
            break
        remain_seconds = response.json().get('process', {}).get('remain_seconds', None)
        upload_percentage = response.json().get('process', {}).get('upload_percentage', None)
        if remain_seconds is not None:
            print(f"Remaining seconds: {remain_seconds}, Upload Percentage: {upload_percentage}")
        else:
             print('.', end='')
        time.sleep(10)

# Define starting time
start = time.time()
print("Starting to monitor...")

# Monitor the indexing process for all tasks
for task_id in TASK_ID_LIST:
    print("Current Task being monitored: ", task_id)
    monitor_upload_status(task_id)

# Define ending time
end = time.time()
print("Uploading finished")
print("Time elapsed (in seconds): ", end - start)
</code></pre>
<pre><code class="language-plaintext">Starting to monitor...
Current Task being monitored:  ##38fb6e5b65d57eaecaf8##
........Remaining seconds: 264.48919677734375, Upload Percentage: 0
Remaining seconds: 258.351806640625, Upload Percentage: 2
Remaining seconds: 253.1555633544922, Upload Percentage: 4
Remaining seconds: 247.93516540527344, Upload Percentage: 6
Remaining seconds: 242.26431274414062, Upload Percentage: 8
Remaining seconds: 237.22894287109375, Upload Percentage: 10
Remaining seconds: 231.01914978027344, Upload Percentage: 12
Remaining seconds: 224.7932891845703, Upload Percentage: 15
Remaining seconds: 218.599609375, Upload Percentage: 17
</code></pre>
List all videos in the index
To ensure that all the required videos have been indexed, let's double-check by listing all the videos present within the index. Additionally, I'm creating a list containing all video IDs and their corresponding names, as this will later be used to fetch the corresponding video name for the video segment, which will be displayed along with the start and end timestamps.
<pre><code class="python"># List all the videos in an index
INDEX_ID='##38d9c4e4225d1c0eb1e8##'
INDEXES_VIDEOS_URL = f"{API_URL}/indexes/{INDEX_ID}/videos"
response = requests.get(INDEXES_VIDEOS_URL, headers=default_header)

response_json = response.json()
pprint(response_json)

video_id_name_list = [{'video_id': video['_id'], 'video_name': video['metadata']['filename']} for video in response_json['data']]

print(video_id_name_list)
</code></pre>
<pre><code class="bash">{'data': [{'_id': '##3d978c86daab572f3481##',
           'created_at': '2023-04-17T18:56:51Z',
           'metadata': {'duration': 1800.56,
                        'engine_id': 'marengo2.5',
                        'filename': '20211113T190000Z.mp4',
                        'fps': 25,
                        'height': 396,
                        'size': 415876158,
                        'width': 704},
           'updated_at': '2023-04-17T19:01:32Z'},
          {'_id': '##3d975786daab572f3481##',
           'created_at': '2023-04-17T18:56:44Z',
           'metadata': {'duration': 1800.56,
                        'engine_id': 'marengo2.5',
                        'filename': '20211114T170000Z.mp4',
                        'fps': 25,
                        'height': 396,
                        'size': 387273943,
                        'width': 704},
           'updated_at': '2023-04-17T19:00:39Z'},
          {'_id': '##3d972e86daab572f3481##',
           'created_at': '2023-04-17T18:56:38Z',
           'metadata': {'duration': 1800.56,
                        'engine_id': 'marengo2.5',
                        'filename': '20211113T193000Z.mp4',
                        'fps': 25,
                        'height': 396,
                        'size': 386209689,
                        'width': 704},
           'updated_at': '2023-04-17T18:59:58Z'},
          {'_id': '##3d96d386daab572f3481##',
           'created_at': '2023-04-17T18:56:28Z',
           'metadata': {'duration': 1800.52,
                        'engine_id': 'marengo2.5',
                        'filename': '20211121T133000Z.mp4',
                        'fps': 25,
                        'height': 396,
                        'size': 348611416,
                        'width': 704},
           'updated_at': '2023-04-17T18:58:27Z'},
          {'_id': '##3d96af86daab572f3481##',
           'created_at': '2023-04-17T18:56:08Z',
           'metadata': {'duration': 1800.56,
                        'engine_id': 'marengo2.5',
                        'filename': '20211113T200000Z.mp4',
                        'fps': 25,
                        'height': 396,
                        'size': 327766175,
                        'width': 704},
           'updated_at': '2023-04-17T18:57:51Z'}],
 'page_info': {'limit_per_page': 10,
               'page': 1,
               'total_duration': 9002.76,
               'total_page': 1,
               'total_results': 5}}

[{'video_id': '##3d978c86daab572f3481##', 'video_name': '20211113T190000Z.mp4'},
 {'video_id': '##3d975786daab572f3481##', 'video_name': '20211114T170000Z.mp4'},
 {'video_id': '##3d972e86daab572f3481##', 'video_name': '20211113T193000Z.mp4'},
 {'video_id': '##3d96d386daab572f3481##', 'video_name': '20211121T133000Z.mp4'},
 {'video_id': '##3d96af86daab572f3481##', 'video_name': '20211113T200000Z.mp4'}]
 </code></pre>
Combined queries
Once the system finishes indexing the videos and generating video embeddings, we will be ready to find the topmost semantically matching moments using the search API. We've already explored how to use simple queries in the previous tutorial; here, we will focus on formulating useful combined queries.
The search API enables constructing combined queries using the following operators:
AND: This operator represents the intersection of simple queries. For example, combining two simple queries, "a red car" and "a blue car," with the 'and' operator will fetch all the scenes where both red and blue cars are present.
OR: This operator is used for the union of simple queries. For our running example of two simple queries, "a red car" and "a blue car", combining them with the 'or' operator will fetch all the scenes where either a red or a blue car is present.
NOT: To use this operator, we will need to create a dictionary where the key is the $not string, and the value is a dictionary composed of two queries named origin and sub. The API will return video segments that match the origin query but do not match the sub query. For our existing example, using "a red car" as the origin and "a blue car" as the sub, the system will fetch segments where a red car is present, but a blue car is not. Note that both origin and sub queries can include any number of subqueries.
THEN: This operator can be used by creating a dictionary where the key is the $then string, and the value is an array of objects. Each object represents a subquery. The API will return results only when the order of the matching video fragments corresponds to the order of the subqueries. So, in the case of our example, video segments where a red car is seen followed by a blue car in that definitive sequence will be returned.
That was quite a bit of theory; now let's dive into the more exciting application aspect by performing our first search using a combined query. This combined query consists of two simple queries combined together using the “AND” operator, with each query having different search options. The first query is to look for scenes that are semantically similar to the concept of "winning a trophy" in both audio and visuals, while the second query is to look for scenes containing text or a logo that reads "crypto.com." By combining these queries, we can find video segments that satisfy both criteria simultaneously:
<pre><code class="python"># Construct the URL of the `/search` endpoint
SEARCH_URL = f"{API_URL}/search/"

# Declare a dictionary named `data`
data = {
    "index_id": INDEX_ID,
    "search_options": ["visual"],
    "query": {
                "$and": [
                    {
                        "text": "winning trophy",
                        "search_options": ["visual"]
                    },
                    {
                        "text": "crypto.com",
                        "search_options": ["text_in_video"]
                    }
                ]
            }
        }
# Make a search request
response = requests.post(SEARCH_URL, headers=default_header, json=data)
if response.status_code == 200:
    print(f"Status code: {response.status_code} - Success")
else:
    print(f"Status code: {response.status_code}")
pprint(response.json())
</code></pre>
Output:
<pre><code class="bash">Status code: 200 - Success
{'data': [{'confidence': 'high',
           'end': 20,
           'score': 92.28,
           'start': 18,
           'video_id': '##3d96af86daab572f3481##'},
          {'confidence': 'high',
           'end': 43,
           'score': 92.28,
           'start': 42,
           'video_id': '##3d978c86daab572f3481##'},
          {'confidence': 'high',
           'end': 71,
           'score': 92.28,
           'start': 61,
           'video_id': '##3d978c86daab572f3481##'},
          {'confidence': 'high',
           'end': 62,
           'score': 92.28,
           'start': 61,
           'video_id': '##3d96af86daab572f3481##'},
          {'confidence': 'high',
           'end': 67,
           'score': 92.28,
           'start': 65,
           'video_id': '##3d96af86daab572f3481##'}],
 'page_info': {'limit_per_page': 10,
               'next_page_token': '##69daa3-827f-4165-982d-ec0d34f97c7c-1',
               'page_expired_at': '2023-04-17T23:56:00Z',
               'total_results': 110},
 'search_pool': {'index_id': '##3d9556f607a5a7bd9ea5##',
                 'total_count': 5,
                 'total_duration': 9003}}
</code></pre>
Corresponding video segments:
<div style="position: relative; padding-bottom: 47.8125%; height: 0;"><iframe src="https://www.loom.com/embed/1a08de21a4d14f85ab3ee125660438da" frameborder="0" webkitallowfullscreen mozallowfullscreen allowfullscreen style="position: absolute; top: 0; left: 0; width: 100%; height: 100%;"></iframe></div>
<div style="position: relative; padding-bottom: 47.8125%; height: 0;"><iframe src="https://www.loom.com/embed/e2cb3c58f49c4b00b0c6c5b2f745acfc" frameborder="0" webkitallowfullscreen mozallowfullscreen allowfullscreen style="position: absolute; top: 0; left: 0; width: 100%; height: 100%;"></iframe></div>
This part exhilarates me as it highlights the presence of intelligence. The model exhibits a human-like understanding of the video content. As you can see in the above screenshot, the system nails it by pinpointing the exact moments I wanted to extract.
Let's give it another shot by combining a set of simple queries to search specifically, but this time for the second index containing the entire Tokyo Drift Movie:
<pre><code class="python"># Construct the URL of the `/search` endpoint
SEARCH_URL = f"{API_URL}/search/"

# Declare a dictionary named `data`
data = {
    "index_id": INDEX_ID,
    "search_options": ["visual"],
    "query": {
                "$and": [
                    {
                        "text": "drift",
                        "search_options": ["visual"]
                    },
                    {
                        "text": "mitsubishi",
                        "search_options": ["logo"]
                    }
                ]
            }
        }
# Make a search request
response = requests.post(SEARCH_URL, headers=default_header, json=data)
if response.status_code == 200:
    print(f"Status code: {response.status_code} - Success")
else:
    print(f"Status code: {response.status_code}")
pprint(response.json())
</code></pre>
Output:
<pre><code class="bash">Status code: 200 - Success
{'data': [{'confidence': 'high',
           'end': 3710,
           'score': 92.28,
           'start': 3705,
           'video_id': '##3e3ace86daab572f3481##'}],
 'page_info': {'limit_per_page': 10,
               'page_expired_at': '2023-04-18T09:09:59Z',
               'total_results': 1},
 'search_pool': {'index_id': '##3e3647f607a5a7bd9ea5##',
                 'total_count': 1,
                 'total_duration': 6246}}
</code></pre>
Corresponding video segment:
<div style="position: relative; padding-bottom: 47.8125%; height: 0;"><iframe src="https://www.loom.com/embed/a7fc79ff424f4d50b7a42dc2bd134473" frameborder="0" webkitallowfullscreen mozallowfullscreen allowfullscreen style="position: absolute; top: 0; left: 0; width: 100%; height: 100%;"></iframe></div>
Bingo! Once again, the system pinpointed the perfect moment spot-on. The scene features Sean (Lucas Black), the lead actor, skillfully drifting a red Mitsubishi.
Let's prepare a python list that includes each video's ID, corresponding title, and its respective start and end timestamps. We'll pass this list to the Flask app in the next step, allowing us to display our search results on a webpage:
<pre><code class="python">response_data = response.json()

# Extract unique video IDs
unique_video_ids = list(set([item['video_id'] for item in response_data['data']]))

# Create empty start and end instances lists for each video ID
video_start_end_lists = {video_id: {'starts': [], 'ends': []} for video_id in unique_video_ids}

def find_video_name(video_id, video_id_name_list):
    for video in video_id_name_list:
        if video['video_id'] == video_id:
            return video['video_name']
    return None

# Append start and end instances to their respective lists
for item in response_data['data']:
    video_id = item['video_id']
    video_start_end_lists[video_id]['starts'].append(item['start'])
    video_start_end_lists[video_id]['ends'].append(item['end'])

for video_id, timestamps in video_start_end_lists.items():
    video_name = find_video_name(video_id, video_id_name_list)
    if video_name:
        timestamps['video_name'] = video_name
    else:
        print(f"No video name found for ID '{video_id}'")

# Print the result
pprint(video_start_end_lists)
</code></pre>
<pre><code class="bash">{'##3d96af86daab572f3481##': {'ends': [20, 62, 67, 114],
                              'starts': [18, 61, 65, 111],
                              'video_name': '20211113T200000Z.mp4'},
 '643d972e86daab572f34810d': {'ends': [84],
                              'starts': [68],
                              'video_name': '20211113T193000Z.mp4'},
 '643d975786daab572f34810e': {'ends': [79],
                              'starts': [70],
                              'video_name': '20211114T170000Z.mp4'},
 '643d978c86daab572f34810f': {'ends': [43, 71, 85, 95],
                              'starts': [42, 61, 84, 91],
                              'video_name': '20211113T190000Z.mp4'}}
</code></pre>
To save the list for later use in a Flask app, we can serialize (pickle) the list to a file:
<pre><code class="python">import pickle

with open("lists.pkl", "wb") as f:
    pickle.dump(video_start_end_lists, f)
</code></pre>
Crafting a demo app
We've arrived at the final step, where we'll leverage the JSON responses we received to efficiently retrieve and display video segments without having to manually identify the start and end points. To achieve this, we'll host a web page that can utilize these timestamps and apply them to the videos retrieved from our local drive. As a result, we will have visually appealing video segments that match our search, all seamlessly displayed on our web page.
The directory structure will look like this:
<pre><code class="markdown">my_flask_app/
│   app.py
│   sample_notebook.ipynb
└───templates/
│	│   index.html
└───static/
	│   <your_video_1.mp4>
	│   <your_video_2.mp4>
	│   <your_video_3.mp4>
			.
			.
			.
</code></pre>
Flask app code
Below is the code for the "app.py" file:
<pre><code class="python">
from flask import Flask, render_template
import pickle

with open("lists.pkl", "rb") as f:
   video_start_end_lists = pickle.load(f)

app = Flask(__name__)

@app.route("/")
def index():
    return render_template("index_local.html", video_start_end_lists=video_start_end_lists)

if __name__ == "__main__":
    app.run(debug=True)
</code></pre>
HTML template
Below is a sample Jinja2-based HTML template that incorporates code within the HTML file to iterate through the list we prepared earlier, fetch the required videos from the local drive, and display the results of our combined query:
<pre><code class="language-html"><!DOCTYPE html>
    <html>
      <head>
        <link rel="shortcut icon" href="#" />
        <style>
          body {
            background-color: #FFE0B2; /* Light Orange */
            font-family: Arial, sans-serif;
            text-align: center;
            margin: 0;
          }
          h1 {
            font-size: 3em;
            color: #000000; /* Black */
            background-color: #9ACD32; /* Light Green */
            padding: 20px;
            margin: 0;
          }
          h2 {
            font-size: 2em;
            color: #000000; /* Black */
            margin-bottom: 20px;
            text-align: left;
            padding-left: 20px;
          }
          .video-container {
            display: flex;
            flex-wrap: wrap;
            padding: 2px;
            justify-content: space-evenly;
            gap: 2px;
          }
          .video-item {
            display: flex;
            flex-direction: column;
            align-items: center;
            width: 45%;
            height: 450px;
            margin: 20px;
            text-align: center;
            background-color: #FFFFFF;
            box-shadow: 0 4px 8px rgba(0, 0, 0, 0.1);
            border-radius: 10px;
            padding: 20px;
          }
          .video-item video {
            width: 100%;
            height: 380px;
            margin: 0; /* Remove bottom margin */
            border-radius: 5px;
          }
          .video-item p {
            font-size: 16px;
            margin-top: 10px;
            font-weight: bold;
            color: #212121; /* Dark Grey */
          }
          .video-item span {
            color: #9ACD32; /* Light Green */
          }
        </style>
      </head>
      <body>
        <h1>My Favorite Scenes</h1>
        {% for video_id, segments in video_start_end_lists.items() %}
        <div class="video-section">
          <h2>Scenes from {{segments['video_name']}}</h2>
          <div class="video-container">
            {% for i in range(segments['starts']|length) %}
              <div class="video-item">
                <video id="video_{{ video_id }}_{{ i }}" width="560" height="315" controls>
                  <source src="{{ url_for('static', filename= segments['video_name']) }}" type="video/mp4">
                  Your browser does not support the video tag.
                </video>
                <p>Start: <span>{{ segments['starts'][i] }}</span> | End: <span>{{ segments['ends'][i] }}</span></p>
                <script>
                  document.getElementById("video_{{ video_id }}_{{ i }}").addEventListener("loadedmetadata", function() {
                    this.currentTime = {{ segments['starts'][i] }};
                  });
                  document.getElementById("video_{{ video_id }}_{{ i }}").addEventListener("timeupdate", function() {
                    if (this.currentTime >= {{ segments['ends'][i] }}) {
                      this.pause();
                    }
                  });
                </script>
              </div>
            {% endfor %}
          </div>
        </div>
        {% endfor %}
      </body>
    </html>
</code></pre>
Running the Flask app
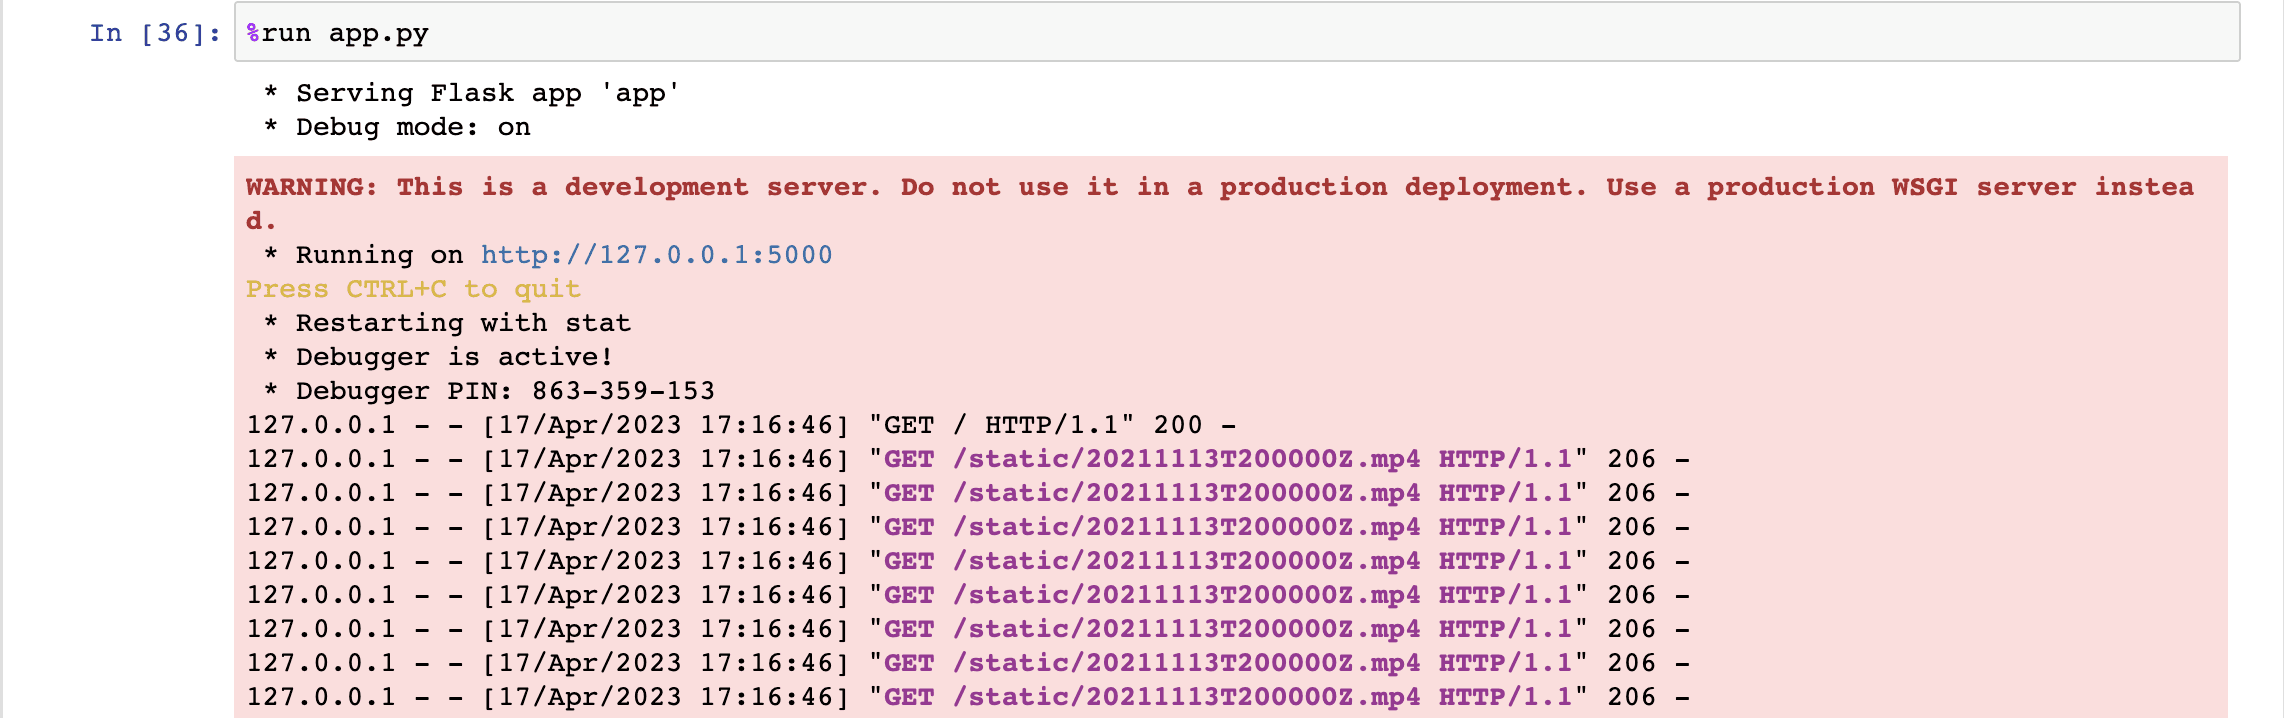
Perfect! let’s just run the last cell of our Jupyter notebook to launch our Flask app:
<pre><code class="python">%run app.py
</code></pre>
You should see an output similar to the one below, which indicates that everything is going according to our expectations 😊:
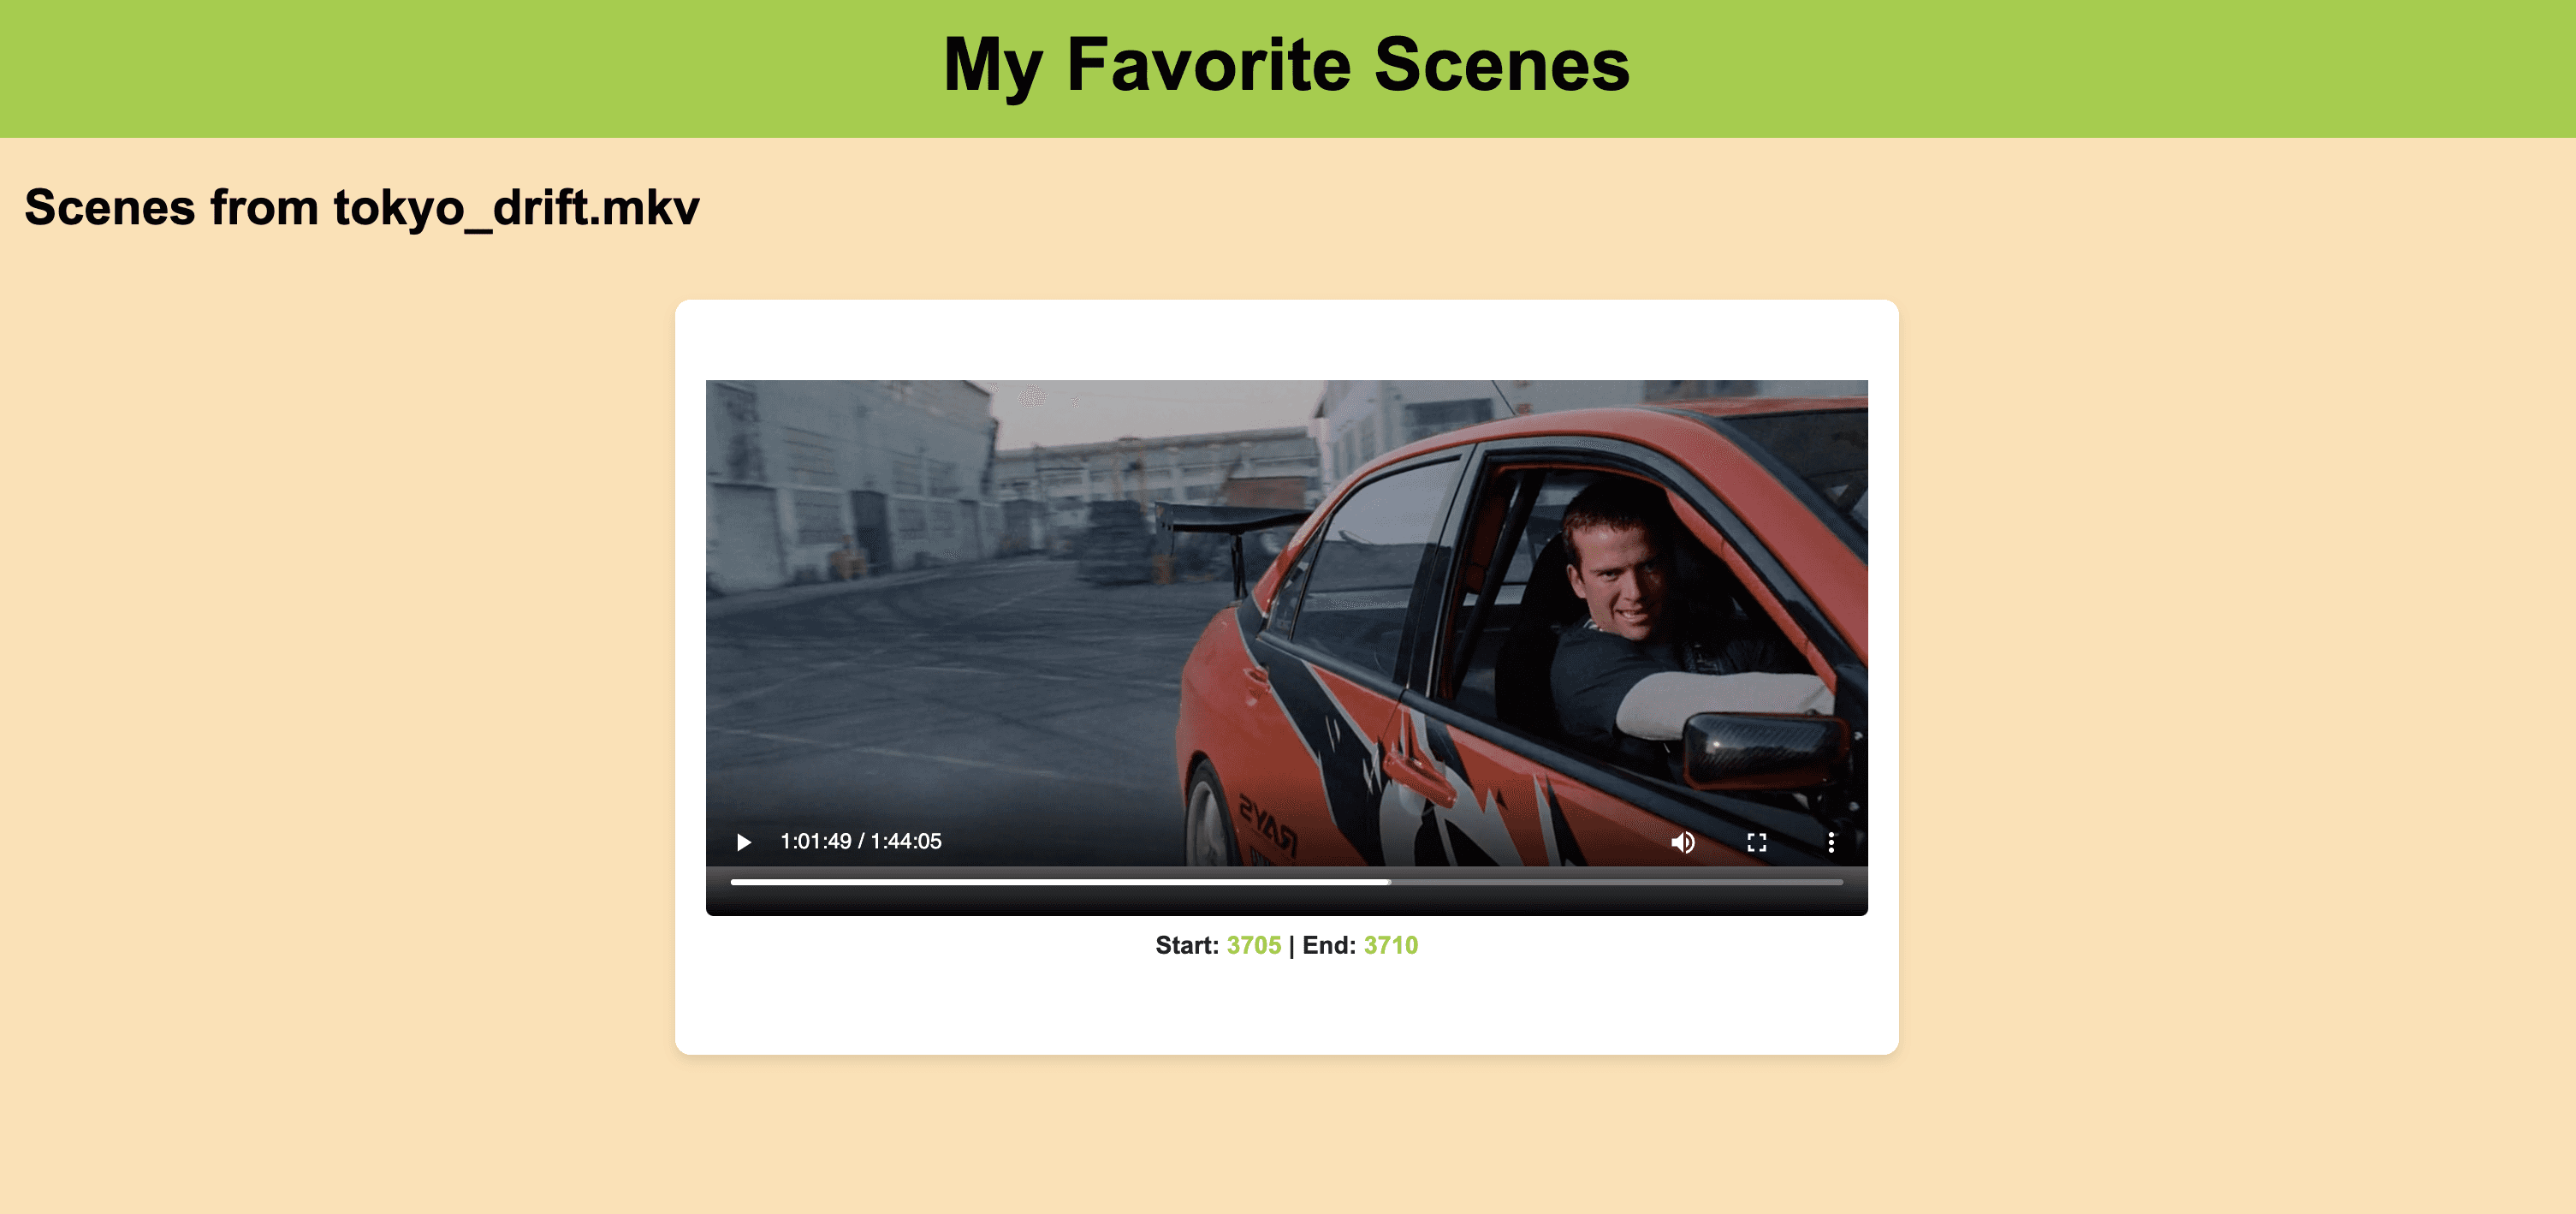
Once you click on the URL link http://127.0.0.1:5000, depending upon your combined search query, the output will be as follows:
Here's the Jupyter Notebook containing the complete code that we've put together throughout this tutorial - https://tinyurl.com/combinedQueries
Fun activities for you to explore
Experiment with various permutations and combinations of search options and operators, and share your analysis with fellow multimodal enthusiasts on our Discord channel.
Experiment with variations in the wording of the simple queries and verify whether the results remain consistent or differ. Explore how subtle changes in language within the queries—when combined together—affect the search outcome and the accuracy of matching video segments.
Showcase your developer skills by enhancing the code! Develop a mechanism to upload all the videos at once in parallel (synchronous upload) and modify the code to monitor the indexing process accordingly.
Upcoming post
In the upcoming post, we'll dive into the Classification API and will develop classification criteria on the fly to effectively classify a set of videos. Stay tuned for the forthcoming excitement and don't forget to join our Discord community to engage with other like-minded individuals who are passionate about multimodal foundation models.
Premise
As a movie aficionado 🎬🍿 and content creator 🎨🖌️✍️, I have created my own Plex server to house my cherished film collection. Often, I like to use movie scenes as anecdotes to enhance my storytelling and create more engaging content. For example, when making a video about motivation, willpower, and overcoming odds, I might showcase relevant moments from a favorite anime, such as the exhilarating Super Saiyan transformation scenes from the Dragon Ball Super saga, or a workout and training scene from one of my favorite movies, like Never Back Down. Alternatively, directors or writers who are developing new movie scripts may want to analyze a set of similar movies to identify common themes or patterns, such as the number of comedy scenes, their duration, the occurrence of drift races, or the frequency of muscle cars being shown. Finding particular scenes within a vast array of movies or even within a single movie can be quite challenging, even for those with impressive memory skills. This is where video understanding comes to the rescue 🛟⛑️.
Twelve Labs Search API offers a flexible video search solution that enables users to write simple natural language queries and combine them ingeniously, helping to uncover the relevant video segments. For instance, one could craft a combined query to reveal the specific drift scenes where the lead actor drives a red Mitsubishi. Alternatively, users might search for the thrilling moment when their favorite Formula One car crosses the finish line victoriously 🏁✌️.
Search result from the indexed Tokyo Drift movie for the combined query - 'drift' (search option: visual) AND 'Mitsubishi' (search option: logo) 😎
Introduction
In the first part of this tutorial series, we explored how to perform searches within videos using simple search, where we only used one query at a time in our search requests. To make the most of this follow-up tutorial, I highly recommend reviewing the previous one to understand the basics of the Twelve Labs Search API. Assuming you have a good grasp on the basics, this tutorial will introduce more advanced concepts. We'll dive into the combined queries feature offered by the Twelve Labs API, which enables us to flexibly and conveniently locate specific moments of interest within indexed videos. To showcase this, I will create two separate indexes: one for Formula One races, and another for a full-length well-known movie, “Tokyo Drift” from the Fast and the Furious franchise. I'll then demonstrate how to use various operators to combine search queries, allowing us to identify the intriguing moments we're looking for. With that said, let's proceed to the tutorial overview and concretely outline what you can expect to learn throughout this guide.
Quick overview
Prerequisites: Sign up for the Twelve Labs API suite and install the required packages to breeze through this tutorial. Don't forget to check out the first tutorial!
Video Upload: Send your videos over to the Twelve Labs platform and watch how it effortlessly indexes them, so you can throw in your complex combined queries and fetch those moments you're after!
Combined Queries: This is where the real excitement begins! Combined queries can be succinctly defined as two or more simple search queries merged together to form a single, unified query using operators such as "or", "and", "not", and "then". We'll briefly review the theoretical aspects of these operators, and then dive into some practical examples of using them to effectively combine two or more natural language queries, aiding us in finding top moments within the indexed videos that semantically match the combined query.
Crafting a Demo App: Craft a nifty Flask-based app to harness the results from the search API, access the videos stored in a local folder on your computer, and then render a custom-designed sleek HTML page to showcase the search results in style.
💡 By the way, if you're reading this article and you're not a developer, fear not! I've included a link to a ready-made Jupyter notebook. You can easily tweak the queries and operators, then run the entire process to obtain the results 😄. Enjoy!
Prerequisites
The previous tutorial is the only prerequisite to this one. If you hit any snags while reading this or the previous one, don't hesitate to give me a shout for help! We have super quick response times 🚅🏎️⚡️ on our Discord server. If Discord isn't your vibe, feel free to reach out to me via email. After creating a Twelve Labs account, you can access the API Dashboard and obtain your API key. For the purpose of this demo, I'll be using my existing account:
<pre><code class="bash">%env API_KEY=<your_API_key>
%env API_URL=https://api.twelvelabs.io/v1.1
</code></pre>
<pre><code class="python">!pip install requests
!pip install flask

import os
import requests
import glob
from pprint import pprint

# Retrieve the URL of the API and my API key
API_URL = os.getenv("API_URL")
assert API_URL

API_KEY = os.getenv("API_KEY")
assert API_KEY
</code></pre>
Video upload
This is the initial step, where I'll create two indexes using our latest state-of-the-art video understanding engine, "Marengo 2.5," but with distinct indexing options. For the index focused on Formula One racing, besides visual and conversation, enabling text-in-video and logo options is beneficial because Formula One events are abundant with logos on vehicles, tracks, fences, and a significant amount of on-screen text during the award distribution. However, for the Tokyo Drift movie index, enabling text-in-video option may not provide any value. This is where the flexibility of creating indexes with different options comes into play. By customizing the indexing options to suit your specific needs, you can optimize the use of compute resources and ultimately save on costs.
<pre><code class="python"># Construct the URL of the `/indexes` endpoint
INDEXES_URL = f"{API_URL}/indexes"

# Set the header of the request
default_header = {
    "x-api-key": API_KEY
}

# Define a function to create an index with a given name
def create_index(index_name, index_options, engine):
    # Declare a dictionary named data
    data = {
        "engine_id": engine,
        "index_options": index_options,
        "index_name": index_name,
    }

    # Create an index
    response = requests.post(INDEXES_URL, headers=default_header, json=data)

    # Store the unique identifier of your index
    INDEX_ID = response.json().get('_id')

    # Check if the status code is 201 and print success
    if response.status_code == 201:
        print(f"Status code: {response.status_code} - The request was successful and a new index was created.")
    else:
        print(f"Status code: {response.status_code}")
    pprint(response.json())
    return INDEX_ID

# Specify the names of the indexes
index_names = ["formula_one", "tokyo_drift"]

# Create the indexes
index_id_formula_one = create_index(index_name = "formula_one", index_options=["visual", "conversation", "text_in_video", "logo"], engine = "marengo2.5")
index_id_tokyo_drift = create_index(index_name = "tokyo_drift", index_options=["visual", "conversation", "logo"], engine = "marengo2.5")

# Print the created index IDs
print(f"Created index IDs: {index_id_formula_one}, {index_id_tokyo_drift}")
</code></pre>
Output:
<pre><code class="language-plaintext">Status code: 201 - The request was successful and a new resource was created.
{'_id': '##38fb695b65d57eaecaf8##'}
Status code: 201 - The request was successful and a new resource was created.
{'_id': '##38fb695b65d57eaecaf8##'}
Created index IDs: ##38fb695b65d57eaecaf8##, ##38fb695b65d57eaecaf8##
</code></pre>
Initiating video indexing tasks
I've set up the code to automatically take in all videos from a specific folder, assign them the same name as the video file itself, and upload them to the platform asynchronously. Just make sure to place all the videos you want to include in an index within a single folder. The total indexing time will be approximately 40% of the longest video's duration since, even if you upload videos using a 'for' loop asynchronously without creating a thread for parallel uploads, the system will index them synchronously (simultaneously). If you want to index more videos within the same index later, no problem! There's no need to create a new folder for new video files. Just add them to the existing folder, and the code will check if there's already an indexed video with the same name or a pending indexing task for a video with the same name before initiating indexing. This way, you can avoid duplicates – pretty cool, right? 😄
<pre><code class="python">TASKS_URL = f"{API_URL}/tasks"
TASK_ID_LIST = []
video_folder = 'static'  # folder containing the video files
INDEX_ID = index_id_tom  # change this to the other index id while creating the index for lex fridman podcast videos
# INDEX_ID = '##38d9c4e4225d1c0eb1e8##'

# Iterate through all the video files in the folder
for file_name in os.listdir(video_folder):
    # Validate if a video already exists in the index
    task_list_response = requests.get(
        TASKS_URL,
        headers=default_header,
        params={"index_id": INDEX_ID, "filename": file_name},
    )
    if "data" in task_list_response.json():
        task_list = task_list_response.json()["data"]
        if len(task_list) > 0:
            if task_list[0]['status'] == 'ready':
                print(f"Video '{file_name}' already exists in index {INDEX_ID}")
            else:
                print("task pending or validating")
            continue

    #Proceed further to create a new task to index the current video if the video didn't exist in the index already
    print("Entering task creation code for the file: ", file_name)

    if file_name.endswith('.mp4'):  # Make sure the file is an MP4 video
        file_path = os.path.join(video_folder, file_name)  # Get the full path of the video file
        with open(file_path, "rb") as file_stream:
            data = {
                "index_id": INDEX_ID,
                "language": "en"
            }
            file_param = [
                ("video_file", (file_name, file_stream, "application/octet-stream")),] # The video will be indexed on the platform using the same name as the video file itself.

            response = requests.post(TASKS_URL, headers=default_header, data=data, files=file_param)
            TASK_ID = response.json().get("_id")
            TASK_ID_LIST.append(TASK_ID)
            # Check if the status code is 201 and print success
            if response.status_code == 201:
                print(f"Status code: {response.status_code} - The request was successful and a new resource was created.")
            else:
                print(f"Status code: {response.status_code}")
            print(f"File name: {file_name}")
            pprint(response.json())
            print("\n")
</code></pre>
Output:
<pre><code class="language-plaintext">Entering task creation code for the file:  20211113T190000Z.mp4
Status code: 201 - The request was successful and a new resource was created.
File name: 20211113T190000Z.mp4
{'_id': '6438fb6e5b65d57eaecaf8bc'}


Entering task creation code for the file:  20211113T193300Z.mp4
Status code: 201 - The request was successful and a new resource was created.
File name: 20211113T193300Z.mp4
{'_id': '##38fb755b65d57eaecaf8##'}
</code></pre>
Monitoring the indexing process
I designed the monitoring function to display the estimated time remaining for the current video being indexed. Once the indexing task is complete, the monitoring process moves on to the next video indexing task, which is already in progress due to the system's parallel indexing approach. This continues until all the videos within your folder are indexed. Finally, the total time taken to perform this synchronous indexing is presented in seconds.
<pre><code class="python">import time

def monitor_upload_status(task_id):
    TASK_STATUS_URL = f"{API_URL}/tasks/{task_id}"
    while True:
        response = requests.get(TASK_STATUS_URL, headers=default_header)
        STATUS = response.json().get("status")
        if STATUS == "ready":
            print(f"Task ID: {task_id}, Status code: {STATUS}")
            break
        remain_seconds = response.json().get('process', {}).get('remain_seconds', None)
        upload_percentage = response.json().get('process', {}).get('upload_percentage', None)
        if remain_seconds is not None:
            print(f"Remaining seconds: {remain_seconds}, Upload Percentage: {upload_percentage}")
        else:
             print('.', end='')
        time.sleep(10)

# Define starting time
start = time.time()
print("Starting to monitor...")

# Monitor the indexing process for all tasks
for task_id in TASK_ID_LIST:
    print("Current Task being monitored: ", task_id)
    monitor_upload_status(task_id)

# Define ending time
end = time.time()
print("Uploading finished")
print("Time elapsed (in seconds): ", end - start)
</code></pre>
<pre><code class="language-plaintext">Starting to monitor...
Current Task being monitored:  ##38fb6e5b65d57eaecaf8##
........Remaining seconds: 264.48919677734375, Upload Percentage: 0
Remaining seconds: 258.351806640625, Upload Percentage: 2
Remaining seconds: 253.1555633544922, Upload Percentage: 4
Remaining seconds: 247.93516540527344, Upload Percentage: 6
Remaining seconds: 242.26431274414062, Upload Percentage: 8
Remaining seconds: 237.22894287109375, Upload Percentage: 10
Remaining seconds: 231.01914978027344, Upload Percentage: 12
Remaining seconds: 224.7932891845703, Upload Percentage: 15
Remaining seconds: 218.599609375, Upload Percentage: 17
</code></pre>
List all videos in the index
To ensure that all the required videos have been indexed, let's double-check by listing all the videos present within the index. Additionally, I'm creating a list containing all video IDs and their corresponding names, as this will later be used to fetch the corresponding video name for the video segment, which will be displayed along with the start and end timestamps.
<pre><code class="python"># List all the videos in an index
INDEX_ID='##38d9c4e4225d1c0eb1e8##'
INDEXES_VIDEOS_URL = f"{API_URL}/indexes/{INDEX_ID}/videos"
response = requests.get(INDEXES_VIDEOS_URL, headers=default_header)

response_json = response.json()
pprint(response_json)

video_id_name_list = [{'video_id': video['_id'], 'video_name': video['metadata']['filename']} for video in response_json['data']]

print(video_id_name_list)
</code></pre>
<pre><code class="bash">{'data': [{'_id': '##3d978c86daab572f3481##',
           'created_at': '2023-04-17T18:56:51Z',
           'metadata': {'duration': 1800.56,
                        'engine_id': 'marengo2.5',
                        'filename': '20211113T190000Z.mp4',
                        'fps': 25,
                        'height': 396,
                        'size': 415876158,
                        'width': 704},
           'updated_at': '2023-04-17T19:01:32Z'},
          {'_id': '##3d975786daab572f3481##',
           'created_at': '2023-04-17T18:56:44Z',
           'metadata': {'duration': 1800.56,
                        'engine_id': 'marengo2.5',
                        'filename': '20211114T170000Z.mp4',
                        'fps': 25,
                        'height': 396,
                        'size': 387273943,
                        'width': 704},
           'updated_at': '2023-04-17T19:00:39Z'},
          {'_id': '##3d972e86daab572f3481##',
           'created_at': '2023-04-17T18:56:38Z',
           'metadata': {'duration': 1800.56,
                        'engine_id': 'marengo2.5',
                        'filename': '20211113T193000Z.mp4',
                        'fps': 25,
                        'height': 396,
                        'size': 386209689,
                        'width': 704},
           'updated_at': '2023-04-17T18:59:58Z'},
          {'_id': '##3d96d386daab572f3481##',
           'created_at': '2023-04-17T18:56:28Z',
           'metadata': {'duration': 1800.52,
                        'engine_id': 'marengo2.5',
                        'filename': '20211121T133000Z.mp4',
                        'fps': 25,
                        'height': 396,
                        'size': 348611416,
                        'width': 704},
           'updated_at': '2023-04-17T18:58:27Z'},
          {'_id': '##3d96af86daab572f3481##',
           'created_at': '2023-04-17T18:56:08Z',
           'metadata': {'duration': 1800.56,
                        'engine_id': 'marengo2.5',
                        'filename': '20211113T200000Z.mp4',
                        'fps': 25,
                        'height': 396,
                        'size': 327766175,
                        'width': 704},
           'updated_at': '2023-04-17T18:57:51Z'}],
 'page_info': {'limit_per_page': 10,
               'page': 1,
               'total_duration': 9002.76,
               'total_page': 1,
               'total_results': 5}}

[{'video_id': '##3d978c86daab572f3481##', 'video_name': '20211113T190000Z.mp4'},
 {'video_id': '##3d975786daab572f3481##', 'video_name': '20211114T170000Z.mp4'},
 {'video_id': '##3d972e86daab572f3481##', 'video_name': '20211113T193000Z.mp4'},
 {'video_id': '##3d96d386daab572f3481##', 'video_name': '20211121T133000Z.mp4'},
 {'video_id': '##3d96af86daab572f3481##', 'video_name': '20211113T200000Z.mp4'}]
 </code></pre>
Combined queries
Once the system finishes indexing the videos and generating video embeddings, we will be ready to find the topmost semantically matching moments using the search API. We've already explored how to use simple queries in the previous tutorial; here, we will focus on formulating useful combined queries.
The search API enables constructing combined queries using the following operators:
AND: This operator represents the intersection of simple queries. For example, combining two simple queries, "a red car" and "a blue car," with the 'and' operator will fetch all the scenes where both red and blue cars are present.
OR: This operator is used for the union of simple queries. For our running example of two simple queries, "a red car" and "a blue car", combining them with the 'or' operator will fetch all the scenes where either a red or a blue car is present.
NOT: To use this operator, we will need to create a dictionary where the key is the $not string, and the value is a dictionary composed of two queries named origin and sub. The API will return video segments that match the origin query but do not match the sub query. For our existing example, using "a red car" as the origin and "a blue car" as the sub, the system will fetch segments where a red car is present, but a blue car is not. Note that both origin and sub queries can include any number of subqueries.
THEN: This operator can be used by creating a dictionary where the key is the $then string, and the value is an array of objects. Each object represents a subquery. The API will return results only when the order of the matching video fragments corresponds to the order of the subqueries. So, in the case of our example, video segments where a red car is seen followed by a blue car in that definitive sequence will be returned.
That was quite a bit of theory; now let's dive into the more exciting application aspect by performing our first search using a combined query. This combined query consists of two simple queries combined together using the “AND” operator, with each query having different search options. The first query is to look for scenes that are semantically similar to the concept of "winning a trophy" in both audio and visuals, while the second query is to look for scenes containing text or a logo that reads "crypto.com." By combining these queries, we can find video segments that satisfy both criteria simultaneously:
<pre><code class="python"># Construct the URL of the `/search` endpoint
SEARCH_URL = f"{API_URL}/search/"

# Declare a dictionary named `data`
data = {
    "index_id": INDEX_ID,
    "search_options": ["visual"],
    "query": {
                "$and": [
                    {
                        "text": "winning trophy",
                        "search_options": ["visual"]
                    },
                    {
                        "text": "crypto.com",
                        "search_options": ["text_in_video"]
                    }
                ]
            }
        }
# Make a search request
response = requests.post(SEARCH_URL, headers=default_header, json=data)
if response.status_code == 200:
    print(f"Status code: {response.status_code} - Success")
else:
    print(f"Status code: {response.status_code}")
pprint(response.json())
</code></pre>
Output:
<pre><code class="bash">Status code: 200 - Success
{'data': [{'confidence': 'high',
           'end': 20,
           'score': 92.28,
           'start': 18,
           'video_id': '##3d96af86daab572f3481##'},
          {'confidence': 'high',
           'end': 43,
           'score': 92.28,
           'start': 42,
           'video_id': '##3d978c86daab572f3481##'},
          {'confidence': 'high',
           'end': 71,
           'score': 92.28,
           'start': 61,
           'video_id': '##3d978c86daab572f3481##'},
          {'confidence': 'high',
           'end': 62,
           'score': 92.28,
           'start': 61,
           'video_id': '##3d96af86daab572f3481##'},
          {'confidence': 'high',
           'end': 67,
           'score': 92.28,
           'start': 65,
           'video_id': '##3d96af86daab572f3481##'}],
 'page_info': {'limit_per_page': 10,
               'next_page_token': '##69daa3-827f-4165-982d-ec0d34f97c7c-1',
               'page_expired_at': '2023-04-17T23:56:00Z',
               'total_results': 110},
 'search_pool': {'index_id': '##3d9556f607a5a7bd9ea5##',
                 'total_count': 5,
                 'total_duration': 9003}}
</code></pre>
Corresponding video segments:
<div style="position: relative; padding-bottom: 47.8125%; height: 0;"><iframe src="https://www.loom.com/embed/1a08de21a4d14f85ab3ee125660438da" frameborder="0" webkitallowfullscreen mozallowfullscreen allowfullscreen style="position: absolute; top: 0; left: 0; width: 100%; height: 100%;"></iframe></div>
<div style="position: relative; padding-bottom: 47.8125%; height: 0;"><iframe src="https://www.loom.com/embed/e2cb3c58f49c4b00b0c6c5b2f745acfc" frameborder="0" webkitallowfullscreen mozallowfullscreen allowfullscreen style="position: absolute; top: 0; left: 0; width: 100%; height: 100%;"></iframe></div>
This part exhilarates me as it highlights the presence of intelligence. The model exhibits a human-like understanding of the video content. As you can see in the above screenshot, the system nails it by pinpointing the exact moments I wanted to extract.
Let's give it another shot by combining a set of simple queries to search specifically, but this time for the second index containing the entire Tokyo Drift Movie:
<pre><code class="python"># Construct the URL of the `/search` endpoint
SEARCH_URL = f"{API_URL}/search/"

# Declare a dictionary named `data`
data = {
    "index_id": INDEX_ID,
    "search_options": ["visual"],
    "query": {
                "$and": [
                    {
                        "text": "drift",
                        "search_options": ["visual"]
                    },
                    {
                        "text": "mitsubishi",
                        "search_options": ["logo"]
                    }
                ]
            }
        }
# Make a search request
response = requests.post(SEARCH_URL, headers=default_header, json=data)
if response.status_code == 200:
    print(f"Status code: {response.status_code} - Success")
else:
    print(f"Status code: {response.status_code}")
pprint(response.json())
</code></pre>
Output:
<pre><code class="bash">Status code: 200 - Success
{'data': [{'confidence': 'high',
           'end': 3710,
           'score': 92.28,
           'start': 3705,
           'video_id': '##3e3ace86daab572f3481##'}],
 'page_info': {'limit_per_page': 10,
               'page_expired_at': '2023-04-18T09:09:59Z',
               'total_results': 1},
 'search_pool': {'index_id': '##3e3647f607a5a7bd9ea5##',
                 'total_count': 1,
                 'total_duration': 6246}}
</code></pre>
Corresponding video segment:
<div style="position: relative; padding-bottom: 47.8125%; height: 0;"><iframe src="https://www.loom.com/embed/a7fc79ff424f4d50b7a42dc2bd134473" frameborder="0" webkitallowfullscreen mozallowfullscreen allowfullscreen style="position: absolute; top: 0; left: 0; width: 100%; height: 100%;"></iframe></div>
Bingo! Once again, the system pinpointed the perfect moment spot-on. The scene features Sean (Lucas Black), the lead actor, skillfully drifting a red Mitsubishi.
Let's prepare a python list that includes each video's ID, corresponding title, and its respective start and end timestamps. We'll pass this list to the Flask app in the next step, allowing us to display our search results on a webpage:
<pre><code class="python">response_data = response.json()

# Extract unique video IDs
unique_video_ids = list(set([item['video_id'] for item in response_data['data']]))

# Create empty start and end instances lists for each video ID
video_start_end_lists = {video_id: {'starts': [], 'ends': []} for video_id in unique_video_ids}

def find_video_name(video_id, video_id_name_list):
    for video in video_id_name_list:
        if video['video_id'] == video_id:
            return video['video_name']
    return None

# Append start and end instances to their respective lists
for item in response_data['data']:
    video_id = item['video_id']
    video_start_end_lists[video_id]['starts'].append(item['start'])
    video_start_end_lists[video_id]['ends'].append(item['end'])

for video_id, timestamps in video_start_end_lists.items():
    video_name = find_video_name(video_id, video_id_name_list)
    if video_name:
        timestamps['video_name'] = video_name
    else:
        print(f"No video name found for ID '{video_id}'")

# Print the result
pprint(video_start_end_lists)
</code></pre>
<pre><code class="bash">{'##3d96af86daab572f3481##': {'ends': [20, 62, 67, 114],
                              'starts': [18, 61, 65, 111],
                              'video_name': '20211113T200000Z.mp4'},
 '643d972e86daab572f34810d': {'ends': [84],
                              'starts': [68],
                              'video_name': '20211113T193000Z.mp4'},
 '643d975786daab572f34810e': {'ends': [79],
                              'starts': [70],
                              'video_name': '20211114T170000Z.mp4'},
 '643d978c86daab572f34810f': {'ends': [43, 71, 85, 95],
                              'starts': [42, 61, 84, 91],
                              'video_name': '20211113T190000Z.mp4'}}
</code></pre>
To save the list for later use in a Flask app, we can serialize (pickle) the list to a file:
<pre><code class="python">import pickle

with open("lists.pkl", "wb") as f:
    pickle.dump(video_start_end_lists, f)
</code></pre>
Crafting a demo app
We've arrived at the final step, where we'll leverage the JSON responses we received to efficiently retrieve and display video segments without having to manually identify the start and end points. To achieve this, we'll host a web page that can utilize these timestamps and apply them to the videos retrieved from our local drive. As a result, we will have visually appealing video segments that match our search, all seamlessly displayed on our web page.
The directory structure will look like this:
<pre><code class="markdown">my_flask_app/
│   app.py
│   sample_notebook.ipynb
└───templates/
│	│   index.html
└───static/
	│   <your_video_1.mp4>
	│   <your_video_2.mp4>
	│   <your_video_3.mp4>
			.
			.
			.
</code></pre>
Flask app code
Below is the code for the "app.py" file:
<pre><code class="python">
from flask import Flask, render_template
import pickle

with open("lists.pkl", "rb") as f:
   video_start_end_lists = pickle.load(f)

app = Flask(__name__)

@app.route("/")
def index():
    return render_template("index_local.html", video_start_end_lists=video_start_end_lists)

if __name__ == "__main__":
    app.run(debug=True)
</code></pre>
HTML template
Below is a sample Jinja2-based HTML template that incorporates code within the HTML file to iterate through the list we prepared earlier, fetch the required videos from the local drive, and display the results of our combined query:
<pre><code class="language-html"><!DOCTYPE html>
    <html>
      <head>
        <link rel="shortcut icon" href="#" />
        <style>
          body {
            background-color: #FFE0B2; /* Light Orange */
            font-family: Arial, sans-serif;
            text-align: center;
            margin: 0;
          }
          h1 {
            font-size: 3em;
            color: #000000; /* Black */
            background-color: #9ACD32; /* Light Green */
            padding: 20px;
            margin: 0;
          }
          h2 {
            font-size: 2em;
            color: #000000; /* Black */
            margin-bottom: 20px;
            text-align: left;
            padding-left: 20px;
          }
          .video-container {
            display: flex;
            flex-wrap: wrap;
            padding: 2px;
            justify-content: space-evenly;
            gap: 2px;
          }
          .video-item {
            display: flex;
            flex-direction: column;
            align-items: center;
            width: 45%;
            height: 450px;
            margin: 20px;
            text-align: center;
            background-color: #FFFFFF;
            box-shadow: 0 4px 8px rgba(0, 0, 0, 0.1);
            border-radius: 10px;
            padding: 20px;
          }
          .video-item video {
            width: 100%;
            height: 380px;
            margin: 0; /* Remove bottom margin */
            border-radius: 5px;
          }
          .video-item p {
            font-size: 16px;
            margin-top: 10px;
            font-weight: bold;
            color: #212121; /* Dark Grey */
          }
          .video-item span {
            color: #9ACD32; /* Light Green */
          }
        </style>
      </head>
      <body>
        <h1>My Favorite Scenes</h1>
        {% for video_id, segments in video_start_end_lists.items() %}
        <div class="video-section">
          <h2>Scenes from {{segments['video_name']}}</h2>
          <div class="video-container">
            {% for i in range(segments['starts']|length) %}
              <div class="video-item">
                <video id="video_{{ video_id }}_{{ i }}" width="560" height="315" controls>
                  <source src="{{ url_for('static', filename= segments['video_name']) }}" type="video/mp4">
                  Your browser does not support the video tag.
                </video>
                <p>Start: <span>{{ segments['starts'][i] }}</span> | End: <span>{{ segments['ends'][i] }}</span></p>
                <script>
                  document.getElementById("video_{{ video_id }}_{{ i }}").addEventListener("loadedmetadata", function() {
                    this.currentTime = {{ segments['starts'][i] }};
                  });
                  document.getElementById("video_{{ video_id }}_{{ i }}").addEventListener("timeupdate", function() {
                    if (this.currentTime >= {{ segments['ends'][i] }}) {
                      this.pause();
                    }
                  });
                </script>
              </div>
            {% endfor %}
          </div>
        </div>
        {% endfor %}
      </body>
    </html>
</code></pre>
Running the Flask app
Perfect! let’s just run the last cell of our Jupyter notebook to launch our Flask app:
<pre><code class="python">%run app.py
</code></pre>
You should see an output similar to the one below, which indicates that everything is going according to our expectations 😊:
Once you click on the URL link http://127.0.0.1:5000, depending upon your combined search query, the output will be as follows:
Here's the Jupyter Notebook containing the complete code that we've put together throughout this tutorial - https://tinyurl.com/combinedQueries
Fun activities for you to explore
Experiment with various permutations and combinations of search options and operators, and share your analysis with fellow multimodal enthusiasts on our Discord channel.
Experiment with variations in the wording of the simple queries and verify whether the results remain consistent or differ. Explore how subtle changes in language within the queries—when combined together—affect the search outcome and the accuracy of matching video segments.
Showcase your developer skills by enhancing the code! Develop a mechanism to upload all the videos at once in parallel (synchronous upload) and modify the code to monitor the indexing process accordingly.
Upcoming post
In the upcoming post, we'll dive into the Classification API and will develop classification criteria on the fly to effectively classify a set of videos. Stay tuned for the forthcoming excitement and don't forget to join our Discord community to engage with other like-minded individuals who are passionate about multimodal foundation models.