" height="9.18705px" id="AiyYyR90G" transform="translate(3.406 3.406)" width="9.18685px"/></svg>)
" height="1.90314px" id="wtDTm6bEW" transform="translate(26.225 0)" width="2.4723000000000006px"/><path d="M 0.557 0 L 1.438 0 C 1.746 0 1.995 0.25 1.995 0.559 L 1.995 1.344 C 1.995 1.653 1.746 1.903 1.438 1.903 L 0.557 1.903 C 0.25 1.903 0 1.653 0 1.344 L 0 0.559 C 0 0.25 0.25 0 0.557 0 Z" fill="rgb(29, 28, 27)" height="1.9031500000000001px" id="GnmDnNra_" transform="translate(36.408 2.728)" width="1.9953000000000003px"/><path d="M 6.224 0 L 0.558 0 C 0.25 0 0 0.25 0 0.559 L 0 1.344 C 0 1.653 0.25 1.903 0.558 1.903 L 6.224 1.903 C 6.531 1.903 6.781 1.653 6.781 1.344 L 6.781 0.559 C 6.781 0.25 6.531 0 6.224 0 Z" fill="rgb(29, 28, 27)" height="1.9031500000000001px" id="hKTQ3dbw4" transform="translate(34.261 5.456)" width="6.781100000000002px"/><path d="M 6.955 0 L 0.558 0 C 0.25 0 0 0.25 0 0.559 L 0 1.344 C 0 1.653 0.25 1.903 0.558 1.903 L 6.955 1.903 C 7.263 1.903 7.513 1.653 7.513 1.344 L 7.513 0.559 C 7.513 0.25 7.263 0 6.955 0 Z" fill="rgb(29, 28, 27)" height="1.9031500000000001px" id="G1Zzk9CUU" transform="translate(28.298 8.243)" width="7.513100000000001px"/><path d="M 7.123 0 L 0.558 0 C 0.25 0 0 0.25 0 0.559 L 0 1.344 C 0 1.653 0.25 1.903 0.558 1.903 L 7.123 1.903 C 7.431 1.903 7.681 1.653 7.681 1.344 L 7.681 0.559 C 7.681 0.25 7.431 0 7.123 0 Z" fill="rgb(29, 28, 27)" height="1.9030999999999985px" id="fm7cHxIfJ" transform="translate(0 10.972)" width="7.68067px"/><path d="M 13.447 0 L 0.558 0 C 0.25 0 0 0.25 0 0.559 L 0 1.344 C 0 1.653 0.25 1.903 0.558 1.903 L 13.447 1.903 C 13.755 1.903 14.004 1.653 14.004 1.344 L 14.004 0.559 C 14.004 0.25 13.755 0 13.447 0 Z" fill="rgb(29, 28, 27)" height="1.9030999999999985px" id="LowSwDrtg" transform="translate(9.552 10.972)" width="14.0044px"/><path d="M 0.558 0 L 8.212 0 C 8.52 0 8.77 0.25 8.77 0.559 L 8.77 1.344 C 8.77 1.653 8.52 1.903 8.212 1.903 L 0.558 1.903 C 0.25 1.903 0 1.653 0 1.344 L 0 0.559 C 0 0.25 0.25 0 0.558 0 Z" fill="rgb(29, 28, 27)" height="1.9030999999999985px" id="xRiKc2od7" transform="translate(27.041 10.972)" width="8.769900000000003px"/><path d="M 0.557 0 L 5.4 0 C 5.708 0 5.958 0.25 5.958 0.559 L 5.958 1.344 C 5.958 1.653 5.708 1.903 5.4 1.903 L 0.557 1.903 C 0.25 1.903 0 1.653 0 1.344 L 0 0.559 C 0 0.25 0.25 0 0.557 0 Z" fill="rgb(29, 28, 27)" height="1.9031500000000001px" id="JWdNVicde" transform="translate(36.796 8.243)" width="5.957599999999999px"/><path d="M 1.438 0 L 0.558 0 C 0.25 0 0 0.25 0 0.559 L 0 1.344 C 0 1.653 0.25 1.903 0.558 1.903 L 1.438 1.903 C 1.746 1.903 1.995 1.653 1.995 1.344 L 1.995 0.559 C 1.995 0.25 1.746 0 1.438 0 Z" fill="rgb(29, 28, 27)" height="1.9031500000000001px" id="RfFYVCT_T" transform="translate(28.717 5.456)" width="1.9953000000000003px"/><path d="M 0.558 0 L 2.895 0 C 3.203 0 3.453 0.25 3.453 0.559 L 3.453 1.406 C 3.453 1.714 3.203 1.964 2.895 1.964 L 0.558 1.964 C 0.25 1.964 0 1.714 0 1.406 L 0 0.559 C 0 0.25 0.25 0 0.558 0 Z" fill="rgb(29, 28, 27)" height="1.964299999999998px" id="dngJ6MU2p" transform="translate(16.183 24.582)" width="3.4525000000000006px"/><path d="M 1.706 0 L 0.558 0 C 0.25 0 0 0.25 0 0.559 L 0 1.406 C 0 1.714 0.25 1.964 0.558 1.964 L 1.706 1.964 C 2.014 1.964 2.263 1.714 2.263 1.406 L 2.263 0.559 C 2.263 0.25 2.014 0 1.706 0 Z" fill="rgb(29, 28, 27)" height="1.964299999999998px" id="N_fstvKmR" transform="translate(22.18 24.582)" width="2.2631999999999977px"/><path d="M 0.558 0 L 5.544 0 C 5.852 0 6.101 0.25 6.101 0.559 L 6.101 1.406 C 6.101 1.714 5.852 1.964 5.544 1.964 L 0.558 1.964 C 0.25 1.964 0 1.714 0 1.406 L 0 0.559 C 0 0.25 0.25 0 0.558 0 Z" fill="rgb(29, 28, 27)" height="1.964299999999998px" id="t55XLYcgb" transform="translate(25.486 24.582)" width="6.101399999999998px"/><path d="M 1.976 0 L 0.558 0 C 0.25 0 0 0.25 0 0.559 L 0 1.406 C 0 1.714 0.25 1.964 0.558 1.964 L 1.976 1.964 C 2.284 1.964 2.533 1.714 2.533 1.406 L 2.533 0.559 C 2.533 0.25 2.284 0 1.976 0 Z" fill="rgb(29, 28, 27)" height="1.964299999999998px" id="ZrEKTVTAe" transform="translate(28.542 21.854)" width="2.5334000000000003px"/><path d="M 0.557 0 L 1.438 0 C 1.746 0 1.995 0.25 1.995 0.559 L 1.995 1.406 C 1.995 1.714 1.746 1.964 1.438 1.964 L 0.557 1.964 C 0.25 1.964 0 1.714 0 1.406 L 0 0.559 C 0 0.25 0.25 0 0.557 0 Z" fill="rgb(29, 28, 27)" height="1.964299999999998px" id="Z0fPTp9aR" transform="translate(11.425 24.582)" width="1.9953000000000003px"/><path d="M 0 0.559 C 0 0.251 0.251 0 0.558 0 L 1.438 0 C 1.745 0 1.995 0.251 1.995 0.559 L 1.995 1.405 C 1.995 1.713 1.745 1.964 1.438 1.964 L 0.558 1.964 C 0.251 1.964 0 1.713 0 1.405 Z" fill="rgb(29, 28, 27)" height="1.964299999999998px" id="Tj_PDHFDh" transform="translate(20.635 27.308)" width="1.9954px"/><path d="M 0.557 0 L 1.342 0 C 1.65 0 1.899 0.25 1.899 0.559 L 1.899 1.406 C 1.899 1.714 1.65 1.964 1.342 1.964 L 0.557 1.964 C 0.25 1.964 0 1.714 0 1.406 L 0 0.559 C 0 0.25 0.25 0 0.557 0 Z" fill="rgb(29, 28, 27)" height="1.9643000000000015px" id="AYq9dXkKz" transform="translate(18.686 30.036)" width="1.8994px"/><path d="M 0.558 0 L 5.768 0 C 6.076 0 6.326 0.25 6.326 0.559 L 6.326 1.344 C 6.326 1.653 6.076 1.903 5.768 1.903 L 0.558 1.903 C 0.25 1.903 0 1.653 0 1.344 L 0 0.559 C 0 0.25 0.25 0 0.558 0 Z" fill="rgb(29, 28, 27)" height="1.9031500000000001px" id="rspevfJcx" transform="translate(12.157 8.243)" width="6.325900000000001px"/><path d="M 3.285 0 L 0.558 0 C 0.25 0 0 0.25 0 0.559 L 0 1.344 C 0 1.653 0.25 1.903 0.558 1.903 L 3.285 1.903 C 3.593 1.903 3.842 1.653 3.842 1.344 L 3.842 0.559 C 3.842 0.25 3.593 0 3.285 0 Z" fill="rgb(29, 28, 27)" height="1.9031500000000001px" id="XRUAhGnph" transform="translate(23.887 2.728)" width="3.8424000000000014px"/><path d="M 0.558 0 L 5.644 0 C 5.952 0 6.202 0.25 6.202 0.559 L 6.202 1.344 C 6.202 1.653 5.952 1.903 5.644 1.903 L 0.558 1.903 C 0.25 1.903 0 1.653 0 1.344 L 0 0.559 C 0 0.25 0.25 0 0.558 0 Z" fill="rgb(29, 28, 27)" height="1.9031500000000001px" id="VsaVVIfke" transform="translate(21.528 5.456)" width="6.201600000000003px"/><path d="M 3.06 0 L 0.558 0 C 0.25 0 0 0.25 0 0.559 L 0 1.344 C 0 1.653 0.25 1.903 0.558 1.903 L 3.06 1.903 C 3.369 1.903 3.618 1.653 3.618 1.344 L 3.618 0.559 C 3.618 0.25 3.369 0 3.06 0 Z" fill="rgb(29, 28, 27)" height="1.9030999999999985px" id="wiAKEgyId" transform="translate(40.819 10.972)" width="3.6182000000000016px"/><path d="M 0.558 0 L 17.318 0 C 17.626 0 17.875 0.25 17.875 0.559 L 17.875 1.345 C 17.875 1.653 17.626 1.903 17.318 1.903 L 0.558 1.903 C 0.25 1.903 0 1.653 0 1.345 L 0 0.559 C 0 0.25 0.25 0 0.558 0 Z" fill="rgb(29, 28, 27)" height="1.9032px" id="FIE0ufK9m" transform="translate(6.666 13.7)" width="17.87506px"/><path d="M 6.426 0 L 0.558 0 C 0.25 0 0 0.25 0 0.559 L 0 1.345 C 0 1.653 0.25 1.903 0.558 1.903 L 6.426 1.903 C 6.734 1.903 6.984 1.653 6.984 1.345 L 6.984 0.559 C 6.984 0.25 6.734 0 6.426 0 Z" fill="rgb(29, 28, 27)" height="1.9032000000000018px" id="ut9UWny3L" transform="translate(22.892 19.156)" width="6.983599999999999px"/><path d="M 0.558 0 L 22.151 0 C 22.459 0 22.709 0.25 22.709 0.559 L 22.709 1.344 C 22.709 1.653 22.459 1.903 22.151 1.903 L 0.558 1.903 C 0.25 1.903 0 1.653 0 1.344 L 0 0.559 C 0 0.25 0.25 0 0.558 0 Z" fill="rgb(29, 28, 27)" height="1.9030999999999985px" id="VULnffgbk" transform="translate(9.552 16.428)" width="22.7089px"/><path d="M 7.886 0 L 0.558 0 C 0.25 0 0 0.25 0 0.559 L 0 1.345 C 0 1.653 0.25 1.903 0.558 1.903 L 7.886 1.903 C 8.194 1.903 8.443 1.653 8.443 1.345 L 8.443 0.559 C 8.443 0.25 8.194 0 7.886 0 Z" fill="rgb(29, 28, 27)" height="1.9032000000000018px" id="adZTYr4MR" transform="translate(6.078 19.156)" width="8.44303px"/><path d="M 0.558 0 L 2.211 0 C 2.519 0 2.769 0.25 2.769 0.559 L 2.769 1.406 C 2.769 1.714 2.519 1.964 2.211 1.964 L 0.558 1.964 C 0.25 1.964 0 1.714 0 1.406 L 0 0.559 C 0 0.25 0.25 0 0.558 0 Z" fill="rgb(29, 28, 27)" height="1.964299999999998px" id="bwdUdEmCH" transform="translate(13.784 21.854)" width="2.768600000000001px"/><path d="M 2.424 0 L 0.558 0 C 0.25 0 0 0.25 0 0.559 L 0 1.406 C 0 1.714 0.25 1.964 0.558 1.964 L 2.424 1.964 C 2.732 1.964 2.982 1.714 2.982 1.406 L 2.982 0.559 C 2.982 0.25 2.732 0 2.424 0 Z" fill="rgb(29, 28, 27)" height="1.964299999999998px" id="PUvesMJEj" transform="translate(23.556 21.854)" width="2.982199999999999px"/><path d="M 0.558 0 L 2.241 0 C 2.55 0 2.799 0.25 2.799 0.559 L 2.799 1.406 C 2.799 1.714 2.55 1.964 2.241 1.964 L 0.558 1.964 C 0.25 1.964 0 1.714 0 1.406 L 0 0.559 C 0 0.25 0.25 0 0.558 0 Z" fill="rgb(29, 28, 27)" height="1.964299999999998px" id="Wo2W7J3Zj" transform="translate(8.672 21.854)" width="2.799050000000001px"/><path d="M 6.661 0 L 0.558 0 C 0.25 0 0 0.25 0 0.559 L 0 1.345 C 0 1.653 0.25 1.903 0.558 1.903 L 6.661 1.903 C 6.969 1.903 7.219 1.653 7.219 1.345 L 7.219 0.559 C 7.219 0.25 6.969 0 6.661 0 Z" fill="rgb(29, 28, 27)" height="1.9032px" id="PpPVZXp9j" transform="translate(27.041 13.7)" width="7.218900000000001px"/><path d="M 0.621 1.905 C 0.218 1.905 0 1.687 0 1.283 L 0 0.622 C 0 0.218 0.218 0 0.621 0 L 11.225 0 C 11.628 0 11.846 0.218 11.846 0.622 L 11.846 1.283 C 11.846 1.687 11.628 1.905 11.225 1.905 L 6.934 1.905 L 6.934 14.926 C 6.934 15.33 6.716 15.548 6.313 15.548 L 5.537 15.548 C 5.134 15.548 4.916 15.33 4.916 14.926 L 4.916 1.905 Z" fill="rgb(29, 28, 27)" height="15.54825px" id="xr32fxeO6" transform="translate(52.177 8.243)" width="11.845599999999997px"/><path d="M 0.621 0 C 0.218 0 0 0.218 0 0.622 L 0 14.924 C 0 15.328 0.218 15.546 0.621 15.546 L 1.357 15.546 C 1.76 15.546 1.978 15.328 1.978 14.924 L 1.978 0.622 C 1.978 0.218 1.76 0 1.357 0 Z" fill="rgb(29, 28, 27)" height="15.546050000000001px" id="oSsO_UPVN" transform="translate(90.476 8.243)" width="1.9779000000000053px"/><path d="M 0.62 15.546 C 0.217 15.546 0 15.328 0 14.924 L 0 0.622 C 0 0.218 0.217 0 0.62 0 L 1.396 0 C 1.799 0 2.017 0.218 2.017 0.622 L 2.017 13.632 L 8.981 13.632 C 9.384 13.632 9.602 13.85 9.602 14.254 L 9.602 14.924 C 9.602 15.328 9.384 15.546 8.981 15.546 Z" fill="rgb(29, 28, 27)" height="15.546050000000001px" id="Sgj4z5osO" transform="translate(116.749 8.243)" width="9.602000000000004px"/><path d="M 1.974 14.924 C 1.974 15.328 1.756 15.546 1.353 15.546 L 0.621 15.546 C 0.218 15.546 0 15.328 0 14.924 L 0 0.622 C 0 0.218 0.218 0 0.621 0 L 1.357 0 C 1.76 0 1.978 0.218 1.978 0.622 L 1.978 5.747 C 2.634 4.721 3.806 4.079 5.309 4.079 C 8.18 4.079 10.356 6.358 10.356 9.948 C 10.356 13.538 8.18 15.817 5.309 15.817 C 3.801 15.817 2.627 15.175 1.971 14.145 L 1.971 14.922 Z M 8.36 9.95 C 8.36 7.362 6.881 5.928 5.121 5.928 C 3.361 5.928 1.863 7.362 1.863 9.95 C 1.863 12.539 3.361 13.972 5.121 13.972 C 6.881 13.972 8.36 12.539 8.36 9.95 Z" fill="rgb(29, 28, 27)" height="15.81665px" id="q13jjj7xd" transform="translate(138.401 8.243)" width="10.355999999999995px"/><path d="M 4.457 11.738 C 0.961 11.738 -0.019 9.872 0 8.318 C 0.005 7.929 0.253 7.735 0.645 7.735 L 1.344 7.735 C 1.748 7.735 1.922 7.949 1.961 8.352 C 2.063 9.315 2.693 9.907 4.433 9.907 C 6.174 9.907 7.012 9.269 7.012 8.289 C 7.012 7.425 6.522 7.108 5.305 6.899 L 3.209 6.539 C 1.453 6.238 0.29 5.247 0.29 3.468 C 0.29 1.467 1.774 0 4.518 0 C 7.263 0 8.838 1.491 8.814 3.23 C 8.81 3.614 8.553 3.808 8.165 3.808 L 7.457 3.808 C 7.054 3.808 6.908 3.595 6.851 3.202 C 6.749 2.477 6.159 1.818 4.518 1.818 C 2.878 1.818 2.249 2.508 2.249 3.403 C 2.249 4.175 2.695 4.516 3.81 4.714 L 5.906 5.083 C 7.72 5.404 8.98 6.292 8.98 8.198 C 8.98 9.976 7.908 11.74 4.455 11.74 Z" fill="rgb(29, 28, 27)" height="11.739799999999999px" id="tJ8syeWTW" transform="translate(150.024 12.325)" width="8.980269730401375px"/><path d="M 9.146 7.997 C 9.146 8.813 9.175 9.983 9.282 10.799 C 9.334 11.223 9.155 11.465 8.728 11.465 L 8.068 11.465 C 7.685 11.465 7.467 11.319 7.428 11.022 L 7.317 10.181 C 6.724 11.157 5.565 11.659 4.145 11.659 C 1.579 11.659 0 10.142 0 8.078 C 0 6.27 1.27 5.157 3.433 5.002 L 6.589 4.78 C 7.162 4.741 7.186 4.688 7.186 4.153 L 7.186 3.682 C 7.186 2.438 6.434 1.807 4.79 1.807 C 3.145 1.807 2.472 2.425 2.405 3.289 C 2.376 3.697 2.235 3.916 1.823 3.916 L 1.067 3.916 C 0.675 3.916 0.427 3.717 0.422 3.328 C 0.407 1.51 1.74 0 4.792 0 C 7.798 0 9.162 1.427 9.155 3.736 Z M 7.188 7.298 L 7.188 6.244 C 6.955 6.327 6.678 6.386 6.363 6.415 L 3.598 6.676 C 2.59 6.775 1.997 7.163 1.997 8.099 L 1.999 8.099 C 1.999 9.188 2.886 9.97 4.4 9.97 C 6.169 9.97 7.188 8.9 7.188 7.298 Z" fill="rgb(29, 28, 27)" height="11.658999999999999px" id="QPESIZvku" transform="translate(126.854 12.325)" width="9.290755130109668px"/><path d="M 5.224 0 C 8.313 0 10.295 2.255 10.295 5.456 L 10.295 5.694 C 10.295 6.098 10.077 6.316 9.674 6.316 L 1.998 6.316 C 2.168 8.547 3.447 9.898 5.407 9.898 C 6.768 9.898 7.598 9.363 7.934 8.431 C 8.06 8.078 8.243 7.892 8.618 7.892 L 9.33 7.892 C 9.746 7.892 9.994 8.125 9.923 8.538 C 9.598 10.433 7.834 11.74 5.409 11.74 L 5.407 11.738 C 2.168 11.738 0 9.424 0 5.797 C 0 2.169 2.135 0 5.224 0 Z M 5.222 1.74 C 3.494 1.74 2.405 2.818 2.074 4.64 L 8.282 4.64 C 8.054 2.842 6.949 1.74 5.222 1.74 Z" fill="rgb(29, 28, 27)" height="11.739799999999999px" id="PKmyQkwJE" transform="translate(104.541 12.325)" width="10.295000000000002px"/><path d="M 4.459 11.194 C 4.099 11.194 3.877 11.039 3.746 10.703 L 0.091 1.021 C -0.024 0.72 -0.031 0.511 0.076 0.297 C 0.178 0.094 0.381 0 0.732 0 L 1.274 0 C 1.633 0 1.86 0.155 1.986 0.495 L 4.958 8.503 L 5.123 9.018 L 5.289 8.503 L 8.262 0.495 C 8.388 0.155 8.615 0 8.974 0 L 9.517 0 C 9.865 0 10.07 0.092 10.172 0.297 C 10.279 0.511 10.275 0.72 10.157 1.021 L 6.502 10.703 C 6.371 11.039 6.149 11.194 5.79 11.194 Z" fill="rgb(29, 28, 27)" height="11.1941px" id="uUQr5Yl4B" transform="translate(93.807 12.595)" width="10.248961642504256px"/><path d="M 5.407 11.738 C 2.167 11.738 0 9.424 0 5.797 C 0 2.169 2.133 0 5.221 0 C 8.31 0 10.292 2.255 10.292 5.456 L 10.292 5.694 C 10.292 6.098 10.075 6.316 9.672 6.316 L 1.995 6.316 C 2.165 8.547 3.446 9.898 5.404 9.898 C 6.768 9.898 7.596 9.363 7.931 8.431 C 8.058 8.078 8.241 7.892 8.615 7.892 L 9.328 7.892 C 9.744 7.892 9.992 8.125 9.918 8.538 C 9.593 10.433 7.829 11.74 5.404 11.74 Z M 8.282 4.64 C 8.053 2.842 6.949 1.74 5.221 1.74 C 3.494 1.74 2.405 2.818 2.074 4.64 Z" fill="rgb(29, 28, 27)" height="11.739799999999999px" id="zo1nSBuSF" transform="translate(78.397 12.325)" width="10.29249999999999px"/><path d="M 3.057 10.677 C 3.163 11.026 3.392 11.192 3.756 11.192 L 3.749 11.194 L 4.987 11.194 C 5.35 11.194 5.579 11.028 5.69 10.679 L 8.173 2.654 L 8.237 2.401 L 8.3 2.654 L 10.787 10.679 C 10.894 11.028 11.123 11.194 11.487 11.194 L 12.733 11.194 C 13.096 11.194 13.325 11.028 13.432 10.679 L 16.418 1.006 C 16.516 0.7 16.512 0.498 16.41 0.288 C 16.307 0.089 16.109 0.002 15.76 0.002 L 15.218 0.002 C 14.848 0.002 14.626 0.168 14.519 0.522 L 12.094 8.547 L 12.046 8.761 L 11.999 8.542 L 9.506 0.517 C 9.4 0.168 9.171 0.002 8.807 0.002 L 7.683 0.002 C 7.319 0.002 7.091 0.168 6.984 0.517 L 4.492 8.542 L 4.449 8.745 L 4.405 8.551 L 1.98 0.519 C 1.874 0.166 1.649 0 1.281 0 L 0.728 0 C 0.38 0 0.181 0.087 0.079 0.286 C -0.021 0.493 -0.028 0.698 0.07 1.004 Z" fill="rgb(29, 28, 27)" height="11.194099999999999px" id="uboloLX99" transform="translate(61.282 12.598)" width="16.489163442184434px"/></svg>)
チュートリアル
Twelve Labs を使ったビデオ AI 面接分析ツールの構築

リシケシュ・ヤダフ
このチュートリアルでは、Twelve LabsのPegasusモデルを使用して、録画された面接を自信、明瞭さ、アイコンタクト、身振り手振り(ボディランゲージ)、話すスピード、声のトーンなどの指標で自動的に評価する「AI面接アナライザー」の構築プロセスを解説します。これにより、求職者と採用担当者の双方が、手作業での確認を行うことなく、構造化されたフィードバックを得ることができます。
このチュートリアルでは、Twelve LabsのPegasusモデルを使用して、録画された面接を自信、明瞭さ、アイコンタクト、身振り手振り(ボディランゲージ)、話すスピード、声のトーンなどの指標で自動的に評価する「AI面接アナライザー」の構築プロセスを解説します。これにより、求職者と採用担当者の双方が、手作業での確認を行うことなく、構造化されたフィードバックを得ることができます。

この記事の内容
No headings found on page
ニュースレターに登録する
ニュースレターに登録する
ビデオ理解に関する最新の技術進歩、チュートリアル、業界の動向をお届けします
ビデオ理解に関する最新の技術進歩、チュートリアル、業界の動向をお届けします
AIを活用してビデオを検索、分析、探索します。
2024/09/21
11分
記事へのリンクをコピー
面接室に入ったとき、あなたの何気ない仕草、言葉、そして表情が単に観察されるだけでなく、深く理解されることを想像してみてください。AIがあなた専属のコーチや相談相手となる、未来の就職面接へようこそ。「AI Interview Analyzer(AI面接アナライザー)」が登場し、求職者にとっても採用担当者にとっても、このプロセスに革命を起こそうとしています。
今日の競争が激しい就職活動市場において、重要な面接をうまくこなせるかどうかは、憧れの仕事を手に入れられるか、それとも手の届かないものになってしまうかの分かれ目となります。しかし、もしあなたに秘密兵器があったらどうでしょうか?あなたのパフォーマンスを分析し、強みを浮き彫りにし、改善すべき点を優しく提案してくれるツールがあったら?
まさにそれを実現するのが「AI Interview Analyzer」です。Twelve LabsのPegasus-1モデルを使用することで、かつては熟練した人事プロフェッショナルしか持ち得なかった洞察を提供します。
アプリケーションのデモはこちらで体験できます:Interview Analyzer アプリケーション。また、こちらのReplitテンプレートから実際に動かしてみることも可能です。
前提条件
Twelve Labs Playgroundにサインアップして、APIキーを生成します。
ノートブックとこのアプリケーションのリポジトリは、GitHubにあります。
このチュートリアルのFlaskアプリケーションは、Python、HTML、CSS、JavaScriptを使用しています。
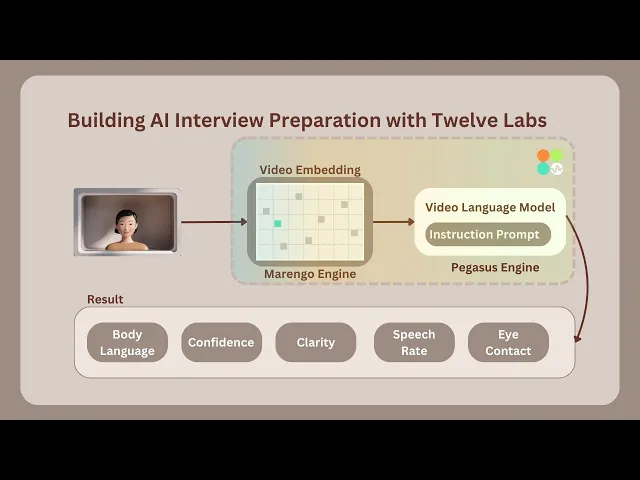
アプリケーションの仕組み
このセクションでは、Twelve Labsを活用した面接準備アプリケーションの開発および利用における、アプリケーションのフロー概要を説明します。
面接プロセスは、ユーザーの準備を促すために、限られた時間だけランダムな適性検査の質問が表示されるところから始まります。ユーザーが回答を終えると、アプリケーションは設定された時間、自動的に面接の録画を開始します。録画終了後、ビデオは即座に処理され、Marengo 2.6 (Embedding Engine)を用いてインデックス登録へと送られます。
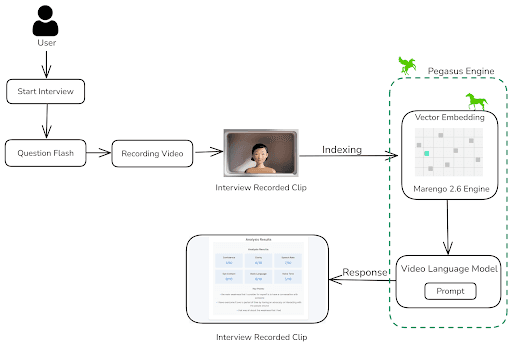
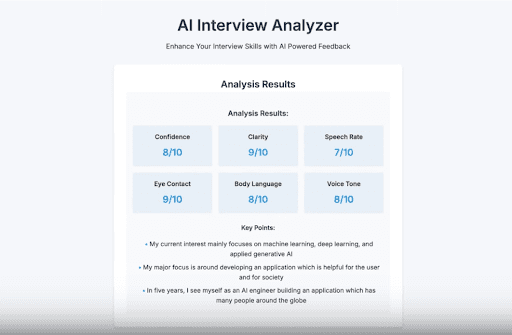
Twelve Labsの生成エンジンであるPegasus 1.1に対して実行されたインストラクション・プロンプティングに基づき、ビデオ面接の評価に用いられる様々なパラメータを分析・スコア化します。これらのパラメータには、自信、明瞭さ、視線(アイコンタクト)、ボディーランゲージ、発話速度、声のトーンが含まれます。さらに、面接中に議論されたすべての重要なポイントを書き留めます。企業や組織はこのアプリケーションを活用することで、多数の候補者に対して自動面接を実施し、時間を節約することができます。あるいは、面接練習のフィードバックを提供し、ユーザーがパフォーマンスを向上させるのを助けることもできます。
準備ステップ
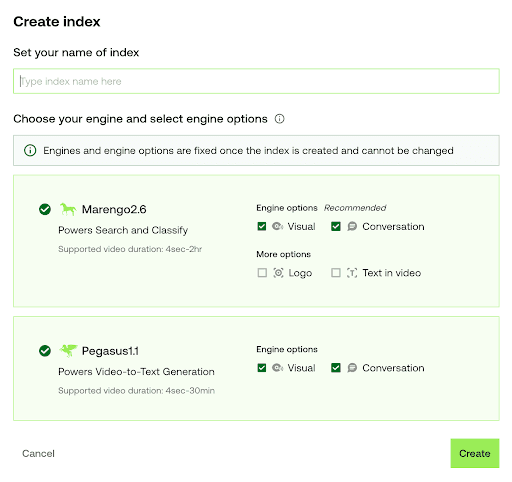
Twelve Labs Playgroundにサインアップし、インデックス(Index)を作成します。
分類に合わせて適切なオプションを選択します:(1) ビデオ検索・分類用の「Marengo 2.6 (Embedding Engine)」、または (2) ビデオからテキストへの生成用の「Pegasus 1.1」。これらのエンジンは、ビデオ理解のための強固な基盤を提供します。
Twelve Labs PlaygroundからAPIキーを取得します。
ステップ1で作成したインデックスを開き、INDEX_IDを取得します。IDはURLに含まれています:https://playground.twelvelabs.io/indexes/{index_id}
メインファイルとともに、APIキーとINDEX_IDを設定した
.envファイルを作成します。
Twelvelabs_API=your_api_key_here
API_URL=your_api_url_here
INDEX_ID=your_index_id_here
これらのステップが完了すれば、いよいよアプリケーションの開発に取り組む準備は完了です。
AI面接アナライザー構築のチュートリアル
このチュートリアルでは、最小限のフロントエンドを持つFlaskアプリケーションを構築します。以下に従うべきディレクトリ構造を示します:
.
├── app.py
├── requirements.txt
├── static
│   ├── css
│   │   └── style.css
│   └── js
│       └── main.js
├── templates
│   └── index.html
└── uploads
1 - Flaskアプリケーションの準備
1.1 - アプリケーションのセットアップ:検証・処理、および面接質問の提供
FlaskコンテナのメインとなるPythonコードは app.py ファイルに記述されています。app.pyを理解するために、セットアップ部分とアップロード・ルート部分の2つに分けて説明します。セットアップではアプリケーションを初期化し、アップロード・ルートでは埋め込み(Embedding)エンジンおよび生成(Generative)エンジンとやり取りを行います。以下は app.py のセットアップ部分のコードです:
# Importing the necessary module
import os
import json
import random
from flask import Flask, render_template, request, jsonify
from twelvelabs import TwelveLabs
from twelvelabs.models.task import Task
import requests
from dotenv import load_dotenv

# Load environment variables
load_dotenv()

# Initialize the Flask app
app = Flask(__name__)

# Get the API credentials from env variables
API_KEY = os.getenv('API_KEY')
API_URL = os.getenv('API_URL')
index_id = os.getenv('index_id')

# Initialize TwelveLabs client
client = TwelveLabs(api_key=API_KEY)

# List of the Aptitude Interview Questions
INTERVIEW_QUESTIONS = [
    "Tell me about yourself.",
    "What are your greatest strengths?",
    "What do you consider to be your weaknesses?",
    "Where do you see yourself in five years?",
    "Why should we hire you?",
    "What motivates you?",
    "What are your career goals?",
    "How do you work in a team?",
    "What's your leadership style?"
]


# Utility function to check API connection
def check_api_connection():
    try:
        response = requests.get(API_URL, headers={"x-api-key": API_KEY})
        return response.status_code == 200
    except requests.RequestException as e:
        print(f"API connection check failed. Error: {str(e)}")
        return False

# Utitliy function to process API response
def process_api_response(data):
    # Initialize default processed data structure
    processed_data = {
        "confidence": "N/A",
        "clarity": "N/A",
        "speech_rate": "N/A",
        "eye_contact": "N/A",
        "body_language": "N/A",
        "voice_tone": "N/A",
        "imp_points": []
    }

    # Handling the string input (convert to dict, if possible)
    if isinstance(data, str):
        try:
            cleaned_data = data.replace("```json", "").replace("```", "").strip()
            data = json.loads(cleaned_data)
        except json.JSONDecodeError as e:
            print(f"Error decoding JSON - {e}")
            return processed_data

    # Extract data from dict
    if isinstance(data, dict):
        for key in processed_data.keys():
            processed_data[key] = data.get(key, "N/A")
    return processed_data

# Main Page Route
@app.route('/')
def index():
    return render_template('index.html')

# API route to get a random interview question from list
@app.route('/get_question')
def get_question():
    question = random.choice(INTERVIEW_QUESTIONS)
    return jsonify({"question": question})
セットアップでは、Twelve Labs SDK用のクライアントと応答処理用ユーティリティを初期化します。また、適性に基づいた面接質問の生成を開始します。次の重要なステップは、アプリケーションのコア機能に焦点を当てた後半部分を確認することです。
1.2 - アップロード・ルートと埋め込みおよび生成エンジンとの対話
# Route for upload
@app.route('/upload', methods=['POST'])
def upload():
    # Checking of the API connection before proceeding
    if not check_api_connection():
        return jsonify({"error": "Failed to connect to the Twelve Labs API."}), 500

    # Validate video file in request
    if 'video' not in request.files:
        return jsonify({"error": "No video file provided"}), 400
    video = request.files['video']
    if video.filename == '':
        return jsonify({"error": "No video file selected"}), 400

    # Save uploaded video file
    video_path = os.path.join('uploads', 'interview.mp4')
    video.save(video_path)

    # Verifying whether the video file was saved successfully
    if not os.path.exists(video_path):
        return jsonify({"error": "Failed to save video file"}), 500

    file_size = os.path.getsize(video_path)
    print(f"Uploaded video file size: {file_size} bytes")

    if file_size == 0:
        return jsonify({"error": "Uploaded video file is empty"}), 500

    try:

       # Create and wait for indexing task
        task = client.task.create(index_id=index_id, file=video_path)
        task.wait_for_done(sleep_interval=5)
        if task.status != "ready":
            return jsonify({"error": f"Indexing failed with status {task.status}"}), 500


        # Generate text analysis from the video
        result = client.generate.text(
            video_id=task.video_id,
            prompt="""You're an Interviewer, Analyze the video clip of the interview answer for the question - {question}.
            If the face is not present in the video then do provide the lower points in all categories, Do provide less than 5 for all the other categories if the face is not visible in the video.

            Do provide the response in the json format with the number assigned as the value.
            After analyzing from 1-10. The keys of the json as confidence, clarity, speech_rate, eye_contact, body_language, voice_tone, relevant_to_question, imp_points.
            The imp_points will contain the exact sentence in a summarized points by the speaker, also do remove the filler words and provide it in a list format which is important from video."""
        )

        # Process and return the API response
        print("Raw API Response:", json.dumps(result.data, indent=2))
        processed_data = process_api_response(result.data)
        print("Processed data:", json.dumps(processed_data, indent=2))
        return jsonify(processed_data), 200
    except Exception as e:

        # To Handle any errors during processing
        print(f"Error processing video: {str(e)}")
        return jsonify({"error": f"Error processing video: {str(e)}"}), 500


# Run the Flask app
if __name__ == '__main__':
    os.makedirs('uploads', exist_ok=True) # To ensure whether the uploads directory exists
    app.run(debug=True)
アップロード・ルートは、Twelve Labs APIを活用して面接ビデオのアップロードおよび処理を行い、ビデオ分析を実行します。ビデオが保存されると、Marengo 2.6 (Embedding Engine)を使用してビデオをインデックス登録するタスクが作成されます。その後、インデックス登録されたビデオは、Pegasus 1.1 (Generative Engine)を搭載した /generate エンドポイントからアクセスされます。
システムはビデオを分析し、簡潔なプロンプトの記述に基づいて回答を提供します。プロンプトの構成は、特徴(評価基準)、目的、および出力形式の3つの要素から成り立っています。
2 - 操作フロー用のシンプルなフロントエンドコード
AI Interview Analyzer ウェブアプリケーションのHTML構造は、スタート(start)、面接(interview)、結果(result)の3つの主要セクションから構成されるシングルページアプリケーションです。
<!DOCTYPE html>
<html lang="en">
<head>
    <meta charset="UTF-8">
    <meta name="viewport" content="width=device-width, initial-scale=1.0">
    <title>AI Interview Analyzer</title>
    <link href="https://fonts.googleapis.com/css2?family=Inter:wght@300;400;600&display=swap" rel="stylesheet">
    <link rel="stylesheet" href="{{ url_for('static', filename='css/style.css') }}">
</head>
<body>
    <div class="container">
        <header>
            <h1>AI Interview Analyzer</h1>
            <p>Enhance Your Interview Skills with AI Powered Feedback</p>
        </header>
        <main>

            <section id="start-section" class="card">
                <h2>Ready to Start Your Interview?</h2>
                <p>Click the button below to begin your AI powered interview experience.</vp>
                <button id="startInterviewButton" class="btn btn-primary">Start Interview</button>
            </section>


            <section id="interview-section" class="card hidden">

                <div id="question-container">
                    <h2>Interview Question -</h2>
                    <p id="interview-question"></p>
                </div>

                <div id="timer-container">
                    <div id="preparation-timer" class="timer">
                        Preparation Time - <span id="prep-time">00:20</span>
                    </div>
                    <div id="recording-timer" class="timer hidden">
                        Recording Time - <span id="rec-time">00:30</span>
                    </div>
                </div>


                <div id="video-container" class="hidden">
                    <video id="videoElement" autoplay muted></video>
                </div>


                <div id="status-message" class="status"></div>
            </section>

            <section id="result-section" class="card hidden">

                <h2>Analysis Results</h2>
                <div id="result" class="result-container">
                    <div id="loading-message" class="loading">Analyzing your response...</div>
                    <small>It may take around 3-4 mins</small>
                </div>
            </section>
        </main>
    </div>
    <script src="{{ url_for('static', filename='js/main.js') }}"></script>
</body>
</html>
最小限の構成要素であるフロントエンドセクションは以下の通りです:
スタート・セクション(Start Section): ページを読み込んだときに最初に表示される画面です。歓迎メッセージと面接プロセスを開始するボタンが含まれています。
面接セクション(Interview Section): 面接が始まると表示されます。現在の質問、準備と録画のタイマー、およびユーザーのカメラ映像が表示されます。
結果セクション(Result Section): 面接完了後、AIによる分析結果を表示します。
この構造は、面接の開始からAIのフィードバック取得まで、ステップバイステップの面接プロセスを構成しています。面接ステージ間のスムーズな切り替えは、後述する main.js 内のJavaScriptコードによって管理される非表示用の hidden クラスによって制御されています。
アプリケーションのスタイリングに関しては、こちらから style.css を取得できます。
3 - JavaScriptにおける録画機能とエラーハンドリング
以下のJavaScriptコードスニペットは main.js で、ブラウザ環境におけるメディア録画の設定、分析結果のテキスト処理、およびエラーハンドリングを含んでいます。
document.addEventListener('DOMContentLoaded', () => { // Object to store all DOM elements const elements = { startButton: document.getElementById('startInterviewButton'), sections: { start: document.getElementById('start-section'), interview: document.getElementById('interview-section'), result: document.getElementById('result-section') }, video: document.getElementById('videoElement'), videoContainer: document.getElementById('video-container'), question: document.getElementById('interview-question'), timers: { prep: document.getElementById('preparation-timer'), rec: document.getElementById('recording-timer') }, timerDisplays: { prep: document.getElementById('prep-time'), rec: document.getElementById('rec-time') }, status: document.getElementById('status-message'), result: document.getElementById('result') }; // Variables for media recording let mediaRecorder; let recordedChunks = []; const prepTime = 20; // Interview Preparation time in seconds const recTime = 30; // Video Interview Recording time in seconds let currentTimer; // Function to set up camera and media recorder async function setupCamera() { try { // Request access to user's camera and microphone const stream = await navigator.mediaDevices.getUserMedia({ video: { width: 640, height: 480 }, audio: true }); elements.video.srcObject = stream; // Set up media recorder const options = { mimeType: 'video/mp4' }; mediaRecorder = new MediaRecorder(stream, options); // Event handler for when data is available mediaRecorder.ondataavailable = (event) => { if (event.data.size > 0) { recordedChunks.push(event.data); } }; // Event handler for when recording stops mediaRecorder.onstop = () => { const blob = new Blob(recordedChunks, { type: 'video/mp4' }); console.log('Recording stopped. Blob size:', blob.size, 'bytes'); if (blob.size > 0) { uploadVideo(blob); } else { showError("Recording failed: No data captured."); } }; } catch (error) { console.error('Error accessing camera:', error); showError('Unable to access camera. Please ensure you have given permission and try again.'); } } // Utility function to show a specific section and hide others function showSection(section) { Object.values(elements.sections).forEach(s => s.classList.add('hidden')); elements.sections[section].classList.remove('hidden'); } // Utility function to update timer display function updateTimer(timerElement, time) { const minutes = Math.floor(time / 60); const seconds = time % 60; timerElement.textContent = `${minutes.toString().padStart(2, '0')}:${seconds.toString().padStart(2, '0')}`; } // Function to start and manage timer function startTimer(phase) { let timeLeft = phase === 'prep' ? prepTime : recTime; updateTimer(elements.timerDisplays[phase], timeLeft); elements.timers[phase].classList.remove('hidden'); return setInterval(() => { timeLeft--; updateTimer(elements.timerDisplays[phase], timeLeft); if (timeLeft <= 0) { clearInterval(currentTimer); elements.timers[phase].classList.add('hidden'); if (phase === 'prep') startRecording(); else stopRecording(); } }, 1000); } // Function to start preparation timer function startPreparationTimer() { showSection('interview'); elements.status.textContent = "Prepare your answer..."; currentTimer = startTimer('prep'); } // Utitlity function to start recording function startRecording() { elements.videoContainer.classList.remove('hidden'); recordedChunks = []; mediaRecorder.start(1000); // Record in 1-second chunks elements.status.textContent = "Recording in progress..."; currentTimer = startTimer('rec'); console.log('Recording started'); } // Utitlity function to stop recording function stopRecording() { mediaRecorder.stop(); elements.status.textContent = "Processing your response..."; showSection('result'); console.log('Recording stopped'); } // Utitlity function to upload recorded video function uploadVideo(blob) { console.log('Uploading video. Blob size:', blob.size, 'bytes'); const formData = new FormData(); formData.append('video', blob, 'interview.mp4'); fetch('/upload', { method: 'POST', body: formData }) .then(response => { if (!response.ok) { return response.json().then(err => { throw new Error(err.error || `HTTP error! status: ${response.status}`); }); } return response.json(); }) .then(data => { console.log('Received data:', data); displayResults(data); }) .catch(error => { console.error('Error:', error); showError(error.message); }); } // Utitlity function to display analysis results function displayResults(data) { let resultHTML = '<h3>Analysis Results:</h3>'; if (data.error) { resultHTML += `<p class="error">Error: ${data.error}</p>`; } else { resultHTML += '<div class="score-grid">'; const metrics = [ { key: 'confidence', label: 'Confidence' }, { key: 'clarity', label: 'Clarity' }, { key: 'speech_rate', label: 'Speech Rate' }, { key: 'eye_contact', label: 'Eye Contact' }, { key: 'body_language', label: 'Body Language' }, { key: 'voice_tone', label: 'Voice Tone' } ]; metrics.forEach(metric => { resultHTML += ` <div class="score"> <span class="score-label">${metric.label}</span> <span class="score-value">${data[metric.key]}/10</span> </div> `; }); resultHTML += '</div>'; if (data.imp_points && data.imp_points.length > 0) { resultHTML += '<h4>Key Points:</h4><ul>'; data.imp_points.forEach(point => { resultHTML += `<li>${point}</li>`; }); resultHTML += '</ul>'; } else { resultHTML += '<p>No key points found in the analysis.</p>'; } } elements.result.innerHTML = resultHTML; } // Utitlity function to display error messages function showError(message) { elements.result.innerHTML = ` <p class="error">Error: ${message}</p> <p>Please try again. If the problem persists, ensure you're recording for the full time and that your video and audio are working correctly.</p> `; } elements.startButton.addEventListener('click', () => { setupCamera().then(() => { fetch('/get_question') .then(response => response.json()) .then(data => { elements.question.textContent = data.question; startPreparationTimer(); }) .catch(error => { console.error('Error fetching question:', error); showError('Failed to fetch interview question. Please try again.'); }); }); }); });
このコードは、ユーザーのカメラとマイクを設定し(setupCamera())、MediaRecorder APIを使用してビデオ録画を管理します。
setupCamera()関数は、ユーザーのカメラとマイクを設定し、MediaRecorder APIを使用してビデオ録画を管理します。ユーザーにストレスのない構造化された面接体験を提供するため、アプリケーションには準備用タイマーと録画用タイマーが実装されています(
startTimer()、startPreparationTimer())。startRecording()やstopRecording()といった関数が、面接の流れを制御します。uploadVideo()関数は、録画されたビデオをサーバーにアップロードし、Pegasus 1.1による分析を用いたインデックス登録およびテキスト生成を行います。面接パフォーマンスのスコアや重要なポイントを含むAIからのフィードバックは、
displayResults()を使用してレンダリングされます。
スタートボタンのイベントリスナーは、クリックされたときに面接のすべてのプロセスを開始します。このスクリプトは、showError() 関数を通じて堅牢なエラーハンドリングを提供し、ユーザーに明確なフィードバックを提示します。
面接ビデオの録画が完了すると、AI Interview Analyzerの出力結果を確認することができます。
これでオブジェクト指向のアプリケーションが利用可能になりました。ぜひ様々なプロンプトを試してみてください。
このチュートリアルを応用するためのその他のアイデア
アプリケーションの動作手順と開発方法を理解することで、革新的なアイデアを実装し、ユーザーのニーズに応えるプロダクトを作成する準備が整います。このチュートリアルブログの内容をベースにして構築できる、同じようなユースケースのアイデアをいくつか紹介します:
📚️ 面接準備(Interview Preparation): 求職者や就職活動中のユーザーが、現実的な環境で面接スキルを練習し、ブラッシュアップするためにAI Interview Analyzerを使用できます。
🤝 採用プロセスの強化(Hiring Process Enhancement): 採用担当者や人事マネージャーは、AI Interview Analyzerを使用して採用プロセスをストリームライン化(効率化)し、より効果的な選考を行うことができます。
🎓 従業員のスキル開発(Employee Skill Development): 社内研修や人材開発を行う部署は、社員のインタービュースキル(プレゼンスキルなど)を向上させるために、このAI Interview Analyzerをプログラムに組み込むことができます。
😊️ 肯定的な候補者体験(Positive Candidate Experience): 求職者はAI Interview Analyzerから貴重な洞察やフィードバックを直接得られるため、採用選考における候補者体験をより好ましいものに改善できます。
結論
このブログ記事は、Twelve Labsを用いて開発された「AI Interview Analyzer」の動作手順とその開発プロセスについて、詳細な解説を提供することを目的としています。チュートリアルを最後までお読みいただきありがとうございました。ユーザー体験をさらに向上させ、様々な課題を解決する皆さんのクリエイティブなアイデアを楽しみにしています。
面接室に入ったとき、あなたの何気ない仕草、言葉、そして表情が単に観察されるだけでなく、深く理解されることを想像してみてください。AIがあなた専属のコーチや相談相手となる、未来の就職面接へようこそ。「AI Interview Analyzer(AI面接アナライザー)」が登場し、求職者にとっても採用担当者にとっても、このプロセスに革命を起こそうとしています。
今日の競争が激しい就職活動市場において、重要な面接をうまくこなせるかどうかは、憧れの仕事を手に入れられるか、それとも手の届かないものになってしまうかの分かれ目となります。しかし、もしあなたに秘密兵器があったらどうでしょうか?あなたのパフォーマンスを分析し、強みを浮き彫りにし、改善すべき点を優しく提案してくれるツールがあったら?
まさにそれを実現するのが「AI Interview Analyzer」です。Twelve LabsのPegasus-1モデルを使用することで、かつては熟練した人事プロフェッショナルしか持ち得なかった洞察を提供します。
アプリケーションのデモはこちらで体験できます:Interview Analyzer アプリケーション。また、こちらのReplitテンプレートから実際に動かしてみることも可能です。
前提条件
Twelve Labs Playgroundにサインアップして、APIキーを生成します。
ノートブックとこのアプリケーションのリポジトリは、GitHubにあります。
このチュートリアルのFlaskアプリケーションは、Python、HTML、CSS、JavaScriptを使用しています。
アプリケーションの仕組み
このセクションでは、Twelve Labsを活用した面接準備アプリケーションの開発および利用における、アプリケーションのフロー概要を説明します。
面接プロセスは、ユーザーの準備を促すために、限られた時間だけランダムな適性検査の質問が表示されるところから始まります。ユーザーが回答を終えると、アプリケーションは設定された時間、自動的に面接の録画を開始します。録画終了後、ビデオは即座に処理され、Marengo 2.6 (Embedding Engine)を用いてインデックス登録へと送られます。
Twelve Labsの生成エンジンであるPegasus 1.1に対して実行されたインストラクション・プロンプティングに基づき、ビデオ面接の評価に用いられる様々なパラメータを分析・スコア化します。これらのパラメータには、自信、明瞭さ、視線(アイコンタクト)、ボディーランゲージ、発話速度、声のトーンが含まれます。さらに、面接中に議論されたすべての重要なポイントを書き留めます。企業や組織はこのアプリケーションを活用することで、多数の候補者に対して自動面接を実施し、時間を節約することができます。あるいは、面接練習のフィードバックを提供し、ユーザーがパフォーマンスを向上させるのを助けることもできます。
準備ステップ
Twelve Labs Playgroundにサインアップし、インデックス(Index)を作成します。
分類に合わせて適切なオプションを選択します:(1) ビデオ検索・分類用の「Marengo 2.6 (Embedding Engine)」、または (2) ビデオからテキストへの生成用の「Pegasus 1.1」。これらのエンジンは、ビデオ理解のための強固な基盤を提供します。
Twelve Labs PlaygroundからAPIキーを取得します。
ステップ1で作成したインデックスを開き、INDEX_IDを取得します。IDはURLに含まれています:https://playground.twelvelabs.io/indexes/{index_id}
メインファイルとともに、APIキーとINDEX_IDを設定した
.envファイルを作成します。
Twelvelabs_API=your_api_key_here
API_URL=your_api_url_here
INDEX_ID=your_index_id_here
これらのステップが完了すれば、いよいよアプリケーションの開発に取り組む準備は完了です。
AI面接アナライザー構築のチュートリアル
このチュートリアルでは、最小限のフロントエンドを持つFlaskアプリケーションを構築します。以下に従うべきディレクトリ構造を示します:
.
├── app.py
├── requirements.txt
├── static
│   ├── css
│   │   └── style.css
│   └── js
│       └── main.js
├── templates
│   └── index.html
└── uploads
1 - Flaskアプリケーションの準備
1.1 - アプリケーションのセットアップ:検証・処理、および面接質問の提供
FlaskコンテナのメインとなるPythonコードは app.py ファイルに記述されています。app.pyを理解するために、セットアップ部分とアップロード・ルート部分の2つに分けて説明します。セットアップではアプリケーションを初期化し、アップロード・ルートでは埋め込み(Embedding)エンジンおよび生成(Generative)エンジンとやり取りを行います。以下は app.py のセットアップ部分のコードです:
# Importing the necessary module
import os
import json
import random
from flask import Flask, render_template, request, jsonify
from twelvelabs import TwelveLabs
from twelvelabs.models.task import Task
import requests
from dotenv import load_dotenv

# Load environment variables
load_dotenv()

# Initialize the Flask app
app = Flask(__name__)

# Get the API credentials from env variables
API_KEY = os.getenv('API_KEY')
API_URL = os.getenv('API_URL')
index_id = os.getenv('index_id')

# Initialize TwelveLabs client
client = TwelveLabs(api_key=API_KEY)

# List of the Aptitude Interview Questions
INTERVIEW_QUESTIONS = [
    "Tell me about yourself.",
    "What are your greatest strengths?",
    "What do you consider to be your weaknesses?",
    "Where do you see yourself in five years?",
    "Why should we hire you?",
    "What motivates you?",
    "What are your career goals?",
    "How do you work in a team?",
    "What's your leadership style?"
]


# Utility function to check API connection
def check_api_connection():
    try:
        response = requests.get(API_URL, headers={"x-api-key": API_KEY})
        return response.status_code == 200
    except requests.RequestException as e:
        print(f"API connection check failed. Error: {str(e)}")
        return False

# Utitliy function to process API response
def process_api_response(data):
    # Initialize default processed data structure
    processed_data = {
        "confidence": "N/A",
        "clarity": "N/A",
        "speech_rate": "N/A",
        "eye_contact": "N/A",
        "body_language": "N/A",
        "voice_tone": "N/A",
        "imp_points": []
    }

    # Handling the string input (convert to dict, if possible)
    if isinstance(data, str):
        try:
            cleaned_data = data.replace("```json", "").replace("```", "").strip()
            data = json.loads(cleaned_data)
        except json.JSONDecodeError as e:
            print(f"Error decoding JSON - {e}")
            return processed_data

    # Extract data from dict
    if isinstance(data, dict):
        for key in processed_data.keys():
            processed_data[key] = data.get(key, "N/A")
    return processed_data

# Main Page Route
@app.route('/')
def index():
    return render_template('index.html')

# API route to get a random interview question from list
@app.route('/get_question')
def get_question():
    question = random.choice(INTERVIEW_QUESTIONS)
    return jsonify({"question": question})
セットアップでは、Twelve Labs SDK用のクライアントと応答処理用ユーティリティを初期化します。また、適性に基づいた面接質問の生成を開始します。次の重要なステップは、アプリケーションのコア機能に焦点を当てた後半部分を確認することです。
1.2 - アップロード・ルートと埋め込みおよび生成エンジンとの対話
# Route for upload
@app.route('/upload', methods=['POST'])
def upload():
    # Checking of the API connection before proceeding
    if not check_api_connection():
        return jsonify({"error": "Failed to connect to the Twelve Labs API."}), 500

    # Validate video file in request
    if 'video' not in request.files:
        return jsonify({"error": "No video file provided"}), 400
    video = request.files['video']
    if video.filename == '':
        return jsonify({"error": "No video file selected"}), 400

    # Save uploaded video file
    video_path = os.path.join('uploads', 'interview.mp4')
    video.save(video_path)

    # Verifying whether the video file was saved successfully
    if not os.path.exists(video_path):
        return jsonify({"error": "Failed to save video file"}), 500

    file_size = os.path.getsize(video_path)
    print(f"Uploaded video file size: {file_size} bytes")

    if file_size == 0:
        return jsonify({"error": "Uploaded video file is empty"}), 500

    try:

       # Create and wait for indexing task
        task = client.task.create(index_id=index_id, file=video_path)
        task.wait_for_done(sleep_interval=5)
        if task.status != "ready":
            return jsonify({"error": f"Indexing failed with status {task.status}"}), 500


        # Generate text analysis from the video
        result = client.generate.text(
            video_id=task.video_id,
            prompt="""You're an Interviewer, Analyze the video clip of the interview answer for the question - {question}.
            If the face is not present in the video then do provide the lower points in all categories, Do provide less than 5 for all the other categories if the face is not visible in the video.

            Do provide the response in the json format with the number assigned as the value.
            After analyzing from 1-10. The keys of the json as confidence, clarity, speech_rate, eye_contact, body_language, voice_tone, relevant_to_question, imp_points.
            The imp_points will contain the exact sentence in a summarized points by the speaker, also do remove the filler words and provide it in a list format which is important from video."""
        )

        # Process and return the API response
        print("Raw API Response:", json.dumps(result.data, indent=2))
        processed_data = process_api_response(result.data)
        print("Processed data:", json.dumps(processed_data, indent=2))
        return jsonify(processed_data), 200
    except Exception as e:

        # To Handle any errors during processing
        print(f"Error processing video: {str(e)}")
        return jsonify({"error": f"Error processing video: {str(e)}"}), 500


# Run the Flask app
if __name__ == '__main__':
    os.makedirs('uploads', exist_ok=True) # To ensure whether the uploads directory exists
    app.run(debug=True)
アップロード・ルートは、Twelve Labs APIを活用して面接ビデオのアップロードおよび処理を行い、ビデオ分析を実行します。ビデオが保存されると、Marengo 2.6 (Embedding Engine)を使用してビデオをインデックス登録するタスクが作成されます。その後、インデックス登録されたビデオは、Pegasus 1.1 (Generative Engine)を搭載した /generate エンドポイントからアクセスされます。
システムはビデオを分析し、簡潔なプロンプトの記述に基づいて回答を提供します。プロンプトの構成は、特徴(評価基準)、目的、および出力形式の3つの要素から成り立っています。
2 - 操作フロー用のシンプルなフロントエンドコード
AI Interview Analyzer ウェブアプリケーションのHTML構造は、スタート(start)、面接(interview)、結果(result)の3つの主要セクションから構成されるシングルページアプリケーションです。
<!DOCTYPE html>
<html lang="en">
<head>
    <meta charset="UTF-8">
    <meta name="viewport" content="width=device-width, initial-scale=1.0">
    <title>AI Interview Analyzer</title>
    <link href="https://fonts.googleapis.com/css2?family=Inter:wght@300;400;600&display=swap" rel="stylesheet">
    <link rel="stylesheet" href="{{ url_for('static', filename='css/style.css') }}">
</head>
<body>
    <div class="container">
        <header>
            <h1>AI Interview Analyzer</h1>
            <p>Enhance Your Interview Skills with AI Powered Feedback</p>
        </header>
        <main>

            <section id="start-section" class="card">
                <h2>Ready to Start Your Interview?</h2>
                <p>Click the button below to begin your AI powered interview experience.</vp>
                <button id="startInterviewButton" class="btn btn-primary">Start Interview</button>
            </section>


            <section id="interview-section" class="card hidden">

                <div id="question-container">
                    <h2>Interview Question -</h2>
                    <p id="interview-question"></p>
                </div>

                <div id="timer-container">
                    <div id="preparation-timer" class="timer">
                        Preparation Time - <span id="prep-time">00:20</span>
                    </div>
                    <div id="recording-timer" class="timer hidden">
                        Recording Time - <span id="rec-time">00:30</span>
                    </div>
                </div>


                <div id="video-container" class="hidden">
                    <video id="videoElement" autoplay muted></video>
                </div>


                <div id="status-message" class="status"></div>
            </section>

            <section id="result-section" class="card hidden">

                <h2>Analysis Results</h2>
                <div id="result" class="result-container">
                    <div id="loading-message" class="loading">Analyzing your response...</div>
                    <small>It may take around 3-4 mins</small>
                </div>
            </section>
        </main>
    </div>
    <script src="{{ url_for('static', filename='js/main.js') }}"></script>
</body>
</html>
最小限の構成要素であるフロントエンドセクションは以下の通りです:
スタート・セクション(Start Section): ページを読み込んだときに最初に表示される画面です。歓迎メッセージと面接プロセスを開始するボタンが含まれています。
面接セクション(Interview Section): 面接が始まると表示されます。現在の質問、準備と録画のタイマー、およびユーザーのカメラ映像が表示されます。
結果セクション(Result Section): 面接完了後、AIによる分析結果を表示します。
この構造は、面接の開始からAIのフィードバック取得まで、ステップバイステップの面接プロセスを構成しています。面接ステージ間のスムーズな切り替えは、後述する main.js 内のJavaScriptコードによって管理される非表示用の hidden クラスによって制御されています。
アプリケーションのスタイリングに関しては、こちらから style.css を取得できます。
3 - JavaScriptにおける録画機能とエラーハンドリング
以下のJavaScriptコードスニペットは main.js で、ブラウザ環境におけるメディア録画の設定、分析結果のテキスト処理、およびエラーハンドリングを含んでいます。
document.addEventListener('DOMContentLoaded', () => { // Object to store all DOM elements const elements = { startButton: document.getElementById('startInterviewButton'), sections: { start: document.getElementById('start-section'), interview: document.getElementById('interview-section'), result: document.getElementById('result-section') }, video: document.getElementById('videoElement'), videoContainer: document.getElementById('video-container'), question: document.getElementById('interview-question'), timers: { prep: document.getElementById('preparation-timer'), rec: document.getElementById('recording-timer') }, timerDisplays: { prep: document.getElementById('prep-time'), rec: document.getElementById('rec-time') }, status: document.getElementById('status-message'), result: document.getElementById('result') }; // Variables for media recording let mediaRecorder; let recordedChunks = []; const prepTime = 20; // Interview Preparation time in seconds const recTime = 30; // Video Interview Recording time in seconds let currentTimer; // Function to set up camera and media recorder async function setupCamera() { try { // Request access to user's camera and microphone const stream = await navigator.mediaDevices.getUserMedia({ video: { width: 640, height: 480 }, audio: true }); elements.video.srcObject = stream; // Set up media recorder const options = { mimeType: 'video/mp4' }; mediaRecorder = new MediaRecorder(stream, options); // Event handler for when data is available mediaRecorder.ondataavailable = (event) => { if (event.data.size > 0) { recordedChunks.push(event.data); } }; // Event handler for when recording stops mediaRecorder.onstop = () => { const blob = new Blob(recordedChunks, { type: 'video/mp4' }); console.log('Recording stopped. Blob size:', blob.size, 'bytes'); if (blob.size > 0) { uploadVideo(blob); } else { showError("Recording failed: No data captured."); } }; } catch (error) { console.error('Error accessing camera:', error); showError('Unable to access camera. Please ensure you have given permission and try again.'); } } // Utility function to show a specific section and hide others function showSection(section) { Object.values(elements.sections).forEach(s => s.classList.add('hidden')); elements.sections[section].classList.remove('hidden'); } // Utility function to update timer display function updateTimer(timerElement, time) { const minutes = Math.floor(time / 60); const seconds = time % 60; timerElement.textContent = `${minutes.toString().padStart(2, '0')}:${seconds.toString().padStart(2, '0')}`; } // Function to start and manage timer function startTimer(phase) { let timeLeft = phase === 'prep' ? prepTime : recTime; updateTimer(elements.timerDisplays[phase], timeLeft); elements.timers[phase].classList.remove('hidden'); return setInterval(() => { timeLeft--; updateTimer(elements.timerDisplays[phase], timeLeft); if (timeLeft <= 0) { clearInterval(currentTimer); elements.timers[phase].classList.add('hidden'); if (phase === 'prep') startRecording(); else stopRecording(); } }, 1000); } // Function to start preparation timer function startPreparationTimer() { showSection('interview'); elements.status.textContent = "Prepare your answer..."; currentTimer = startTimer('prep'); } // Utitlity function to start recording function startRecording() { elements.videoContainer.classList.remove('hidden'); recordedChunks = []; mediaRecorder.start(1000); // Record in 1-second chunks elements.status.textContent = "Recording in progress..."; currentTimer = startTimer('rec'); console.log('Recording started'); } // Utitlity function to stop recording function stopRecording() { mediaRecorder.stop(); elements.status.textContent = "Processing your response..."; showSection('result'); console.log('Recording stopped'); } // Utitlity function to upload recorded video function uploadVideo(blob) { console.log('Uploading video. Blob size:', blob.size, 'bytes'); const formData = new FormData(); formData.append('video', blob, 'interview.mp4'); fetch('/upload', { method: 'POST', body: formData }) .then(response => { if (!response.ok) { return response.json().then(err => { throw new Error(err.error || `HTTP error! status: ${response.status}`); }); } return response.json(); }) .then(data => { console.log('Received data:', data); displayResults(data); }) .catch(error => { console.error('Error:', error); showError(error.message); }); } // Utitlity function to display analysis results function displayResults(data) { let resultHTML = '<h3>Analysis Results:</h3>'; if (data.error) { resultHTML += `<p class="error">Error: ${data.error}</p>`; } else { resultHTML += '<div class="score-grid">'; const metrics = [ { key: 'confidence', label: 'Confidence' }, { key: 'clarity', label: 'Clarity' }, { key: 'speech_rate', label: 'Speech Rate' }, { key: 'eye_contact', label: 'Eye Contact' }, { key: 'body_language', label: 'Body Language' }, { key: 'voice_tone', label: 'Voice Tone' } ]; metrics.forEach(metric => { resultHTML += ` <div class="score"> <span class="score-label">${metric.label}</span> <span class="score-value">${data[metric.key]}/10</span> </div> `; }); resultHTML += '</div>'; if (data.imp_points && data.imp_points.length > 0) { resultHTML += '<h4>Key Points:</h4><ul>'; data.imp_points.forEach(point => { resultHTML += `<li>${point}</li>`; }); resultHTML += '</ul>'; } else { resultHTML += '<p>No key points found in the analysis.</p>'; } } elements.result.innerHTML = resultHTML; } // Utitlity function to display error messages function showError(message) { elements.result.innerHTML = ` <p class="error">Error: ${message}</p> <p>Please try again. If the problem persists, ensure you're recording for the full time and that your video and audio are working correctly.</p> `; } elements.startButton.addEventListener('click', () => { setupCamera().then(() => { fetch('/get_question') .then(response => response.json()) .then(data => { elements.question.textContent = data.question; startPreparationTimer(); }) .catch(error => { console.error('Error fetching question:', error); showError('Failed to fetch interview question. Please try again.'); }); }); }); });
このコードは、ユーザーのカメラとマイクを設定し(setupCamera())、MediaRecorder APIを使用してビデオ録画を管理します。
setupCamera()関数は、ユーザーのカメラとマイクを設定し、MediaRecorder APIを使用してビデオ録画を管理します。ユーザーにストレスのない構造化された面接体験を提供するため、アプリケーションには準備用タイマーと録画用タイマーが実装されています(
startTimer()、startPreparationTimer())。startRecording()やstopRecording()といった関数が、面接の流れを制御します。uploadVideo()関数は、録画されたビデオをサーバーにアップロードし、Pegasus 1.1による分析を用いたインデックス登録およびテキスト生成を行います。面接パフォーマンスのスコアや重要なポイントを含むAIからのフィードバックは、
displayResults()を使用してレンダリングされます。
スタートボタンのイベントリスナーは、クリックされたときに面接のすべてのプロセスを開始します。このスクリプトは、showError() 関数を通じて堅牢なエラーハンドリングを提供し、ユーザーに明確なフィードバックを提示します。
面接ビデオの録画が完了すると、AI Interview Analyzerの出力結果を確認することができます。
これでオブジェクト指向のアプリケーションが利用可能になりました。ぜひ様々なプロンプトを試してみてください。
このチュートリアルを応用するためのその他のアイデア
アプリケーションの動作手順と開発方法を理解することで、革新的なアイデアを実装し、ユーザーのニーズに応えるプロダクトを作成する準備が整います。このチュートリアルブログの内容をベースにして構築できる、同じようなユースケースのアイデアをいくつか紹介します:
📚️ 面接準備(Interview Preparation): 求職者や就職活動中のユーザーが、現実的な環境で面接スキルを練習し、ブラッシュアップするためにAI Interview Analyzerを使用できます。
🤝 採用プロセスの強化(Hiring Process Enhancement): 採用担当者や人事マネージャーは、AI Interview Analyzerを使用して採用プロセスをストリームライン化(効率化)し、より効果的な選考を行うことができます。
🎓 従業員のスキル開発(Employee Skill Development): 社内研修や人材開発を行う部署は、社員のインタービュースキル(プレゼンスキルなど)を向上させるために、このAI Interview Analyzerをプログラムに組み込むことができます。
😊️ 肯定的な候補者体験(Positive Candidate Experience): 求職者はAI Interview Analyzerから貴重な洞察やフィードバックを直接得られるため、採用選考における候補者体験をより好ましいものに改善できます。
結論
このブログ記事は、Twelve Labsを用いて開発された「AI Interview Analyzer」の動作手順とその開発プロセスについて、詳細な解説を提供することを目的としています。チュートリアルを最後までお読みいただきありがとうございました。ユーザー体験をさらに向上させ、様々な課題を解決する皆さんのクリエイティブなアイデアを楽しみにしています。