" height="9.18705px" id="AiyYyR90G" transform="translate(3.406 3.406)" width="9.18685px"/></svg>)
" height="1.90314px" id="wtDTm6bEW" transform="translate(26.225 0)" width="2.4723000000000006px"/><path d="M 0.557 0 L 1.438 0 C 1.746 0 1.995 0.25 1.995 0.559 L 1.995 1.344 C 1.995 1.653 1.746 1.903 1.438 1.903 L 0.557 1.903 C 0.25 1.903 0 1.653 0 1.344 L 0 0.559 C 0 0.25 0.25 0 0.557 0 Z" fill="rgb(29, 28, 27)" height="1.9031500000000001px" id="GnmDnNra_" transform="translate(36.408 2.728)" width="1.9953000000000003px"/><path d="M 6.224 0 L 0.558 0 C 0.25 0 0 0.25 0 0.559 L 0 1.344 C 0 1.653 0.25 1.903 0.558 1.903 L 6.224 1.903 C 6.531 1.903 6.781 1.653 6.781 1.344 L 6.781 0.559 C 6.781 0.25 6.531 0 6.224 0 Z" fill="rgb(29, 28, 27)" height="1.9031500000000001px" id="hKTQ3dbw4" transform="translate(34.261 5.456)" width="6.781100000000002px"/><path d="M 6.955 0 L 0.558 0 C 0.25 0 0 0.25 0 0.559 L 0 1.344 C 0 1.653 0.25 1.903 0.558 1.903 L 6.955 1.903 C 7.263 1.903 7.513 1.653 7.513 1.344 L 7.513 0.559 C 7.513 0.25 7.263 0 6.955 0 Z" fill="rgb(29, 28, 27)" height="1.9031500000000001px" id="G1Zzk9CUU" transform="translate(28.298 8.243)" width="7.513100000000001px"/><path d="M 7.123 0 L 0.558 0 C 0.25 0 0 0.25 0 0.559 L 0 1.344 C 0 1.653 0.25 1.903 0.558 1.903 L 7.123 1.903 C 7.431 1.903 7.681 1.653 7.681 1.344 L 7.681 0.559 C 7.681 0.25 7.431 0 7.123 0 Z" fill="rgb(29, 28, 27)" height="1.9030999999999985px" id="fm7cHxIfJ" transform="translate(0 10.972)" width="7.68067px"/><path d="M 13.447 0 L 0.558 0 C 0.25 0 0 0.25 0 0.559 L 0 1.344 C 0 1.653 0.25 1.903 0.558 1.903 L 13.447 1.903 C 13.755 1.903 14.004 1.653 14.004 1.344 L 14.004 0.559 C 14.004 0.25 13.755 0 13.447 0 Z" fill="rgb(29, 28, 27)" height="1.9030999999999985px" id="LowSwDrtg" transform="translate(9.552 10.972)" width="14.0044px"/><path d="M 0.558 0 L 8.212 0 C 8.52 0 8.77 0.25 8.77 0.559 L 8.77 1.344 C 8.77 1.653 8.52 1.903 8.212 1.903 L 0.558 1.903 C 0.25 1.903 0 1.653 0 1.344 L 0 0.559 C 0 0.25 0.25 0 0.558 0 Z" fill="rgb(29, 28, 27)" height="1.9030999999999985px" id="xRiKc2od7" transform="translate(27.041 10.972)" width="8.769900000000003px"/><path d="M 0.557 0 L 5.4 0 C 5.708 0 5.958 0.25 5.958 0.559 L 5.958 1.344 C 5.958 1.653 5.708 1.903 5.4 1.903 L 0.557 1.903 C 0.25 1.903 0 1.653 0 1.344 L 0 0.559 C 0 0.25 0.25 0 0.557 0 Z" fill="rgb(29, 28, 27)" height="1.9031500000000001px" id="JWdNVicde" transform="translate(36.796 8.243)" width="5.957599999999999px"/><path d="M 1.438 0 L 0.558 0 C 0.25 0 0 0.25 0 0.559 L 0 1.344 C 0 1.653 0.25 1.903 0.558 1.903 L 1.438 1.903 C 1.746 1.903 1.995 1.653 1.995 1.344 L 1.995 0.559 C 1.995 0.25 1.746 0 1.438 0 Z" fill="rgb(29, 28, 27)" height="1.9031500000000001px" id="RfFYVCT_T" transform="translate(28.717 5.456)" width="1.9953000000000003px"/><path d="M 0.558 0 L 2.895 0 C 3.203 0 3.453 0.25 3.453 0.559 L 3.453 1.406 C 3.453 1.714 3.203 1.964 2.895 1.964 L 0.558 1.964 C 0.25 1.964 0 1.714 0 1.406 L 0 0.559 C 0 0.25 0.25 0 0.558 0 Z" fill="rgb(29, 28, 27)" height="1.964299999999998px" id="dngJ6MU2p" transform="translate(16.183 24.582)" width="3.4525000000000006px"/><path d="M 1.706 0 L 0.558 0 C 0.25 0 0 0.25 0 0.559 L 0 1.406 C 0 1.714 0.25 1.964 0.558 1.964 L 1.706 1.964 C 2.014 1.964 2.263 1.714 2.263 1.406 L 2.263 0.559 C 2.263 0.25 2.014 0 1.706 0 Z" fill="rgb(29, 28, 27)" height="1.964299999999998px" id="N_fstvKmR" transform="translate(22.18 24.582)" width="2.2631999999999977px"/><path d="M 0.558 0 L 5.544 0 C 5.852 0 6.101 0.25 6.101 0.559 L 6.101 1.406 C 6.101 1.714 5.852 1.964 5.544 1.964 L 0.558 1.964 C 0.25 1.964 0 1.714 0 1.406 L 0 0.559 C 0 0.25 0.25 0 0.558 0 Z" fill="rgb(29, 28, 27)" height="1.964299999999998px" id="t55XLYcgb" transform="translate(25.486 24.582)" width="6.101399999999998px"/><path d="M 1.976 0 L 0.558 0 C 0.25 0 0 0.25 0 0.559 L 0 1.406 C 0 1.714 0.25 1.964 0.558 1.964 L 1.976 1.964 C 2.284 1.964 2.533 1.714 2.533 1.406 L 2.533 0.559 C 2.533 0.25 2.284 0 1.976 0 Z" fill="rgb(29, 28, 27)" height="1.964299999999998px" id="ZrEKTVTAe" transform="translate(28.542 21.854)" width="2.5334000000000003px"/><path d="M 0.557 0 L 1.438 0 C 1.746 0 1.995 0.25 1.995 0.559 L 1.995 1.406 C 1.995 1.714 1.746 1.964 1.438 1.964 L 0.557 1.964 C 0.25 1.964 0 1.714 0 1.406 L 0 0.559 C 0 0.25 0.25 0 0.557 0 Z" fill="rgb(29, 28, 27)" height="1.964299999999998px" id="Z0fPTp9aR" transform="translate(11.425 24.582)" width="1.9953000000000003px"/><path d="M 0 0.559 C 0 0.251 0.251 0 0.558 0 L 1.438 0 C 1.745 0 1.995 0.251 1.995 0.559 L 1.995 1.405 C 1.995 1.713 1.745 1.964 1.438 1.964 L 0.558 1.964 C 0.251 1.964 0 1.713 0 1.405 Z" fill="rgb(29, 28, 27)" height="1.964299999999998px" id="Tj_PDHFDh" transform="translate(20.635 27.308)" width="1.9954px"/><path d="M 0.557 0 L 1.342 0 C 1.65 0 1.899 0.25 1.899 0.559 L 1.899 1.406 C 1.899 1.714 1.65 1.964 1.342 1.964 L 0.557 1.964 C 0.25 1.964 0 1.714 0 1.406 L 0 0.559 C 0 0.25 0.25 0 0.557 0 Z" fill="rgb(29, 28, 27)" height="1.9643000000000015px" id="AYq9dXkKz" transform="translate(18.686 30.036)" width="1.8994px"/><path d="M 0.558 0 L 5.768 0 C 6.076 0 6.326 0.25 6.326 0.559 L 6.326 1.344 C 6.326 1.653 6.076 1.903 5.768 1.903 L 0.558 1.903 C 0.25 1.903 0 1.653 0 1.344 L 0 0.559 C 0 0.25 0.25 0 0.558 0 Z" fill="rgb(29, 28, 27)" height="1.9031500000000001px" id="rspevfJcx" transform="translate(12.157 8.243)" width="6.325900000000001px"/><path d="M 3.285 0 L 0.558 0 C 0.25 0 0 0.25 0 0.559 L 0 1.344 C 0 1.653 0.25 1.903 0.558 1.903 L 3.285 1.903 C 3.593 1.903 3.842 1.653 3.842 1.344 L 3.842 0.559 C 3.842 0.25 3.593 0 3.285 0 Z" fill="rgb(29, 28, 27)" height="1.9031500000000001px" id="XRUAhGnph" transform="translate(23.887 2.728)" width="3.8424000000000014px"/><path d="M 0.558 0 L 5.644 0 C 5.952 0 6.202 0.25 6.202 0.559 L 6.202 1.344 C 6.202 1.653 5.952 1.903 5.644 1.903 L 0.558 1.903 C 0.25 1.903 0 1.653 0 1.344 L 0 0.559 C 0 0.25 0.25 0 0.558 0 Z" fill="rgb(29, 28, 27)" height="1.9031500000000001px" id="VsaVVIfke" transform="translate(21.528 5.456)" width="6.201600000000003px"/><path d="M 3.06 0 L 0.558 0 C 0.25 0 0 0.25 0 0.559 L 0 1.344 C 0 1.653 0.25 1.903 0.558 1.903 L 3.06 1.903 C 3.369 1.903 3.618 1.653 3.618 1.344 L 3.618 0.559 C 3.618 0.25 3.369 0 3.06 0 Z" fill="rgb(29, 28, 27)" height="1.9030999999999985px" id="wiAKEgyId" transform="translate(40.819 10.972)" width="3.6182000000000016px"/><path d="M 0.558 0 L 17.318 0 C 17.626 0 17.875 0.25 17.875 0.559 L 17.875 1.345 C 17.875 1.653 17.626 1.903 17.318 1.903 L 0.558 1.903 C 0.25 1.903 0 1.653 0 1.345 L 0 0.559 C 0 0.25 0.25 0 0.558 0 Z" fill="rgb(29, 28, 27)" height="1.9032px" id="FIE0ufK9m" transform="translate(6.666 13.7)" width="17.87506px"/><path d="M 6.426 0 L 0.558 0 C 0.25 0 0 0.25 0 0.559 L 0 1.345 C 0 1.653 0.25 1.903 0.558 1.903 L 6.426 1.903 C 6.734 1.903 6.984 1.653 6.984 1.345 L 6.984 0.559 C 6.984 0.25 6.734 0 6.426 0 Z" fill="rgb(29, 28, 27)" height="1.9032000000000018px" id="ut9UWny3L" transform="translate(22.892 19.156)" width="6.983599999999999px"/><path d="M 0.558 0 L 22.151 0 C 22.459 0 22.709 0.25 22.709 0.559 L 22.709 1.344 C 22.709 1.653 22.459 1.903 22.151 1.903 L 0.558 1.903 C 0.25 1.903 0 1.653 0 1.344 L 0 0.559 C 0 0.25 0.25 0 0.558 0 Z" fill="rgb(29, 28, 27)" height="1.9030999999999985px" id="VULnffgbk" transform="translate(9.552 16.428)" width="22.7089px"/><path d="M 7.886 0 L 0.558 0 C 0.25 0 0 0.25 0 0.559 L 0 1.345 C 0 1.653 0.25 1.903 0.558 1.903 L 7.886 1.903 C 8.194 1.903 8.443 1.653 8.443 1.345 L 8.443 0.559 C 8.443 0.25 8.194 0 7.886 0 Z" fill="rgb(29, 28, 27)" height="1.9032000000000018px" id="adZTYr4MR" transform="translate(6.078 19.156)" width="8.44303px"/><path d="M 0.558 0 L 2.211 0 C 2.519 0 2.769 0.25 2.769 0.559 L 2.769 1.406 C 2.769 1.714 2.519 1.964 2.211 1.964 L 0.558 1.964 C 0.25 1.964 0 1.714 0 1.406 L 0 0.559 C 0 0.25 0.25 0 0.558 0 Z" fill="rgb(29, 28, 27)" height="1.964299999999998px" id="bwdUdEmCH" transform="translate(13.784 21.854)" width="2.768600000000001px"/><path d="M 2.424 0 L 0.558 0 C 0.25 0 0 0.25 0 0.559 L 0 1.406 C 0 1.714 0.25 1.964 0.558 1.964 L 2.424 1.964 C 2.732 1.964 2.982 1.714 2.982 1.406 L 2.982 0.559 C 2.982 0.25 2.732 0 2.424 0 Z" fill="rgb(29, 28, 27)" height="1.964299999999998px" id="PUvesMJEj" transform="translate(23.556 21.854)" width="2.982199999999999px"/><path d="M 0.558 0 L 2.241 0 C 2.55 0 2.799 0.25 2.799 0.559 L 2.799 1.406 C 2.799 1.714 2.55 1.964 2.241 1.964 L 0.558 1.964 C 0.25 1.964 0 1.714 0 1.406 L 0 0.559 C 0 0.25 0.25 0 0.558 0 Z" fill="rgb(29, 28, 27)" height="1.964299999999998px" id="Wo2W7J3Zj" transform="translate(8.672 21.854)" width="2.799050000000001px"/><path d="M 6.661 0 L 0.558 0 C 0.25 0 0 0.25 0 0.559 L 0 1.345 C 0 1.653 0.25 1.903 0.558 1.903 L 6.661 1.903 C 6.969 1.903 7.219 1.653 7.219 1.345 L 7.219 0.559 C 7.219 0.25 6.969 0 6.661 0 Z" fill="rgb(29, 28, 27)" height="1.9032px" id="PpPVZXp9j" transform="translate(27.041 13.7)" width="7.218900000000001px"/><path d="M 0.621 1.905 C 0.218 1.905 0 1.687 0 1.283 L 0 0.622 C 0 0.218 0.218 0 0.621 0 L 11.225 0 C 11.628 0 11.846 0.218 11.846 0.622 L 11.846 1.283 C 11.846 1.687 11.628 1.905 11.225 1.905 L 6.934 1.905 L 6.934 14.926 C 6.934 15.33 6.716 15.548 6.313 15.548 L 5.537 15.548 C 5.134 15.548 4.916 15.33 4.916 14.926 L 4.916 1.905 Z" fill="rgb(29, 28, 27)" height="15.54825px" id="xr32fxeO6" transform="translate(52.177 8.243)" width="11.845599999999997px"/><path d="M 0.621 0 C 0.218 0 0 0.218 0 0.622 L 0 14.924 C 0 15.328 0.218 15.546 0.621 15.546 L 1.357 15.546 C 1.76 15.546 1.978 15.328 1.978 14.924 L 1.978 0.622 C 1.978 0.218 1.76 0 1.357 0 Z" fill="rgb(29, 28, 27)" height="15.546050000000001px" id="oSsO_UPVN" transform="translate(90.476 8.243)" width="1.9779000000000053px"/><path d="M 0.62 15.546 C 0.217 15.546 0 15.328 0 14.924 L 0 0.622 C 0 0.218 0.217 0 0.62 0 L 1.396 0 C 1.799 0 2.017 0.218 2.017 0.622 L 2.017 13.632 L 8.981 13.632 C 9.384 13.632 9.602 13.85 9.602 14.254 L 9.602 14.924 C 9.602 15.328 9.384 15.546 8.981 15.546 Z" fill="rgb(29, 28, 27)" height="15.546050000000001px" id="Sgj4z5osO" transform="translate(116.749 8.243)" width="9.602000000000004px"/><path d="M 1.974 14.924 C 1.974 15.328 1.756 15.546 1.353 15.546 L 0.621 15.546 C 0.218 15.546 0 15.328 0 14.924 L 0 0.622 C 0 0.218 0.218 0 0.621 0 L 1.357 0 C 1.76 0 1.978 0.218 1.978 0.622 L 1.978 5.747 C 2.634 4.721 3.806 4.079 5.309 4.079 C 8.18 4.079 10.356 6.358 10.356 9.948 C 10.356 13.538 8.18 15.817 5.309 15.817 C 3.801 15.817 2.627 15.175 1.971 14.145 L 1.971 14.922 Z M 8.36 9.95 C 8.36 7.362 6.881 5.928 5.121 5.928 C 3.361 5.928 1.863 7.362 1.863 9.95 C 1.863 12.539 3.361 13.972 5.121 13.972 C 6.881 13.972 8.36 12.539 8.36 9.95 Z" fill="rgb(29, 28, 27)" height="15.81665px" id="q13jjj7xd" transform="translate(138.401 8.243)" width="10.355999999999995px"/><path d="M 4.457 11.738 C 0.961 11.738 -0.019 9.872 0 8.318 C 0.005 7.929 0.253 7.735 0.645 7.735 L 1.344 7.735 C 1.748 7.735 1.922 7.949 1.961 8.352 C 2.063 9.315 2.693 9.907 4.433 9.907 C 6.174 9.907 7.012 9.269 7.012 8.289 C 7.012 7.425 6.522 7.108 5.305 6.899 L 3.209 6.539 C 1.453 6.238 0.29 5.247 0.29 3.468 C 0.29 1.467 1.774 0 4.518 0 C 7.263 0 8.838 1.491 8.814 3.23 C 8.81 3.614 8.553 3.808 8.165 3.808 L 7.457 3.808 C 7.054 3.808 6.908 3.595 6.851 3.202 C 6.749 2.477 6.159 1.818 4.518 1.818 C 2.878 1.818 2.249 2.508 2.249 3.403 C 2.249 4.175 2.695 4.516 3.81 4.714 L 5.906 5.083 C 7.72 5.404 8.98 6.292 8.98 8.198 C 8.98 9.976 7.908 11.74 4.455 11.74 Z" fill="rgb(29, 28, 27)" height="11.739799999999999px" id="tJ8syeWTW" transform="translate(150.024 12.325)" width="8.980269730401375px"/><path d="M 9.146 7.997 C 9.146 8.813 9.175 9.983 9.282 10.799 C 9.334 11.223 9.155 11.465 8.728 11.465 L 8.068 11.465 C 7.685 11.465 7.467 11.319 7.428 11.022 L 7.317 10.181 C 6.724 11.157 5.565 11.659 4.145 11.659 C 1.579 11.659 0 10.142 0 8.078 C 0 6.27 1.27 5.157 3.433 5.002 L 6.589 4.78 C 7.162 4.741 7.186 4.688 7.186 4.153 L 7.186 3.682 C 7.186 2.438 6.434 1.807 4.79 1.807 C 3.145 1.807 2.472 2.425 2.405 3.289 C 2.376 3.697 2.235 3.916 1.823 3.916 L 1.067 3.916 C 0.675 3.916 0.427 3.717 0.422 3.328 C 0.407 1.51 1.74 0 4.792 0 C 7.798 0 9.162 1.427 9.155 3.736 Z M 7.188 7.298 L 7.188 6.244 C 6.955 6.327 6.678 6.386 6.363 6.415 L 3.598 6.676 C 2.59 6.775 1.997 7.163 1.997 8.099 L 1.999 8.099 C 1.999 9.188 2.886 9.97 4.4 9.97 C 6.169 9.97 7.188 8.9 7.188 7.298 Z" fill="rgb(29, 28, 27)" height="11.658999999999999px" id="QPESIZvku" transform="translate(126.854 12.325)" width="9.290755130109668px"/><path d="M 5.224 0 C 8.313 0 10.295 2.255 10.295 5.456 L 10.295 5.694 C 10.295 6.098 10.077 6.316 9.674 6.316 L 1.998 6.316 C 2.168 8.547 3.447 9.898 5.407 9.898 C 6.768 9.898 7.598 9.363 7.934 8.431 C 8.06 8.078 8.243 7.892 8.618 7.892 L 9.33 7.892 C 9.746 7.892 9.994 8.125 9.923 8.538 C 9.598 10.433 7.834 11.74 5.409 11.74 L 5.407 11.738 C 2.168 11.738 0 9.424 0 5.797 C 0 2.169 2.135 0 5.224 0 Z M 5.222 1.74 C 3.494 1.74 2.405 2.818 2.074 4.64 L 8.282 4.64 C 8.054 2.842 6.949 1.74 5.222 1.74 Z" fill="rgb(29, 28, 27)" height="11.739799999999999px" id="PKmyQkwJE" transform="translate(104.541 12.325)" width="10.295000000000002px"/><path d="M 4.459 11.194 C 4.099 11.194 3.877 11.039 3.746 10.703 L 0.091 1.021 C -0.024 0.72 -0.031 0.511 0.076 0.297 C 0.178 0.094 0.381 0 0.732 0 L 1.274 0 C 1.633 0 1.86 0.155 1.986 0.495 L 4.958 8.503 L 5.123 9.018 L 5.289 8.503 L 8.262 0.495 C 8.388 0.155 8.615 0 8.974 0 L 9.517 0 C 9.865 0 10.07 0.092 10.172 0.297 C 10.279 0.511 10.275 0.72 10.157 1.021 L 6.502 10.703 C 6.371 11.039 6.149 11.194 5.79 11.194 Z" fill="rgb(29, 28, 27)" height="11.1941px" id="uUQr5Yl4B" transform="translate(93.807 12.595)" width="10.248961642504256px"/><path d="M 5.407 11.738 C 2.167 11.738 0 9.424 0 5.797 C 0 2.169 2.133 0 5.221 0 C 8.31 0 10.292 2.255 10.292 5.456 L 10.292 5.694 C 10.292 6.098 10.075 6.316 9.672 6.316 L 1.995 6.316 C 2.165 8.547 3.446 9.898 5.404 9.898 C 6.768 9.898 7.596 9.363 7.931 8.431 C 8.058 8.078 8.241 7.892 8.615 7.892 L 9.328 7.892 C 9.744 7.892 9.992 8.125 9.918 8.538 C 9.593 10.433 7.829 11.74 5.404 11.74 Z M 8.282 4.64 C 8.053 2.842 6.949 1.74 5.221 1.74 C 3.494 1.74 2.405 2.818 2.074 4.64 Z" fill="rgb(29, 28, 27)" height="11.739799999999999px" id="zo1nSBuSF" transform="translate(78.397 12.325)" width="10.29249999999999px"/><path d="M 3.057 10.677 C 3.163 11.026 3.392 11.192 3.756 11.192 L 3.749 11.194 L 4.987 11.194 C 5.35 11.194 5.579 11.028 5.69 10.679 L 8.173 2.654 L 8.237 2.401 L 8.3 2.654 L 10.787 10.679 C 10.894 11.028 11.123 11.194 11.487 11.194 L 12.733 11.194 C 13.096 11.194 13.325 11.028 13.432 10.679 L 16.418 1.006 C 16.516 0.7 16.512 0.498 16.41 0.288 C 16.307 0.089 16.109 0.002 15.76 0.002 L 15.218 0.002 C 14.848 0.002 14.626 0.168 14.519 0.522 L 12.094 8.547 L 12.046 8.761 L 11.999 8.542 L 9.506 0.517 C 9.4 0.168 9.171 0.002 8.807 0.002 L 7.683 0.002 C 7.319 0.002 7.091 0.168 6.984 0.517 L 4.492 8.542 L 4.449 8.745 L 4.405 8.551 L 1.98 0.519 C 1.874 0.166 1.649 0 1.281 0 L 0.728 0 C 0.38 0 0.181 0.087 0.079 0.286 C -0.021 0.493 -0.028 0.698 0.07 1.004 Z" fill="rgb(29, 28, 27)" height="11.194099999999999px" id="uboloLX99" transform="translate(61.282 12.598)" width="16.489163442184434px"/></svg>)
チュートリアル
Twelve Labs を使ったオリンピック動画分類アプリケーションの構築

リシケシュ・ヤダフ
このチュートリアルでは、Twelve Labsの分類APIとMarengo 2.6を使用し、モデルのトレーニングを一切行うことなく、Streamlitインターフェースを介してスポーツ映像を定義済みまたはカスタムのクラスに自動分類する「オリンピック・ビデオクリップ分類アプリケーション」の構築手順を説明します。
このチュートリアルでは、Twelve Labsの分類APIとMarengo 2.6を使用し、モデルのトレーニングを一切行うことなく、Streamlitインターフェースを介してスポーツ映像を定義済みまたはカスタムのクラスに自動分類する「オリンピック・ビデオクリップ分類アプリケーション」の構築手順を説明します。

この記事の内容
No headings found on page
ニュースレターに登録する
ニュースレターに登録する
ビデオ理解に関する最新の技術進歩、チュートリアル、業界の動向をお届けします
ビデオ理解に関する最新の技術進歩、チュートリアル、業界の動向をお届けします
AIを活用してビデオを検索、分析、探索します。
2024/09/03
15分
記事へのリンクをコピー
オリンピックのビデオ映像を整理してメダルを獲得することを夢見たことはありませんか? 🥇 さあ、表彰台に立つチャンスです!
オリンピック動画クリップ分類アプリケーションは、スポーツ映像をカテゴリ分けする退屈なプロセスを効率化することを目指しています。Twelve LabsのMarengo 2.6埋め込みモデルを使用し、このアプリは動画クリップからオリンピック競技を迅速に分類します。
画面上のテキスト、会話、視覚情報を分析することにより、アプリケーションは動画クリップを簡単にカテゴリ分けします。このチュートリアルでは、研究者、スポーツ愛好家、放送局がオリンピックコンテンツと対話する方法に革命をもたらすStreamlitアプリケーションの作成方法をガイドします。ユーザー定義のカテゴリに基づいて動画を分類するアプリの構築方法を学びます。アプリケーションの詳細なデモンストレーション動画は、以下に提供されています。
アプリケーションのデモはこちらでご覧いただけます:Olympics Application。また、こちらのReplitテンプレートを使って触ってみることもできます。
前提条件
Twelve Labs Playgroundにサインアップして、APIキーを生成します。
ノートブックとこのアプリケーションのリポジトリはGitHubにあります。
Streamlitアプリケーションは、Python、HTML、JavaScriptを使用しています。
アプリケーションの仕組み
本セクションでは、オリンピック動画クリップを分類するためのアプリケーションフローの概要を説明します。
アプリケーションは分類検索エンジンを使用しており、さまざまな潜在的用途があります。このタスクでは、オリンピックのスポーツ動画クリップの分類と取得に焦点を当てます。最初の重要なステップは、インデックスの作成です。
これを行うには、Twelve Labs Playgroundにアクセスしてください。
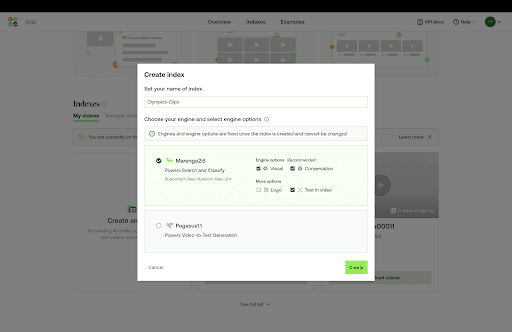
[New Index (新しいインデックス)] を作成し、インデックス作成と分類に適した
Marengo 2.6 (Embedding Engine)を選択します。すべてのスポーツ動画がこのインデックスにアップロードされたら、次に進むことができます。
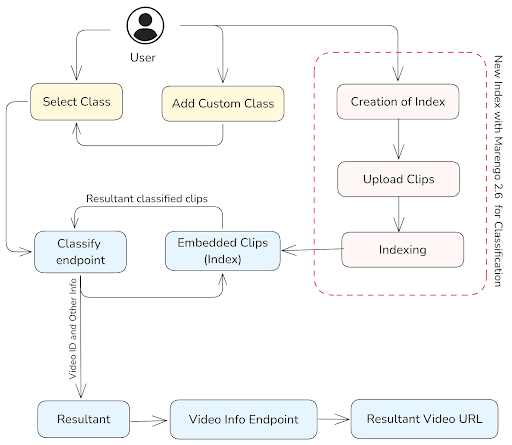
次のセクションでは、インデックスIDを作成して実装する方法をステップバイステップで詳しく説明します。一般的なアプリケーションワークフローの概要は以下のとおりです:
ユーザーには2つのオプションがあります。マルチセレクトメニューから表示したいスポーツのタイプを選択するか、独自のカスタムクラスを追加することができます。
選択されたクラスは、関連するすべての動画クリップを取得および分類するために、
INDEX IDと共にclassify(分類)エンドポイントに送信されます。include_clipsなどの追加パラメータもこのエンドポイントに送信されます。レスポンスには、ビデオID、クラス、信頼度(信頼スコア)、開始および終了時間、サムネイルURLなどが含まれます。
結果のビデオIDに関連付けられたビデオURLを取得するには、ビデオ情報エンドポイントにアクセスする必要があります。
準備ステップ
Twelve Labs Playgroundでサインアップし、インデックスを作成します。
分類に適切なオプションを選択します:Marengo 2.6 (Embedding Engine)。このエンジンは動画検索と分類に優れており、動画理解のための堅牢な基盤を提供します。
スポーツ動画クリップをアップロードします。必要に応じて、このチュートリアル用に提供されているサンプルクリップを使用してください:Sports Clips。
Twelve Labs PlaygroundからAPIキーを取得します。
オリンピックのクリップが含まれているインデックスを開いて、
INDEX_IDを取得します。IDはURLに含まれています:https://playground.twelvelabs.io/indexes/{index_id}メインファイルと共に、APIキーとINDEX_IDを設定した .env ファイルをセットアップします。
これらのステップが完了すれば、アプリケーションの開発に取り掛かる準備は完了です!
Twelvelabs_API=your_api_key_here
API_URL=your_api_url_here
INDEX_ID=your_index_id_here
分類のウォークスルー
1 - クライアントのインポート、検証、セットアップ
まず、必要なライブラリをインポートし、正しい環境を作成するために環境変数を設定することから始めます。開始するには:
import os
import requests
import glob
import requests
from twelvelabs import TwelveLabs
from twelvelabs.models.task import Task
import dotenv


API_KEY=os.getenv("Twelvelabs_API")
API_URL=os.getenv("API_URL")
INDEX_ID=os.getenv("INDEX_ID")

client = TwelveLabs(api_key=API_KEY)

# URL of the /indexes endpoint
INDEXES_URL = f"{API_URL}/indexes"

# Setting headers variables

default_header = {
    "x-api-key": API_KEY
}
依存関係がインポートされ、環境変数が正しくロードされ、適切なシークレット情報でAPIクライアントが初期化されました。インデックスにアクセスするためのベースURLと、APIリクエストのデフォルトヘッダーも設定されています。
この基盤が整ったので、インデックスを作成するなど、より具体的な分類タスクを進める準備が整いました。
2 - クラスの設定
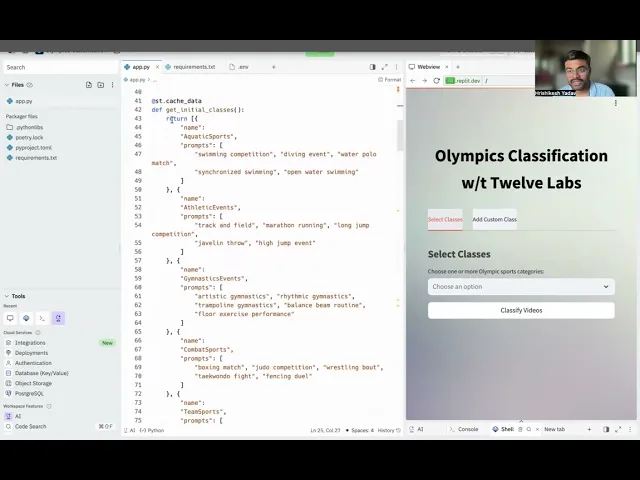
以下は、オリンピックスポーツのクリップを分類するためのクラスのリストです:
# Categories for the classification of the Olympics Sports

CLASSES = [
    {
        "name": "AquaticSports",
        "prompts": [
            "swimming competition",
            "diving event",
            "water polo match",
            "synchronized swimming",
            "open water swimming"
        ]
    },
    {
        "name": "AthleticEvents",
        "prompts": [
            "track and field",
            "marathon running",
            "long jump competition",
            "javelin throw",
            "high jump event"
        ]
    },
    {
        "name": "GymnasticsEvents",
        "prompts": [
            "artistic gymnastics",
            "rhythmic gymnastics",
            "trampoline gymnastics",
            "balance beam routine",
            "floor exercise performance"
        ]
    },
    {
        "name": "CombatSports",
        "prompts": [
            "boxing match",
            "judo competition",
            "wrestling bout",
            "taekwondo fight",
            "fencing duel"
        ]
    },
    {
        "name": "TeamSports",
        "prompts": [
            "basketball game",
            "volleyball match",
            "football (soccer) match",
            "handball game",
            "field hockey competition"
        ]
    },
    {
        "name": "CyclingSports",
        "prompts": [
            "road cycling race",
            "track cycling event",
            "mountain bike competition",
            "BMX racing",
            "cycling time trial"
        ]
    },
    {
        "name": "RacquetSports",
        "prompts": [
            "tennis match",
            "badminton game",
            "table tennis competition",
            "squash game",
            "tennis doubles match"
        ]
    },
    {
        "name": "RowingAndSailing",
        "prompts": [
            "rowing competition",
            "sailing race",
            "canoe sprint",
            "kayak event",
            "windsurfing competition"
        ]
    }
]
3 - 特定のインデックスからすべての動画を分類するためのユーティリティ関数
# Utility function
def print_page(page):
    for data in page:
        print(f"video_id={data.video_id}")
        for cl in data.classes:
            print(
                f"  name={cl.name} score={cl.score} duration_ratio={cl.duration_ratio} clips={cl.clips.model_dump_json(indent=2)}"
            )


result = client.classify.index(
    index_id=INDEX_ID,
    options=["visual"],
    classes=CLASSES,
    include_clips=True
)
分類を実行するために、 client.classify.index() メソッドが呼び出されます。これは以前に定義された INDEX_ID を使用し、視覚的な分類(options=["visual"])に焦点を当て、結果にクリップ情報を含めます。 CLASSES パラメータは、分類に使用するクラスを指定します。
print_page(result) 関数は、分類結果を読みやすい形式で表示します。これは分類レスポンスを反復処理し、ビデオIDと、名前、スコア、デュレーション比(時間比率)、関連クリップなど、分類された各クラスに関する詳細情報を出力します。このアプローチにより、指定したインデックス内のすべてのビデオにわたる分類出力を簡単に分析できます。
4 - 結果を構造化して明確に出力する関数
print_classification_result() 関数は、TwelveLabs APIの分類結果を構造化された読みやすい形式で表示します。結果セット内の各動画を処理し、ビデオID、検出されたクラス、関連するスコアなどの重要情報を提示します。クラスごとに、全体的なスコアとデュレーション比を表示し、続いてスコアの降順でソートされた上位5つのクリップの詳細を表示します。これらのクリップ詳細には、開始時間と終了時間、および CLASSES 内の関連プロンプトが含まれます。この関数は、上位5つ以外に追加のクリップがあるかどうかも示します。
def print_classification_result(result) -> None:

    for video_data in result.data:
        print(f"Video ID: {video_data.video_id}")
        print("=" * 50)


        for class_data in video_data.classes:
            print(f"  Class: {class_data.name}")
            print(f"  Score: {class_data.score:.2f}")
            print(f"  Duration Ratio: {class_data.duration_ratio:.2f}")
            print("  Clips:")


            sorted_clips = sorted(class_data.clips, key=lambda x: x.score, reverse=True)


            for i, clip in enumerate(sorted_clips[:5], 1):  # Print top 5 clips
                print(f"    {i}. Score: {clip.score:.2f}")
                print(f"       Start: {clip.start:.2f}s, End: {clip.end:.2f}s")
                print(f"       Prompt: {clip.prompt}")


            if len(sorted_clips) > 5:
                print(f"    ... and {len(sorted_clips) - 5} more clips")


            print("-" * 40)


        print("\n")


    print(f"Total results: {result.page_info.total_results}")
    print(f"Page expires at: {result.page_info.page_expired_at}")
    print(f"Next page token: {result.page_info.next_page_token}")
上記の結果のサンプル出力は以下のようになります -
Video ID: 66c9b03be53394f4aaed82c1
==================================================
  Class: AquaticSports
  Score: 96.08
  Duration Ratio: 0.90
  Clips:
    1. Score: 85.74
       Start: 19.30s, End: 42.00s
       Prompt: water polo match
    2. Score: 85.38
       Start: 56.30s, End: 160.41s
       Prompt: water polo match
    3. Score: 85.25
       Start: 19.30s, End: 124.07s
       Prompt: synchronized swimming
    4. Score: 85.13
       Start: 0.00s, End: 24.83s
       Prompt: swimming competition
    5. Score: 85.08
       Start: 124.10s, End: 160.41s
       Prompt: synchronized swimming
    ... and 19 more clips
5 - インデックス内のすべての動画からの特定クラスのカテゴリ分け
このセクションでは、特定のインデックス内のすべての動画に対する「AquaticSports」の特定クラスのカテゴリ分けに焦点を当てます。このプロセスは、関連するプロンプトを持つ特定クラスの定義、分類の実行、および結果の表示という3つの主要なステップで構成されます。
この絞り込んだアプローチにより、水上スポーツのコンテンツを含む動画をより正確に分類できるようになります。 print_page() 関数はユーティリティツールとして機能し、分類結果を分かりやすく出力します。
CLASS = [
    {
        "name": "AquaticSports",
        "prompts": [
            "swimming competition",
            "diving event",
            "water polo match",
            "synchronized swimming",
            "open water swimming"
        ]
    }


]


def print_page(page):
    for data in page:
        print(f"video_id={data.video_id}")
        for cl in data.classes:
            print(
                f"  name={cl.name} score={cl.score} duration_ratio={cl.duration_ratio} detailed_scores={cl.detailed_scores.model_dump_json(indent=2)}"
            )
result = client.classify.index(
    index_id=INDEX_ID,
    options=["visual"],
    classes=CLASS,
    include_clips=True,
    show_detailed_score=True
)


print_classification_result(result)
上記のコードスニペットのサンプル出力セクションは、特定の CLASS に分類される動画を提供します。
Video ID: 66c9b03be53394f4aaed82c1
==================================================
  Class: AquaticSports
  Score: 96.08
  Duration Ratio: 0.90
  Clips:
    1. Score: 85.74
       Start: 19.30s, End: 42.00s
       Prompt: water polo match
    2. Score: 85.38
       Start: 56.30s, End: 160.41s
       Prompt: water polo match
    3. Score: 85.25
       Start: 19.30s, End: 124.07s
       Prompt: synchronized swimming
    4. Score: 85.13
       Start: 0.00s, End: 24.83s
       Prompt: swimming competition
    5. Score: 85.08
       Start: 124.10s, End: 160.41s
       Prompt: synchronized swimming
    ... and 19 more clips
Twelve Labs SDKを使用してclassifyエンドポイントを実装し、それと対話する方法を理解したところで、ユーザー向けに完全なStreamlitアプリケーションの開発に進みましょう。
Streamlitアプリケーションの作成
Streamlitは、そのシンプルさと迅速なプロトタイピング機能により、開発の初期段階に最適であるため、アプリケーションの構築用として選択されました。Streamlitを使用すると、最小限のコードでインタラクティブなWebインターフェイスを迅速に作成でき、分類タスクの結果をユーザーフレンドリーな方法で紹介するのに最適です。Twelve Labs SDKを組み合わせることで、高度にインタラクティブなWebインターフェイスを数分で作成できます。
Streamlitを使い始めるには、仮想環境を設定していることを確認し、次のコマンドを使用してStreamlitをインストールします:
pip install streamlit
詳細については、公式のStreamlitドキュメントを確認してください。
Streamlitアプリケーションを構築するには、次のファイル構造を使用します:
.
├── .env
├── app.py
├── requirements.txt
└── .gitignore
requirements.txt ファイルの内容は以下のとおりです:
streamlit
twelvelabs
requests
python-dotenv
これらの依存関係は、オリンピックの動画クリップ分類アプリケーションに必要なコア機能をカバーしています。
メインの app.py ファイルには、以下の機能が含まれています:
get_initial_classes(): 事前定義されたオリンピックスポーツカテゴリを設定します。get_custom_classes()およびadd_custom_class(): 柔軟性を高めるために、ユーザー定義のカテゴリを管理します。classify_videos(): TwelveLabs APIと連携して、選択したカテゴリに基づいて動画の分類を実行します。get_video_urls(): 分類されたコンテンツのビデオURLを取得します。render_video(): スムーズな再生のために、HLS.jsを使用して組み込みビデオプレーヤーを作成します。
# Import Necessary Dependencies import streamlit as st from twelvelabs import TwelveLabs import requests import os from dotenv import load_dotenv load_dotenv() # Get the API Key from the Dashboard - https://playground.twelvelabs.io/dashboard/api-key API_KEY = os.getenv("API_KEY") # Create the INDEX ID as specified in the README.md and get the INDEX_ID INDEX_ID = os.getenv("INDEX_ID") client = TwelveLabs(api_key=API_KEY) # Background Setting of the Application page_element = """ <style> [data-testid="stAppViewContainer"] { background-image: url("https://wallpapercave.com/wp/wp3589963.jpg"); background-size: cover; } [data-testid="stHeader"] { background-color: rgba(0,0,0,0); } [data-testid="stToolbar"] { right: 2rem; background-image: url(""); background-size: cover; } </style> """ st.markdown(page_element, unsafe_allow_html=True) # Classes to classify the video into, there are categories name and # the prompts which specifc finds that factor to label that category @st.cache_data def get_initial_classes(): return [ {"name": "AquaticSports", "prompts": ["swimming competition", "diving event", "water polo match", "synchronized swimming", "open water swimming"]}, {"name": "AthleticEvents", "prompts": ["track and field", "marathon running", "long jump competition", "javelin throw", "high jump event"]}, {"name": "GymnasticsEvents", "prompts": ["artistic gymnastics", "rhythmic gymnastics", "trampoline gymnastics", "balance beam routine", "floor exercise performance"]}, {"name": "CombatSports", "prompts": ["boxing match", "judo competition", "wrestling bout", "taekwondo fight", "fencing duel"]}, {"name": "TeamSports", "prompts": ["basketball game", "volleyball match", "football (soccer) match", "handball game", "field hockey competition"]}, {"name": "CyclingSports", "prompts": ["road cycling race", "track cycling event", "mountain bike competition", "BMX racing", "cycling time trial"]}, {"name": "RacquetSports", "prompts": ["tennis match", "badminton game", "table tennis competition", "squash game", "tennis doubles match"]}, {"name": "RowingAndSailing", "prompts": ["rowing competition", "sailing race", "canoe sprint", "kayak event", "windsurfing competition"]} ] # Session State for the custom classes def get_custom_classes(): if 'custom_classes' not in st.session_state: st.session_state.custom_classes = [] return st.session_state.custom_classes # Utitlity Function to add the custom classes in app def add_custom_class(name, prompts): custom_classes = get_custom_classes() custom_classes.append({"name": name, "prompts": prompts}) st.session_state.custom_classes = custom_classes st.session_state.new_class_added = True # Utitlity Function to classify all the videos in the specified Index def classify_videos(selected_classes): return client.classify.index( index_id=INDEX_ID, options=["visual"], classes=selected_classes, include_clips=True ) # To get the video urls from the resultant video id def get_video_urls(video_ids): base_url = f"https://api.twelvelabs.io/v1.2/indexes/{INDEX_ID}/videos/{{}}" headers = {"x-api-key": API_KEY, "Content-Type": "application/json"} video_urls = {} for video_id in video_ids: try: response = requests.get(base_url.format(video_id), headers=headers) response.raise_for_status() data = response.json() if 'hls' in data and 'video_url' in data['hls']: video_urls[video_id] = data['hls']['video_url'] else: st.warning(f"No video URL found for video ID: {video_id}") except requests.exceptions.RequestException as e: st.error(f"Failed to get data for video ID: {video_id}. Error: {str(e)}") return video_urls # Utitlity Function to Render the Video by the resultant video url def render_video(video_url): hls_player = f""" <script src="https://cdn.jsdelivr.net/npm/hls.js@latest"></script> <div style="width: 100%; border-radius: 10px; overflow: hidden; box-shadow: 0 4px 6px rgba(0, 0, 0, 0.1);"> <video id="video" controls style="width: 100%; height: auto;"></video> </div> <script> var video = document.getElementById('video'); var videoSrc = "{video_url}"; if (Hls.isSupported()) {{ var hls = new Hls(); hls.loadSource(videoSrc); hls.attachMedia(video); hls.on(Hls.Events.MANIFEST_PARSED, function() {{ video.pause(); }}); }} else if (video.canPlayType('application/vnd.apple.mpegurl')) {{ video.src = videoSrc; video.addEventListener('loadedmetadata', function() {{ video.pause(); }}); }} </script> """ st.components.v1.html(hls_player, height=300)
get_initial_classes() 関数は、オリンピックスポーツの事前定義されたカテゴリの静的なリストを返します。Streamlitはこのデータをキャッシュするため、関数が実行されるのは1回だけで、その結果はメモリに保存されます。この関数をそれ以降に呼び出すと、キャッシュされた結果が返されるため、繰り返しの実行を避けることができます。
get_initial_classes() 関数はキャッシュされますが、get_custom_classes() はキャッシュされません。Streamlitのセッション状態に保存されるカスタムクラスは、アプリケーションの実行中に変化することが予想されるためです。
get_video_urls() はビデオIDのリストを受け取り、TwelveLabsに対してAPIコールを行って対応するHLS (HTTP Live Streaming) URLを取得し、潜在的なエラーや欠落しているURLを処理します。
render_video() は、複数のブラウザやデバイスと互換性のある、HLS.jsサポート付きのHTML5ビデオプレーヤーを作成します。必要に応じてネイティブのHLSにフォールバックします。
classify_videos() では、TwelveLabsクライアントを使用して、指定されたインデックス内のビデオを分類するために、ユーザーが選択したクラスが使用されます。この関数は視覚的な分類に焦点を当て、結果にクリップ情報を含めます。
# Main Function def main(): # Basic Markdown Setup for the Application st.markdown(""" <style> .big-font { font-size: 40px !important; font-weight: bold; color: #000000; text-align: center; margin-bottom: 30px; } .subheader { font-size: 24px; font-weight: bold; color: #424242; margin-top: 20px; margin-bottom: 10px; } .stButton>button { width: 100%; } .video-info { background-color: #f0f0f0; border-radius: 10px; padding: 15px; margin-bottom: 20px; } .custom-box { background-color: #f9f9f9; border-radius: 10px; padding: 20px; margin-bottom: 20px; box-shadow: 0 2px 4px rgba(0,0,0,0.1); } .stTabs [data-baseweb="tab-list"] { gap: 24px; } .stTabs [data-baseweb="tab"] { height: 50px; white-space: pre-wrap; background-color: #f0f2f6; border-radius: 4px 4px 0px 0px; gap: 1px; padding-top: 10px; padding-bottom: 10px; } .stTabs [data-baseweb="tab-list"] button[aria-selected="true"] { background-color: #e8eaed; } </style> """, unsafe_allow_html=True) st.markdown('<p class="big-font">Olympics Classification w/t Twelve Labs</p>', unsafe_allow_html=True) # Updation of the classes CLASSES = get_initial_classes() + get_custom_classes() # Nav Tabs Creation tab1, tab2 = st.tabs(["Select Classes", "Add Custom Class"]) with tab1: st.markdown('<p class="subheader">Select Classes</p>', unsafe_allow_html=True) with st.container(): class_names = [cls["name"] for cls in CLASSES] # Multiselect option from the CLASSES selected_classes = st.multiselect("Choose one or more Olympic sports categories:", class_names) if st.button("Classify Videos", key="classify_button"): if selected_classes: with st.spinner("Classifying videos..."): selected_classes_with_prompts = [cls for cls in CLASSES if cls["name"] in selected_classes] res = classify_videos(selected_classes_with_prompts) video_ids = [data.video_id for data in res.data] # Retrieving the video urls from the resultant video which matches to the selected CLASSES video_urls = get_video_urls(video_ids) st.markdown('<p class="subheader">Classified Videos</p>', unsafe_allow_html=True) # Iterating over to showcase the information for every resulatant video for i, video_data in enumerate(res.data, 1): video_id = video_data.video_id video_url = video_urls.get(video_id, "URL not found") st.markdown(f"### Video {i}") st.markdown('<div class="video-info">', unsafe_allow_html=True) st.markdown(f"**Video ID:** {video_id}") for class_data in video_data.classes: st.markdown(f""" **Class:** {class_data.name} - Score: {class_data.score:.2f} - Duration Ratio: {class_data.duration_ratio:.2f} """) if video_url != "URL not found": render_video(video_url) else: st.warning("Video URL not available. Unable to render video.") st.markdown("---") st.success(f"Total videos classified: {len(res.data)}") else: st.warning("Please select at least one class.") st.markdown('</div>', unsafe_allow_html=True) # Nav Tab for the addition of the Custom Classes to select from with tab2: st.markdown('<p class="subheader">Add Custom Class</p>', unsafe_allow_html=True) with st.container(): custom_class_name = st.text_input("Enter custom class name") custom_class_prompts = st.text_input("Enter custom class prompts (comma-separated)") if st.button("Add Custom Class"): if custom_class_name and custom_class_prompts: add_custom_class(custom_class_name, custom_class_prompts.split(',')) st.success(f"Custom class '{custom_class_name}' added successfully!") st.experimental_rerun() else: st.warning("Please enter both class name and prompts.") st.markdown('</div>', unsafe_allow_html=True) if st.session_state.get('new_class_added', False): st.session_state.new_class_added = False st.experimental_rerun() if __name__ == "__main__": main()
アプリケーションのメイン関数では、指示の正しい順序だけでなく、CSSとレイアウトに大きく重点を置いています。ユーザーは動画分類タブの下にある [Add Custom Class (カスタムクラスの追加)] タブから新しい分類カテゴリを追加できます。[Select Classes (クラスの選択)] タブを使用すると、ユーザーは定義されたカテゴリおよびカスタムカテゴリから選択できます。
ユーザーが「Classify Videos(動画の分類)」ボタンをクリックすると、アプリケーションは次の処理を行います:
選択されたクラスを取得します。
TwelveLabs APIを呼び出して動画を分類します(classify_videos() 関数)。
分類された動画の動画URLを取得します。
分類結果を表示し、動画をレンダリングします。
最終的なアプリケーション結果は以下の通りです —

チュートリアルをさらに試すためのアイデア
アプリケーションの動作手順と開発プロセスを理解することで、革新的なアイデアを実装し、現実世界にインパクトを与える準備が整います。このチュートリアルブログに類似した、さらに発展させることができるいくつかのユースケースのアイデアをご紹介します:
🔍 ビデオ検索エンジン:ビデオコンテンツの検索可能なデータベースを作成し、ユーザーが大容量の動画コレクションから特定のシーンやトピックを見つけられるようにします。
🎥 防犯カメラ映像分析:防犯カメラ映像内の特定のイベントや行動を検出してカテゴリ分けします。
💃 ダンスムーブ分類:ダンス動画からさまざまなダンススタイルや特定の動きを識別し、カテゴリ分けします。
結論
このブログ記事では、Twelve Labsを活用した分類タスクを使って、アプリケーションがどのように構築されるのか、その動作手順を詳細に解説しました。チュートリアルにお付き合いいただきありがとうございました。ユーザーエクスペリエンスの向上やさまざまな問題の解決に関する皆様のアイデアを楽しみにしています。
オリンピックのビデオ映像を整理してメダルを獲得することを夢見たことはありませんか? 🥇 さあ、表彰台に立つチャンスです!
オリンピック動画クリップ分類アプリケーションは、スポーツ映像をカテゴリ分けする退屈なプロセスを効率化することを目指しています。Twelve LabsのMarengo 2.6埋め込みモデルを使用し、このアプリは動画クリップからオリンピック競技を迅速に分類します。
画面上のテキスト、会話、視覚情報を分析することにより、アプリケーションは動画クリップを簡単にカテゴリ分けします。このチュートリアルでは、研究者、スポーツ愛好家、放送局がオリンピックコンテンツと対話する方法に革命をもたらすStreamlitアプリケーションの作成方法をガイドします。ユーザー定義のカテゴリに基づいて動画を分類するアプリの構築方法を学びます。アプリケーションの詳細なデモンストレーション動画は、以下に提供されています。
アプリケーションのデモはこちらでご覧いただけます:Olympics Application。また、こちらのReplitテンプレートを使って触ってみることもできます。
前提条件
Twelve Labs Playgroundにサインアップして、APIキーを生成します。
ノートブックとこのアプリケーションのリポジトリはGitHubにあります。
Streamlitアプリケーションは、Python、HTML、JavaScriptを使用しています。
アプリケーションの仕組み
本セクションでは、オリンピック動画クリップを分類するためのアプリケーションフローの概要を説明します。
アプリケーションは分類検索エンジンを使用しており、さまざまな潜在的用途があります。このタスクでは、オリンピックのスポーツ動画クリップの分類と取得に焦点を当てます。最初の重要なステップは、インデックスの作成です。
これを行うには、Twelve Labs Playgroundにアクセスしてください。
[New Index (新しいインデックス)] を作成し、インデックス作成と分類に適した
Marengo 2.6 (Embedding Engine)を選択します。すべてのスポーツ動画がこのインデックスにアップロードされたら、次に進むことができます。
次のセクションでは、インデックスIDを作成して実装する方法をステップバイステップで詳しく説明します。一般的なアプリケーションワークフローの概要は以下のとおりです:
ユーザーには2つのオプションがあります。マルチセレクトメニューから表示したいスポーツのタイプを選択するか、独自のカスタムクラスを追加することができます。
選択されたクラスは、関連するすべての動画クリップを取得および分類するために、
INDEX IDと共にclassify(分類)エンドポイントに送信されます。include_clipsなどの追加パラメータもこのエンドポイントに送信されます。レスポンスには、ビデオID、クラス、信頼度(信頼スコア)、開始および終了時間、サムネイルURLなどが含まれます。
結果のビデオIDに関連付けられたビデオURLを取得するには、ビデオ情報エンドポイントにアクセスする必要があります。
準備ステップ
Twelve Labs Playgroundでサインアップし、インデックスを作成します。
分類に適切なオプションを選択します:Marengo 2.6 (Embedding Engine)。このエンジンは動画検索と分類に優れており、動画理解のための堅牢な基盤を提供します。
スポーツ動画クリップをアップロードします。必要に応じて、このチュートリアル用に提供されているサンプルクリップを使用してください:Sports Clips。
Twelve Labs PlaygroundからAPIキーを取得します。
オリンピックのクリップが含まれているインデックスを開いて、
INDEX_IDを取得します。IDはURLに含まれています:https://playground.twelvelabs.io/indexes/{index_id}メインファイルと共に、APIキーとINDEX_IDを設定した .env ファイルをセットアップします。
これらのステップが完了すれば、アプリケーションの開発に取り掛かる準備は完了です!
Twelvelabs_API=your_api_key_here
API_URL=your_api_url_here
INDEX_ID=your_index_id_here
分類のウォークスルー
1 - クライアントのインポート、検証、セットアップ
まず、必要なライブラリをインポートし、正しい環境を作成するために環境変数を設定することから始めます。開始するには:
import os
import requests
import glob
import requests
from twelvelabs import TwelveLabs
from twelvelabs.models.task import Task
import dotenv


API_KEY=os.getenv("Twelvelabs_API")
API_URL=os.getenv("API_URL")
INDEX_ID=os.getenv("INDEX_ID")

client = TwelveLabs(api_key=API_KEY)

# URL of the /indexes endpoint
INDEXES_URL = f"{API_URL}/indexes"

# Setting headers variables

default_header = {
    "x-api-key": API_KEY
}
依存関係がインポートされ、環境変数が正しくロードされ、適切なシークレット情報でAPIクライアントが初期化されました。インデックスにアクセスするためのベースURLと、APIリクエストのデフォルトヘッダーも設定されています。
この基盤が整ったので、インデックスを作成するなど、より具体的な分類タスクを進める準備が整いました。
2 - クラスの設定
以下は、オリンピックスポーツのクリップを分類するためのクラスのリストです:
# Categories for the classification of the Olympics Sports

CLASSES = [
    {
        "name": "AquaticSports",
        "prompts": [
            "swimming competition",
            "diving event",
            "water polo match",
            "synchronized swimming",
            "open water swimming"
        ]
    },
    {
        "name": "AthleticEvents",
        "prompts": [
            "track and field",
            "marathon running",
            "long jump competition",
            "javelin throw",
            "high jump event"
        ]
    },
    {
        "name": "GymnasticsEvents",
        "prompts": [
            "artistic gymnastics",
            "rhythmic gymnastics",
            "trampoline gymnastics",
            "balance beam routine",
            "floor exercise performance"
        ]
    },
    {
        "name": "CombatSports",
        "prompts": [
            "boxing match",
            "judo competition",
            "wrestling bout",
            "taekwondo fight",
            "fencing duel"
        ]
    },
    {
        "name": "TeamSports",
        "prompts": [
            "basketball game",
            "volleyball match",
            "football (soccer) match",
            "handball game",
            "field hockey competition"
        ]
    },
    {
        "name": "CyclingSports",
        "prompts": [
            "road cycling race",
            "track cycling event",
            "mountain bike competition",
            "BMX racing",
            "cycling time trial"
        ]
    },
    {
        "name": "RacquetSports",
        "prompts": [
            "tennis match",
            "badminton game",
            "table tennis competition",
            "squash game",
            "tennis doubles match"
        ]
    },
    {
        "name": "RowingAndSailing",
        "prompts": [
            "rowing competition",
            "sailing race",
            "canoe sprint",
            "kayak event",
            "windsurfing competition"
        ]
    }
]
3 - 特定のインデックスからすべての動画を分類するためのユーティリティ関数
# Utility function
def print_page(page):
    for data in page:
        print(f"video_id={data.video_id}")
        for cl in data.classes:
            print(
                f"  name={cl.name} score={cl.score} duration_ratio={cl.duration_ratio} clips={cl.clips.model_dump_json(indent=2)}"
            )


result = client.classify.index(
    index_id=INDEX_ID,
    options=["visual"],
    classes=CLASSES,
    include_clips=True
)
分類を実行するために、 client.classify.index() メソッドが呼び出されます。これは以前に定義された INDEX_ID を使用し、視覚的な分類(options=["visual"])に焦点を当て、結果にクリップ情報を含めます。 CLASSES パラメータは、分類に使用するクラスを指定します。
print_page(result) 関数は、分類結果を読みやすい形式で表示します。これは分類レスポンスを反復処理し、ビデオIDと、名前、スコア、デュレーション比(時間比率)、関連クリップなど、分類された各クラスに関する詳細情報を出力します。このアプローチにより、指定したインデックス内のすべてのビデオにわたる分類出力を簡単に分析できます。
4 - 結果を構造化して明確に出力する関数
print_classification_result() 関数は、TwelveLabs APIの分類結果を構造化された読みやすい形式で表示します。結果セット内の各動画を処理し、ビデオID、検出されたクラス、関連するスコアなどの重要情報を提示します。クラスごとに、全体的なスコアとデュレーション比を表示し、続いてスコアの降順でソートされた上位5つのクリップの詳細を表示します。これらのクリップ詳細には、開始時間と終了時間、および CLASSES 内の関連プロンプトが含まれます。この関数は、上位5つ以外に追加のクリップがあるかどうかも示します。
def print_classification_result(result) -> None:

    for video_data in result.data:
        print(f"Video ID: {video_data.video_id}")
        print("=" * 50)


        for class_data in video_data.classes:
            print(f"  Class: {class_data.name}")
            print(f"  Score: {class_data.score:.2f}")
            print(f"  Duration Ratio: {class_data.duration_ratio:.2f}")
            print("  Clips:")


            sorted_clips = sorted(class_data.clips, key=lambda x: x.score, reverse=True)


            for i, clip in enumerate(sorted_clips[:5], 1):  # Print top 5 clips
                print(f"    {i}. Score: {clip.score:.2f}")
                print(f"       Start: {clip.start:.2f}s, End: {clip.end:.2f}s")
                print(f"       Prompt: {clip.prompt}")


            if len(sorted_clips) > 5:
                print(f"    ... and {len(sorted_clips) - 5} more clips")


            print("-" * 40)


        print("\n")


    print(f"Total results: {result.page_info.total_results}")
    print(f"Page expires at: {result.page_info.page_expired_at}")
    print(f"Next page token: {result.page_info.next_page_token}")
上記の結果のサンプル出力は以下のようになります -
Video ID: 66c9b03be53394f4aaed82c1
==================================================
  Class: AquaticSports
  Score: 96.08
  Duration Ratio: 0.90
  Clips:
    1. Score: 85.74
       Start: 19.30s, End: 42.00s
       Prompt: water polo match
    2. Score: 85.38
       Start: 56.30s, End: 160.41s
       Prompt: water polo match
    3. Score: 85.25
       Start: 19.30s, End: 124.07s
       Prompt: synchronized swimming
    4. Score: 85.13
       Start: 0.00s, End: 24.83s
       Prompt: swimming competition
    5. Score: 85.08
       Start: 124.10s, End: 160.41s
       Prompt: synchronized swimming
    ... and 19 more clips
5 - インデックス内のすべての動画からの特定クラスのカテゴリ分け
このセクションでは、特定のインデックス内のすべての動画に対する「AquaticSports」の特定クラスのカテゴリ分けに焦点を当てます。このプロセスは、関連するプロンプトを持つ特定クラスの定義、分類の実行、および結果の表示という3つの主要なステップで構成されます。
この絞り込んだアプローチにより、水上スポーツのコンテンツを含む動画をより正確に分類できるようになります。 print_page() 関数はユーティリティツールとして機能し、分類結果を分かりやすく出力します。
CLASS = [
    {
        "name": "AquaticSports",
        "prompts": [
            "swimming competition",
            "diving event",
            "water polo match",
            "synchronized swimming",
            "open water swimming"
        ]
    }


]


def print_page(page):
    for data in page:
        print(f"video_id={data.video_id}")
        for cl in data.classes:
            print(
                f"  name={cl.name} score={cl.score} duration_ratio={cl.duration_ratio} detailed_scores={cl.detailed_scores.model_dump_json(indent=2)}"
            )
result = client.classify.index(
    index_id=INDEX_ID,
    options=["visual"],
    classes=CLASS,
    include_clips=True,
    show_detailed_score=True
)


print_classification_result(result)
上記のコードスニペットのサンプル出力セクションは、特定の CLASS に分類される動画を提供します。
Video ID: 66c9b03be53394f4aaed82c1
==================================================
  Class: AquaticSports
  Score: 96.08
  Duration Ratio: 0.90
  Clips:
    1. Score: 85.74
       Start: 19.30s, End: 42.00s
       Prompt: water polo match
    2. Score: 85.38
       Start: 56.30s, End: 160.41s
       Prompt: water polo match
    3. Score: 85.25
       Start: 19.30s, End: 124.07s
       Prompt: synchronized swimming
    4. Score: 85.13
       Start: 0.00s, End: 24.83s
       Prompt: swimming competition
    5. Score: 85.08
       Start: 124.10s, End: 160.41s
       Prompt: synchronized swimming
    ... and 19 more clips
Twelve Labs SDKを使用してclassifyエンドポイントを実装し、それと対話する方法を理解したところで、ユーザー向けに完全なStreamlitアプリケーションの開発に進みましょう。
Streamlitアプリケーションの作成
Streamlitは、そのシンプルさと迅速なプロトタイピング機能により、開発の初期段階に最適であるため、アプリケーションの構築用として選択されました。Streamlitを使用すると、最小限のコードでインタラクティブなWebインターフェイスを迅速に作成でき、分類タスクの結果をユーザーフレンドリーな方法で紹介するのに最適です。Twelve Labs SDKを組み合わせることで、高度にインタラクティブなWebインターフェイスを数分で作成できます。
Streamlitを使い始めるには、仮想環境を設定していることを確認し、次のコマンドを使用してStreamlitをインストールします:
pip install streamlit
詳細については、公式のStreamlitドキュメントを確認してください。
Streamlitアプリケーションを構築するには、次のファイル構造を使用します:
.
├── .env
├── app.py
├── requirements.txt
└── .gitignore
requirements.txt ファイルの内容は以下のとおりです:
streamlit
twelvelabs
requests
python-dotenv
これらの依存関係は、オリンピックの動画クリップ分類アプリケーションに必要なコア機能をカバーしています。
メインの app.py ファイルには、以下の機能が含まれています:
get_initial_classes(): 事前定義されたオリンピックスポーツカテゴリを設定します。get_custom_classes()およびadd_custom_class(): 柔軟性を高めるために、ユーザー定義のカテゴリを管理します。classify_videos(): TwelveLabs APIと連携して、選択したカテゴリに基づいて動画の分類を実行します。get_video_urls(): 分類されたコンテンツのビデオURLを取得します。render_video(): スムーズな再生のために、HLS.jsを使用して組み込みビデオプレーヤーを作成します。
# Import Necessary Dependencies import streamlit as st from twelvelabs import TwelveLabs import requests import os from dotenv import load_dotenv load_dotenv() # Get the API Key from the Dashboard - https://playground.twelvelabs.io/dashboard/api-key API_KEY = os.getenv("API_KEY") # Create the INDEX ID as specified in the README.md and get the INDEX_ID INDEX_ID = os.getenv("INDEX_ID") client = TwelveLabs(api_key=API_KEY) # Background Setting of the Application page_element = """ <style> [data-testid="stAppViewContainer"] { background-image: url("https://wallpapercave.com/wp/wp3589963.jpg"); background-size: cover; } [data-testid="stHeader"] { background-color: rgba(0,0,0,0); } [data-testid="stToolbar"] { right: 2rem; background-image: url(""); background-size: cover; } </style> """ st.markdown(page_element, unsafe_allow_html=True) # Classes to classify the video into, there are categories name and # the prompts which specifc finds that factor to label that category @st.cache_data def get_initial_classes(): return [ {"name": "AquaticSports", "prompts": ["swimming competition", "diving event", "water polo match", "synchronized swimming", "open water swimming"]}, {"name": "AthleticEvents", "prompts": ["track and field", "marathon running", "long jump competition", "javelin throw", "high jump event"]}, {"name": "GymnasticsEvents", "prompts": ["artistic gymnastics", "rhythmic gymnastics", "trampoline gymnastics", "balance beam routine", "floor exercise performance"]}, {"name": "CombatSports", "prompts": ["boxing match", "judo competition", "wrestling bout", "taekwondo fight", "fencing duel"]}, {"name": "TeamSports", "prompts": ["basketball game", "volleyball match", "football (soccer) match", "handball game", "field hockey competition"]}, {"name": "CyclingSports", "prompts": ["road cycling race", "track cycling event", "mountain bike competition", "BMX racing", "cycling time trial"]}, {"name": "RacquetSports", "prompts": ["tennis match", "badminton game", "table tennis competition", "squash game", "tennis doubles match"]}, {"name": "RowingAndSailing", "prompts": ["rowing competition", "sailing race", "canoe sprint", "kayak event", "windsurfing competition"]} ] # Session State for the custom classes def get_custom_classes(): if 'custom_classes' not in st.session_state: st.session_state.custom_classes = [] return st.session_state.custom_classes # Utitlity Function to add the custom classes in app def add_custom_class(name, prompts): custom_classes = get_custom_classes() custom_classes.append({"name": name, "prompts": prompts}) st.session_state.custom_classes = custom_classes st.session_state.new_class_added = True # Utitlity Function to classify all the videos in the specified Index def classify_videos(selected_classes): return client.classify.index( index_id=INDEX_ID, options=["visual"], classes=selected_classes, include_clips=True ) # To get the video urls from the resultant video id def get_video_urls(video_ids): base_url = f"https://api.twelvelabs.io/v1.2/indexes/{INDEX_ID}/videos/{{}}" headers = {"x-api-key": API_KEY, "Content-Type": "application/json"} video_urls = {} for video_id in video_ids: try: response = requests.get(base_url.format(video_id), headers=headers) response.raise_for_status() data = response.json() if 'hls' in data and 'video_url' in data['hls']: video_urls[video_id] = data['hls']['video_url'] else: st.warning(f"No video URL found for video ID: {video_id}") except requests.exceptions.RequestException as e: st.error(f"Failed to get data for video ID: {video_id}. Error: {str(e)}") return video_urls # Utitlity Function to Render the Video by the resultant video url def render_video(video_url): hls_player = f""" <script src="https://cdn.jsdelivr.net/npm/hls.js@latest"></script> <div style="width: 100%; border-radius: 10px; overflow: hidden; box-shadow: 0 4px 6px rgba(0, 0, 0, 0.1);"> <video id="video" controls style="width: 100%; height: auto;"></video> </div> <script> var video = document.getElementById('video'); var videoSrc = "{video_url}"; if (Hls.isSupported()) {{ var hls = new Hls(); hls.loadSource(videoSrc); hls.attachMedia(video); hls.on(Hls.Events.MANIFEST_PARSED, function() {{ video.pause(); }}); }} else if (video.canPlayType('application/vnd.apple.mpegurl')) {{ video.src = videoSrc; video.addEventListener('loadedmetadata', function() {{ video.pause(); }}); }} </script> """ st.components.v1.html(hls_player, height=300)
get_initial_classes() 関数は、オリンピックスポーツの事前定義されたカテゴリの静的なリストを返します。Streamlitはこのデータをキャッシュするため、関数が実行されるのは1回だけで、その結果はメモリに保存されます。この関数をそれ以降に呼び出すと、キャッシュされた結果が返されるため、繰り返しの実行を避けることができます。
get_initial_classes() 関数はキャッシュされますが、get_custom_classes() はキャッシュされません。Streamlitのセッション状態に保存されるカスタムクラスは、アプリケーションの実行中に変化することが予想されるためです。
get_video_urls() はビデオIDのリストを受け取り、TwelveLabsに対してAPIコールを行って対応するHLS (HTTP Live Streaming) URLを取得し、潜在的なエラーや欠落しているURLを処理します。
render_video() は、複数のブラウザやデバイスと互換性のある、HLS.jsサポート付きのHTML5ビデオプレーヤーを作成します。必要に応じてネイティブのHLSにフォールバックします。
classify_videos() では、TwelveLabsクライアントを使用して、指定されたインデックス内のビデオを分類するために、ユーザーが選択したクラスが使用されます。この関数は視覚的な分類に焦点を当て、結果にクリップ情報を含めます。
# Main Function def main(): # Basic Markdown Setup for the Application st.markdown(""" <style> .big-font { font-size: 40px !important; font-weight: bold; color: #000000; text-align: center; margin-bottom: 30px; } .subheader { font-size: 24px; font-weight: bold; color: #424242; margin-top: 20px; margin-bottom: 10px; } .stButton>button { width: 100%; } .video-info { background-color: #f0f0f0; border-radius: 10px; padding: 15px; margin-bottom: 20px; } .custom-box { background-color: #f9f9f9; border-radius: 10px; padding: 20px; margin-bottom: 20px; box-shadow: 0 2px 4px rgba(0,0,0,0.1); } .stTabs [data-baseweb="tab-list"] { gap: 24px; } .stTabs [data-baseweb="tab"] { height: 50px; white-space: pre-wrap; background-color: #f0f2f6; border-radius: 4px 4px 0px 0px; gap: 1px; padding-top: 10px; padding-bottom: 10px; } .stTabs [data-baseweb="tab-list"] button[aria-selected="true"] { background-color: #e8eaed; } </style> """, unsafe_allow_html=True) st.markdown('<p class="big-font">Olympics Classification w/t Twelve Labs</p>', unsafe_allow_html=True) # Updation of the classes CLASSES = get_initial_classes() + get_custom_classes() # Nav Tabs Creation tab1, tab2 = st.tabs(["Select Classes", "Add Custom Class"]) with tab1: st.markdown('<p class="subheader">Select Classes</p>', unsafe_allow_html=True) with st.container(): class_names = [cls["name"] for cls in CLASSES] # Multiselect option from the CLASSES selected_classes = st.multiselect("Choose one or more Olympic sports categories:", class_names) if st.button("Classify Videos", key="classify_button"): if selected_classes: with st.spinner("Classifying videos..."): selected_classes_with_prompts = [cls for cls in CLASSES if cls["name"] in selected_classes] res = classify_videos(selected_classes_with_prompts) video_ids = [data.video_id for data in res.data] # Retrieving the video urls from the resultant video which matches to the selected CLASSES video_urls = get_video_urls(video_ids) st.markdown('<p class="subheader">Classified Videos</p>', unsafe_allow_html=True) # Iterating over to showcase the information for every resulatant video for i, video_data in enumerate(res.data, 1): video_id = video_data.video_id video_url = video_urls.get(video_id, "URL not found") st.markdown(f"### Video {i}") st.markdown('<div class="video-info">', unsafe_allow_html=True) st.markdown(f"**Video ID:** {video_id}") for class_data in video_data.classes: st.markdown(f""" **Class:** {class_data.name} - Score: {class_data.score:.2f} - Duration Ratio: {class_data.duration_ratio:.2f} """) if video_url != "URL not found": render_video(video_url) else: st.warning("Video URL not available. Unable to render video.") st.markdown("---") st.success(f"Total videos classified: {len(res.data)}") else: st.warning("Please select at least one class.") st.markdown('</div>', unsafe_allow_html=True) # Nav Tab for the addition of the Custom Classes to select from with tab2: st.markdown('<p class="subheader">Add Custom Class</p>', unsafe_allow_html=True) with st.container(): custom_class_name = st.text_input("Enter custom class name") custom_class_prompts = st.text_input("Enter custom class prompts (comma-separated)") if st.button("Add Custom Class"): if custom_class_name and custom_class_prompts: add_custom_class(custom_class_name, custom_class_prompts.split(',')) st.success(f"Custom class '{custom_class_name}' added successfully!") st.experimental_rerun() else: st.warning("Please enter both class name and prompts.") st.markdown('</div>', unsafe_allow_html=True) if st.session_state.get('new_class_added', False): st.session_state.new_class_added = False st.experimental_rerun() if __name__ == "__main__": main()
アプリケーションのメイン関数では、指示の正しい順序だけでなく、CSSとレイアウトに大きく重点を置いています。ユーザーは動画分類タブの下にある [Add Custom Class (カスタムクラスの追加)] タブから新しい分類カテゴリを追加できます。[Select Classes (クラスの選択)] タブを使用すると、ユーザーは定義されたカテゴリおよびカスタムカテゴリから選択できます。
ユーザーが「Classify Videos(動画の分類)」ボタンをクリックすると、アプリケーションは次の処理を行います:
選択されたクラスを取得します。
TwelveLabs APIを呼び出して動画を分類します(classify_videos() 関数)。
分類された動画の動画URLを取得します。
分類結果を表示し、動画をレンダリングします。
最終的なアプリケーション結果は以下の通りです —
チュートリアルをさらに試すためのアイデア
アプリケーションの動作手順と開発プロセスを理解することで、革新的なアイデアを実装し、現実世界にインパクトを与える準備が整います。このチュートリアルブログに類似した、さらに発展させることができるいくつかのユースケースのアイデアをご紹介します:
🔍 ビデオ検索エンジン:ビデオコンテンツの検索可能なデータベースを作成し、ユーザーが大容量の動画コレクションから特定のシーンやトピックを見つけられるようにします。
🎥 防犯カメラ映像分析:防犯カメラ映像内の特定のイベントや行動を検出してカテゴリ分けします。
💃 ダンスムーブ分類:ダンス動画からさまざまなダンススタイルや特定の動きを識別し、カテゴリ分けします。
結論
このブログ記事では、Twelve Labsを活用した分類タスクを使って、アプリケーションがどのように構築されるのか、その動作手順を詳細に解説しました。チュートリアルにお付き合いいただきありがとうございました。ユーザーエクスペリエンスの向上やさまざまな問題の解決に関する皆様のアイデアを楽しみにしています。