" height="9.18705px" id="AiyYyR90G" transform="translate(3.406 3.406)" width="9.18685px"/></svg>)
" height="1.90314px" id="wtDTm6bEW" transform="translate(26.225 0)" width="2.4723000000000006px"/><path d="M 0.557 0 L 1.438 0 C 1.746 0 1.995 0.25 1.995 0.559 L 1.995 1.344 C 1.995 1.653 1.746 1.903 1.438 1.903 L 0.557 1.903 C 0.25 1.903 0 1.653 0 1.344 L 0 0.559 C 0 0.25 0.25 0 0.557 0 Z" fill="rgb(29, 28, 27)" height="1.9031500000000001px" id="GnmDnNra_" transform="translate(36.408 2.728)" width="1.9953000000000003px"/><path d="M 6.224 0 L 0.558 0 C 0.25 0 0 0.25 0 0.559 L 0 1.344 C 0 1.653 0.25 1.903 0.558 1.903 L 6.224 1.903 C 6.531 1.903 6.781 1.653 6.781 1.344 L 6.781 0.559 C 6.781 0.25 6.531 0 6.224 0 Z" fill="rgb(29, 28, 27)" height="1.9031500000000001px" id="hKTQ3dbw4" transform="translate(34.261 5.456)" width="6.781100000000002px"/><path d="M 6.955 0 L 0.558 0 C 0.25 0 0 0.25 0 0.559 L 0 1.344 C 0 1.653 0.25 1.903 0.558 1.903 L 6.955 1.903 C 7.263 1.903 7.513 1.653 7.513 1.344 L 7.513 0.559 C 7.513 0.25 7.263 0 6.955 0 Z" fill="rgb(29, 28, 27)" height="1.9031500000000001px" id="G1Zzk9CUU" transform="translate(28.298 8.243)" width="7.513100000000001px"/><path d="M 7.123 0 L 0.558 0 C 0.25 0 0 0.25 0 0.559 L 0 1.344 C 0 1.653 0.25 1.903 0.558 1.903 L 7.123 1.903 C 7.431 1.903 7.681 1.653 7.681 1.344 L 7.681 0.559 C 7.681 0.25 7.431 0 7.123 0 Z" fill="rgb(29, 28, 27)" height="1.9030999999999985px" id="fm7cHxIfJ" transform="translate(0 10.972)" width="7.68067px"/><path d="M 13.447 0 L 0.558 0 C 0.25 0 0 0.25 0 0.559 L 0 1.344 C 0 1.653 0.25 1.903 0.558 1.903 L 13.447 1.903 C 13.755 1.903 14.004 1.653 14.004 1.344 L 14.004 0.559 C 14.004 0.25 13.755 0 13.447 0 Z" fill="rgb(29, 28, 27)" height="1.9030999999999985px" id="LowSwDrtg" transform="translate(9.552 10.972)" width="14.0044px"/><path d="M 0.558 0 L 8.212 0 C 8.52 0 8.77 0.25 8.77 0.559 L 8.77 1.344 C 8.77 1.653 8.52 1.903 8.212 1.903 L 0.558 1.903 C 0.25 1.903 0 1.653 0 1.344 L 0 0.559 C 0 0.25 0.25 0 0.558 0 Z" fill="rgb(29, 28, 27)" height="1.9030999999999985px" id="xRiKc2od7" transform="translate(27.041 10.972)" width="8.769900000000003px"/><path d="M 0.557 0 L 5.4 0 C 5.708 0 5.958 0.25 5.958 0.559 L 5.958 1.344 C 5.958 1.653 5.708 1.903 5.4 1.903 L 0.557 1.903 C 0.25 1.903 0 1.653 0 1.344 L 0 0.559 C 0 0.25 0.25 0 0.557 0 Z" fill="rgb(29, 28, 27)" height="1.9031500000000001px" id="JWdNVicde" transform="translate(36.796 8.243)" width="5.957599999999999px"/><path d="M 1.438 0 L 0.558 0 C 0.25 0 0 0.25 0 0.559 L 0 1.344 C 0 1.653 0.25 1.903 0.558 1.903 L 1.438 1.903 C 1.746 1.903 1.995 1.653 1.995 1.344 L 1.995 0.559 C 1.995 0.25 1.746 0 1.438 0 Z" fill="rgb(29, 28, 27)" height="1.9031500000000001px" id="RfFYVCT_T" transform="translate(28.717 5.456)" width="1.9953000000000003px"/><path d="M 0.558 0 L 2.895 0 C 3.203 0 3.453 0.25 3.453 0.559 L 3.453 1.406 C 3.453 1.714 3.203 1.964 2.895 1.964 L 0.558 1.964 C 0.25 1.964 0 1.714 0 1.406 L 0 0.559 C 0 0.25 0.25 0 0.558 0 Z" fill="rgb(29, 28, 27)" height="1.964299999999998px" id="dngJ6MU2p" transform="translate(16.183 24.582)" width="3.4525000000000006px"/><path d="M 1.706 0 L 0.558 0 C 0.25 0 0 0.25 0 0.559 L 0 1.406 C 0 1.714 0.25 1.964 0.558 1.964 L 1.706 1.964 C 2.014 1.964 2.263 1.714 2.263 1.406 L 2.263 0.559 C 2.263 0.25 2.014 0 1.706 0 Z" fill="rgb(29, 28, 27)" height="1.964299999999998px" id="N_fstvKmR" transform="translate(22.18 24.582)" width="2.2631999999999977px"/><path d="M 0.558 0 L 5.544 0 C 5.852 0 6.101 0.25 6.101 0.559 L 6.101 1.406 C 6.101 1.714 5.852 1.964 5.544 1.964 L 0.558 1.964 C 0.25 1.964 0 1.714 0 1.406 L 0 0.559 C 0 0.25 0.25 0 0.558 0 Z" fill="rgb(29, 28, 27)" height="1.964299999999998px" id="t55XLYcgb" transform="translate(25.486 24.582)" width="6.101399999999998px"/><path d="M 1.976 0 L 0.558 0 C 0.25 0 0 0.25 0 0.559 L 0 1.406 C 0 1.714 0.25 1.964 0.558 1.964 L 1.976 1.964 C 2.284 1.964 2.533 1.714 2.533 1.406 L 2.533 0.559 C 2.533 0.25 2.284 0 1.976 0 Z" fill="rgb(29, 28, 27)" height="1.964299999999998px" id="ZrEKTVTAe" transform="translate(28.542 21.854)" width="2.5334000000000003px"/><path d="M 0.557 0 L 1.438 0 C 1.746 0 1.995 0.25 1.995 0.559 L 1.995 1.406 C 1.995 1.714 1.746 1.964 1.438 1.964 L 0.557 1.964 C 0.25 1.964 0 1.714 0 1.406 L 0 0.559 C 0 0.25 0.25 0 0.557 0 Z" fill="rgb(29, 28, 27)" height="1.964299999999998px" id="Z0fPTp9aR" transform="translate(11.425 24.582)" width="1.9953000000000003px"/><path d="M 0 0.559 C 0 0.251 0.251 0 0.558 0 L 1.438 0 C 1.745 0 1.995 0.251 1.995 0.559 L 1.995 1.405 C 1.995 1.713 1.745 1.964 1.438 1.964 L 0.558 1.964 C 0.251 1.964 0 1.713 0 1.405 Z" fill="rgb(29, 28, 27)" height="1.964299999999998px" id="Tj_PDHFDh" transform="translate(20.635 27.308)" width="1.9954px"/><path d="M 0.557 0 L 1.342 0 C 1.65 0 1.899 0.25 1.899 0.559 L 1.899 1.406 C 1.899 1.714 1.65 1.964 1.342 1.964 L 0.557 1.964 C 0.25 1.964 0 1.714 0 1.406 L 0 0.559 C 0 0.25 0.25 0 0.557 0 Z" fill="rgb(29, 28, 27)" height="1.9643000000000015px" id="AYq9dXkKz" transform="translate(18.686 30.036)" width="1.8994px"/><path d="M 0.558 0 L 5.768 0 C 6.076 0 6.326 0.25 6.326 0.559 L 6.326 1.344 C 6.326 1.653 6.076 1.903 5.768 1.903 L 0.558 1.903 C 0.25 1.903 0 1.653 0 1.344 L 0 0.559 C 0 0.25 0.25 0 0.558 0 Z" fill="rgb(29, 28, 27)" height="1.9031500000000001px" id="rspevfJcx" transform="translate(12.157 8.243)" width="6.325900000000001px"/><path d="M 3.285 0 L 0.558 0 C 0.25 0 0 0.25 0 0.559 L 0 1.344 C 0 1.653 0.25 1.903 0.558 1.903 L 3.285 1.903 C 3.593 1.903 3.842 1.653 3.842 1.344 L 3.842 0.559 C 3.842 0.25 3.593 0 3.285 0 Z" fill="rgb(29, 28, 27)" height="1.9031500000000001px" id="XRUAhGnph" transform="translate(23.887 2.728)" width="3.8424000000000014px"/><path d="M 0.558 0 L 5.644 0 C 5.952 0 6.202 0.25 6.202 0.559 L 6.202 1.344 C 6.202 1.653 5.952 1.903 5.644 1.903 L 0.558 1.903 C 0.25 1.903 0 1.653 0 1.344 L 0 0.559 C 0 0.25 0.25 0 0.558 0 Z" fill="rgb(29, 28, 27)" height="1.9031500000000001px" id="VsaVVIfke" transform="translate(21.528 5.456)" width="6.201600000000003px"/><path d="M 3.06 0 L 0.558 0 C 0.25 0 0 0.25 0 0.559 L 0 1.344 C 0 1.653 0.25 1.903 0.558 1.903 L 3.06 1.903 C 3.369 1.903 3.618 1.653 3.618 1.344 L 3.618 0.559 C 3.618 0.25 3.369 0 3.06 0 Z" fill="rgb(29, 28, 27)" height="1.9030999999999985px" id="wiAKEgyId" transform="translate(40.819 10.972)" width="3.6182000000000016px"/><path d="M 0.558 0 L 17.318 0 C 17.626 0 17.875 0.25 17.875 0.559 L 17.875 1.345 C 17.875 1.653 17.626 1.903 17.318 1.903 L 0.558 1.903 C 0.25 1.903 0 1.653 0 1.345 L 0 0.559 C 0 0.25 0.25 0 0.558 0 Z" fill="rgb(29, 28, 27)" height="1.9032px" id="FIE0ufK9m" transform="translate(6.666 13.7)" width="17.87506px"/><path d="M 6.426 0 L 0.558 0 C 0.25 0 0 0.25 0 0.559 L 0 1.345 C 0 1.653 0.25 1.903 0.558 1.903 L 6.426 1.903 C 6.734 1.903 6.984 1.653 6.984 1.345 L 6.984 0.559 C 6.984 0.25 6.734 0 6.426 0 Z" fill="rgb(29, 28, 27)" height="1.9032000000000018px" id="ut9UWny3L" transform="translate(22.892 19.156)" width="6.983599999999999px"/><path d="M 0.558 0 L 22.151 0 C 22.459 0 22.709 0.25 22.709 0.559 L 22.709 1.344 C 22.709 1.653 22.459 1.903 22.151 1.903 L 0.558 1.903 C 0.25 1.903 0 1.653 0 1.344 L 0 0.559 C 0 0.25 0.25 0 0.558 0 Z" fill="rgb(29, 28, 27)" height="1.9030999999999985px" id="VULnffgbk" transform="translate(9.552 16.428)" width="22.7089px"/><path d="M 7.886 0 L 0.558 0 C 0.25 0 0 0.25 0 0.559 L 0 1.345 C 0 1.653 0.25 1.903 0.558 1.903 L 7.886 1.903 C 8.194 1.903 8.443 1.653 8.443 1.345 L 8.443 0.559 C 8.443 0.25 8.194 0 7.886 0 Z" fill="rgb(29, 28, 27)" height="1.9032000000000018px" id="adZTYr4MR" transform="translate(6.078 19.156)" width="8.44303px"/><path d="M 0.558 0 L 2.211 0 C 2.519 0 2.769 0.25 2.769 0.559 L 2.769 1.406 C 2.769 1.714 2.519 1.964 2.211 1.964 L 0.558 1.964 C 0.25 1.964 0 1.714 0 1.406 L 0 0.559 C 0 0.25 0.25 0 0.558 0 Z" fill="rgb(29, 28, 27)" height="1.964299999999998px" id="bwdUdEmCH" transform="translate(13.784 21.854)" width="2.768600000000001px"/><path d="M 2.424 0 L 0.558 0 C 0.25 0 0 0.25 0 0.559 L 0 1.406 C 0 1.714 0.25 1.964 0.558 1.964 L 2.424 1.964 C 2.732 1.964 2.982 1.714 2.982 1.406 L 2.982 0.559 C 2.982 0.25 2.732 0 2.424 0 Z" fill="rgb(29, 28, 27)" height="1.964299999999998px" id="PUvesMJEj" transform="translate(23.556 21.854)" width="2.982199999999999px"/><path d="M 0.558 0 L 2.241 0 C 2.55 0 2.799 0.25 2.799 0.559 L 2.799 1.406 C 2.799 1.714 2.55 1.964 2.241 1.964 L 0.558 1.964 C 0.25 1.964 0 1.714 0 1.406 L 0 0.559 C 0 0.25 0.25 0 0.558 0 Z" fill="rgb(29, 28, 27)" height="1.964299999999998px" id="Wo2W7J3Zj" transform="translate(8.672 21.854)" width="2.799050000000001px"/><path d="M 6.661 0 L 0.558 0 C 0.25 0 0 0.25 0 0.559 L 0 1.345 C 0 1.653 0.25 1.903 0.558 1.903 L 6.661 1.903 C 6.969 1.903 7.219 1.653 7.219 1.345 L 7.219 0.559 C 7.219 0.25 6.969 0 6.661 0 Z" fill="rgb(29, 28, 27)" height="1.9032px" id="PpPVZXp9j" transform="translate(27.041 13.7)" width="7.218900000000001px"/><path d="M 0.621 1.905 C 0.218 1.905 0 1.687 0 1.283 L 0 0.622 C 0 0.218 0.218 0 0.621 0 L 11.225 0 C 11.628 0 11.846 0.218 11.846 0.622 L 11.846 1.283 C 11.846 1.687 11.628 1.905 11.225 1.905 L 6.934 1.905 L 6.934 14.926 C 6.934 15.33 6.716 15.548 6.313 15.548 L 5.537 15.548 C 5.134 15.548 4.916 15.33 4.916 14.926 L 4.916 1.905 Z" fill="rgb(29, 28, 27)" height="15.54825px" id="xr32fxeO6" transform="translate(52.177 8.243)" width="11.845599999999997px"/><path d="M 0.621 0 C 0.218 0 0 0.218 0 0.622 L 0 14.924 C 0 15.328 0.218 15.546 0.621 15.546 L 1.357 15.546 C 1.76 15.546 1.978 15.328 1.978 14.924 L 1.978 0.622 C 1.978 0.218 1.76 0 1.357 0 Z" fill="rgb(29, 28, 27)" height="15.546050000000001px" id="oSsO_UPVN" transform="translate(90.476 8.243)" width="1.9779000000000053px"/><path d="M 0.62 15.546 C 0.217 15.546 0 15.328 0 14.924 L 0 0.622 C 0 0.218 0.217 0 0.62 0 L 1.396 0 C 1.799 0 2.017 0.218 2.017 0.622 L 2.017 13.632 L 8.981 13.632 C 9.384 13.632 9.602 13.85 9.602 14.254 L 9.602 14.924 C 9.602 15.328 9.384 15.546 8.981 15.546 Z" fill="rgb(29, 28, 27)" height="15.546050000000001px" id="Sgj4z5osO" transform="translate(116.749 8.243)" width="9.602000000000004px"/><path d="M 1.974 14.924 C 1.974 15.328 1.756 15.546 1.353 15.546 L 0.621 15.546 C 0.218 15.546 0 15.328 0 14.924 L 0 0.622 C 0 0.218 0.218 0 0.621 0 L 1.357 0 C 1.76 0 1.978 0.218 1.978 0.622 L 1.978 5.747 C 2.634 4.721 3.806 4.079 5.309 4.079 C 8.18 4.079 10.356 6.358 10.356 9.948 C 10.356 13.538 8.18 15.817 5.309 15.817 C 3.801 15.817 2.627 15.175 1.971 14.145 L 1.971 14.922 Z M 8.36 9.95 C 8.36 7.362 6.881 5.928 5.121 5.928 C 3.361 5.928 1.863 7.362 1.863 9.95 C 1.863 12.539 3.361 13.972 5.121 13.972 C 6.881 13.972 8.36 12.539 8.36 9.95 Z" fill="rgb(29, 28, 27)" height="15.81665px" id="q13jjj7xd" transform="translate(138.401 8.243)" width="10.355999999999995px"/><path d="M 4.457 11.738 C 0.961 11.738 -0.019 9.872 0 8.318 C 0.005 7.929 0.253 7.735 0.645 7.735 L 1.344 7.735 C 1.748 7.735 1.922 7.949 1.961 8.352 C 2.063 9.315 2.693 9.907 4.433 9.907 C 6.174 9.907 7.012 9.269 7.012 8.289 C 7.012 7.425 6.522 7.108 5.305 6.899 L 3.209 6.539 C 1.453 6.238 0.29 5.247 0.29 3.468 C 0.29 1.467 1.774 0 4.518 0 C 7.263 0 8.838 1.491 8.814 3.23 C 8.81 3.614 8.553 3.808 8.165 3.808 L 7.457 3.808 C 7.054 3.808 6.908 3.595 6.851 3.202 C 6.749 2.477 6.159 1.818 4.518 1.818 C 2.878 1.818 2.249 2.508 2.249 3.403 C 2.249 4.175 2.695 4.516 3.81 4.714 L 5.906 5.083 C 7.72 5.404 8.98 6.292 8.98 8.198 C 8.98 9.976 7.908 11.74 4.455 11.74 Z" fill="rgb(29, 28, 27)" height="11.739799999999999px" id="tJ8syeWTW" transform="translate(150.024 12.325)" width="8.980269730401375px"/><path d="M 9.146 7.997 C 9.146 8.813 9.175 9.983 9.282 10.799 C 9.334 11.223 9.155 11.465 8.728 11.465 L 8.068 11.465 C 7.685 11.465 7.467 11.319 7.428 11.022 L 7.317 10.181 C 6.724 11.157 5.565 11.659 4.145 11.659 C 1.579 11.659 0 10.142 0 8.078 C 0 6.27 1.27 5.157 3.433 5.002 L 6.589 4.78 C 7.162 4.741 7.186 4.688 7.186 4.153 L 7.186 3.682 C 7.186 2.438 6.434 1.807 4.79 1.807 C 3.145 1.807 2.472 2.425 2.405 3.289 C 2.376 3.697 2.235 3.916 1.823 3.916 L 1.067 3.916 C 0.675 3.916 0.427 3.717 0.422 3.328 C 0.407 1.51 1.74 0 4.792 0 C 7.798 0 9.162 1.427 9.155 3.736 Z M 7.188 7.298 L 7.188 6.244 C 6.955 6.327 6.678 6.386 6.363 6.415 L 3.598 6.676 C 2.59 6.775 1.997 7.163 1.997 8.099 L 1.999 8.099 C 1.999 9.188 2.886 9.97 4.4 9.97 C 6.169 9.97 7.188 8.9 7.188 7.298 Z" fill="rgb(29, 28, 27)" height="11.658999999999999px" id="QPESIZvku" transform="translate(126.854 12.325)" width="9.290755130109668px"/><path d="M 5.224 0 C 8.313 0 10.295 2.255 10.295 5.456 L 10.295 5.694 C 10.295 6.098 10.077 6.316 9.674 6.316 L 1.998 6.316 C 2.168 8.547 3.447 9.898 5.407 9.898 C 6.768 9.898 7.598 9.363 7.934 8.431 C 8.06 8.078 8.243 7.892 8.618 7.892 L 9.33 7.892 C 9.746 7.892 9.994 8.125 9.923 8.538 C 9.598 10.433 7.834 11.74 5.409 11.74 L 5.407 11.738 C 2.168 11.738 0 9.424 0 5.797 C 0 2.169 2.135 0 5.224 0 Z M 5.222 1.74 C 3.494 1.74 2.405 2.818 2.074 4.64 L 8.282 4.64 C 8.054 2.842 6.949 1.74 5.222 1.74 Z" fill="rgb(29, 28, 27)" height="11.739799999999999px" id="PKmyQkwJE" transform="translate(104.541 12.325)" width="10.295000000000002px"/><path d="M 4.459 11.194 C 4.099 11.194 3.877 11.039 3.746 10.703 L 0.091 1.021 C -0.024 0.72 -0.031 0.511 0.076 0.297 C 0.178 0.094 0.381 0 0.732 0 L 1.274 0 C 1.633 0 1.86 0.155 1.986 0.495 L 4.958 8.503 L 5.123 9.018 L 5.289 8.503 L 8.262 0.495 C 8.388 0.155 8.615 0 8.974 0 L 9.517 0 C 9.865 0 10.07 0.092 10.172 0.297 C 10.279 0.511 10.275 0.72 10.157 1.021 L 6.502 10.703 C 6.371 11.039 6.149 11.194 5.79 11.194 Z" fill="rgb(29, 28, 27)" height="11.1941px" id="uUQr5Yl4B" transform="translate(93.807 12.595)" width="10.248961642504256px"/><path d="M 5.407 11.738 C 2.167 11.738 0 9.424 0 5.797 C 0 2.169 2.133 0 5.221 0 C 8.31 0 10.292 2.255 10.292 5.456 L 10.292 5.694 C 10.292 6.098 10.075 6.316 9.672 6.316 L 1.995 6.316 C 2.165 8.547 3.446 9.898 5.404 9.898 C 6.768 9.898 7.596 9.363 7.931 8.431 C 8.058 8.078 8.241 7.892 8.615 7.892 L 9.328 7.892 C 9.744 7.892 9.992 8.125 9.918 8.538 C 9.593 10.433 7.829 11.74 5.404 11.74 Z M 8.282 4.64 C 8.053 2.842 6.949 1.74 5.221 1.74 C 3.494 1.74 2.405 2.818 2.074 4.64 Z" fill="rgb(29, 28, 27)" height="11.739799999999999px" id="zo1nSBuSF" transform="translate(78.397 12.325)" width="10.29249999999999px"/><path d="M 3.057 10.677 C 3.163 11.026 3.392 11.192 3.756 11.192 L 3.749 11.194 L 4.987 11.194 C 5.35 11.194 5.579 11.028 5.69 10.679 L 8.173 2.654 L 8.237 2.401 L 8.3 2.654 L 10.787 10.679 C 10.894 11.028 11.123 11.194 11.487 11.194 L 12.733 11.194 C 13.096 11.194 13.325 11.028 13.432 10.679 L 16.418 1.006 C 16.516 0.7 16.512 0.498 16.41 0.288 C 16.307 0.089 16.109 0.002 15.76 0.002 L 15.218 0.002 C 14.848 0.002 14.626 0.168 14.519 0.522 L 12.094 8.547 L 12.046 8.761 L 11.999 8.542 L 9.506 0.517 C 9.4 0.168 9.171 0.002 8.807 0.002 L 7.683 0.002 C 7.319 0.002 7.091 0.168 6.984 0.517 L 4.492 8.542 L 4.449 8.745 L 4.405 8.551 L 1.98 0.519 C 1.874 0.166 1.649 0 1.281 0 L 0.728 0 C 0.38 0 0.181 0.087 0.079 0.286 C -0.021 0.493 -0.028 0.698 0.07 1.004 Z" fill="rgb(29, 28, 27)" height="11.194099999999999px" id="uboloLX99" transform="translate(61.282 12.598)" width="16.489163442184434px"/></svg>)
Tutorials
Effortlessly Craft Social Media Content from Video

Meeran Kim
This tutorial walks through building a social media content generator using the Twelve Labs Analyze API that converts any indexed video into platform-ready written content, including Instagram posts, Facebook updates, X posts, and blog entries, with preset prompts or custom user input.
This tutorial walks through building a social media content generator using the Twelve Labs Analyze API that converts any indexed video into platform-ready written content, including Instagram posts, Facebook updates, X posts, and blog entries, with preset prompts or custom user input.

In this article
Join our newsletter
Join our newsletter
Receive the latest advancements, tutorials, and industry insights in video understanding
Receive the latest advancements, tutorials, and industry insights in video understanding
Search, analyze, and explore your videos with AI.
May 12, 2024
8 Min
Copy link to article
Are you familiar with the concept of “one source, multi-use”? For content creators and influencers, it's all about maximizing audience engagement by repurposing content across different platforms.
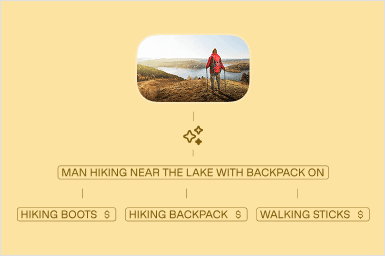
This tool, “Generate Social Posts for your Video”, is specifically designed to assist video content creators in converting their videos into written formats, whether it's a fun Instagram post packed with emojis or a detailed blog entry.
Here's how it works: Simply upload your video to the application and select one of the given social media platforms where you want to make a post. Or customize your own prompt or requirements of a desired written format, such as "Write a summary in bullet points." In just a few clicks, you'll have your transformed content ready to go.
Now, let's dive into the step-by-step process of building the app!
Prerequisites
You should have your Twelve Labs API Key. If you don’t have one, visit the Twelve Labs Playground, sign up, and generate your API key.
The repository containing all the files for this app is available on Github.
(Good to Have) Basic knowledge in JavaScript, TypeScript, Node, React, and React Query.
How the App is Structured
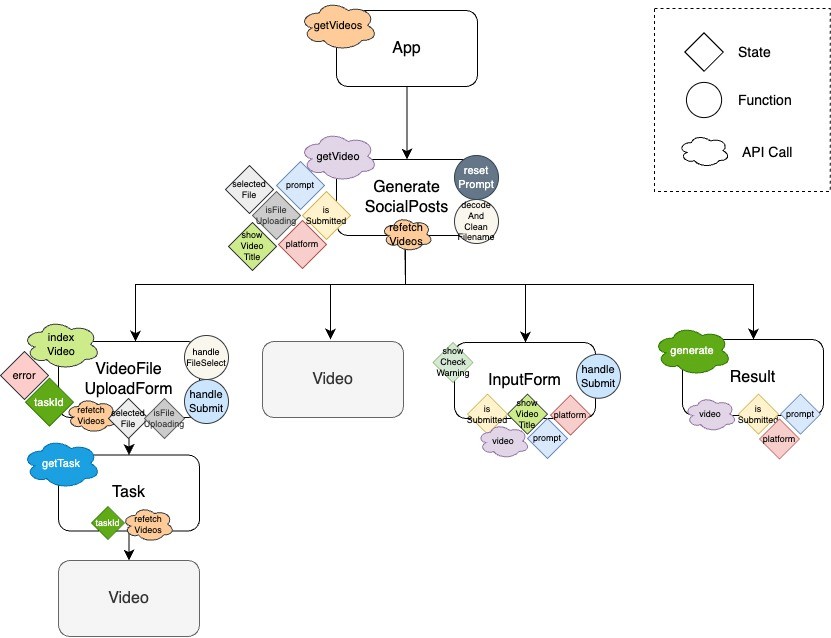
The app consists of five main components; GenerateSocialPosts, VideoFileUploadForm, Video, InputForm, and Result.
GenerateSocialPosts: It serves as the parent container for the other components. It holds key states that are shared with its descendants.
VideoUrlUploadForm: It features a straightforward form for uploading a video file and indexing it using the TwelveLabs API. It displays the video being indexed and provides real-time status updates until the indexing process is complete.
Video: It displays a video based on a given URL. It is utilized within multiple components throughout the application.
InputForm: It consists of preset radio buttons representing major social media platforms and a text area where users can specify the requirements of written content they desire from a video.
Result: This component showcases the generated written content/text based on the user's selection of a social platform or input, leveraging the TwelveLab’s '/generate' API.
The app also has a server that stores all the code involving the API calls and the apiHooks.tsx which is a set of custom React Query hooks for managing state, cache, and fetching data.
Now, let’s take a look at how these components work along with the Twelve Labs API.
How the App Works with Twelve Labs API
1 - Showing the Most Recent Video of an Index

This app only works with one video, which is the most recently uploaded video of an index. Thus, on mount, the app shows the most recent video of a given index by default. Below is the process of how it works.
Get all videos of a given index in App.tsx (GET Videos)
Extract the first video’s id from the response and pass it down to GenerateSocialPosts.tsx
Get details of a video using the video id, extract the video url and pass it down to Video.tsx (GET Video)
So, we make two GET requests to the Twelve Labs API in this flow of getting the videos and showing the first video on the page. Let’s take each step in detail.
1.1 - Get all videos of a given index in App.tsx
Inside the app, the videos are returned by calling the react query hook useGetVideos which makes the request to the server. The server then makes a GET request to the Twelve Labs API to get all videos of an index. (💡Find details in the API document - GET Videos)
/** Get videos */

app.get("/indexes/:indexId/videos", async (request, response, next) => {
 const params = {
   page_limit: request.query.page_limit,
 };


 try {
   const options = {
     method: "GET",
     url: `${API_BASE_URL}/indexes/${request.params.indexId}/videos`,
     headers: { ...HEADERS },
     data: { params },
   };
   const apiResponse = await axios.request(options);
   response.tsxon(apiResponse.data);
 } catch (error) {
   const status = error.response?.status || 500;
   const message = error.response?.data?.message || "Error Getting Videos";
   return next({ status, message });
 }
});
The returned data (videos) looks like below.
{
	"data": [
		{
			"_id": "64eadb7e37db8fa679cb47e2",
			"created_at": "2024-03-08T09:34:06Z",
			"metadata": {
				"duration": 213.72,
				"engine_ids": [
					"pegasus1",
				],
				"filename": "myFile.mp4",
				"fps": 25,
				"height": 720,
				"size": 25014061,
				"width": 1280
			}
		},
		{ 2nd video },
		{ 3rd video },
		…
}
1.2 - Extract the first video’s id from the response and pass it down to GenerateSocialPosts.tsx
Based on the returned videos, we’re passing down the first video’s id to the GenerateSocialPosts.tsx component.
           <GenerateSocialPosts
             index={apiConfig.INDEX_ID}
             videoId={videos.data[0]?._id || null} //passing down the id
             refetchVideos={refetchVideos}
           />
1.3 - Get details of a video using the video id, extract the video url and pass it down to Video.tsx
Similar to what we’ve seen from the previous step in getting videos, to get details of a video, we’re using the react query hook useGetVideo which makes the request to the server. The server then makes a GET request to the Twelve Labs API to get details of a specific video. (💡Find details in the API document - GET Video)
/** Get a video of an index */

app.get(
 "/indexes/:indexId/videos/:videoId",
 async (request, response, next) => {
   const indexId = request.params.indexId;
   const videoId = request.params.videoId;


   try {
     const options = {
       method: "GET",
       url: `${API_BASE_URL}/indexes/${indexId}/videos/${videoId}`,
       headers: { ...HEADERS },
     };
     const apiResponse = await axios.request(options);
     response.json(apiResponse.data);
   } catch (error) {
     const status = error.response?.status || 500;
     const message = error.response?.data?.message || "Error Getting a Video";
     return next({ status, message });
   }
 }
);
It returns the details of a video including the url of a video. You may have observed that the video URL was not readily available from the previous GET Videos request. This is precisely why we're executing the GET Video request here – to delve deeper and extract the video URL.
{
	"_id": "64eadb7e37db8fa679cb47e2",
	"created_at": "2024-03-08T09:34:06Z",
	"indexed_at": "2024-03-08T09:39:14Z",
	"metadata": {
		"duration": 213.72,
		"engine_ids": [
			"pegasus1",
		],
		"filename": "myFile.mp4",
		"fps": 25,
		"height": 720,
		"size": 25014061,
		"video_title": "myFile.mp4",
		"width": 1280
	},
	"hls": {
		"video_url": "https://deuqpmn4rs7j5.cloudfront.net/…", //here!
		"thumbnail_urls": [
			"https://deuqpmn4rs7j5.cloudfront.net/…"
		],
		"status": "COMPLETE",
		"updated_at": "2024-03-08T09:35:21.813Z"
	}
}
Based on the returned data (video), we’re passing down its url to the Video component where the React Player is rendered using the url.
GenerateSocialPosts.tsx (line 110 - 116)
 {video && (
             <Video
               url={video.hls?.video_url} // passing down the url
               width={"381px"}
               height={"214px"}
2 - Uploading/Indexing a Video by Video File
In this app, a user can upload and index a video by selecting a video file from the local device. We’re assuming that a main user of this application would be a video content creator who has a video ready in the local device.
Once you submit a video indexing request (we call it a ‘task’), then we can receive the progress of the indexing task. I also made a video visible during the indexing process so that a user can confirm and watch the video while the indexing is in progress. Please note that the video is not instantly available from the beginning of the indexing process; the video url becomes available about at the middle of the indexing process.
Create a video indexing task by a video file in VideoUrlUploadForm.tsx (POST Task)
Receive and show the progress of the indexing task in Task.tsx (GET Task)
Let’s take a look at each step one by one.
2.1 - Create a video indexing task by a video file in VideoUrlUploadForm.tsx
When a user selects a video file from his/her local device and submits the videoFileUploadForm, the video indexing process starts. indexYouTubeVideo puts together the necessary data that needs to be sent for making the API request (e.g., language, index id, video file) as a form and makes a POST request to the server. The server then makes a post request to Twelve Labs API’s ‘/tasks’ endpoint. (💡Find details in the API document - POST Task)
/** Index a video and return a task ID */

app.post(
 "/index",
 upload.single("video_file"),
 async (request, response, next) => {
   const formData = new FormData();


   // Append data from request.body
   Object.entries(request.body).forEach(([key, value]) => {
     formData.append(key, value);
   });


   const blob = new Blob([request.file.buffer], {
     type: request.file.mimetype,
   });


   formData.append("video_file", blob, request.file.originalname);


   const options = {
     method: "POST",
     url: `${API_BASE_URL}/tasks`,
     headers: {
       "x-api-key": TWELVE_LABS_API_KEY,
       accept: "application/json",
       "Content-Type":
         "multipart/form-data; boundary=---011000010111000001101001",
     },
     data: formData,
   };
   try {
     const apiResponse = await axios.request(options);
     response.json(apiResponse.data);
   } catch (error) {
     const status = error.response?.status || 500;
     const message =
       error.response?.data?.message || "Error indexing a Video";
     return next({ status, message });
   }
 }
);
It returns an id of the video task that has just been created.
{
	"_id": "65e9f732bb29f13bdd6f305a"
}
2.2 - Receive and show the progress of the indexing task in Task.tsx
With the returned task id from the previous step of getting details of a video, we will use this task id to get details of the task and keep updating the task status to the user. So I’ve set the Task component to render inside the VideoFileUploadForm when there is a task id.
VideoFileUploadForm.tsx (line 153)
{taskId && (
               <Task
                 taskId={taskId}
                 refetchVideos={refetchVideos}
Inside the Task component, we’re receiving the data by using the useGetTask React Query hook which makes a GET request to the server. The server then makes a GET request to the Twelve Labs API as below. (💡Find details in the API document - GET Task)
/** Check the status of a specific indexing task */

app.get("/tasks/:taskId", async (request, response, next) => {
 const taskId = request.params.taskId;


 try {
   const options = {
     method: "GET",
     url: `${API_BASE_URL}/tasks/${taskId}`,
     headers: { ...HEADERS },
   };
   const apiResponse = await axios.request(options);
   response.tsxon(apiResponse.data);
 } catch (error) {
   const status = error.response?.status || 500;
   const message = error.response?.data?.message || "Error getting a task";
   return next({ status, message });
 }
});
It returns the task details as below.
{
	"_id": "65e9f732bb29f13bdd6f305a",
	"index_id": "65e9f6d6bb29f13bdd6f3059",
	"video_id": "65e9f73248db9fa679cb47a2",
	"status": "indexing",
	"metadata": {
		"filename": "fileName.mp4",
		"duration": 327.326988,
		"width": 1920,
		"height": 1080
	},
	"created_at": "2024-03-07T17:19:46.277Z",
	"updated_at": "2024-03-07T17:27:27.135Z",
	"estimated_time": "2024-03-07T17:25:59.621Z",
	"type": "index_task_info",
	"hls": {
		"video_url": "...",
		"thumbnail_urls": [
			"..."
		],
		"status": "COMPLETE",
		"updated_at": "2024-03-07T17:21:23.921Z"
	}
}
Unless the “status” is “ready”, the useGetTask hook will refetch the data every 5,000 ms so that a user can see the progress of the task in real-time. Check how I leveraged the refetchInterval property of useQuery below.
export function useGetTask(taskId: string) {
 return useQuery<Task, Error, Task, [string, string]>({
   queryKey: [keys.TASK, taskId],
   queryFn: async (): Promise<Task> => {
     try {
       const response = await apiConfig.SERVER.get(`${apiConfig.TASKS_URL}/${taskId}`);
       const respData: Task = response.data;
       return respData;
     } catch (error) {
       console.error("Error fetching task:", error);
       throw error;
     }
   },
   refetchInterval: (query) => {
     const data = query.state.data;
     return data && (data.status === "ready" || data.status === "failed")
       ? false
       : 5000;
   },
   refetchIntervalInBackground: true,
 });
}
3 - Receiving User Inputs and Generate/Show Results
Now we’re at the core and fun part - generating any text from a video! We’re receiving the user input then using the Twelve Labs API’s ‘/analyze’ endpoint to generate open-ended texts.
Receive a user input either from the preset radio buttons representing major social media platforms or a text area form in InputForm.tsx
Based on the user input, make ‘analyze’ API call in Result.tsx (POST Open-ended texts)
Show the results in Result.tsx
Let’s dive into each step.
3.1 - Receive a user input either from the preset radio buttons representing major social media platforms or a text area form in InputForm.tsx
InputForm is a simple form consisting of five radio buttons; four representing Instagram, Facebook, X, blog and the last one representing ‘Others’ where a user can customize and specify what kind of text the user wants from a video.
If a user selects the preset social platform, the embedded prompt for the platform will be set as prompt. This will later invoke the generate API in the result.tsx. If a user selects ‘Others’, the user input will be set as prompt.
InputForm.tsx (line 76 - 107)
async function handleSubmit(event: React.FormEvent<HTMLFormElement>) {
   event.preventDefault();
   let promptValue = "";
   let platformValue = "";


   if (instagramRef.current?.checked) {
     promptValue = "write a Instagram post with emojis, 100 words or less. Do not provide an explanation. Do not provide a summary.";
     platformValue = "Instagram";
   } else if (facebookRef.current?.checked) {
     promptValue = "write a Facebook post with emojis, 150 words or less. Do not provide an explanation. Do not provide a summary.";
     platformValue = "Facebook";
   } else if (xRef.current?.checked) {
     promptValue = "write a X (formerly Twitter) post with emojis, 50 words or less. Do not provide an explanation. Do not provide a summary.";
     platformValue = "X";
   } else if (blogRef.current?.checked) {
     promptValue = "write a blog post with details. Divide sections with subtitles. Do not provide an explanation. Do not provide a summary.";
     platformValue = "Blog";
   } else if (textRadioRef.current?.checked) {
     const inputValue = textAreaRef.current?.value.trim();
     if (inputValue?.length && inputValue?.length > 0) {
       promptValue = inputValue;
       platformValue = `"${inputValue}"`;
     } else {
       setShowCheckWarning(true)
💡 Tips on prompt engineering
Take a look at the embedded prompts I've configured for Instagram, Facebook, and more. Dive into this guide on prompt engineering tailored for Twelve Labs API!
3.2 - Based on the user input , make ‘/analyze’ API call in Result.tsx
When the form has been submitted and the video id and prompt are set, useAnalyze hook will be called from the Result.tsx. The hook will then make the request to the server where the API request to Twelve Labs API is made. (💡Find details in the API document - POST Open-ended analysis)
/** Generate open-ended text of a video */
app.post("/videos/:videoId/analyze", async (request, response, next) => {
 const videoId = request.params.videoId;
 let prompt = request.body.data;
 try {
   const options = {
     method: "POST",
     url: `${API_BASE_URL}/analyze`,
     headers: { ...HEADERS, accept: "application/json" },
     data: { ...prompt, video_id: videoId, temperature: 0.3, stream: false },
   };
   const apiResponse = await axios.request(options);
   response.json(apiResponse.data);
 } catch (error) {
   const status = error.response?.status || 500;
   const message = error.response?.data?.message || "Error Generating Text";
   return next({ status, message });
 }
});
It returns an object consisting of response ‘id’ and ‘data’ which is the generated text based on a provided prompt. Below is an example result when you select ‘Instagram’.
id: '2403323b-b648-48a7-8897-95258e68e8a4', data: "👨🍳 Tuna isn't just for cat food! 🐱 Today, I elevated canned tuna into 4 delicious dishes: 🍚 Spicy tuna fried rice with veggies & scrambled eggs, 🍔 tuna burger packed with flavor & topped with arugula, 🍝 tuna pasta tossed with capers & lemon zest, and 🍙 tuna mayo onigiri - a tasty snack! 🍲 Each dish is simple, nutritious, and perfect for any meal. Plus, I shared some cooking tips & tricks along the way. 🎉 Thanks for joining me, and don't forget to like & subscribe! 🙏 #TunaTransformation #CookingWithTuna #SimpleMeals #HomeCooking", usage: { output_tokens: 151 }
3.3 - Shows the results in Result.tsx
Based on the response we get from the above step, the results are shown in the Result component. To improve the presentation of the results in the Result component, you can split the returned string by the line dividers ("\n") and render each line within its own <p> tag.
{result.data.split("\n").map((paragraph:string, index:number) => (
               <p key={index}>{paragraph}<
Conclusion
Unlocking the full potential of your video content has never been easier, thanks to Twelve Labs' /analyze API! With this powerful technology, you can effortlessly transform your videos into captivating social media posts tailored for platforms like Instagram, X, and even blog posts! Whether you're looking to engage your audience on social media or create compelling blog content, the possibilities are endless.
This application is also the culmination of a series of tools I've developed, all leveraging Twelve Labs' Analyze API. From gaining inspiration from other influencers with the "Summarize a YouTube Video", to effortlessly generating titles, topics, and hashtags for video uploads with "Generate Titles and Hashtags for Your Video" and now, repurposing content for various platforms with this tool – it's all about simplifying the content creation process. Feel free to utilize all three applications in this context!
What's Next?
Check out the Quickstart tutorial, and begin building amazing apps with Twelve Labs.
Try out our Playground. Default video credits are 10 hours.
Follow us on X (Twitter) and LinkedIn.
Join our Discord community to connect with fellow users and developers.
Are you familiar with the concept of “one source, multi-use”? For content creators and influencers, it's all about maximizing audience engagement by repurposing content across different platforms.
This tool, “Generate Social Posts for your Video”, is specifically designed to assist video content creators in converting their videos into written formats, whether it's a fun Instagram post packed with emojis or a detailed blog entry.
Here's how it works: Simply upload your video to the application and select one of the given social media platforms where you want to make a post. Or customize your own prompt or requirements of a desired written format, such as "Write a summary in bullet points." In just a few clicks, you'll have your transformed content ready to go.
Now, let's dive into the step-by-step process of building the app!
Prerequisites
You should have your Twelve Labs API Key. If you don’t have one, visit the Twelve Labs Playground, sign up, and generate your API key.
The repository containing all the files for this app is available on Github.
(Good to Have) Basic knowledge in JavaScript, TypeScript, Node, React, and React Query.
How the App is Structured
The app consists of five main components; GenerateSocialPosts, VideoFileUploadForm, Video, InputForm, and Result.
GenerateSocialPosts: It serves as the parent container for the other components. It holds key states that are shared with its descendants.
VideoUrlUploadForm: It features a straightforward form for uploading a video file and indexing it using the TwelveLabs API. It displays the video being indexed and provides real-time status updates until the indexing process is complete.
Video: It displays a video based on a given URL. It is utilized within multiple components throughout the application.
InputForm: It consists of preset radio buttons representing major social media platforms and a text area where users can specify the requirements of written content they desire from a video.
Result: This component showcases the generated written content/text based on the user's selection of a social platform or input, leveraging the TwelveLab’s '/generate' API.
The app also has a server that stores all the code involving the API calls and the apiHooks.tsx which is a set of custom React Query hooks for managing state, cache, and fetching data.
Now, let’s take a look at how these components work along with the Twelve Labs API.
How the App Works with Twelve Labs API
1 - Showing the Most Recent Video of an Index
This app only works with one video, which is the most recently uploaded video of an index. Thus, on mount, the app shows the most recent video of a given index by default. Below is the process of how it works.
Get all videos of a given index in App.tsx (GET Videos)
Extract the first video’s id from the response and pass it down to GenerateSocialPosts.tsx
Get details of a video using the video id, extract the video url and pass it down to Video.tsx (GET Video)
So, we make two GET requests to the Twelve Labs API in this flow of getting the videos and showing the first video on the page. Let’s take each step in detail.
1.1 - Get all videos of a given index in App.tsx
Inside the app, the videos are returned by calling the react query hook useGetVideos which makes the request to the server. The server then makes a GET request to the Twelve Labs API to get all videos of an index. (💡Find details in the API document - GET Videos)
/** Get videos */

app.get("/indexes/:indexId/videos", async (request, response, next) => {
 const params = {
   page_limit: request.query.page_limit,
 };


 try {
   const options = {
     method: "GET",
     url: `${API_BASE_URL}/indexes/${request.params.indexId}/videos`,
     headers: { ...HEADERS },
     data: { params },
   };
   const apiResponse = await axios.request(options);
   response.tsxon(apiResponse.data);
 } catch (error) {
   const status = error.response?.status || 500;
   const message = error.response?.data?.message || "Error Getting Videos";
   return next({ status, message });
 }
});
The returned data (videos) looks like below.
{
	"data": [
		{
			"_id": "64eadb7e37db8fa679cb47e2",
			"created_at": "2024-03-08T09:34:06Z",
			"metadata": {
				"duration": 213.72,
				"engine_ids": [
					"pegasus1",
				],
				"filename": "myFile.mp4",
				"fps": 25,
				"height": 720,
				"size": 25014061,
				"width": 1280
			}
		},
		{ 2nd video },
		{ 3rd video },
		…
}
1.2 - Extract the first video’s id from the response and pass it down to GenerateSocialPosts.tsx
Based on the returned videos, we’re passing down the first video’s id to the GenerateSocialPosts.tsx component.
           <GenerateSocialPosts
             index={apiConfig.INDEX_ID}
             videoId={videos.data[0]?._id || null} //passing down the id
             refetchVideos={refetchVideos}
           />
1.3 - Get details of a video using the video id, extract the video url and pass it down to Video.tsx
Similar to what we’ve seen from the previous step in getting videos, to get details of a video, we’re using the react query hook useGetVideo which makes the request to the server. The server then makes a GET request to the Twelve Labs API to get details of a specific video. (💡Find details in the API document - GET Video)
/** Get a video of an index */

app.get(
 "/indexes/:indexId/videos/:videoId",
 async (request, response, next) => {
   const indexId = request.params.indexId;
   const videoId = request.params.videoId;


   try {
     const options = {
       method: "GET",
       url: `${API_BASE_URL}/indexes/${indexId}/videos/${videoId}`,
       headers: { ...HEADERS },
     };
     const apiResponse = await axios.request(options);
     response.json(apiResponse.data);
   } catch (error) {
     const status = error.response?.status || 500;
     const message = error.response?.data?.message || "Error Getting a Video";
     return next({ status, message });
   }
 }
);
It returns the details of a video including the url of a video. You may have observed that the video URL was not readily available from the previous GET Videos request. This is precisely why we're executing the GET Video request here – to delve deeper and extract the video URL.
{
	"_id": "64eadb7e37db8fa679cb47e2",
	"created_at": "2024-03-08T09:34:06Z",
	"indexed_at": "2024-03-08T09:39:14Z",
	"metadata": {
		"duration": 213.72,
		"engine_ids": [
			"pegasus1",
		],
		"filename": "myFile.mp4",
		"fps": 25,
		"height": 720,
		"size": 25014061,
		"video_title": "myFile.mp4",
		"width": 1280
	},
	"hls": {
		"video_url": "https://deuqpmn4rs7j5.cloudfront.net/…", //here!
		"thumbnail_urls": [
			"https://deuqpmn4rs7j5.cloudfront.net/…"
		],
		"status": "COMPLETE",
		"updated_at": "2024-03-08T09:35:21.813Z"
	}
}
Based on the returned data (video), we’re passing down its url to the Video component where the React Player is rendered using the url.
GenerateSocialPosts.tsx (line 110 - 116)
 {video && (
             <Video
               url={video.hls?.video_url} // passing down the url
               width={"381px"}
               height={"214px"}
2 - Uploading/Indexing a Video by Video File
In this app, a user can upload and index a video by selecting a video file from the local device. We’re assuming that a main user of this application would be a video content creator who has a video ready in the local device.
Once you submit a video indexing request (we call it a ‘task’), then we can receive the progress of the indexing task. I also made a video visible during the indexing process so that a user can confirm and watch the video while the indexing is in progress. Please note that the video is not instantly available from the beginning of the indexing process; the video url becomes available about at the middle of the indexing process.
Create a video indexing task by a video file in VideoUrlUploadForm.tsx (POST Task)
Receive and show the progress of the indexing task in Task.tsx (GET Task)
Let’s take a look at each step one by one.
2.1 - Create a video indexing task by a video file in VideoUrlUploadForm.tsx
When a user selects a video file from his/her local device and submits the videoFileUploadForm, the video indexing process starts. indexYouTubeVideo puts together the necessary data that needs to be sent for making the API request (e.g., language, index id, video file) as a form and makes a POST request to the server. The server then makes a post request to Twelve Labs API’s ‘/tasks’ endpoint. (💡Find details in the API document - POST Task)
/** Index a video and return a task ID */

app.post(
 "/index",
 upload.single("video_file"),
 async (request, response, next) => {
   const formData = new FormData();


   // Append data from request.body
   Object.entries(request.body).forEach(([key, value]) => {
     formData.append(key, value);
   });


   const blob = new Blob([request.file.buffer], {
     type: request.file.mimetype,
   });


   formData.append("video_file", blob, request.file.originalname);


   const options = {
     method: "POST",
     url: `${API_BASE_URL}/tasks`,
     headers: {
       "x-api-key": TWELVE_LABS_API_KEY,
       accept: "application/json",
       "Content-Type":
         "multipart/form-data; boundary=---011000010111000001101001",
     },
     data: formData,
   };
   try {
     const apiResponse = await axios.request(options);
     response.json(apiResponse.data);
   } catch (error) {
     const status = error.response?.status || 500;
     const message =
       error.response?.data?.message || "Error indexing a Video";
     return next({ status, message });
   }
 }
);
It returns an id of the video task that has just been created.
{
	"_id": "65e9f732bb29f13bdd6f305a"
}
2.2 - Receive and show the progress of the indexing task in Task.tsx
With the returned task id from the previous step of getting details of a video, we will use this task id to get details of the task and keep updating the task status to the user. So I’ve set the Task component to render inside the VideoFileUploadForm when there is a task id.
VideoFileUploadForm.tsx (line 153)
{taskId && (
               <Task
                 taskId={taskId}
                 refetchVideos={refetchVideos}
Inside the Task component, we’re receiving the data by using the useGetTask React Query hook which makes a GET request to the server. The server then makes a GET request to the Twelve Labs API as below. (💡Find details in the API document - GET Task)
/** Check the status of a specific indexing task */

app.get("/tasks/:taskId", async (request, response, next) => {
 const taskId = request.params.taskId;


 try {
   const options = {
     method: "GET",
     url: `${API_BASE_URL}/tasks/${taskId}`,
     headers: { ...HEADERS },
   };
   const apiResponse = await axios.request(options);
   response.tsxon(apiResponse.data);
 } catch (error) {
   const status = error.response?.status || 500;
   const message = error.response?.data?.message || "Error getting a task";
   return next({ status, message });
 }
});
It returns the task details as below.
{
	"_id": "65e9f732bb29f13bdd6f305a",
	"index_id": "65e9f6d6bb29f13bdd6f3059",
	"video_id": "65e9f73248db9fa679cb47a2",
	"status": "indexing",
	"metadata": {
		"filename": "fileName.mp4",
		"duration": 327.326988,
		"width": 1920,
		"height": 1080
	},
	"created_at": "2024-03-07T17:19:46.277Z",
	"updated_at": "2024-03-07T17:27:27.135Z",
	"estimated_time": "2024-03-07T17:25:59.621Z",
	"type": "index_task_info",
	"hls": {
		"video_url": "...",
		"thumbnail_urls": [
			"..."
		],
		"status": "COMPLETE",
		"updated_at": "2024-03-07T17:21:23.921Z"
	}
}
Unless the “status” is “ready”, the useGetTask hook will refetch the data every 5,000 ms so that a user can see the progress of the task in real-time. Check how I leveraged the refetchInterval property of useQuery below.
export function useGetTask(taskId: string) {
 return useQuery<Task, Error, Task, [string, string]>({
   queryKey: [keys.TASK, taskId],
   queryFn: async (): Promise<Task> => {
     try {
       const response = await apiConfig.SERVER.get(`${apiConfig.TASKS_URL}/${taskId}`);
       const respData: Task = response.data;
       return respData;
     } catch (error) {
       console.error("Error fetching task:", error);
       throw error;
     }
   },
   refetchInterval: (query) => {
     const data = query.state.data;
     return data && (data.status === "ready" || data.status === "failed")
       ? false
       : 5000;
   },
   refetchIntervalInBackground: true,
 });
}
3 - Receiving User Inputs and Generate/Show Results
Now we’re at the core and fun part - generating any text from a video! We’re receiving the user input then using the Twelve Labs API’s ‘/analyze’ endpoint to generate open-ended texts.
Receive a user input either from the preset radio buttons representing major social media platforms or a text area form in InputForm.tsx
Based on the user input, make ‘analyze’ API call in Result.tsx (POST Open-ended texts)
Show the results in Result.tsx
Let’s dive into each step.
3.1 - Receive a user input either from the preset radio buttons representing major social media platforms or a text area form in InputForm.tsx
InputForm is a simple form consisting of five radio buttons; four representing Instagram, Facebook, X, blog and the last one representing ‘Others’ where a user can customize and specify what kind of text the user wants from a video.
If a user selects the preset social platform, the embedded prompt for the platform will be set as prompt. This will later invoke the generate API in the result.tsx. If a user selects ‘Others’, the user input will be set as prompt.
InputForm.tsx (line 76 - 107)
async function handleSubmit(event: React.FormEvent<HTMLFormElement>) {
   event.preventDefault();
   let promptValue = "";
   let platformValue = "";


   if (instagramRef.current?.checked) {
     promptValue = "write a Instagram post with emojis, 100 words or less. Do not provide an explanation. Do not provide a summary.";
     platformValue = "Instagram";
   } else if (facebookRef.current?.checked) {
     promptValue = "write a Facebook post with emojis, 150 words or less. Do not provide an explanation. Do not provide a summary.";
     platformValue = "Facebook";
   } else if (xRef.current?.checked) {
     promptValue = "write a X (formerly Twitter) post with emojis, 50 words or less. Do not provide an explanation. Do not provide a summary.";
     platformValue = "X";
   } else if (blogRef.current?.checked) {
     promptValue = "write a blog post with details. Divide sections with subtitles. Do not provide an explanation. Do not provide a summary.";
     platformValue = "Blog";
   } else if (textRadioRef.current?.checked) {
     const inputValue = textAreaRef.current?.value.trim();
     if (inputValue?.length && inputValue?.length > 0) {
       promptValue = inputValue;
       platformValue = `"${inputValue}"`;
     } else {
       setShowCheckWarning(true)
💡 Tips on prompt engineering
Take a look at the embedded prompts I've configured for Instagram, Facebook, and more. Dive into this guide on prompt engineering tailored for Twelve Labs API!
3.2 - Based on the user input , make ‘/analyze’ API call in Result.tsx
When the form has been submitted and the video id and prompt are set, useAnalyze hook will be called from the Result.tsx. The hook will then make the request to the server where the API request to Twelve Labs API is made. (💡Find details in the API document - POST Open-ended analysis)
/** Generate open-ended text of a video */
app.post("/videos/:videoId/analyze", async (request, response, next) => {
 const videoId = request.params.videoId;
 let prompt = request.body.data;
 try {
   const options = {
     method: "POST",
     url: `${API_BASE_URL}/analyze`,
     headers: { ...HEADERS, accept: "application/json" },
     data: { ...prompt, video_id: videoId, temperature: 0.3, stream: false },
   };
   const apiResponse = await axios.request(options);
   response.json(apiResponse.data);
 } catch (error) {
   const status = error.response?.status || 500;
   const message = error.response?.data?.message || "Error Generating Text";
   return next({ status, message });
 }
});
It returns an object consisting of response ‘id’ and ‘data’ which is the generated text based on a provided prompt. Below is an example result when you select ‘Instagram’.
id: '2403323b-b648-48a7-8897-95258e68e8a4', data: "👨🍳 Tuna isn't just for cat food! 🐱 Today, I elevated canned tuna into 4 delicious dishes: 🍚 Spicy tuna fried rice with veggies & scrambled eggs, 🍔 tuna burger packed with flavor & topped with arugula, 🍝 tuna pasta tossed with capers & lemon zest, and 🍙 tuna mayo onigiri - a tasty snack! 🍲 Each dish is simple, nutritious, and perfect for any meal. Plus, I shared some cooking tips & tricks along the way. 🎉 Thanks for joining me, and don't forget to like & subscribe! 🙏 #TunaTransformation #CookingWithTuna #SimpleMeals #HomeCooking", usage: { output_tokens: 151 }
3.3 - Shows the results in Result.tsx
Based on the response we get from the above step, the results are shown in the Result component. To improve the presentation of the results in the Result component, you can split the returned string by the line dividers ("\n") and render each line within its own <p> tag.
{result.data.split("\n").map((paragraph:string, index:number) => (
               <p key={index}>{paragraph}<
Conclusion
Unlocking the full potential of your video content has never been easier, thanks to Twelve Labs' /analyze API! With this powerful technology, you can effortlessly transform your videos into captivating social media posts tailored for platforms like Instagram, X, and even blog posts! Whether you're looking to engage your audience on social media or create compelling blog content, the possibilities are endless.
This application is also the culmination of a series of tools I've developed, all leveraging Twelve Labs' Analyze API. From gaining inspiration from other influencers with the "Summarize a YouTube Video", to effortlessly generating titles, topics, and hashtags for video uploads with "Generate Titles and Hashtags for Your Video" and now, repurposing content for various platforms with this tool – it's all about simplifying the content creation process. Feel free to utilize all three applications in this context!
What's Next?
Check out the Quickstart tutorial, and begin building amazing apps with Twelve Labs.
Try out our Playground. Default video credits are 10 hours.
Follow us on X (Twitter) and LinkedIn.
Join our Discord community to connect with fellow users and developers.
Related articles


Platform
Enterprise
© 2021
-
2026
TwelveLabs, Inc. All Rights Reserved

Platform
Enterprise
© 2021
-
2026
TwelveLabs, Inc. All Rights Reserved


Platform
Enterprise
© 2021
-
2026
TwelveLabs, Inc. All Rights Reserved