" height="9.18705px" id="AiyYyR90G" transform="translate(3.406 3.406)" width="9.18685px"/></svg>)
" height="1.90314px" id="wtDTm6bEW" transform="translate(26.225 0)" width="2.4723000000000006px"/><path d="M 0.557 0 L 1.438 0 C 1.746 0 1.995 0.25 1.995 0.559 L 1.995 1.344 C 1.995 1.653 1.746 1.903 1.438 1.903 L 0.557 1.903 C 0.25 1.903 0 1.653 0 1.344 L 0 0.559 C 0 0.25 0.25 0 0.557 0 Z" fill="rgb(29, 28, 27)" height="1.9031500000000001px" id="GnmDnNra_" transform="translate(36.408 2.728)" width="1.9953000000000003px"/><path d="M 6.224 0 L 0.558 0 C 0.25 0 0 0.25 0 0.559 L 0 1.344 C 0 1.653 0.25 1.903 0.558 1.903 L 6.224 1.903 C 6.531 1.903 6.781 1.653 6.781 1.344 L 6.781 0.559 C 6.781 0.25 6.531 0 6.224 0 Z" fill="rgb(29, 28, 27)" height="1.9031500000000001px" id="hKTQ3dbw4" transform="translate(34.261 5.456)" width="6.781100000000002px"/><path d="M 6.955 0 L 0.558 0 C 0.25 0 0 0.25 0 0.559 L 0 1.344 C 0 1.653 0.25 1.903 0.558 1.903 L 6.955 1.903 C 7.263 1.903 7.513 1.653 7.513 1.344 L 7.513 0.559 C 7.513 0.25 7.263 0 6.955 0 Z" fill="rgb(29, 28, 27)" height="1.9031500000000001px" id="G1Zzk9CUU" transform="translate(28.298 8.243)" width="7.513100000000001px"/><path d="M 7.123 0 L 0.558 0 C 0.25 0 0 0.25 0 0.559 L 0 1.344 C 0 1.653 0.25 1.903 0.558 1.903 L 7.123 1.903 C 7.431 1.903 7.681 1.653 7.681 1.344 L 7.681 0.559 C 7.681 0.25 7.431 0 7.123 0 Z" fill="rgb(29, 28, 27)" height="1.9030999999999985px" id="fm7cHxIfJ" transform="translate(0 10.972)" width="7.68067px"/><path d="M 13.447 0 L 0.558 0 C 0.25 0 0 0.25 0 0.559 L 0 1.344 C 0 1.653 0.25 1.903 0.558 1.903 L 13.447 1.903 C 13.755 1.903 14.004 1.653 14.004 1.344 L 14.004 0.559 C 14.004 0.25 13.755 0 13.447 0 Z" fill="rgb(29, 28, 27)" height="1.9030999999999985px" id="LowSwDrtg" transform="translate(9.552 10.972)" width="14.0044px"/><path d="M 0.558 0 L 8.212 0 C 8.52 0 8.77 0.25 8.77 0.559 L 8.77 1.344 C 8.77 1.653 8.52 1.903 8.212 1.903 L 0.558 1.903 C 0.25 1.903 0 1.653 0 1.344 L 0 0.559 C 0 0.25 0.25 0 0.558 0 Z" fill="rgb(29, 28, 27)" height="1.9030999999999985px" id="xRiKc2od7" transform="translate(27.041 10.972)" width="8.769900000000003px"/><path d="M 0.557 0 L 5.4 0 C 5.708 0 5.958 0.25 5.958 0.559 L 5.958 1.344 C 5.958 1.653 5.708 1.903 5.4 1.903 L 0.557 1.903 C 0.25 1.903 0 1.653 0 1.344 L 0 0.559 C 0 0.25 0.25 0 0.557 0 Z" fill="rgb(29, 28, 27)" height="1.9031500000000001px" id="JWdNVicde" transform="translate(36.796 8.243)" width="5.957599999999999px"/><path d="M 1.438 0 L 0.558 0 C 0.25 0 0 0.25 0 0.559 L 0 1.344 C 0 1.653 0.25 1.903 0.558 1.903 L 1.438 1.903 C 1.746 1.903 1.995 1.653 1.995 1.344 L 1.995 0.559 C 1.995 0.25 1.746 0 1.438 0 Z" fill="rgb(29, 28, 27)" height="1.9031500000000001px" id="RfFYVCT_T" transform="translate(28.717 5.456)" width="1.9953000000000003px"/><path d="M 0.558 0 L 2.895 0 C 3.203 0 3.453 0.25 3.453 0.559 L 3.453 1.406 C 3.453 1.714 3.203 1.964 2.895 1.964 L 0.558 1.964 C 0.25 1.964 0 1.714 0 1.406 L 0 0.559 C 0 0.25 0.25 0 0.558 0 Z" fill="rgb(29, 28, 27)" height="1.964299999999998px" id="dngJ6MU2p" transform="translate(16.183 24.582)" width="3.4525000000000006px"/><path d="M 1.706 0 L 0.558 0 C 0.25 0 0 0.25 0 0.559 L 0 1.406 C 0 1.714 0.25 1.964 0.558 1.964 L 1.706 1.964 C 2.014 1.964 2.263 1.714 2.263 1.406 L 2.263 0.559 C 2.263 0.25 2.014 0 1.706 0 Z" fill="rgb(29, 28, 27)" height="1.964299999999998px" id="N_fstvKmR" transform="translate(22.18 24.582)" width="2.2631999999999977px"/><path d="M 0.558 0 L 5.544 0 C 5.852 0 6.101 0.25 6.101 0.559 L 6.101 1.406 C 6.101 1.714 5.852 1.964 5.544 1.964 L 0.558 1.964 C 0.25 1.964 0 1.714 0 1.406 L 0 0.559 C 0 0.25 0.25 0 0.558 0 Z" fill="rgb(29, 28, 27)" height="1.964299999999998px" id="t55XLYcgb" transform="translate(25.486 24.582)" width="6.101399999999998px"/><path d="M 1.976 0 L 0.558 0 C 0.25 0 0 0.25 0 0.559 L 0 1.406 C 0 1.714 0.25 1.964 0.558 1.964 L 1.976 1.964 C 2.284 1.964 2.533 1.714 2.533 1.406 L 2.533 0.559 C 2.533 0.25 2.284 0 1.976 0 Z" fill="rgb(29, 28, 27)" height="1.964299999999998px" id="ZrEKTVTAe" transform="translate(28.542 21.854)" width="2.5334000000000003px"/><path d="M 0.557 0 L 1.438 0 C 1.746 0 1.995 0.25 1.995 0.559 L 1.995 1.406 C 1.995 1.714 1.746 1.964 1.438 1.964 L 0.557 1.964 C 0.25 1.964 0 1.714 0 1.406 L 0 0.559 C 0 0.25 0.25 0 0.557 0 Z" fill="rgb(29, 28, 27)" height="1.964299999999998px" id="Z0fPTp9aR" transform="translate(11.425 24.582)" width="1.9953000000000003px"/><path d="M 0 0.559 C 0 0.251 0.251 0 0.558 0 L 1.438 0 C 1.745 0 1.995 0.251 1.995 0.559 L 1.995 1.405 C 1.995 1.713 1.745 1.964 1.438 1.964 L 0.558 1.964 C 0.251 1.964 0 1.713 0 1.405 Z" fill="rgb(29, 28, 27)" height="1.964299999999998px" id="Tj_PDHFDh" transform="translate(20.635 27.308)" width="1.9954px"/><path d="M 0.557 0 L 1.342 0 C 1.65 0 1.899 0.25 1.899 0.559 L 1.899 1.406 C 1.899 1.714 1.65 1.964 1.342 1.964 L 0.557 1.964 C 0.25 1.964 0 1.714 0 1.406 L 0 0.559 C 0 0.25 0.25 0 0.557 0 Z" fill="rgb(29, 28, 27)" height="1.9643000000000015px" id="AYq9dXkKz" transform="translate(18.686 30.036)" width="1.8994px"/><path d="M 0.558 0 L 5.768 0 C 6.076 0 6.326 0.25 6.326 0.559 L 6.326 1.344 C 6.326 1.653 6.076 1.903 5.768 1.903 L 0.558 1.903 C 0.25 1.903 0 1.653 0 1.344 L 0 0.559 C 0 0.25 0.25 0 0.558 0 Z" fill="rgb(29, 28, 27)" height="1.9031500000000001px" id="rspevfJcx" transform="translate(12.157 8.243)" width="6.325900000000001px"/><path d="M 3.285 0 L 0.558 0 C 0.25 0 0 0.25 0 0.559 L 0 1.344 C 0 1.653 0.25 1.903 0.558 1.903 L 3.285 1.903 C 3.593 1.903 3.842 1.653 3.842 1.344 L 3.842 0.559 C 3.842 0.25 3.593 0 3.285 0 Z" fill="rgb(29, 28, 27)" height="1.9031500000000001px" id="XRUAhGnph" transform="translate(23.887 2.728)" width="3.8424000000000014px"/><path d="M 0.558 0 L 5.644 0 C 5.952 0 6.202 0.25 6.202 0.559 L 6.202 1.344 C 6.202 1.653 5.952 1.903 5.644 1.903 L 0.558 1.903 C 0.25 1.903 0 1.653 0 1.344 L 0 0.559 C 0 0.25 0.25 0 0.558 0 Z" fill="rgb(29, 28, 27)" height="1.9031500000000001px" id="VsaVVIfke" transform="translate(21.528 5.456)" width="6.201600000000003px"/><path d="M 3.06 0 L 0.558 0 C 0.25 0 0 0.25 0 0.559 L 0 1.344 C 0 1.653 0.25 1.903 0.558 1.903 L 3.06 1.903 C 3.369 1.903 3.618 1.653 3.618 1.344 L 3.618 0.559 C 3.618 0.25 3.369 0 3.06 0 Z" fill="rgb(29, 28, 27)" height="1.9030999999999985px" id="wiAKEgyId" transform="translate(40.819 10.972)" width="3.6182000000000016px"/><path d="M 0.558 0 L 17.318 0 C 17.626 0 17.875 0.25 17.875 0.559 L 17.875 1.345 C 17.875 1.653 17.626 1.903 17.318 1.903 L 0.558 1.903 C 0.25 1.903 0 1.653 0 1.345 L 0 0.559 C 0 0.25 0.25 0 0.558 0 Z" fill="rgb(29, 28, 27)" height="1.9032px" id="FIE0ufK9m" transform="translate(6.666 13.7)" width="17.87506px"/><path d="M 6.426 0 L 0.558 0 C 0.25 0 0 0.25 0 0.559 L 0 1.345 C 0 1.653 0.25 1.903 0.558 1.903 L 6.426 1.903 C 6.734 1.903 6.984 1.653 6.984 1.345 L 6.984 0.559 C 6.984 0.25 6.734 0 6.426 0 Z" fill="rgb(29, 28, 27)" height="1.9032000000000018px" id="ut9UWny3L" transform="translate(22.892 19.156)" width="6.983599999999999px"/><path d="M 0.558 0 L 22.151 0 C 22.459 0 22.709 0.25 22.709 0.559 L 22.709 1.344 C 22.709 1.653 22.459 1.903 22.151 1.903 L 0.558 1.903 C 0.25 1.903 0 1.653 0 1.344 L 0 0.559 C 0 0.25 0.25 0 0.558 0 Z" fill="rgb(29, 28, 27)" height="1.9030999999999985px" id="VULnffgbk" transform="translate(9.552 16.428)" width="22.7089px"/><path d="M 7.886 0 L 0.558 0 C 0.25 0 0 0.25 0 0.559 L 0 1.345 C 0 1.653 0.25 1.903 0.558 1.903 L 7.886 1.903 C 8.194 1.903 8.443 1.653 8.443 1.345 L 8.443 0.559 C 8.443 0.25 8.194 0 7.886 0 Z" fill="rgb(29, 28, 27)" height="1.9032000000000018px" id="adZTYr4MR" transform="translate(6.078 19.156)" width="8.44303px"/><path d="M 0.558 0 L 2.211 0 C 2.519 0 2.769 0.25 2.769 0.559 L 2.769 1.406 C 2.769 1.714 2.519 1.964 2.211 1.964 L 0.558 1.964 C 0.25 1.964 0 1.714 0 1.406 L 0 0.559 C 0 0.25 0.25 0 0.558 0 Z" fill="rgb(29, 28, 27)" height="1.964299999999998px" id="bwdUdEmCH" transform="translate(13.784 21.854)" width="2.768600000000001px"/><path d="M 2.424 0 L 0.558 0 C 0.25 0 0 0.25 0 0.559 L 0 1.406 C 0 1.714 0.25 1.964 0.558 1.964 L 2.424 1.964 C 2.732 1.964 2.982 1.714 2.982 1.406 L 2.982 0.559 C 2.982 0.25 2.732 0 2.424 0 Z" fill="rgb(29, 28, 27)" height="1.964299999999998px" id="PUvesMJEj" transform="translate(23.556 21.854)" width="2.982199999999999px"/><path d="M 0.558 0 L 2.241 0 C 2.55 0 2.799 0.25 2.799 0.559 L 2.799 1.406 C 2.799 1.714 2.55 1.964 2.241 1.964 L 0.558 1.964 C 0.25 1.964 0 1.714 0 1.406 L 0 0.559 C 0 0.25 0.25 0 0.558 0 Z" fill="rgb(29, 28, 27)" height="1.964299999999998px" id="Wo2W7J3Zj" transform="translate(8.672 21.854)" width="2.799050000000001px"/><path d="M 6.661 0 L 0.558 0 C 0.25 0 0 0.25 0 0.559 L 0 1.345 C 0 1.653 0.25 1.903 0.558 1.903 L 6.661 1.903 C 6.969 1.903 7.219 1.653 7.219 1.345 L 7.219 0.559 C 7.219 0.25 6.969 0 6.661 0 Z" fill="rgb(29, 28, 27)" height="1.9032px" id="PpPVZXp9j" transform="translate(27.041 13.7)" width="7.218900000000001px"/><path d="M 0.621 1.905 C 0.218 1.905 0 1.687 0 1.283 L 0 0.622 C 0 0.218 0.218 0 0.621 0 L 11.225 0 C 11.628 0 11.846 0.218 11.846 0.622 L 11.846 1.283 C 11.846 1.687 11.628 1.905 11.225 1.905 L 6.934 1.905 L 6.934 14.926 C 6.934 15.33 6.716 15.548 6.313 15.548 L 5.537 15.548 C 5.134 15.548 4.916 15.33 4.916 14.926 L 4.916 1.905 Z" fill="rgb(29, 28, 27)" height="15.54825px" id="xr32fxeO6" transform="translate(52.177 8.243)" width="11.845599999999997px"/><path d="M 0.621 0 C 0.218 0 0 0.218 0 0.622 L 0 14.924 C 0 15.328 0.218 15.546 0.621 15.546 L 1.357 15.546 C 1.76 15.546 1.978 15.328 1.978 14.924 L 1.978 0.622 C 1.978 0.218 1.76 0 1.357 0 Z" fill="rgb(29, 28, 27)" height="15.546050000000001px" id="oSsO_UPVN" transform="translate(90.476 8.243)" width="1.9779000000000053px"/><path d="M 0.62 15.546 C 0.217 15.546 0 15.328 0 14.924 L 0 0.622 C 0 0.218 0.217 0 0.62 0 L 1.396 0 C 1.799 0 2.017 0.218 2.017 0.622 L 2.017 13.632 L 8.981 13.632 C 9.384 13.632 9.602 13.85 9.602 14.254 L 9.602 14.924 C 9.602 15.328 9.384 15.546 8.981 15.546 Z" fill="rgb(29, 28, 27)" height="15.546050000000001px" id="Sgj4z5osO" transform="translate(116.749 8.243)" width="9.602000000000004px"/><path d="M 1.974 14.924 C 1.974 15.328 1.756 15.546 1.353 15.546 L 0.621 15.546 C 0.218 15.546 0 15.328 0 14.924 L 0 0.622 C 0 0.218 0.218 0 0.621 0 L 1.357 0 C 1.76 0 1.978 0.218 1.978 0.622 L 1.978 5.747 C 2.634 4.721 3.806 4.079 5.309 4.079 C 8.18 4.079 10.356 6.358 10.356 9.948 C 10.356 13.538 8.18 15.817 5.309 15.817 C 3.801 15.817 2.627 15.175 1.971 14.145 L 1.971 14.922 Z M 8.36 9.95 C 8.36 7.362 6.881 5.928 5.121 5.928 C 3.361 5.928 1.863 7.362 1.863 9.95 C 1.863 12.539 3.361 13.972 5.121 13.972 C 6.881 13.972 8.36 12.539 8.36 9.95 Z" fill="rgb(29, 28, 27)" height="15.81665px" id="q13jjj7xd" transform="translate(138.401 8.243)" width="10.355999999999995px"/><path d="M 4.457 11.738 C 0.961 11.738 -0.019 9.872 0 8.318 C 0.005 7.929 0.253 7.735 0.645 7.735 L 1.344 7.735 C 1.748 7.735 1.922 7.949 1.961 8.352 C 2.063 9.315 2.693 9.907 4.433 9.907 C 6.174 9.907 7.012 9.269 7.012 8.289 C 7.012 7.425 6.522 7.108 5.305 6.899 L 3.209 6.539 C 1.453 6.238 0.29 5.247 0.29 3.468 C 0.29 1.467 1.774 0 4.518 0 C 7.263 0 8.838 1.491 8.814 3.23 C 8.81 3.614 8.553 3.808 8.165 3.808 L 7.457 3.808 C 7.054 3.808 6.908 3.595 6.851 3.202 C 6.749 2.477 6.159 1.818 4.518 1.818 C 2.878 1.818 2.249 2.508 2.249 3.403 C 2.249 4.175 2.695 4.516 3.81 4.714 L 5.906 5.083 C 7.72 5.404 8.98 6.292 8.98 8.198 C 8.98 9.976 7.908 11.74 4.455 11.74 Z" fill="rgb(29, 28, 27)" height="11.739799999999999px" id="tJ8syeWTW" transform="translate(150.024 12.325)" width="8.980269730401375px"/><path d="M 9.146 7.997 C 9.146 8.813 9.175 9.983 9.282 10.799 C 9.334 11.223 9.155 11.465 8.728 11.465 L 8.068 11.465 C 7.685 11.465 7.467 11.319 7.428 11.022 L 7.317 10.181 C 6.724 11.157 5.565 11.659 4.145 11.659 C 1.579 11.659 0 10.142 0 8.078 C 0 6.27 1.27 5.157 3.433 5.002 L 6.589 4.78 C 7.162 4.741 7.186 4.688 7.186 4.153 L 7.186 3.682 C 7.186 2.438 6.434 1.807 4.79 1.807 C 3.145 1.807 2.472 2.425 2.405 3.289 C 2.376 3.697 2.235 3.916 1.823 3.916 L 1.067 3.916 C 0.675 3.916 0.427 3.717 0.422 3.328 C 0.407 1.51 1.74 0 4.792 0 C 7.798 0 9.162 1.427 9.155 3.736 Z M 7.188 7.298 L 7.188 6.244 C 6.955 6.327 6.678 6.386 6.363 6.415 L 3.598 6.676 C 2.59 6.775 1.997 7.163 1.997 8.099 L 1.999 8.099 C 1.999 9.188 2.886 9.97 4.4 9.97 C 6.169 9.97 7.188 8.9 7.188 7.298 Z" fill="rgb(29, 28, 27)" height="11.658999999999999px" id="QPESIZvku" transform="translate(126.854 12.325)" width="9.290755130109668px"/><path d="M 5.224 0 C 8.313 0 10.295 2.255 10.295 5.456 L 10.295 5.694 C 10.295 6.098 10.077 6.316 9.674 6.316 L 1.998 6.316 C 2.168 8.547 3.447 9.898 5.407 9.898 C 6.768 9.898 7.598 9.363 7.934 8.431 C 8.06 8.078 8.243 7.892 8.618 7.892 L 9.33 7.892 C 9.746 7.892 9.994 8.125 9.923 8.538 C 9.598 10.433 7.834 11.74 5.409 11.74 L 5.407 11.738 C 2.168 11.738 0 9.424 0 5.797 C 0 2.169 2.135 0 5.224 0 Z M 5.222 1.74 C 3.494 1.74 2.405 2.818 2.074 4.64 L 8.282 4.64 C 8.054 2.842 6.949 1.74 5.222 1.74 Z" fill="rgb(29, 28, 27)" height="11.739799999999999px" id="PKmyQkwJE" transform="translate(104.541 12.325)" width="10.295000000000002px"/><path d="M 4.459 11.194 C 4.099 11.194 3.877 11.039 3.746 10.703 L 0.091 1.021 C -0.024 0.72 -0.031 0.511 0.076 0.297 C 0.178 0.094 0.381 0 0.732 0 L 1.274 0 C 1.633 0 1.86 0.155 1.986 0.495 L 4.958 8.503 L 5.123 9.018 L 5.289 8.503 L 8.262 0.495 C 8.388 0.155 8.615 0 8.974 0 L 9.517 0 C 9.865 0 10.07 0.092 10.172 0.297 C 10.279 0.511 10.275 0.72 10.157 1.021 L 6.502 10.703 C 6.371 11.039 6.149 11.194 5.79 11.194 Z" fill="rgb(29, 28, 27)" height="11.1941px" id="uUQr5Yl4B" transform="translate(93.807 12.595)" width="10.248961642504256px"/><path d="M 5.407 11.738 C 2.167 11.738 0 9.424 0 5.797 C 0 2.169 2.133 0 5.221 0 C 8.31 0 10.292 2.255 10.292 5.456 L 10.292 5.694 C 10.292 6.098 10.075 6.316 9.672 6.316 L 1.995 6.316 C 2.165 8.547 3.446 9.898 5.404 9.898 C 6.768 9.898 7.596 9.363 7.931 8.431 C 8.058 8.078 8.241 7.892 8.615 7.892 L 9.328 7.892 C 9.744 7.892 9.992 8.125 9.918 8.538 C 9.593 10.433 7.829 11.74 5.404 11.74 Z M 8.282 4.64 C 8.053 2.842 6.949 1.74 5.221 1.74 C 3.494 1.74 2.405 2.818 2.074 4.64 Z" fill="rgb(29, 28, 27)" height="11.739799999999999px" id="zo1nSBuSF" transform="translate(78.397 12.325)" width="10.29249999999999px"/><path d="M 3.057 10.677 C 3.163 11.026 3.392 11.192 3.756 11.192 L 3.749 11.194 L 4.987 11.194 C 5.35 11.194 5.579 11.028 5.69 10.679 L 8.173 2.654 L 8.237 2.401 L 8.3 2.654 L 10.787 10.679 C 10.894 11.028 11.123 11.194 11.487 11.194 L 12.733 11.194 C 13.096 11.194 13.325 11.028 13.432 10.679 L 16.418 1.006 C 16.516 0.7 16.512 0.498 16.41 0.288 C 16.307 0.089 16.109 0.002 15.76 0.002 L 15.218 0.002 C 14.848 0.002 14.626 0.168 14.519 0.522 L 12.094 8.547 L 12.046 8.761 L 11.999 8.542 L 9.506 0.517 C 9.4 0.168 9.171 0.002 8.807 0.002 L 7.683 0.002 C 7.319 0.002 7.091 0.168 6.984 0.517 L 4.492 8.542 L 4.449 8.745 L 4.405 8.551 L 1.98 0.519 C 1.874 0.166 1.649 0 1.281 0 L 0.728 0 C 0.38 0 0.181 0.087 0.079 0.286 C -0.021 0.493 -0.028 0.698 0.07 1.004 Z" fill="rgb(29, 28, 27)" height="11.194099999999999px" id="uboloLX99" transform="translate(61.282 12.598)" width="16.489163442184434px"/></svg>)
Tutorials
Building Brand Integration Assistant and Ad Break Finder App with Twelve Labs

Meeran Kim
This tutorial walks through building the Brand Integration Assistant and Ad Break Finder App, which uses the Twelve Labs Analyze and Embed APIs with Pinecone to automatically generate ad metadata tags, find contextually aligned content videos through multimodal similarity search, and simulate mid-roll ad insertions at AI-generated chapter breaks.
This tutorial walks through building the Brand Integration Assistant and Ad Break Finder App, which uses the Twelve Labs Analyze and Embed APIs with Pinecone to automatically generate ad metadata tags, find contextually aligned content videos through multimodal similarity search, and simulate mid-roll ad insertions at AI-generated chapter breaks.

In this article
No headings found on page
Join our newsletter
Join our newsletter
Receive the latest advancements, tutorials, and industry insights in video understanding
Receive the latest advancements, tutorials, and industry insights in video understanding
Search, analyze, and explore your videos with AI.
Jul 14, 2025
12 Min
Copy link to article
Introduction
Viewers are often overwhelmed by irrelevant ads that don’t align with the content they’re watching. This disconnect leads to frustration and makes ads feel intrusive or poorly timed.
The Brand Integration Assistant & Ad Break Finder App solves this by delivering contextually relevant ad recommendations—ensuring the right message reaches the right audience at the right moment of engagement.
In this tutorial, you’ll learn how the app works across its core features:
Automatic Tag Generation: Each uploaded ad is analyzed to generate rich metadata—Topic Category, Emotions, Brands, Target Demographics (Gender & Age), and Location—enabling smart filtering, search, and content matching.
Search for Contextually Aligned Content: Use AI-powered similarity search to find content videos that are semantically aligned with your ad, based on both video and text embeddings.
Ad Break Recommendation & Simulation: Automatically segment content into chapters and simulate mid-roll ad insertions - creating a seamless, immersive ad experience.
Prerequisites
Sign up for the Twelve Labs Playground and generate your API key and create two indexes each for ads and content videos.
Set up a Pinecone account and create an index to store video embeddings.
Make sure to set Dimensions to 1024 and Metric to Cosine
Find the application’s source code in the corresponding GitHub repository.
It’s helpful to have familiarity with JavaScript, TypeScript, and Next.js for a smoother setup and development experience.
Demo
Check out the demo application to try it yourself, or watch the quick demo video below to see how it works in action: https://www.loom.com/share/233cc8cb66ae44218e3cff69afb772d7
You can watch the webinar recording below for the entire demo:
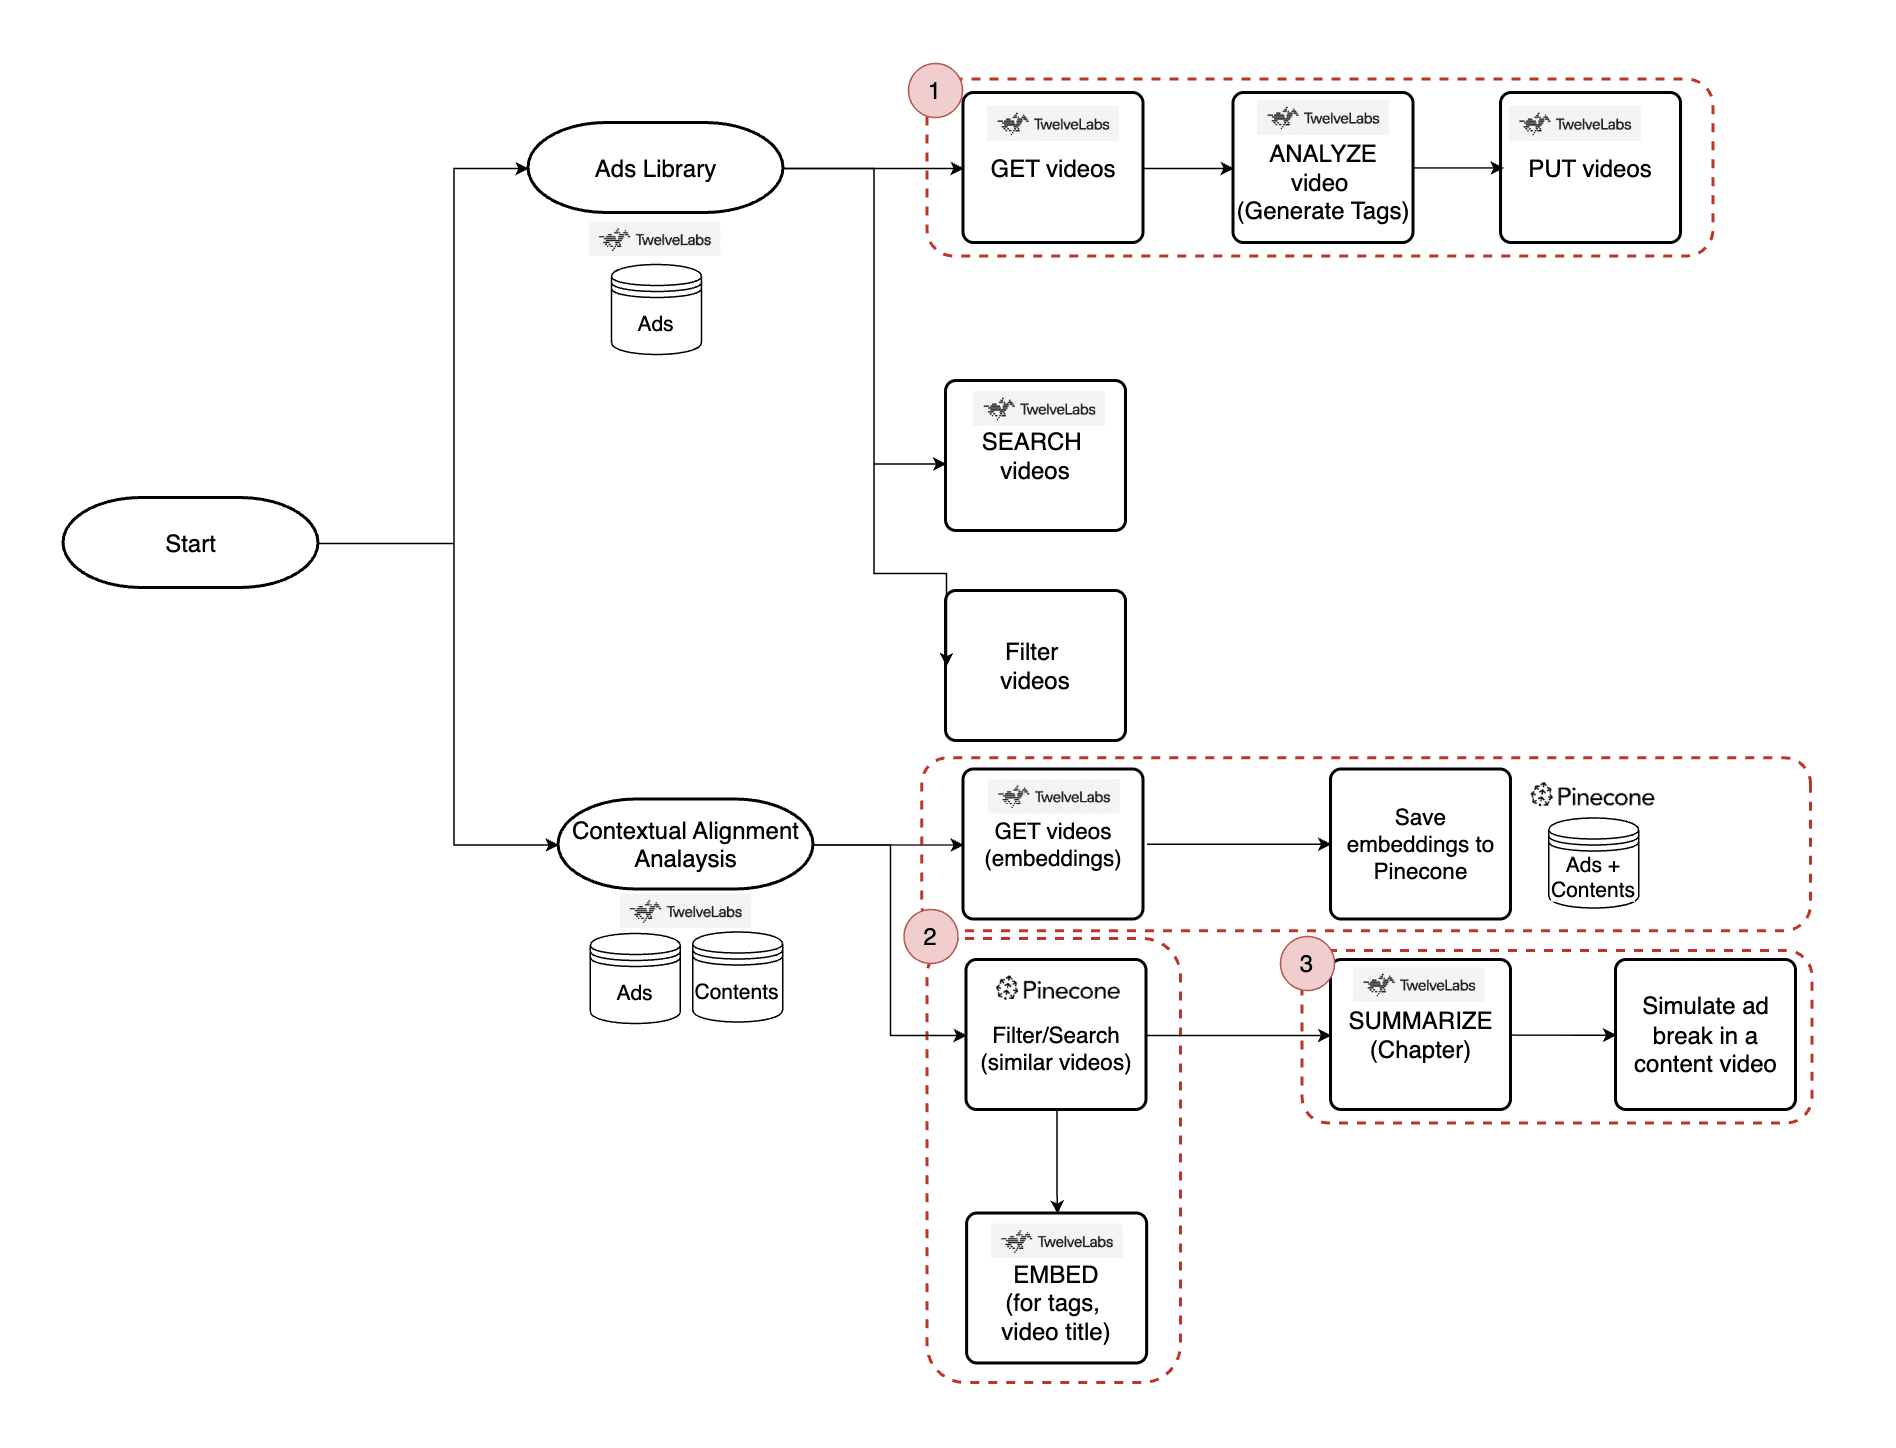
How the App Works
Once inside the app, users will find two main menus: Ads Library and Contextual Alignment Analysis.
Ads Library - The Ads Library provides brand marketers with an organized view of their ad videos, each enriched with automatically generated tags. Users can filter ads by Topic Category, Emotions, Brands, Gender, Age, and Location, or search by short-tail or long-tail keywords using the Twelve Labs Search API. In this tutorial, we’ll focus on the auto-tag generation feature within the Ads Library.
Contextual Alignment Analysis - This section enables users to find the most contextually relevant content videos for each ad. Powered by Twelve Labs EMBED and GET video API (for tag and video embeddings) and Pinecone (for similarity-based filtering), it surfaces highly aligned content.
Users can then select a content video, generate auto-chapters for ad break insertion, and simulate ad playback at chapter transitions.
The following tutorial will walk through both the content matching and ad simulation features in detail.
Three Main Features of the App and How They Work
Main Feature 1. Automatic Tag Generation (in ‘Ads Library’)
The Ads Library allows users to browse a collection of indexed videos and view their auto-generated tags. These tags help categorize videos by topic, emotion, brand, demographics, and more — all extracted using Twelve Labs' Analyze API.
Step 1 - Generate tags of each video
When a video is loaded and determined to have incomplete or missing metadata, the system calls generateMetadata to obtain tags using Twelve Labs' Analyze API.
⭐️Check out details here for Twelve Labs’ Analyze API
🔁 Where it’s used
You’ll find this call inside processVideoMetadataSingle in page.tsx, like this:
ads-library/page.ts (line 279-290)
     if (!video.user_metadata ||
         Object.keys(video.user_metadata).length === 0 ||
          !video.user_metadata.topic_category &&
          !video.user_metadata.emotions &&
          !video.user_metadata.brands &&
          !video.user_metadata.locations)) {


       setVideosInProcessing(prev => [...prev, videoId]);


       const hashtagText = await generateMetadata(videoId);


       if (hashtagText) {
         const metadata = parseHashtags(hashtagText);
The generateMetadata function is a custom hook that triggers a server-side API call to request AI-generated tags from the Twelve Labs engine.
This triggers the backend handler in api/analyze/route.ts, which constructs a structured and specific prompt for the Twelve Labs analyze API. The prompt ensures that the returned data is well-categorized and consistently formatted — making it easy to convert into tags and display them in the Filter Menu. Here’s the key part of the backend route:
api/analyze/route.ts (line 1 - 85)
import { NextResponse } from 'next/server';


const API_KEY = process.env.TWELVELABS_API_KEY;
const TWELVELABS_API_BASE_URL = process.env.TWELVELABS_API_BASE_URL;


export const maxDuration = 60;


export async function GET(req: Request) {
   const { searchParams } = new URL(req.url);
   const videoId = searchParams.get("videoId");
   const prompt =
   `You are a marketing assistant specialized in generating hashtags for video content.


Based on the input video metadata, generate a list of hashtags labeled by category.


**Output Format:**
Each line must be in the format:
[Category]: [Hashtag]
(e.g., sector: #beauty)


**Allowed Values:**


Gender: Male, Female
Age: 18-25, 25-34, 35-44, 45-54, 55+
Topic: Beauty, Fashion, Tech, Travel, CPG, Food & Bev, Retail, Other
Emotions: sorrow, happiness, laughter, anger, empathy, fear, love, trust, sadness, belonging, guilt, compassion, pride


**Instructions:**


1. Use only the values provided in Allowed Values.
2. Do not invent new values except for Brands and Location. Only use values from the Allowed Values.
3. Output must contain at least one hashtag for each of the following categories:
 - Gender
 - Age
 - Topic
 - Emotions
 - Location
 - Brands


4. Do not output any explanations or category names—only return the final hashtag list.


**Output Example:**


Gender: female
Age: 25-34
Topic: beauty
Emotions: happiness
Location: Los Angeles
Brands: Fenty Beauty


---
`


  …


   const url = `${TWELVELABS_API_BASE_URL}/analyze`;
   const options = {
       method: "POST",
       headers: {
           "Content-Type": "application/json",
           "x-api-key": API_KEY,
       },
       body: JSON.stringify({
           prompt: prompt,
           video_id: videoId,
           stream: false
       })
   };


   try {
     const response = await fetch(url, options);
…
Step 2 - PUT each video to save generated tags
After the tags are generated using the /api/analyze route, the next step is to save them back to the video object in your indexed library. This is done through a PUT API call that updates the video’s metadata in the Twelve Labs index.
⭐️ Check out details here for Twelve Labs’ Update Video Information API
This operation is handled by the updateVideoMetadata hook, which ultimately calls the backend route at api/videos/metadata/route.ts.
❗️To store your custom metadata, make sure to use the key user_metadata when updating each video.
api/videos/metadata/route.ts (line 1-68)
import { NextRequest, NextResponse } from 'next/server';
…


export async function PUT(request: NextRequest) {
 try {
   // Parse request body
   const body: MetadataUpdateRequest = await request.json();
   const { videoId, indexId, metadata } = body;
  …


   // Prepare API request
   const url = `${TWELVELABS_API_BASE_URL}/indexes/${indexId}/videos/${videoId}`;


   const requestBody = {
     user_metadata: {
       source: metadata.source || '',
       sector: metadata.sector || '',
       emotions: metadata.emotions || '',
       brands: metadata.brands || '',
       locations: metadata.locations || '',
       demographics: metadata.demographics || ''
     }
   };


   const options = {
     method: 'PUT',
     headers: {
       'Content-Type': 'application/json',
       'x-api-key': API_KEY,
     },
     body: JSON.stringify(requestBody)
   };


   // Call Twelve Labs API
   const response = await fetch(url, options);


…
🔁 Where it’s used
You’ll find this call inside processVideoMetadataSingle in page.tsx, like this:
ads-library/page.tsx (line 289-292)
 if (hashtagText) {
         const metadata = parseHashtags(hashtagText);


         await updateVideoMetadata(videoId, adsIndexId, metadata);
📌 What’s in the user_metadata?
The saved user_metadata object includes key fields like:
{
  "gender": "female",
  "age": "25-34",
  "topic": "beauty",
  "emotions": "happiness",
  "location": "Los Angeles",
  "brands": "Fenty Beauty"
This consistent format enables filter-by-category UX, search, and visual grouping in dashboards. These custom metadata are now embedded in the videos retrieved from Twelve Labs, so you can simply use a GET request to fetch each video and display the metadata as needed.
⭐️Check out details here for Twelve Labs’ Retrieve Video Information API
Main Feature 2. Search Similar videos (in ‘Contextual Alignment Analysis’)
The Contextual Alignment Analysis feature helps you find content videos that are most relevant to a selected ad by comparing video and text embeddings. These embeddings are:
Generated by Twelve Labs
Stored and queried via Pinecone for similarity search
To enable this, we must ensure that:
Embeddings exist for all content videos
Embeddings exist for the selected ad video
All embeddings are stored in the same Pinecone index
❗️When you index a video via Twelve Labs, embeddings are automatically generated and can be retrieved with a Retrieve Video Information API call.
Step 1 - Process Content Video Embeddings
Before performing similarity search, all content videos need their embeddings stored in Pinecone. This is handled by the client-side function processContentVideoEmbeddings().
💡 Internal Flow
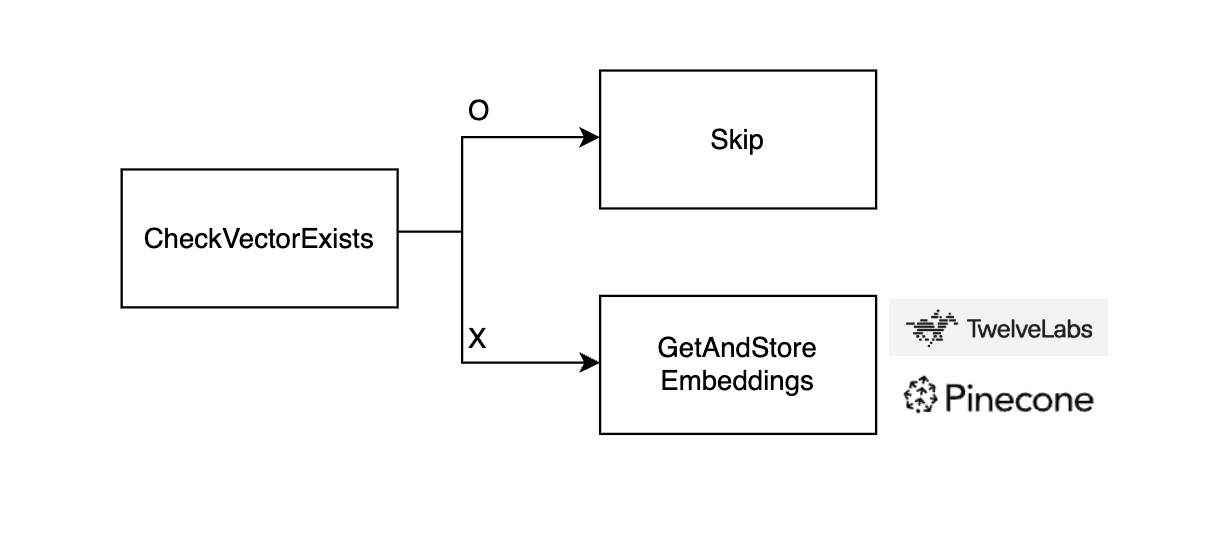
🔧 Core Functions
checkVectorExists Checks if the video’s embedding vector is already present in Pinecone. It internally calls the backend route.
api/vectors/exists (line 15-27)
   // Fetch vectors using metadata filter instead of direct ID
   const queryResponse = await index.query({
     vector: new Array(1024).fill(0),
     filter: {
       tl_video_id: videoId
     },
     topK: 1,
     includeMetadata: true
   });


   return NextResponse.json({
     exists: queryResponse.matches.length > 0
   });
If the embedding does not exist, getAndStoreEmbeddings:
Fetches the embedding from Twelve Labs (/api/videos/[videoId]?embed=true)
Stores it in Pinecone via /api/vectors/store
api/videos/[videoId] (line 77-95)
// Base URL
 let url = `${TWELVELABS_API_BASE_URL}/indexes/${indexId}/videos/${videoId}`;


 // Always include embedding query parameters if requested
 if (requestEmbeddings) {
   // Include only supported embedding options
   url += `?embedding_option=visual-text&embedding_option=audio`;
 }


 const options = {
   method: "GET",
   headers: {
     "x-api-key": `${API_KEY}`,
     "Accept": "application/json"
   },
 };


 try {
   const response = await fetch(url, options);
api/vectors/store (line 126-173)
// Create vectors from embedding segments
   const vectors = embedding.video_embedding.segments.map((segment: Segment, index: number) => {
     // Create a meaningful and unique vector ID
     const vectorId = `${vectorIdBase}_segment${index + 1}`;


     const vector = {
       id: vectorId,
       values: segment.float,
       metadata: {
         video_file: actualFileName,
         video_title: videoTitle,
         video_segment: index + 1,
         start_time: segment.start_offset_sec,
         end_time: segment.end_offset_sec,
         scope: segment.embedding_scope,
         tl_video_id: videoId,
         tl_index_id: indexId,
         category
       }
     };


     return vector;
   });


   try {
     const index = getPineconeIndex();


     // Upload vectors in batches
     const batchSize = 100;
     const totalBatches = Math.ceil(vectors.length / batchSize);


     console.log(`🚀 FILENAME DEBUG - Starting vector upload with ${totalBatches} batches...`);


     for (let i = 0; i < vectors.length; i += batchSize) {
       const batch = vectors.slice(i, i + batchSize);
       const batchNumber = Math.floor(i / batchSize) + 1;


       try {
         // Test Pinecone connection before upserting
         try {
           await index.describeIndexStats();
         } catch (statsError) {
           console.error(`❌ Pinecone connection test failed:`, statsError);
           throw new Error(`Failed to connect to Pinecone: ${statsError instanceof Error ? statsError.message : 'Unknown error'}`);
         }


         // Perform the actual upsert
         await index.upsert(batch);
Step 2 - Process Selected Ad Video Embedding
Once a user selects an ad, the app automatically checks whether its embedding is ready. This logic runs inside a useEffect() hook that watches the selected ad:
contextual-analysis/page.tsx (line 296-318)
// Automatically check ONLY the ad video embedding when a video is selected
 useEffect(() => {
   if (selectedVideoId && !isLoadingEmbeddings) {
     const cachedStatus = queryClient.getQueryData(['embeddingStatus', selectedVideoId]) as
       { checked: boolean, ready: boolean } | undefined;


     if (!cachedStatus?.checked) {
       setIsLoadingEmbeddings(true);


       ensureEmbeddings().then(success => {
         queryClient.setQueryData(['embeddingStatus', selectedVideoId], {
           checked: true,
           ready: success
         });


         setEmbeddingsReady(success);
         setIsLoadingEmbeddings(false);
       });
     } else {
       setEmbeddingsReady(cachedStatus.ready);
     }
   }
 }, [selectedVideoId, isLoadingEmbeddings, queryClient]);
🔧 Core Functions
ensureEmbeddings calls checkAndEnsureEmbeddings() to:
Check if embedding exists for the ad via checkVectorExists
If missing, generate and store it using getAndStoreEmbeddings
Optionally process all content videos in the same call
❗️The internal workings of checkVectorExists() and getAndStoreEmbeddings() were already explained in Step 1, so we refer to them here without repeating.
Step 3 - Similarity search in Pinecone + TL search
Once all video embeddings (ad + content) are in place, clicking the "Run Contextual Analysis" button runs two types of similarity searches in parallel:
Text-to-Video Search: Uses the textual tags (e.g. sector and emotions) of the selected ad to find semantically relevant content videos.
Video-to-Video Search: Uses the frame-level video embeddings of the selected ad to find visually/contextually similar content clips.
Both results are merged and scored, prioritizing matches found in both searches.
Text-to-Video Search
contextual-analysis/page.tsx (line 351-384)
const handleContextualAnalysis = async () => {
  …
     try {
       textResults = await textToVideoEmbeddingSearch(selectedVideoId, adsIndexId, contentIndexId);
      …
     try {
       videoResults = await videoToVideoEmbeddingSearch(selectedVideoId, adsIndexId, contentIndexId);
…
textToVideoEmbeddingSearch extracts sector and emotions tags, and the video title from the selected ad.
Sends them as text prompts to the api/embeddingSearch/textToVideo route.
Twelve Labs generates a text embedding, which is used to query Pinecone for semantically similar content videos.
api/embeddingSearch/textToVideo (line 20-45)
const { data: embedData } = await axios.post(url, formData, {
    …
   // extract embedding vector from text_embedding object
   const textEmbedding = embedData.text_embedding.segments[0].float;
…
   // Get index and search
   const searchResults = await index.query({
     vector: textEmbedding,
     filter: {
       // video_type: 'ad',
       tl_index_id: indexId,
       scope: 'clip'
     },
     topK: 10,
     includeMetadata: true,
   });
Video-to-Video Search
videoToVideoEmbeddingSearch finds the frame-level segments (vector values) of the selected ad.
For each segment, runs a similarity query against the content index in Pinecone.
Each result reflects a clip-level match in video embeddings.
api/embeddingSearch/videoToVideo (line 22-50)
// First, get the original video's clip embedding
   const originalClipQuery = await index.query({
     filter: {
       tl_video_id: videoId,
       scope: 'clip'
     },
     topK: 100,
     includeMetadata: true,
     includeValues: true,
     vector: new Array(1024).fill(0)
   });


   // If we found matching clips, search for similar ads for each match
   const similarResults = [];
   if (originalClipQuery.matches.length > 0) {
     for (const originalClip of originalClipQuery.matches) {
       const vectorValues = originalClip.values || new Array(1024).fill(0);
       const queryResult = await index.query({
         vector: vectorValues,
         filter: {
           tl_index_id: indexId,
           scope: 'clip'
         },
         topK: 5,
         includeMetadata: true,
       });
       similarResults.push(queryResult);
     }
   }
Merging Results
Results from both searches are merged by video ID. If a video appears in both searches, its score is boosted by 2x.
contextual-analysis/page.tsx (line 412-428)
 if (combinedResultsMap.has(videoId)) {
           // This is a match found in both searches - update it
           const existingResult = combinedResultsMap.get(videoId);


           // Apply a significant boost for results found in both searches (50% boost)
           const boostMultiplier = 2;


           // Combine the scores: use the max of both scores and apply the boost
           const maxScore = Math.max(existingResult.textScore, result.score);
           const boostedScore = maxScore * boostMultiplier;


           combinedResultsMap.set(videoId, {
             ...existingResult,
             videoScore: result.score,
             finalScore: boostedScore,  // Boosted score for appearing in both searches
             source: "BOTH"
           });
Main Feature 3. GENERATE chapters and implement ad break (in ‘Contextual Alignment Analysis’)
This feature enhances the contextual video recommendation experience by breaking selected content into meaningful chapters and inserting a relevant ad at the end of a selected chapter — simulating a real-world mid-roll ad break.
Step 1 - Auto-Generate Chapters of Selected Content
When a user opens the VideoModal, the app automatically calls the generateChapters API to segment the selected content video.
 // Fetch chapters data
 const { data: chaptersData, isLoading: isChaptersLoading } = useQuery({
   queryKey: ["chapters", videoId],
   queryFn: () => generateChapters(videoId),
   enabled: isOpen && !!videoId,
 });
Each chapter includes:
end: end time of the chapter (used as the ad cue point)
chapter_title: a generated short title
chapter_summary: a one-sentence description of the scene and why it’s a good ad break
These chapters are visualized on a chapter timeline bar, where each dot marks an end point. Clicking a dot simulates inserting an ad right before that chapter ends.
UX Behavior:
Dots appear as chapter end markers.
Clicking a dot triggers a "Show Ad" overlay at that cue point.
The ad is skippable and plays like a real mid-roll.
Server Logic: Chapter Generation via Twelve Labs
Chapters are generated using Twelve Labs' summarize endpoint with a custom prompt.
api/generateChapters (line 19-30)
 const url = `${TWELVELABS_API_BASE_URL}/summarize`;
     const options = {
         method: "POST",
         headers: {
             "Content-Type": "application/json",
             "x-api-key": `${API_KEY}`,
           },
           body: JSON.stringify({type: "chapter", video_id: videoId, prompt: "Chapterize this video into 3 chapters. For every chapter, describe why it is a strategically appropriate point for placing an advertisement. Do not mention what type of advertisement would be suitable, as the ad content has already been determined. "})
       };


     try {
       const response = await fetch(url, options);
Client-side Helper: generateChapters
Used by React Query to fetch chapter data:
export const generateChapters = async (videoId: string): Promise<ChaptersData> => {
 try {
   const response = await fetch(`/api/generateChapters?videoId=${videoId}`);
Step 2 - Insert and Play Ad at Selected Chapter Break
When a user clicks on a chapter marker:
The content video seeks to 3 seconds before the chapter ends.
When playback reaches the chapter’s end time, the app transitions into an ad playback sequence.
After the ad finishes, the original content resumes from just after the chapter break.
Chapter Marker Click Logic
When a chapter marker is clicked, the player seeks to just before that chapter ends, setting the stage for a mid-roll ad.
 // Chapter click handler
 const handleChapterClick = (index: number) => {
   if (playbackSequence === 'ad') {
     return;
   }


   if (!adVideoDetail?.hls?.video_url) {
     console.warn("No ad selected. Please select an ad in the contextual analysis page.");
     return;
   }


   if (!chaptersData) return;


   const chapter = chaptersData.chapters[index];
   setSelectedChapter(index);
   setHasPlayedAd(false);
   setPlaybackSequence('video');
   setShowChapterInfo(true);


   if (playerRef.current) {
     // Start 3 seconds before the chapter end time
     const startTime = Math.max(0, chapter.end - 3);
     playerRef.current.seekTo(startTime, 'seconds');
   }
 };
Progress Monitoring – Trigger Ad at Chapter End
While the content is playing, the app checks if the current play time has reached a chapter endpoint and switches to ad playback if conditions are met.
 // Track video progress
 const handleProgress = (state: { playedSeconds: number }) => {
   if (selectedChapter === null || !chaptersData || !adVideoDetail) {
     return;
   }


   const chapter = chaptersData.chapters[selectedChapter];
   const timeDiff = state.playedSeconds - chapter.end;
   const isLastChapter = selectedChapter === chaptersData.chapters.length - 1;


   if (
     playbackSequence === 'video' &&
     !hasPlayedAd &&
     ((isLastChapter && Math.abs(timeDiff) < 0.5) || (!isLastChapter && timeDiff >= 0))
   ) {
     setPlaybackSequence('ad');
     setHasPlayedAd(true);
   }
 };
Ad Playback & Resume Content
After the ad finishes, the app automatically resumes the content from where the chapter left off.
 // Ad ended handler
 const handleAdEnded = () => {
   if (selectedChapter === null || !chaptersData) return;
   const chapter = chaptersData.chapters[selectedChapter];
   setPlaybackSequence('video');
   setReturnToTime(chapter.end);
   setIsPlaying(true);
 };
This creates an immersive, chapter-aware viewing experience with smart ad insertions aligned to meaningful content breaks — ideal for showcasing contextually relevant ads at natural pause points.
Conclusion
In this tutorial, we walked through the full flow of Contextual Analysis — from generating and storing video embeddings, to running similarity searches, and finally simulating mid-roll ad insertions using chapter segmentation. By combining Twelve Labs’ multimodal embeddings with Pinecone’s vector filtering, you can deliver smart, content-aware ad experiences. This foundation can be further extended for real-time targeting, A/B testing, or personalized ad delivery at scale.
Introduction
Viewers are often overwhelmed by irrelevant ads that don’t align with the content they’re watching. This disconnect leads to frustration and makes ads feel intrusive or poorly timed.
The Brand Integration Assistant & Ad Break Finder App solves this by delivering contextually relevant ad recommendations—ensuring the right message reaches the right audience at the right moment of engagement.
In this tutorial, you’ll learn how the app works across its core features:
Automatic Tag Generation: Each uploaded ad is analyzed to generate rich metadata—Topic Category, Emotions, Brands, Target Demographics (Gender & Age), and Location—enabling smart filtering, search, and content matching.
Search for Contextually Aligned Content: Use AI-powered similarity search to find content videos that are semantically aligned with your ad, based on both video and text embeddings.
Ad Break Recommendation & Simulation: Automatically segment content into chapters and simulate mid-roll ad insertions - creating a seamless, immersive ad experience.
Prerequisites
Sign up for the Twelve Labs Playground and generate your API key and create two indexes each for ads and content videos.
Set up a Pinecone account and create an index to store video embeddings.
Make sure to set Dimensions to 1024 and Metric to Cosine
Find the application’s source code in the corresponding GitHub repository.
It’s helpful to have familiarity with JavaScript, TypeScript, and Next.js for a smoother setup and development experience.
Demo
Check out the demo application to try it yourself, or watch the quick demo video below to see how it works in action: https://www.loom.com/share/233cc8cb66ae44218e3cff69afb772d7
You can watch the webinar recording below for the entire demo:
How the App Works
Once inside the app, users will find two main menus: Ads Library and Contextual Alignment Analysis.
Ads Library - The Ads Library provides brand marketers with an organized view of their ad videos, each enriched with automatically generated tags. Users can filter ads by Topic Category, Emotions, Brands, Gender, Age, and Location, or search by short-tail or long-tail keywords using the Twelve Labs Search API. In this tutorial, we’ll focus on the auto-tag generation feature within the Ads Library.
Contextual Alignment Analysis - This section enables users to find the most contextually relevant content videos for each ad. Powered by Twelve Labs EMBED and GET video API (for tag and video embeddings) and Pinecone (for similarity-based filtering), it surfaces highly aligned content.
Users can then select a content video, generate auto-chapters for ad break insertion, and simulate ad playback at chapter transitions.
The following tutorial will walk through both the content matching and ad simulation features in detail.
Three Main Features of the App and How They Work
Main Feature 1. Automatic Tag Generation (in ‘Ads Library’)
The Ads Library allows users to browse a collection of indexed videos and view their auto-generated tags. These tags help categorize videos by topic, emotion, brand, demographics, and more — all extracted using Twelve Labs' Analyze API.
Step 1 - Generate tags of each video
When a video is loaded and determined to have incomplete or missing metadata, the system calls generateMetadata to obtain tags using Twelve Labs' Analyze API.
⭐️Check out details here for Twelve Labs’ Analyze API
🔁 Where it’s used
You’ll find this call inside processVideoMetadataSingle in page.tsx, like this:
ads-library/page.ts (line 279-290)
     if (!video.user_metadata ||
         Object.keys(video.user_metadata).length === 0 ||
          !video.user_metadata.topic_category &&
          !video.user_metadata.emotions &&
          !video.user_metadata.brands &&
          !video.user_metadata.locations)) {


       setVideosInProcessing(prev => [...prev, videoId]);


       const hashtagText = await generateMetadata(videoId);


       if (hashtagText) {
         const metadata = parseHashtags(hashtagText);
The generateMetadata function is a custom hook that triggers a server-side API call to request AI-generated tags from the Twelve Labs engine.
This triggers the backend handler in api/analyze/route.ts, which constructs a structured and specific prompt for the Twelve Labs analyze API. The prompt ensures that the returned data is well-categorized and consistently formatted — making it easy to convert into tags and display them in the Filter Menu. Here’s the key part of the backend route:
api/analyze/route.ts (line 1 - 85)
import { NextResponse } from 'next/server';


const API_KEY = process.env.TWELVELABS_API_KEY;
const TWELVELABS_API_BASE_URL = process.env.TWELVELABS_API_BASE_URL;


export const maxDuration = 60;


export async function GET(req: Request) {
   const { searchParams } = new URL(req.url);
   const videoId = searchParams.get("videoId");
   const prompt =
   `You are a marketing assistant specialized in generating hashtags for video content.


Based on the input video metadata, generate a list of hashtags labeled by category.


**Output Format:**
Each line must be in the format:
[Category]: [Hashtag]
(e.g., sector: #beauty)


**Allowed Values:**


Gender: Male, Female
Age: 18-25, 25-34, 35-44, 45-54, 55+
Topic: Beauty, Fashion, Tech, Travel, CPG, Food & Bev, Retail, Other
Emotions: sorrow, happiness, laughter, anger, empathy, fear, love, trust, sadness, belonging, guilt, compassion, pride


**Instructions:**


1. Use only the values provided in Allowed Values.
2. Do not invent new values except for Brands and Location. Only use values from the Allowed Values.
3. Output must contain at least one hashtag for each of the following categories:
 - Gender
 - Age
 - Topic
 - Emotions
 - Location
 - Brands


4. Do not output any explanations or category names—only return the final hashtag list.


**Output Example:**


Gender: female
Age: 25-34
Topic: beauty
Emotions: happiness
Location: Los Angeles
Brands: Fenty Beauty


---
`


  …


   const url = `${TWELVELABS_API_BASE_URL}/analyze`;
   const options = {
       method: "POST",
       headers: {
           "Content-Type": "application/json",
           "x-api-key": API_KEY,
       },
       body: JSON.stringify({
           prompt: prompt,
           video_id: videoId,
           stream: false
       })
   };


   try {
     const response = await fetch(url, options);
…
Step 2 - PUT each video to save generated tags
After the tags are generated using the /api/analyze route, the next step is to save them back to the video object in your indexed library. This is done through a PUT API call that updates the video’s metadata in the Twelve Labs index.
⭐️ Check out details here for Twelve Labs’ Update Video Information API
This operation is handled by the updateVideoMetadata hook, which ultimately calls the backend route at api/videos/metadata/route.ts.
❗️To store your custom metadata, make sure to use the key user_metadata when updating each video.
api/videos/metadata/route.ts (line 1-68)
import { NextRequest, NextResponse } from 'next/server';
…


export async function PUT(request: NextRequest) {
 try {
   // Parse request body
   const body: MetadataUpdateRequest = await request.json();
   const { videoId, indexId, metadata } = body;
  …


   // Prepare API request
   const url = `${TWELVELABS_API_BASE_URL}/indexes/${indexId}/videos/${videoId}`;


   const requestBody = {
     user_metadata: {
       source: metadata.source || '',
       sector: metadata.sector || '',
       emotions: metadata.emotions || '',
       brands: metadata.brands || '',
       locations: metadata.locations || '',
       demographics: metadata.demographics || ''
     }
   };


   const options = {
     method: 'PUT',
     headers: {
       'Content-Type': 'application/json',
       'x-api-key': API_KEY,
     },
     body: JSON.stringify(requestBody)
   };


   // Call Twelve Labs API
   const response = await fetch(url, options);


…
🔁 Where it’s used
You’ll find this call inside processVideoMetadataSingle in page.tsx, like this:
ads-library/page.tsx (line 289-292)
 if (hashtagText) {
         const metadata = parseHashtags(hashtagText);


         await updateVideoMetadata(videoId, adsIndexId, metadata);
📌 What’s in the user_metadata?
The saved user_metadata object includes key fields like:
{
  "gender": "female",
  "age": "25-34",
  "topic": "beauty",
  "emotions": "happiness",
  "location": "Los Angeles",
  "brands": "Fenty Beauty"
This consistent format enables filter-by-category UX, search, and visual grouping in dashboards. These custom metadata are now embedded in the videos retrieved from Twelve Labs, so you can simply use a GET request to fetch each video and display the metadata as needed.
⭐️Check out details here for Twelve Labs’ Retrieve Video Information API
Main Feature 2. Search Similar videos (in ‘Contextual Alignment Analysis’)
The Contextual Alignment Analysis feature helps you find content videos that are most relevant to a selected ad by comparing video and text embeddings. These embeddings are:
Generated by Twelve Labs
Stored and queried via Pinecone for similarity search
To enable this, we must ensure that:
Embeddings exist for all content videos
Embeddings exist for the selected ad video
All embeddings are stored in the same Pinecone index
❗️When you index a video via Twelve Labs, embeddings are automatically generated and can be retrieved with a Retrieve Video Information API call.
Step 1 - Process Content Video Embeddings
Before performing similarity search, all content videos need their embeddings stored in Pinecone. This is handled by the client-side function processContentVideoEmbeddings().
💡 Internal Flow
🔧 Core Functions
checkVectorExists Checks if the video’s embedding vector is already present in Pinecone. It internally calls the backend route.
api/vectors/exists (line 15-27)
   // Fetch vectors using metadata filter instead of direct ID
   const queryResponse = await index.query({
     vector: new Array(1024).fill(0),
     filter: {
       tl_video_id: videoId
     },
     topK: 1,
     includeMetadata: true
   });


   return NextResponse.json({
     exists: queryResponse.matches.length > 0
   });
If the embedding does not exist, getAndStoreEmbeddings:
Fetches the embedding from Twelve Labs (/api/videos/[videoId]?embed=true)
Stores it in Pinecone via /api/vectors/store
api/videos/[videoId] (line 77-95)
// Base URL
 let url = `${TWELVELABS_API_BASE_URL}/indexes/${indexId}/videos/${videoId}`;


 // Always include embedding query parameters if requested
 if (requestEmbeddings) {
   // Include only supported embedding options
   url += `?embedding_option=visual-text&embedding_option=audio`;
 }


 const options = {
   method: "GET",
   headers: {
     "x-api-key": `${API_KEY}`,
     "Accept": "application/json"
   },
 };


 try {
   const response = await fetch(url, options);
api/vectors/store (line 126-173)
// Create vectors from embedding segments
   const vectors = embedding.video_embedding.segments.map((segment: Segment, index: number) => {
     // Create a meaningful and unique vector ID
     const vectorId = `${vectorIdBase}_segment${index + 1}`;


     const vector = {
       id: vectorId,
       values: segment.float,
       metadata: {
         video_file: actualFileName,
         video_title: videoTitle,
         video_segment: index + 1,
         start_time: segment.start_offset_sec,
         end_time: segment.end_offset_sec,
         scope: segment.embedding_scope,
         tl_video_id: videoId,
         tl_index_id: indexId,
         category
       }
     };


     return vector;
   });


   try {
     const index = getPineconeIndex();


     // Upload vectors in batches
     const batchSize = 100;
     const totalBatches = Math.ceil(vectors.length / batchSize);


     console.log(`🚀 FILENAME DEBUG - Starting vector upload with ${totalBatches} batches...`);


     for (let i = 0; i < vectors.length; i += batchSize) {
       const batch = vectors.slice(i, i + batchSize);
       const batchNumber = Math.floor(i / batchSize) + 1;


       try {
         // Test Pinecone connection before upserting
         try {
           await index.describeIndexStats();
         } catch (statsError) {
           console.error(`❌ Pinecone connection test failed:`, statsError);
           throw new Error(`Failed to connect to Pinecone: ${statsError instanceof Error ? statsError.message : 'Unknown error'}`);
         }


         // Perform the actual upsert
         await index.upsert(batch);
Step 2 - Process Selected Ad Video Embedding
Once a user selects an ad, the app automatically checks whether its embedding is ready. This logic runs inside a useEffect() hook that watches the selected ad:
contextual-analysis/page.tsx (line 296-318)
// Automatically check ONLY the ad video embedding when a video is selected
 useEffect(() => {
   if (selectedVideoId && !isLoadingEmbeddings) {
     const cachedStatus = queryClient.getQueryData(['embeddingStatus', selectedVideoId]) as
       { checked: boolean, ready: boolean } | undefined;


     if (!cachedStatus?.checked) {
       setIsLoadingEmbeddings(true);


       ensureEmbeddings().then(success => {
         queryClient.setQueryData(['embeddingStatus', selectedVideoId], {
           checked: true,
           ready: success
         });


         setEmbeddingsReady(success);
         setIsLoadingEmbeddings(false);
       });
     } else {
       setEmbeddingsReady(cachedStatus.ready);
     }
   }
 }, [selectedVideoId, isLoadingEmbeddings, queryClient]);
🔧 Core Functions
ensureEmbeddings calls checkAndEnsureEmbeddings() to:
Check if embedding exists for the ad via checkVectorExists
If missing, generate and store it using getAndStoreEmbeddings
Optionally process all content videos in the same call
❗️The internal workings of checkVectorExists() and getAndStoreEmbeddings() were already explained in Step 1, so we refer to them here without repeating.
Step 3 - Similarity search in Pinecone + TL search
Once all video embeddings (ad + content) are in place, clicking the "Run Contextual Analysis" button runs two types of similarity searches in parallel:
Text-to-Video Search: Uses the textual tags (e.g. sector and emotions) of the selected ad to find semantically relevant content videos.
Video-to-Video Search: Uses the frame-level video embeddings of the selected ad to find visually/contextually similar content clips.
Both results are merged and scored, prioritizing matches found in both searches.
Text-to-Video Search
contextual-analysis/page.tsx (line 351-384)
const handleContextualAnalysis = async () => {
  …
     try {
       textResults = await textToVideoEmbeddingSearch(selectedVideoId, adsIndexId, contentIndexId);
      …
     try {
       videoResults = await videoToVideoEmbeddingSearch(selectedVideoId, adsIndexId, contentIndexId);
…
textToVideoEmbeddingSearch extracts sector and emotions tags, and the video title from the selected ad.
Sends them as text prompts to the api/embeddingSearch/textToVideo route.
Twelve Labs generates a text embedding, which is used to query Pinecone for semantically similar content videos.
api/embeddingSearch/textToVideo (line 20-45)
const { data: embedData } = await axios.post(url, formData, {
    …
   // extract embedding vector from text_embedding object
   const textEmbedding = embedData.text_embedding.segments[0].float;
…
   // Get index and search
   const searchResults = await index.query({
     vector: textEmbedding,
     filter: {
       // video_type: 'ad',
       tl_index_id: indexId,
       scope: 'clip'
     },
     topK: 10,
     includeMetadata: true,
   });
Video-to-Video Search
videoToVideoEmbeddingSearch finds the frame-level segments (vector values) of the selected ad.
For each segment, runs a similarity query against the content index in Pinecone.
Each result reflects a clip-level match in video embeddings.
api/embeddingSearch/videoToVideo (line 22-50)
// First, get the original video's clip embedding
   const originalClipQuery = await index.query({
     filter: {
       tl_video_id: videoId,
       scope: 'clip'
     },
     topK: 100,
     includeMetadata: true,
     includeValues: true,
     vector: new Array(1024).fill(0)
   });


   // If we found matching clips, search for similar ads for each match
   const similarResults = [];
   if (originalClipQuery.matches.length > 0) {
     for (const originalClip of originalClipQuery.matches) {
       const vectorValues = originalClip.values || new Array(1024).fill(0);
       const queryResult = await index.query({
         vector: vectorValues,
         filter: {
           tl_index_id: indexId,
           scope: 'clip'
         },
         topK: 5,
         includeMetadata: true,
       });
       similarResults.push(queryResult);
     }
   }
Merging Results
Results from both searches are merged by video ID. If a video appears in both searches, its score is boosted by 2x.
contextual-analysis/page.tsx (line 412-428)
 if (combinedResultsMap.has(videoId)) {
           // This is a match found in both searches - update it
           const existingResult = combinedResultsMap.get(videoId);


           // Apply a significant boost for results found in both searches (50% boost)
           const boostMultiplier = 2;


           // Combine the scores: use the max of both scores and apply the boost
           const maxScore = Math.max(existingResult.textScore, result.score);
           const boostedScore = maxScore * boostMultiplier;


           combinedResultsMap.set(videoId, {
             ...existingResult,
             videoScore: result.score,
             finalScore: boostedScore,  // Boosted score for appearing in both searches
             source: "BOTH"
           });
Main Feature 3. GENERATE chapters and implement ad break (in ‘Contextual Alignment Analysis’)
This feature enhances the contextual video recommendation experience by breaking selected content into meaningful chapters and inserting a relevant ad at the end of a selected chapter — simulating a real-world mid-roll ad break.
Step 1 - Auto-Generate Chapters of Selected Content
When a user opens the VideoModal, the app automatically calls the generateChapters API to segment the selected content video.
 // Fetch chapters data
 const { data: chaptersData, isLoading: isChaptersLoading } = useQuery({
   queryKey: ["chapters", videoId],
   queryFn: () => generateChapters(videoId),
   enabled: isOpen && !!videoId,
 });
Each chapter includes:
end: end time of the chapter (used as the ad cue point)
chapter_title: a generated short title
chapter_summary: a one-sentence description of the scene and why it’s a good ad break
These chapters are visualized on a chapter timeline bar, where each dot marks an end point. Clicking a dot simulates inserting an ad right before that chapter ends.
UX Behavior:
Dots appear as chapter end markers.
Clicking a dot triggers a "Show Ad" overlay at that cue point.
The ad is skippable and plays like a real mid-roll.
Server Logic: Chapter Generation via Twelve Labs
Chapters are generated using Twelve Labs' summarize endpoint with a custom prompt.
api/generateChapters (line 19-30)
 const url = `${TWELVELABS_API_BASE_URL}/summarize`;
     const options = {
         method: "POST",
         headers: {
             "Content-Type": "application/json",
             "x-api-key": `${API_KEY}`,
           },
           body: JSON.stringify({type: "chapter", video_id: videoId, prompt: "Chapterize this video into 3 chapters. For every chapter, describe why it is a strategically appropriate point for placing an advertisement. Do not mention what type of advertisement would be suitable, as the ad content has already been determined. "})
       };


     try {
       const response = await fetch(url, options);
Client-side Helper: generateChapters
Used by React Query to fetch chapter data:
export const generateChapters = async (videoId: string): Promise<ChaptersData> => {
 try {
   const response = await fetch(`/api/generateChapters?videoId=${videoId}`);
Step 2 - Insert and Play Ad at Selected Chapter Break
When a user clicks on a chapter marker:
The content video seeks to 3 seconds before the chapter ends.
When playback reaches the chapter’s end time, the app transitions into an ad playback sequence.
After the ad finishes, the original content resumes from just after the chapter break.
Chapter Marker Click Logic
When a chapter marker is clicked, the player seeks to just before that chapter ends, setting the stage for a mid-roll ad.
 // Chapter click handler
 const handleChapterClick = (index: number) => {
   if (playbackSequence === 'ad') {
     return;
   }


   if (!adVideoDetail?.hls?.video_url) {
     console.warn("No ad selected. Please select an ad in the contextual analysis page.");
     return;
   }


   if (!chaptersData) return;


   const chapter = chaptersData.chapters[index];
   setSelectedChapter(index);
   setHasPlayedAd(false);
   setPlaybackSequence('video');
   setShowChapterInfo(true);


   if (playerRef.current) {
     // Start 3 seconds before the chapter end time
     const startTime = Math.max(0, chapter.end - 3);
     playerRef.current.seekTo(startTime, 'seconds');
   }
 };
Progress Monitoring – Trigger Ad at Chapter End
While the content is playing, the app checks if the current play time has reached a chapter endpoint and switches to ad playback if conditions are met.
 // Track video progress
 const handleProgress = (state: { playedSeconds: number }) => {
   if (selectedChapter === null || !chaptersData || !adVideoDetail) {
     return;
   }


   const chapter = chaptersData.chapters[selectedChapter];
   const timeDiff = state.playedSeconds - chapter.end;
   const isLastChapter = selectedChapter === chaptersData.chapters.length - 1;


   if (
     playbackSequence === 'video' &&
     !hasPlayedAd &&
     ((isLastChapter && Math.abs(timeDiff) < 0.5) || (!isLastChapter && timeDiff >= 0))
   ) {
     setPlaybackSequence('ad');
     setHasPlayedAd(true);
   }
 };
Ad Playback & Resume Content
After the ad finishes, the app automatically resumes the content from where the chapter left off.
 // Ad ended handler
 const handleAdEnded = () => {
   if (selectedChapter === null || !chaptersData) return;
   const chapter = chaptersData.chapters[selectedChapter];
   setPlaybackSequence('video');
   setReturnToTime(chapter.end);
   setIsPlaying(true);
 };
This creates an immersive, chapter-aware viewing experience with smart ad insertions aligned to meaningful content breaks — ideal for showcasing contextually relevant ads at natural pause points.
Conclusion
In this tutorial, we walked through the full flow of Contextual Analysis — from generating and storing video embeddings, to running similarity searches, and finally simulating mid-roll ad insertions using chapter segmentation. By combining Twelve Labs’ multimodal embeddings with Pinecone’s vector filtering, you can deliver smart, content-aware ad experiences. This foundation can be further extended for real-time targeting, A/B testing, or personalized ad delivery at scale.
Related articles


Platform
Enterprise
© 2021
-
2026
TwelveLabs, Inc. All Rights Reserved

Platform
Enterprise
© 2021
-
2026
TwelveLabs, Inc. All Rights Reserved


Platform
Enterprise
© 2021
-
2026
TwelveLabs, Inc. All Rights Reserved