" height="1.90314px" id="wtDTm6bEW" transform="translate(26.225 0)" width="2.4723000000000006px"/><path d="M 0.557 0 L 1.438 0 C 1.746 0 1.995 0.25 1.995 0.559 L 1.995 1.344 C 1.995 1.653 1.746 1.903 1.438 1.903 L 0.557 1.903 C 0.25 1.903 0 1.653 0 1.344 L 0 0.559 C 0 0.25 0.25 0 0.557 0 Z" fill="rgb(29, 28, 27)" height="1.9031500000000001px" id="GnmDnNra_" transform="translate(36.408 2.728)" width="1.9953000000000003px"/><path d="M 6.224 0 L 0.558 0 C 0.25 0 0 0.25 0 0.559 L 0 1.344 C 0 1.653 0.25 1.903 0.558 1.903 L 6.224 1.903 C 6.531 1.903 6.781 1.653 6.781 1.344 L 6.781 0.559 C 6.781 0.25 6.531 0 6.224 0 Z" fill="rgb(29, 28, 27)" height="1.9031500000000001px" id="hKTQ3dbw4" transform="translate(34.261 5.456)" width="6.781100000000002px"/><path d="M 6.955 0 L 0.558 0 C 0.25 0 0 0.25 0 0.559 L 0 1.344 C 0 1.653 0.25 1.903 0.558 1.903 L 6.955 1.903 C 7.263 1.903 7.513 1.653 7.513 1.344 L 7.513 0.559 C 7.513 0.25 7.263 0 6.955 0 Z" fill="rgb(29, 28, 27)" height="1.9031500000000001px" id="G1Zzk9CUU" transform="translate(28.298 8.243)" width="7.513100000000001px"/><path d="M 7.123 0 L 0.558 0 C 0.25 0 0 0.25 0 0.559 L 0 1.344 C 0 1.653 0.25 1.903 0.558 1.903 L 7.123 1.903 C 7.431 1.903 7.681 1.653 7.681 1.344 L 7.681 0.559 C 7.681 0.25 7.431 0 7.123 0 Z" fill="rgb(29, 28, 27)" height="1.9030999999999985px" id="fm7cHxIfJ" transform="translate(0 10.972)" width="7.68067px"/><path d="M 13.447 0 L 0.558 0 C 0.25 0 0 0.25 0 0.559 L 0 1.344 C 0 1.653 0.25 1.903 0.558 1.903 L 13.447 1.903 C 13.755 1.903 14.004 1.653 14.004 1.344 L 14.004 0.559 C 14.004 0.25 13.755 0 13.447 0 Z" fill="rgb(29, 28, 27)" height="1.9030999999999985px" id="LowSwDrtg" transform="translate(9.552 10.972)" width="14.0044px"/><path d="M 0.558 0 L 8.212 0 C 8.52 0 8.77 0.25 8.77 0.559 L 8.77 1.344 C 8.77 1.653 8.52 1.903 8.212 1.903 L 0.558 1.903 C 0.25 1.903 0 1.653 0 1.344 L 0 0.559 C 0 0.25 0.25 0 0.558 0 Z" fill="rgb(29, 28, 27)" height="1.9030999999999985px" id="xRiKc2od7" transform="translate(27.041 10.972)" width="8.769900000000003px"/><path d="M 0.557 0 L 5.4 0 C 5.708 0 5.958 0.25 5.958 0.559 L 5.958 1.344 C 5.958 1.653 5.708 1.903 5.4 1.903 L 0.557 1.903 C 0.25 1.903 0 1.653 0 1.344 L 0 0.559 C 0 0.25 0.25 0 0.557 0 Z" fill="rgb(29, 28, 27)" height="1.9031500000000001px" id="JWdNVicde" transform="translate(36.796 8.243)" width="5.957599999999999px"/><path d="M 1.438 0 L 0.558 0 C 0.25 0 0 0.25 0 0.559 L 0 1.344 C 0 1.653 0.25 1.903 0.558 1.903 L 1.438 1.903 C 1.746 1.903 1.995 1.653 1.995 1.344 L 1.995 0.559 C 1.995 0.25 1.746 0 1.438 0 Z" fill="rgb(29, 28, 27)" height="1.9031500000000001px" id="RfFYVCT_T" transform="translate(28.717 5.456)" width="1.9953000000000003px"/><path d="M 0.558 0 L 2.895 0 C 3.203 0 3.453 0.25 3.453 0.559 L 3.453 1.406 C 3.453 1.714 3.203 1.964 2.895 1.964 L 0.558 1.964 C 0.25 1.964 0 1.714 0 1.406 L 0 0.559 C 0 0.25 0.25 0 0.558 0 Z" fill="rgb(29, 28, 27)" height="1.964299999999998px" id="dngJ6MU2p" transform="translate(16.183 24.582)" width="3.4525000000000006px"/><path d="M 1.706 0 L 0.558 0 C 0.25 0 0 0.25 0 0.559 L 0 1.406 C 0 1.714 0.25 1.964 0.558 1.964 L 1.706 1.964 C 2.014 1.964 2.263 1.714 2.263 1.406 L 2.263 0.559 C 2.263 0.25 2.014 0 1.706 0 Z" fill="rgb(29, 28, 27)" height="1.964299999999998px" id="N_fstvKmR" transform="translate(22.18 24.582)" width="2.2631999999999977px"/><path d="M 0.558 0 L 5.544 0 C 5.852 0 6.101 0.25 6.101 0.559 L 6.101 1.406 C 6.101 1.714 5.852 1.964 5.544 1.964 L 0.558 1.964 C 0.25 1.964 0 1.714 0 1.406 L 0 0.559 C 0 0.25 0.25 0 0.558 0 Z" fill="rgb(29, 28, 27)" height="1.964299999999998px" id="t55XLYcgb" transform="translate(25.486 24.582)" width="6.101399999999998px"/><path d="M 1.976 0 L 0.558 0 C 0.25 0 0 0.25 0 0.559 L 0 1.406 C 0 1.714 0.25 1.964 0.558 1.964 L 1.976 1.964 C 2.284 1.964 2.533 1.714 2.533 1.406 L 2.533 0.559 C 2.533 0.25 2.284 0 1.976 0 Z" fill="rgb(29, 28, 27)" height="1.964299999999998px" id="ZrEKTVTAe" transform="translate(28.542 21.854)" width="2.5334000000000003px"/><path d="M 0.557 0 L 1.438 0 C 1.746 0 1.995 0.25 1.995 0.559 L 1.995 1.406 C 1.995 1.714 1.746 1.964 1.438 1.964 L 0.557 1.964 C 0.25 1.964 0 1.714 0 1.406 L 0 0.559 C 0 0.25 0.25 0 0.557 0 Z" fill="rgb(29, 28, 27)" height="1.964299999999998px" id="Z0fPTp9aR" transform="translate(11.425 24.582)" width="1.9953000000000003px"/><path d="M 0 0.559 C 0 0.251 0.251 0 0.558 0 L 1.438 0 C 1.745 0 1.995 0.251 1.995 0.559 L 1.995 1.405 C 1.995 1.713 1.745 1.964 1.438 1.964 L 0.558 1.964 C 0.251 1.964 0 1.713 0 1.405 Z" fill="rgb(29, 28, 27)" height="1.964299999999998px" id="Tj_PDHFDh" transform="translate(20.635 27.308)" width="1.9954px"/><path d="M 0.557 0 L 1.342 0 C 1.65 0 1.899 0.25 1.899 0.559 L 1.899 1.406 C 1.899 1.714 1.65 1.964 1.342 1.964 L 0.557 1.964 C 0.25 1.964 0 1.714 0 1.406 L 0 0.559 C 0 0.25 0.25 0 0.557 0 Z" fill="rgb(29, 28, 27)" height="1.9643000000000015px" id="AYq9dXkKz" transform="translate(18.686 30.036)" width="1.8994px"/><path d="M 0.558 0 L 5.768 0 C 6.076 0 6.326 0.25 6.326 0.559 L 6.326 1.344 C 6.326 1.653 6.076 1.903 5.768 1.903 L 0.558 1.903 C 0.25 1.903 0 1.653 0 1.344 L 0 0.559 C 0 0.25 0.25 0 0.558 0 Z" fill="rgb(29, 28, 27)" height="1.9031500000000001px" id="rspevfJcx" transform="translate(12.157 8.243)" width="6.325900000000001px"/><path d="M 3.285 0 L 0.558 0 C 0.25 0 0 0.25 0 0.559 L 0 1.344 C 0 1.653 0.25 1.903 0.558 1.903 L 3.285 1.903 C 3.593 1.903 3.842 1.653 3.842 1.344 L 3.842 0.559 C 3.842 0.25 3.593 0 3.285 0 Z" fill="rgb(29, 28, 27)" height="1.9031500000000001px" id="XRUAhGnph" transform="translate(23.887 2.728)" width="3.8424000000000014px"/><path d="M 0.558 0 L 5.644 0 C 5.952 0 6.202 0.25 6.202 0.559 L 6.202 1.344 C 6.202 1.653 5.952 1.903 5.644 1.903 L 0.558 1.903 C 0.25 1.903 0 1.653 0 1.344 L 0 0.559 C 0 0.25 0.25 0 0.558 0 Z" fill="rgb(29, 28, 27)" height="1.9031500000000001px" id="VsaVVIfke" transform="translate(21.528 5.456)" width="6.201600000000003px"/><path d="M 3.06 0 L 0.558 0 C 0.25 0 0 0.25 0 0.559 L 0 1.344 C 0 1.653 0.25 1.903 0.558 1.903 L 3.06 1.903 C 3.369 1.903 3.618 1.653 3.618 1.344 L 3.618 0.559 C 3.618 0.25 3.369 0 3.06 0 Z" fill="rgb(29, 28, 27)" height="1.9030999999999985px" id="wiAKEgyId" transform="translate(40.819 10.972)" width="3.6182000000000016px"/><path d="M 0.558 0 L 17.318 0 C 17.626 0 17.875 0.25 17.875 0.559 L 17.875 1.345 C 17.875 1.653 17.626 1.903 17.318 1.903 L 0.558 1.903 C 0.25 1.903 0 1.653 0 1.345 L 0 0.559 C 0 0.25 0.25 0 0.558 0 Z" fill="rgb(29, 28, 27)" height="1.9032px" id="FIE0ufK9m" transform="translate(6.666 13.7)" width="17.87506px"/><path d="M 6.426 0 L 0.558 0 C 0.25 0 0 0.25 0 0.559 L 0 1.345 C 0 1.653 0.25 1.903 0.558 1.903 L 6.426 1.903 C 6.734 1.903 6.984 1.653 6.984 1.345 L 6.984 0.559 C 6.984 0.25 6.734 0 6.426 0 Z" fill="rgb(29, 28, 27)" height="1.9032000000000018px" id="ut9UWny3L" transform="translate(22.892 19.156)" width="6.983599999999999px"/><path d="M 0.558 0 L 22.151 0 C 22.459 0 22.709 0.25 22.709 0.559 L 22.709 1.344 C 22.709 1.653 22.459 1.903 22.151 1.903 L 0.558 1.903 C 0.25 1.903 0 1.653 0 1.344 L 0 0.559 C 0 0.25 0.25 0 0.558 0 Z" fill="rgb(29, 28, 27)" height="1.9030999999999985px" id="VULnffgbk" transform="translate(9.552 16.428)" width="22.7089px"/><path d="M 7.886 0 L 0.558 0 C 0.25 0 0 0.25 0 0.559 L 0 1.345 C 0 1.653 0.25 1.903 0.558 1.903 L 7.886 1.903 C 8.194 1.903 8.443 1.653 8.443 1.345 L 8.443 0.559 C 8.443 0.25 8.194 0 7.886 0 Z" fill="rgb(29, 28, 27)" height="1.9032000000000018px" id="adZTYr4MR" transform="translate(6.078 19.156)" width="8.44303px"/><path d="M 0.558 0 L 2.211 0 C 2.519 0 2.769 0.25 2.769 0.559 L 2.769 1.406 C 2.769 1.714 2.519 1.964 2.211 1.964 L 0.558 1.964 C 0.25 1.964 0 1.714 0 1.406 L 0 0.559 C 0 0.25 0.25 0 0.558 0 Z" fill="rgb(29, 28, 27)" height="1.964299999999998px" id="bwdUdEmCH" transform="translate(13.784 21.854)" width="2.768600000000001px"/><path d="M 2.424 0 L 0.558 0 C 0.25 0 0 0.25 0 0.559 L 0 1.406 C 0 1.714 0.25 1.964 0.558 1.964 L 2.424 1.964 C 2.732 1.964 2.982 1.714 2.982 1.406 L 2.982 0.559 C 2.982 0.25 2.732 0 2.424 0 Z" fill="rgb(29, 28, 27)" height="1.964299999999998px" id="PUvesMJEj" transform="translate(23.556 21.854)" width="2.982199999999999px"/><path d="M 0.558 0 L 2.241 0 C 2.55 0 2.799 0.25 2.799 0.559 L 2.799 1.406 C 2.799 1.714 2.55 1.964 2.241 1.964 L 0.558 1.964 C 0.25 1.964 0 1.714 0 1.406 L 0 0.559 C 0 0.25 0.25 0 0.558 0 Z" fill="rgb(29, 28, 27)" height="1.964299999999998px" id="Wo2W7J3Zj" transform="translate(8.672 21.854)" width="2.799050000000001px"/><path d="M 6.661 0 L 0.558 0 C 0.25 0 0 0.25 0 0.559 L 0 1.345 C 0 1.653 0.25 1.903 0.558 1.903 L 6.661 1.903 C 6.969 1.903 7.219 1.653 7.219 1.345 L 7.219 0.559 C 7.219 0.25 6.969 0 6.661 0 Z" fill="rgb(29, 28, 27)" height="1.9032px" id="PpPVZXp9j" transform="translate(27.041 13.7)" width="7.218900000000001px"/><path d="M 0.621 1.905 C 0.218 1.905 0 1.687 0 1.283 L 0 0.622 C 0 0.218 0.218 0 0.621 0 L 11.225 0 C 11.628 0 11.846 0.218 11.846 0.622 L 11.846 1.283 C 11.846 1.687 11.628 1.905 11.225 1.905 L 6.934 1.905 L 6.934 14.926 C 6.934 15.33 6.716 15.548 6.313 15.548 L 5.537 15.548 C 5.134 15.548 4.916 15.33 4.916 14.926 L 4.916 1.905 Z" fill="rgb(29, 28, 27)" height="15.54825px" id="xr32fxeO6" transform="translate(52.177 8.243)" width="11.845599999999997px"/><path d="M 0.621 0 C 0.218 0 0 0.218 0 0.622 L 0 14.924 C 0 15.328 0.218 15.546 0.621 15.546 L 1.357 15.546 C 1.76 15.546 1.978 15.328 1.978 14.924 L 1.978 0.622 C 1.978 0.218 1.76 0 1.357 0 Z" fill="rgb(29, 28, 27)" height="15.546050000000001px" id="oSsO_UPVN" transform="translate(90.476 8.243)" width="1.9779000000000053px"/><path d="M 0.62 15.546 C 0.217 15.546 0 15.328 0 14.924 L 0 0.622 C 0 0.218 0.217 0 0.62 0 L 1.396 0 C 1.799 0 2.017 0.218 2.017 0.622 L 2.017 13.632 L 8.981 13.632 C 9.384 13.632 9.602 13.85 9.602 14.254 L 9.602 14.924 C 9.602 15.328 9.384 15.546 8.981 15.546 Z" fill="rgb(29, 28, 27)" height="15.546050000000001px" id="Sgj4z5osO" transform="translate(116.749 8.243)" width="9.602000000000004px"/><path d="M 1.974 14.924 C 1.974 15.328 1.756 15.546 1.353 15.546 L 0.621 15.546 C 0.218 15.546 0 15.328 0 14.924 L 0 0.622 C 0 0.218 0.218 0 0.621 0 L 1.357 0 C 1.76 0 1.978 0.218 1.978 0.622 L 1.978 5.747 C 2.634 4.721 3.806 4.079 5.309 4.079 C 8.18 4.079 10.356 6.358 10.356 9.948 C 10.356 13.538 8.18 15.817 5.309 15.817 C 3.801 15.817 2.627 15.175 1.971 14.145 L 1.971 14.922 Z M 8.36 9.95 C 8.36 7.362 6.881 5.928 5.121 5.928 C 3.361 5.928 1.863 7.362 1.863 9.95 C 1.863 12.539 3.361 13.972 5.121 13.972 C 6.881 13.972 8.36 12.539 8.36 9.95 Z" fill="rgb(29, 28, 27)" height="15.81665px" id="q13jjj7xd" transform="translate(138.401 8.243)" width="10.355999999999995px"/><path d="M 4.457 11.738 C 0.961 11.738 -0.019 9.872 0 8.318 C 0.005 7.929 0.253 7.735 0.645 7.735 L 1.344 7.735 C 1.748 7.735 1.922 7.949 1.961 8.352 C 2.063 9.315 2.693 9.907 4.433 9.907 C 6.174 9.907 7.012 9.269 7.012 8.289 C 7.012 7.425 6.522 7.108 5.305 6.899 L 3.209 6.539 C 1.453 6.238 0.29 5.247 0.29 3.468 C 0.29 1.467 1.774 0 4.518 0 C 7.263 0 8.838 1.491 8.814 3.23 C 8.81 3.614 8.553 3.808 8.165 3.808 L 7.457 3.808 C 7.054 3.808 6.908 3.595 6.851 3.202 C 6.749 2.477 6.159 1.818 4.518 1.818 C 2.878 1.818 2.249 2.508 2.249 3.403 C 2.249 4.175 2.695 4.516 3.81 4.714 L 5.906 5.083 C 7.72 5.404 8.98 6.292 8.98 8.198 C 8.98 9.976 7.908 11.74 4.455 11.74 Z" fill="rgb(29, 28, 27)" height="11.739799999999999px" id="tJ8syeWTW" transform="translate(150.024 12.325)" width="8.980269730401375px"/><path d="M 9.146 7.997 C 9.146 8.813 9.175 9.983 9.282 10.799 C 9.334 11.223 9.155 11.465 8.728 11.465 L 8.068 11.465 C 7.685 11.465 7.467 11.319 7.428 11.022 L 7.317 10.181 C 6.724 11.157 5.565 11.659 4.145 11.659 C 1.579 11.659 0 10.142 0 8.078 C 0 6.27 1.27 5.157 3.433 5.002 L 6.589 4.78 C 7.162 4.741 7.186 4.688 7.186 4.153 L 7.186 3.682 C 7.186 2.438 6.434 1.807 4.79 1.807 C 3.145 1.807 2.472 2.425 2.405 3.289 C 2.376 3.697 2.235 3.916 1.823 3.916 L 1.067 3.916 C 0.675 3.916 0.427 3.717 0.422 3.328 C 0.407 1.51 1.74 0 4.792 0 C 7.798 0 9.162 1.427 9.155 3.736 Z M 7.188 7.298 L 7.188 6.244 C 6.955 6.327 6.678 6.386 6.363 6.415 L 3.598 6.676 C 2.59 6.775 1.997 7.163 1.997 8.099 L 1.999 8.099 C 1.999 9.188 2.886 9.97 4.4 9.97 C 6.169 9.97 7.188 8.9 7.188 7.298 Z" fill="rgb(29, 28, 27)" height="11.658999999999999px" id="QPESIZvku" transform="translate(126.854 12.325)" width="9.290755130109668px"/><path d="M 5.224 0 C 8.313 0 10.295 2.255 10.295 5.456 L 10.295 5.694 C 10.295 6.098 10.077 6.316 9.674 6.316 L 1.998 6.316 C 2.168 8.547 3.447 9.898 5.407 9.898 C 6.768 9.898 7.598 9.363 7.934 8.431 C 8.06 8.078 8.243 7.892 8.618 7.892 L 9.33 7.892 C 9.746 7.892 9.994 8.125 9.923 8.538 C 9.598 10.433 7.834 11.74 5.409 11.74 L 5.407 11.738 C 2.168 11.738 0 9.424 0 5.797 C 0 2.169 2.135 0 5.224 0 Z M 5.222 1.74 C 3.494 1.74 2.405 2.818 2.074 4.64 L 8.282 4.64 C 8.054 2.842 6.949 1.74 5.222 1.74 Z" fill="rgb(29, 28, 27)" height="11.739799999999999px" id="PKmyQkwJE" transform="translate(104.541 12.325)" width="10.295000000000002px"/><path d="M 4.459 11.194 C 4.099 11.194 3.877 11.039 3.746 10.703 L 0.091 1.021 C -0.024 0.72 -0.031 0.511 0.076 0.297 C 0.178 0.094 0.381 0 0.732 0 L 1.274 0 C 1.633 0 1.86 0.155 1.986 0.495 L 4.958 8.503 L 5.123 9.018 L 5.289 8.503 L 8.262 0.495 C 8.388 0.155 8.615 0 8.974 0 L 9.517 0 C 9.865 0 10.07 0.092 10.172 0.297 C 10.279 0.511 10.275 0.72 10.157 1.021 L 6.502 10.703 C 6.371 11.039 6.149 11.194 5.79 11.194 Z" fill="rgb(29, 28, 27)" height="11.1941px" id="uUQr5Yl4B" transform="translate(93.807 12.595)" width="10.248961642504256px"/><path d="M 5.407 11.738 C 2.167 11.738 0 9.424 0 5.797 C 0 2.169 2.133 0 5.221 0 C 8.31 0 10.292 2.255 10.292 5.456 L 10.292 5.694 C 10.292 6.098 10.075 6.316 9.672 6.316 L 1.995 6.316 C 2.165 8.547 3.446 9.898 5.404 9.898 C 6.768 9.898 7.596 9.363 7.931 8.431 C 8.058 8.078 8.241 7.892 8.615 7.892 L 9.328 7.892 C 9.744 7.892 9.992 8.125 9.918 8.538 C 9.593 10.433 7.829 11.74 5.404 11.74 Z M 8.282 4.64 C 8.053 2.842 6.949 1.74 5.221 1.74 C 3.494 1.74 2.405 2.818 2.074 4.64 Z" fill="rgb(29, 28, 27)" height="11.739799999999999px" id="zo1nSBuSF" transform="translate(78.397 12.325)" width="10.29249999999999px"/><path d="M 3.057 10.677 C 3.163 11.026 3.392 11.192 3.756 11.192 L 3.749 11.194 L 4.987 11.194 C 5.35 11.194 5.579 11.028 5.69 10.679 L 8.173 2.654 L 8.237 2.401 L 8.3 2.654 L 10.787 10.679 C 10.894 11.028 11.123 11.194 11.487 11.194 L 12.733 11.194 C 13.096 11.194 13.325 11.028 13.432 10.679 L 16.418 1.006 C 16.516 0.7 16.512 0.498 16.41 0.288 C 16.307 0.089 16.109 0.002 15.76 0.002 L 15.218 0.002 C 14.848 0.002 14.626 0.168 14.519 0.522 L 12.094 8.547 L 12.046 8.761 L 11.999 8.542 L 9.506 0.517 C 9.4 0.168 9.171 0.002 8.807 0.002 L 7.683 0.002 C 7.319 0.002 7.091 0.168 6.984 0.517 L 4.492 8.542 L 4.449 8.745 L 4.405 8.551 L 1.98 0.519 C 1.874 0.166 1.649 0 1.281 0 L 0.728 0 C 0.38 0 0.181 0.087 0.079 0.286 C -0.021 0.493 -0.028 0.698 0.07 1.004 Z" fill="rgb(29, 28, 27)" height="11.194099999999999px" id="uboloLX99" transform="translate(61.282 12.598)" width="16.489163442184434px"/></svg>)
Partnerships
Automate Video Analysis and Semantic Search with n8n and TwelveLabs

Jordan Woods, Brice Penven, James Le
Developers can build production-ready video AI workflows using n8n and TwelveLabs without custom integration code, covering an S3 ingestion pipeline that runs parallel compliance, summary, chapter, and highlight analysis stored in Airtable, and a semantic video search interface with a branded results page.
Developers can build production-ready video AI workflows using n8n and TwelveLabs without custom integration code, covering an S3 ingestion pipeline that runs parallel compliance, summary, chapter, and highlight analysis stored in Airtable, and a semantic video search interface with a branded results page.

In this article
No headings found on page
Join our newsletter
Receive the latest advancements, tutorials, and industry insights in video understanding
Search, analyze, and explore your videos with AI.
Feb 17, 2026
25 Minutes
Copy link to article
1 - Overview Introduction
1.1 - Overview of n8n: Automation Built for Technical Teams
n8n is an open source workflow automation platform that connects applications, APIs, and services through a visual, node based interface. Unlike many traditional automation tools, n8n gives developers and technical teams full control over their data and logic, with the flexibility to self host or run it in the cloud.
The platform has gained strong traction in AI driven use cases because it bridges the gap between AI services and existing business systems. With more than 400 pre built integrations and support for custom code, n8n lets teams orchestrate complex AI workflows without having to build and maintain infrastructure from scratch.
For video AI in particular, n8n is well suited to handle the unglamorous but critical parts of the workflow: moving media between storage systems, triggering analysis jobs, handling retries and failures, parsing model outputs, and routing results back into operational tools like MAMs or databases.
What really makes n8n powerful for AI implementations is its ability to chain multiple steps together, manage error recovery, and transform data between different formats, all through a visual interface that technical teams can iterate on quickly and adapt as requirements evolve.
1.2 - Why TwelveLabs + n8n: Accelerating Video AI to Production
TwelveLabs delivers state-of-the-art multimodal video understanding through APIs, but calling an API is just the first step. Real video workflows are messy: content sits in MAMs, results need to land in databases, compliance teams have their own tools, and search needs to work inside your existing applications.
n8n solves this by orchestrating the connections between TwelveLabs and your systems. Instead of writing custom integration code for each platform, n8n gives you pre-built connectors and flexible logic to push video URLs to TwelveLabs, process what comes back, and route the results where they need to go.
This dramatically shortens time to production. TwelveLabs customers can connect video AI to their actual workflows in days rather than months—whether that means enriching a media library with metadata, automating compliance reviews, or adding semantic search to an internal app.
1.3 - Who This Is For
This tutorial is built for technical teams working with video at scale who need practical automation that integrates seamlessly with existing tools:
Media & Entertainment professionals (production, post-production, broadcast): Automate video analysis, content moderation, and metadata enrichment across large libraries.
Enterprise teams managing internal video (corporate communications, marketing, training): Add better search, organization, and compliance workflows.
Platform and engineering teams building video applications: Embed semantic search, recommendations, or automated analysis without managing AI infrastructure.
System integrators and solutions architects: Deliver video AI projects across different client environments efficiently.
API and workflow practitioners (visual or code-based): Connect production-ready video AI to your stack with the flexibility you need.
2 - Key Operations
The TwelveLabs n8n community node provides three core resource groups that handle the complete video AI workflow—from index creation and video upload to analysis and insights generation. Each resource contains specific operations that map to common tasks in production video workflows.
2.1 - Index Resource: Manage Searchable Video Indexes
The Index resource lets you create and manage the foundational containers where your videos are stored and processed.
Create Index – Set up a new searchable index with AI models. You choose which model powers your index (Pegasus Plus or Marengo Plus), configure model-specific options, and enable any addons you need for your use case.
List Indexes – Retrieve all indexes in your account so you can see what's already been created and manage multiple projects or environments.
Search Index by Name – Quickly locate a specific index by name, useful when you're building workflows that target particular video collections or projects.
2.2 - Video Resource: Upload and Manage Videos Within Indexes
The Video resource handles the practical work of getting your content into an index and tracking its status.
Upload Video – Add videos to an index with flexible input options. You can upload video files directly or provide video URLs (helpful when your content is already in cloud storage like S3). Videos are automatically processed and indexed once uploaded.
List Videos – Retrieve all videos stored in a specific index. This operation returns video metadata and processing status, so you know when videos are ready for analysis and can track ingestion progress.
2.3 - Analysis Resource: Generate AI-Powered Insights from Videos
The Analysis resource produces actionable intelligence from your indexed video content.
Generate Summary – Create concise summaries of video content with customizable summary types and adjustable prompt templates. Useful for quickly understanding long videos or creating digestible descriptions for metadata.
Generate Chapters – Automatically segment videos into chapters using smart chapter detection. Results include timestamped segments, making it easy to navigate long-form content or create structured outlines.
Generate Highlights – Extract key moments from videos by identifying important scenes. Use this to create highlight reels, clip compilations, or surface the most relevant portions of your video library.
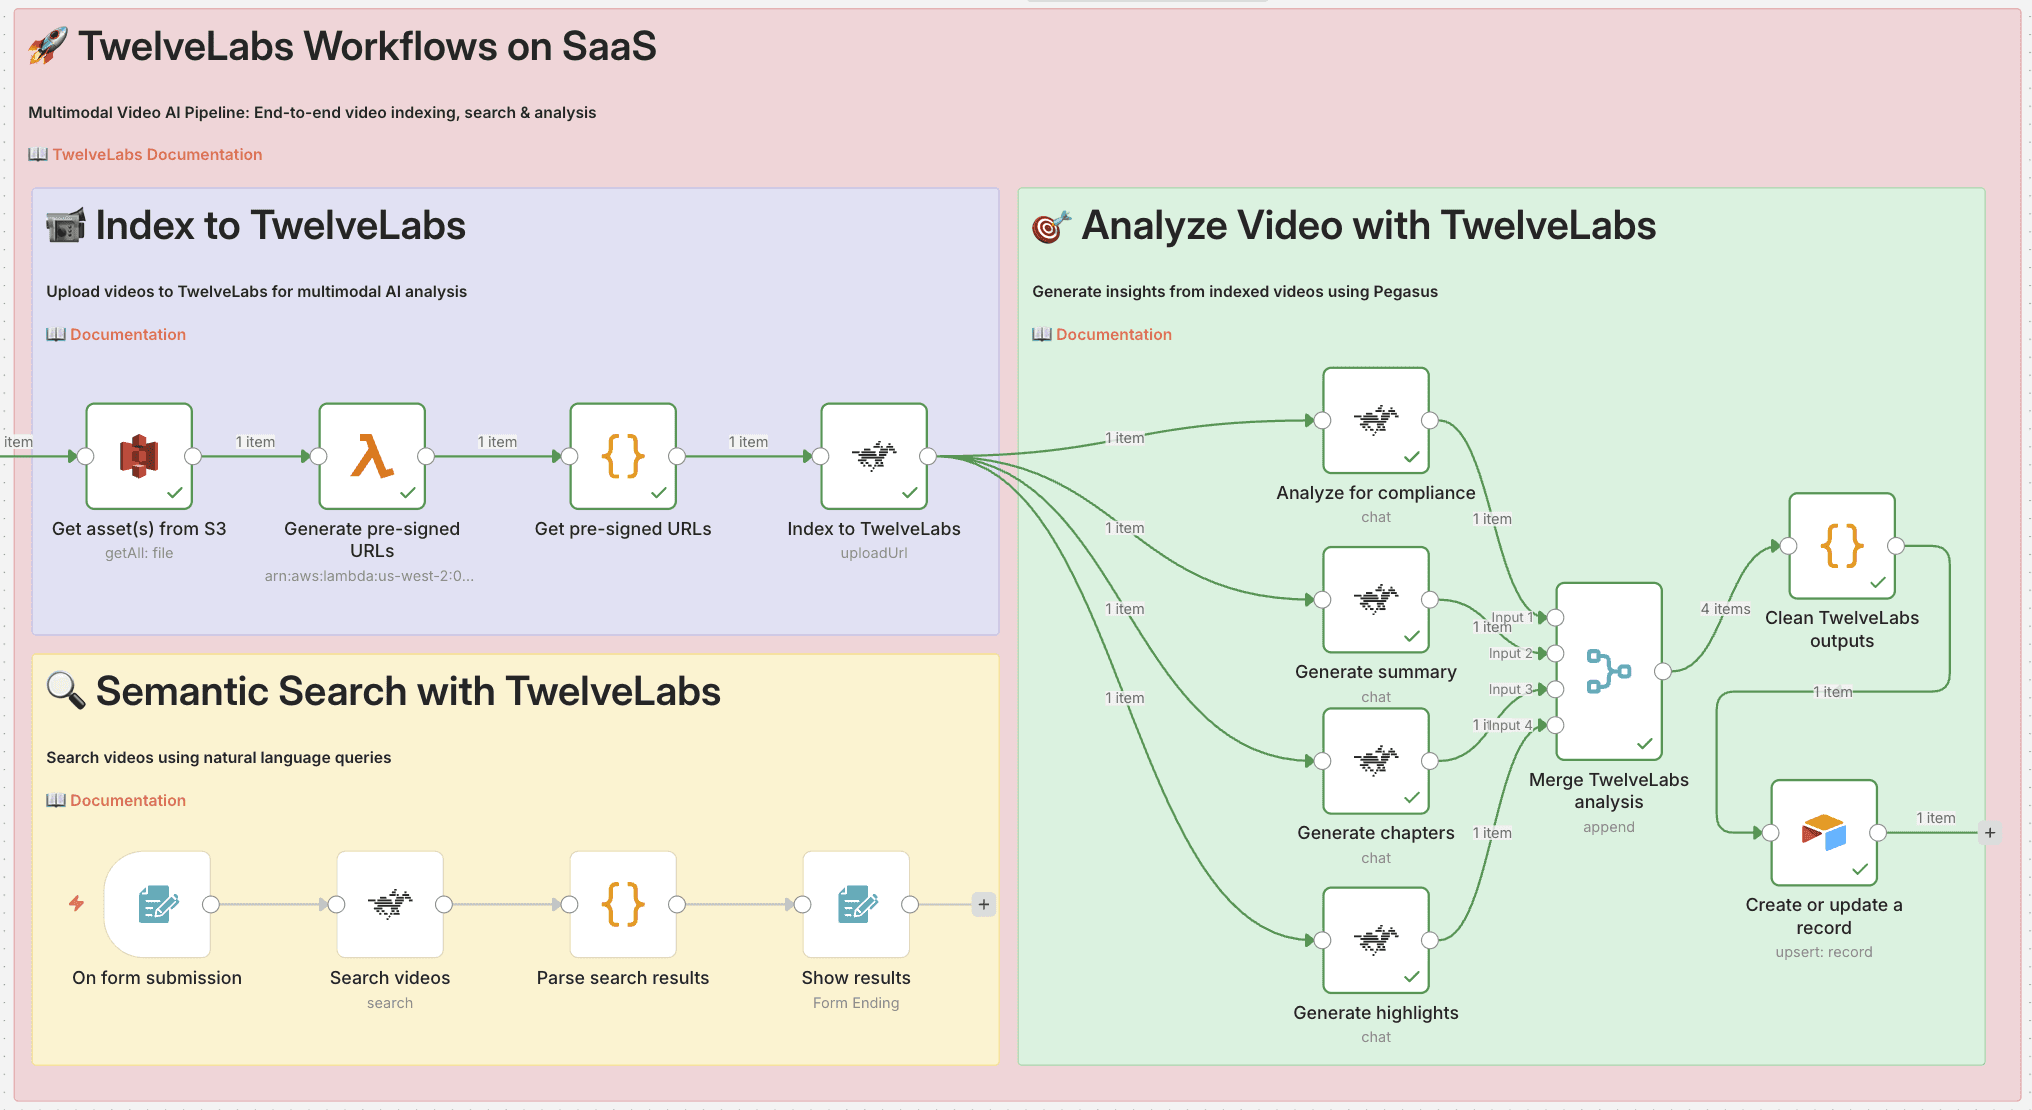
3 - Basic Workflow Demo: S3 to Metadata
3.1 - Workflow Overview
This workflow demonstrates end-to-end video AI automation: ingest videos from S3, analyze them with TwelveLabs, and store enriched metadata in Airtable.
Prerequisites
Before you begin, make sure you have:
An n8n account (cloud or self-hosted)
An AWS account with S3 access
A TwelveLabs account and API key
An Airtable account
Pipeline Architecture
The workflow consists of three main stages:
1. Index to TwelveLabs
Pull video files from S3 bucket
Generate pre-signed URLs via Lambda
Remove duplicate URLs
Index videos in TwelveLabs
2. Analyze Video with TwelveLabs
Run 4 analyses in parallel:
Compliance: Flag content against platform policies (YouTube ABCD framework)
Summary: Extract key themes and overview
Chapters: Generate timestamped segments
Highlights: Pull out notable moments
Merge results and parse compliance status
Structure output for database storage
3. Store Results
Upsert to Airtable with tags and metadata
In production, results typically go to MAMs, SQL/NoSQL databases, or cloud data platforms
Key Technical Patterns
Pre-signed URLs - Securely share private S3 files with TwelveLabs without exposing AWS credentials
Parallel processing - Run 4 analysis tasks simultaneously, then merge results
Upsert logic - Intelligently create or update Airtable records (no duplicates on re-runs)
Status parsing - Extract structured compliance status from AI-generated text
3.2 - Setup: Trigger and S3 Connection
Step 1: Create the Manual Trigger
Open n8n and click "New Workflow"
Click the "+" button to add your first node
Search for "Manual Trigger" and select it
The Manual Trigger acts as a "Start" button for your workflow. When you click "Execute Workflow" in n8n, this node fires and kicks off everything downstream.
💡 Production tip: Once working, swap this for automated triggers like Schedule Trigger (run every hour/day), Webhook Trigger (run when another app sends a request), or S3 Trigger (run when new files upload).
Step 2: Fetch Your Videos from S3
Click the "+" button on your Manual Trigger node
Search for "AWS S3" and select it
Configure the node:
Operation: Select "Get Many"
Bucket Name: Enter your bucket name (e.g.,
my-video-bucket)Return All: Toggle this ON
Click "Credentials" and add your AWS credentials:
Enter your AWS Access Key ID
Enter your AWS Secret Access Key
Select your region
This retrieves metadata about every file in your S3 bucket—Key (file path/name), Size, and LastModified timestamp. It doesn't download actual videos (too slow and expensive), just the information needed to generate access links.
⚠️ Permissions check: Ensure your AWS credentials have s3:ListBucket and s3:GetObject permissions. If you get "Access Denied," check your IAM policy.
Step 3: Generate Secure Access Links
TwelveLabs needs to download your videos, but your S3 bucket is private. Pre-signed URLs solve this—they're temporary, secure links (valid for 1 hour) that work without AWS credentials.
Click the "+" button on your S3 node
Search for "AWS Lambda" and select it
Configure the node:
Function: Select or paste your Lambda function ARN
Payload: Click "Add Expression" and enter:
{{ JSON.stringify({
  bucketName: "your-bucket-name",
  files: $input.all().map(item => item.json),
  expiresIn: 3600
}) }}
{{ JSON.stringify({
  bucketName: "your-bucket-name",
  files: $input.all().map(item => item.json),
  expiresIn: 3600
}) }}
Your Lambda function should loop through each file, generate a pre-signed URL using the AWS SDK, and return all URLs to n8n.
💡 Why use Lambda? n8n can't generate pre-signed URLs directly because it requires the AWS SDK running server-side. Lambda handles this for us.
Step 4: Parse and Clean the URL Data
Click the "+" button on your Lambda node
Search for "Code" and select it
Paste this code:
// Parse Lambda response and remove duplicates
const seenKeys = new Set();
const results = [];

for (const item of $input.all()) {
  const response = JSON.parse(item.json.result.body);

  for (const file of response.files) {
    if (!seenKeys.has(file.Key)) {
      seenKeys.add(file.Key);
      results.push({
        json: {
          Key: file.Key,
          presignedUrl: file.presignedUrl,
          Size: file.Size,
          LastModified: file.LastModified,
          expiresIn: file.expiresIn
        }
      });
    }
  }
}

return results;
This code parses the Lambda response (which returns a string), removes any duplicate files using a Set, and creates one clean n8n item per video file.
3.3 - Index Videos in TwelveLabs
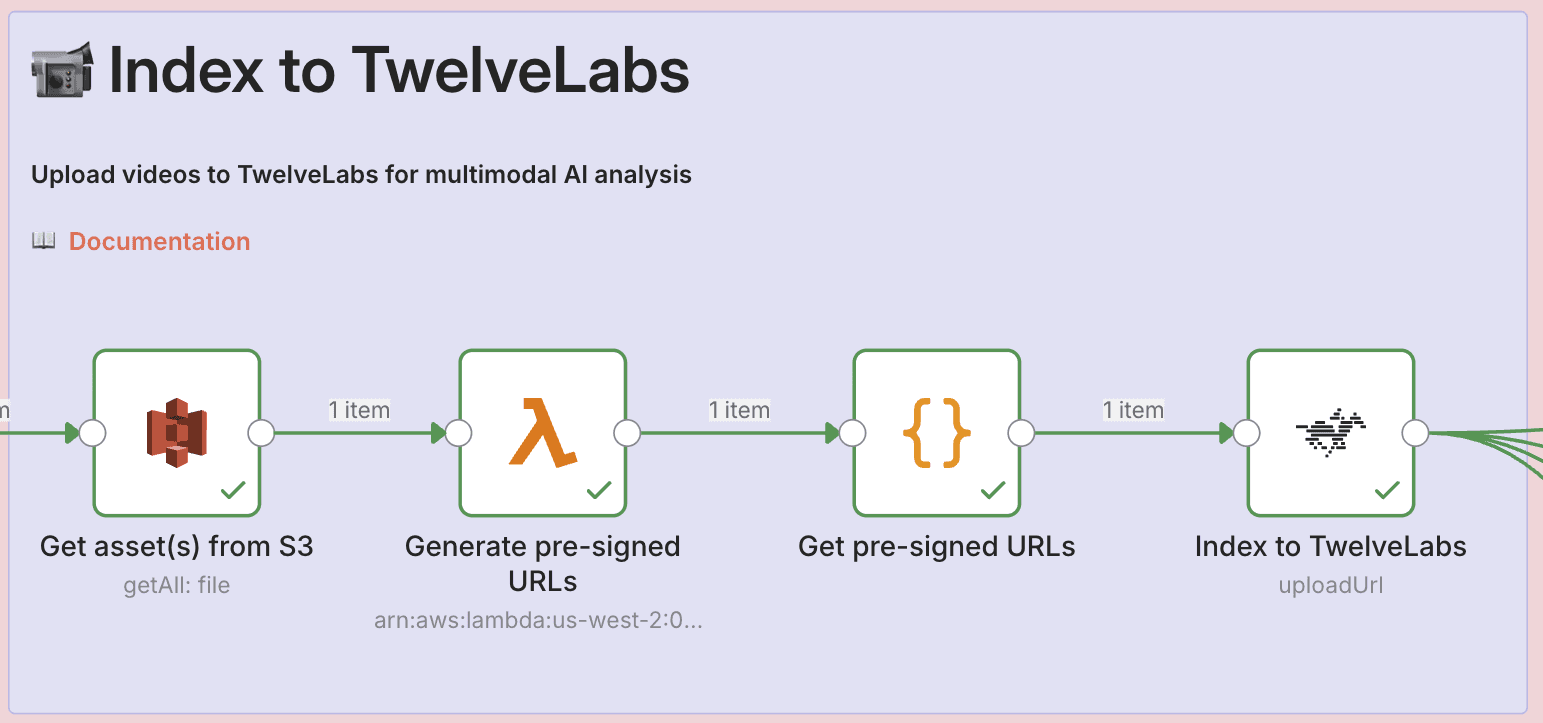
Now we upload each video to TwelveLabs for AI processing.
Click the "+" button on your Code node
Search for "TwelveLabs" and select it
Configure the node:
Operation: Select "Upload URL"
Index ID: Enter your TwelveLabs index ID (find this in your TwelveLabs dashboard)
Video URL: Click "Add Expression" and enter
{{ $json.presignedUrl }}
Add your TwelveLabs API credentials

What Gets Indexed
TwelveLabs processes each video to:
Analyze visual content - Objects, people, actions, scenes, colors, compositions
Transcribe audio - Spoken words, dialogue, narration
Extract on-screen text - OCR for any text appearing in frames
Create embeddings - Vector representations for semantic search
The node returns a videoId that you'll use in subsequent analysis steps.
⏱️ Timing: Indexing takes time depending on video length (typically 1-3 minutes per minute of video). n8n waits for completion before proceeding.
3.4 - Configure Parallel Analysis
Instead of running analyses sequentially (slow), we'll run four different analyses simultaneously to save time.
Set Up Parallel Branches
From your TwelveLabs indexing node, create four separate connections to four different TwelveLabs Analysis nodes:
Click and drag from the output of "Index to TwelveLabs"
Create your first TwelveLabs Analysis node
Repeat three more times for a total of four analysis nodes
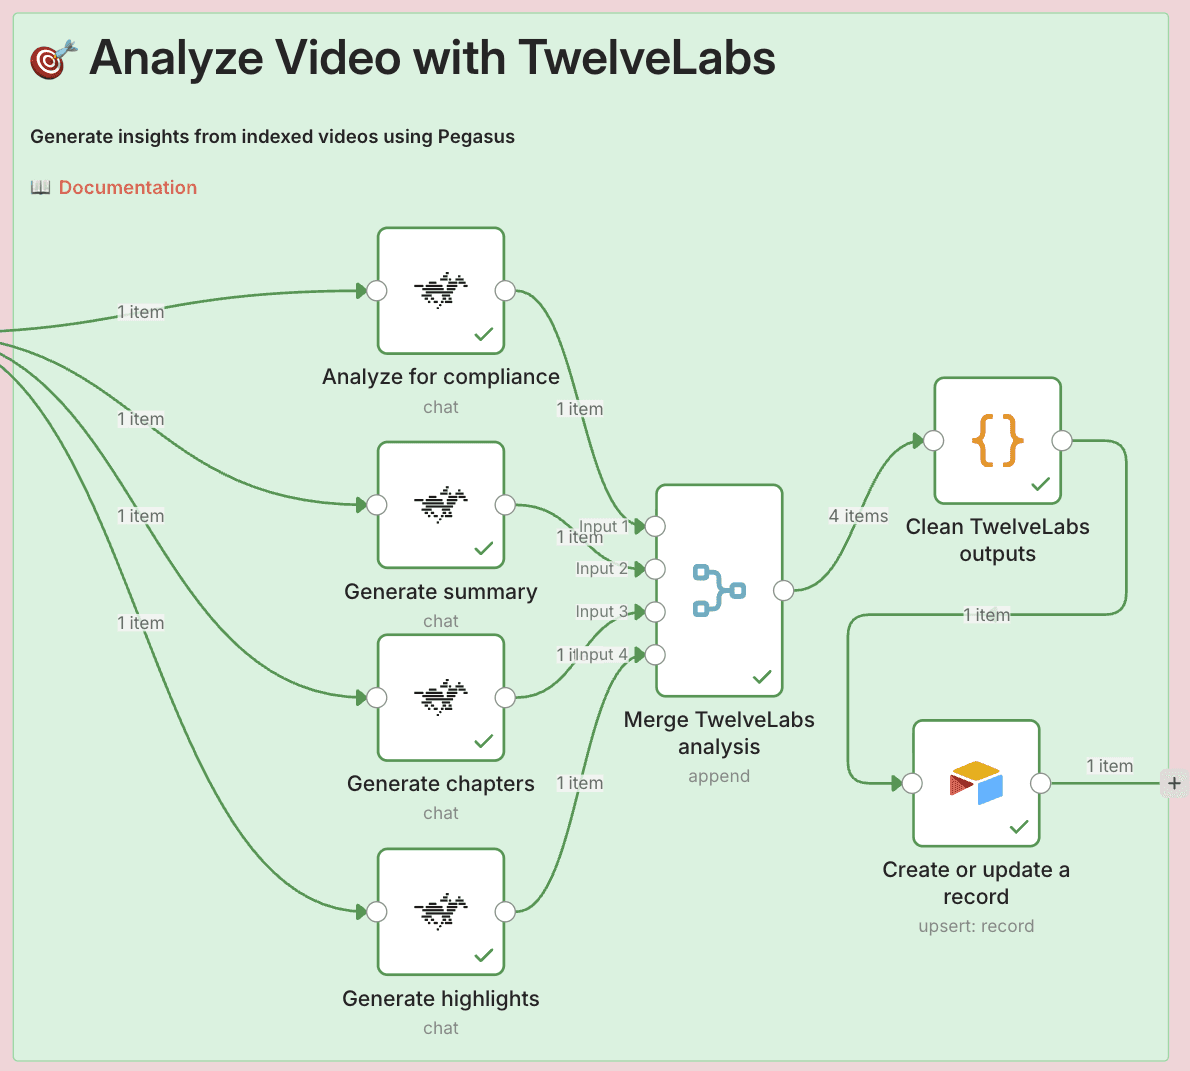
Analysis Types Comparison
Each analysis node uses the same basic configuration but different prompts:
1 - Compliance Analysis
Purpose: Flag content against YouTube ABCD framework
Output Format: Status (Pass/Needs Review/Failed) + flagged issues with timestamps
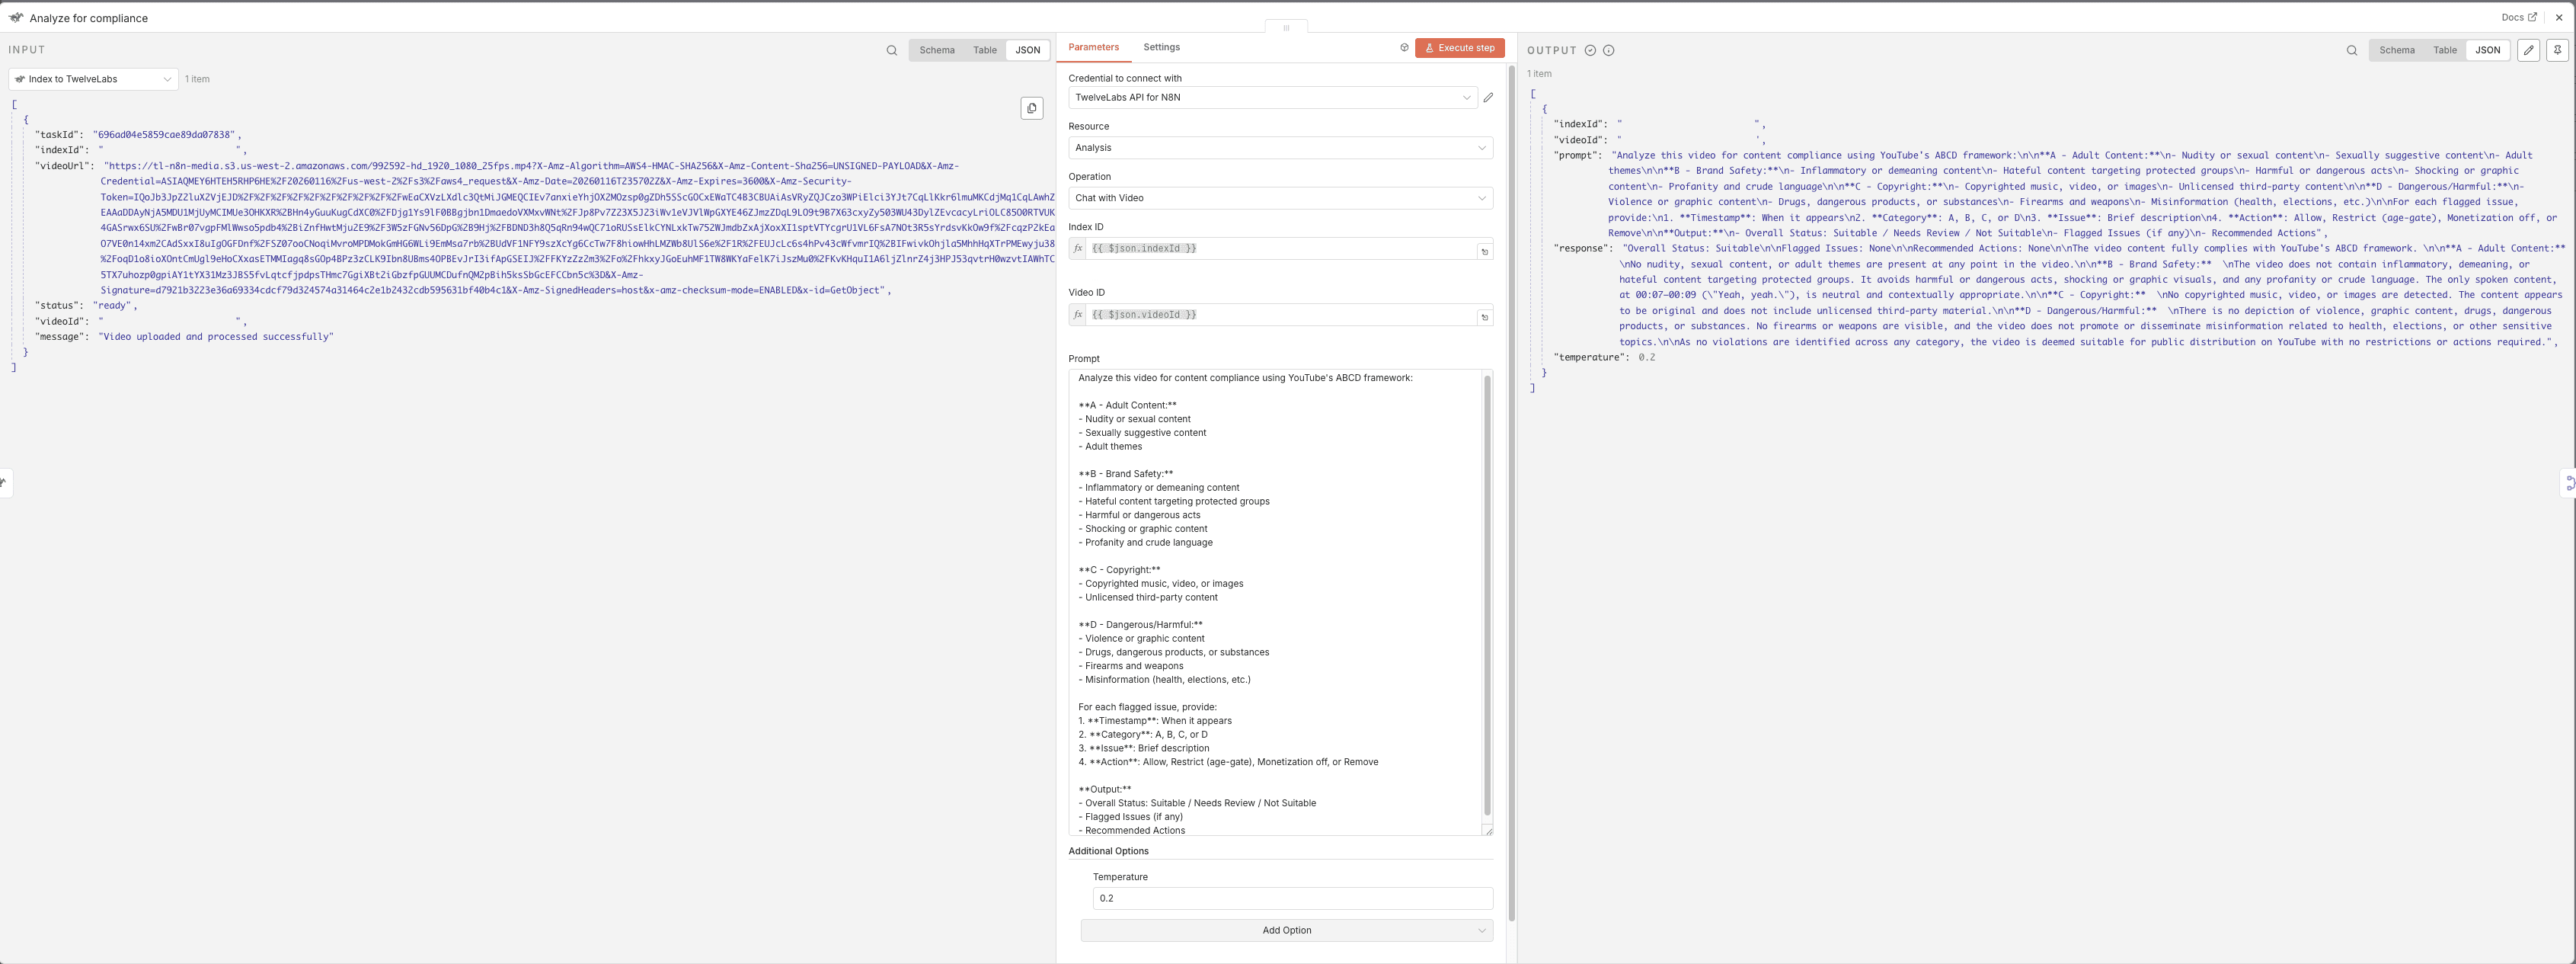
Compliance Analysis Prompt:
Analyze this video for content compliance using YouTube's ABCD framework:

**A - Adult Content:**
- Nudity or sexual content
- Sexually suggestive content
- Adult themes

**B - Brand Safety:**
- Inflammatory or demeaning content
- Hateful content targeting protected groups
- Harmful or dangerous acts
- Shocking or graphic content
- Profanity and crude language

**C - Copyright:**
- Copyrighted music, video, or images
- Unlicensed third-party content

**D - Dangerous/Harmful:**
- Violence or graphic content
- Drugs, dangerous products, or substances
- Firearms and weapons
- Misinformation (health, elections, etc.)

For each flagged issue, provide:
1. **Timestamp**: When it appears
2. **Category**: A, B, C, or D
3. **Issue**: Brief description
4. **Action**: Allow, Restrict (age-gate), Monetization off, or Remove

**Output:**
2 - Summary Analysis
Purpose: Extract key themes and overview
Output Format: 3-4 paragraph summary of video content
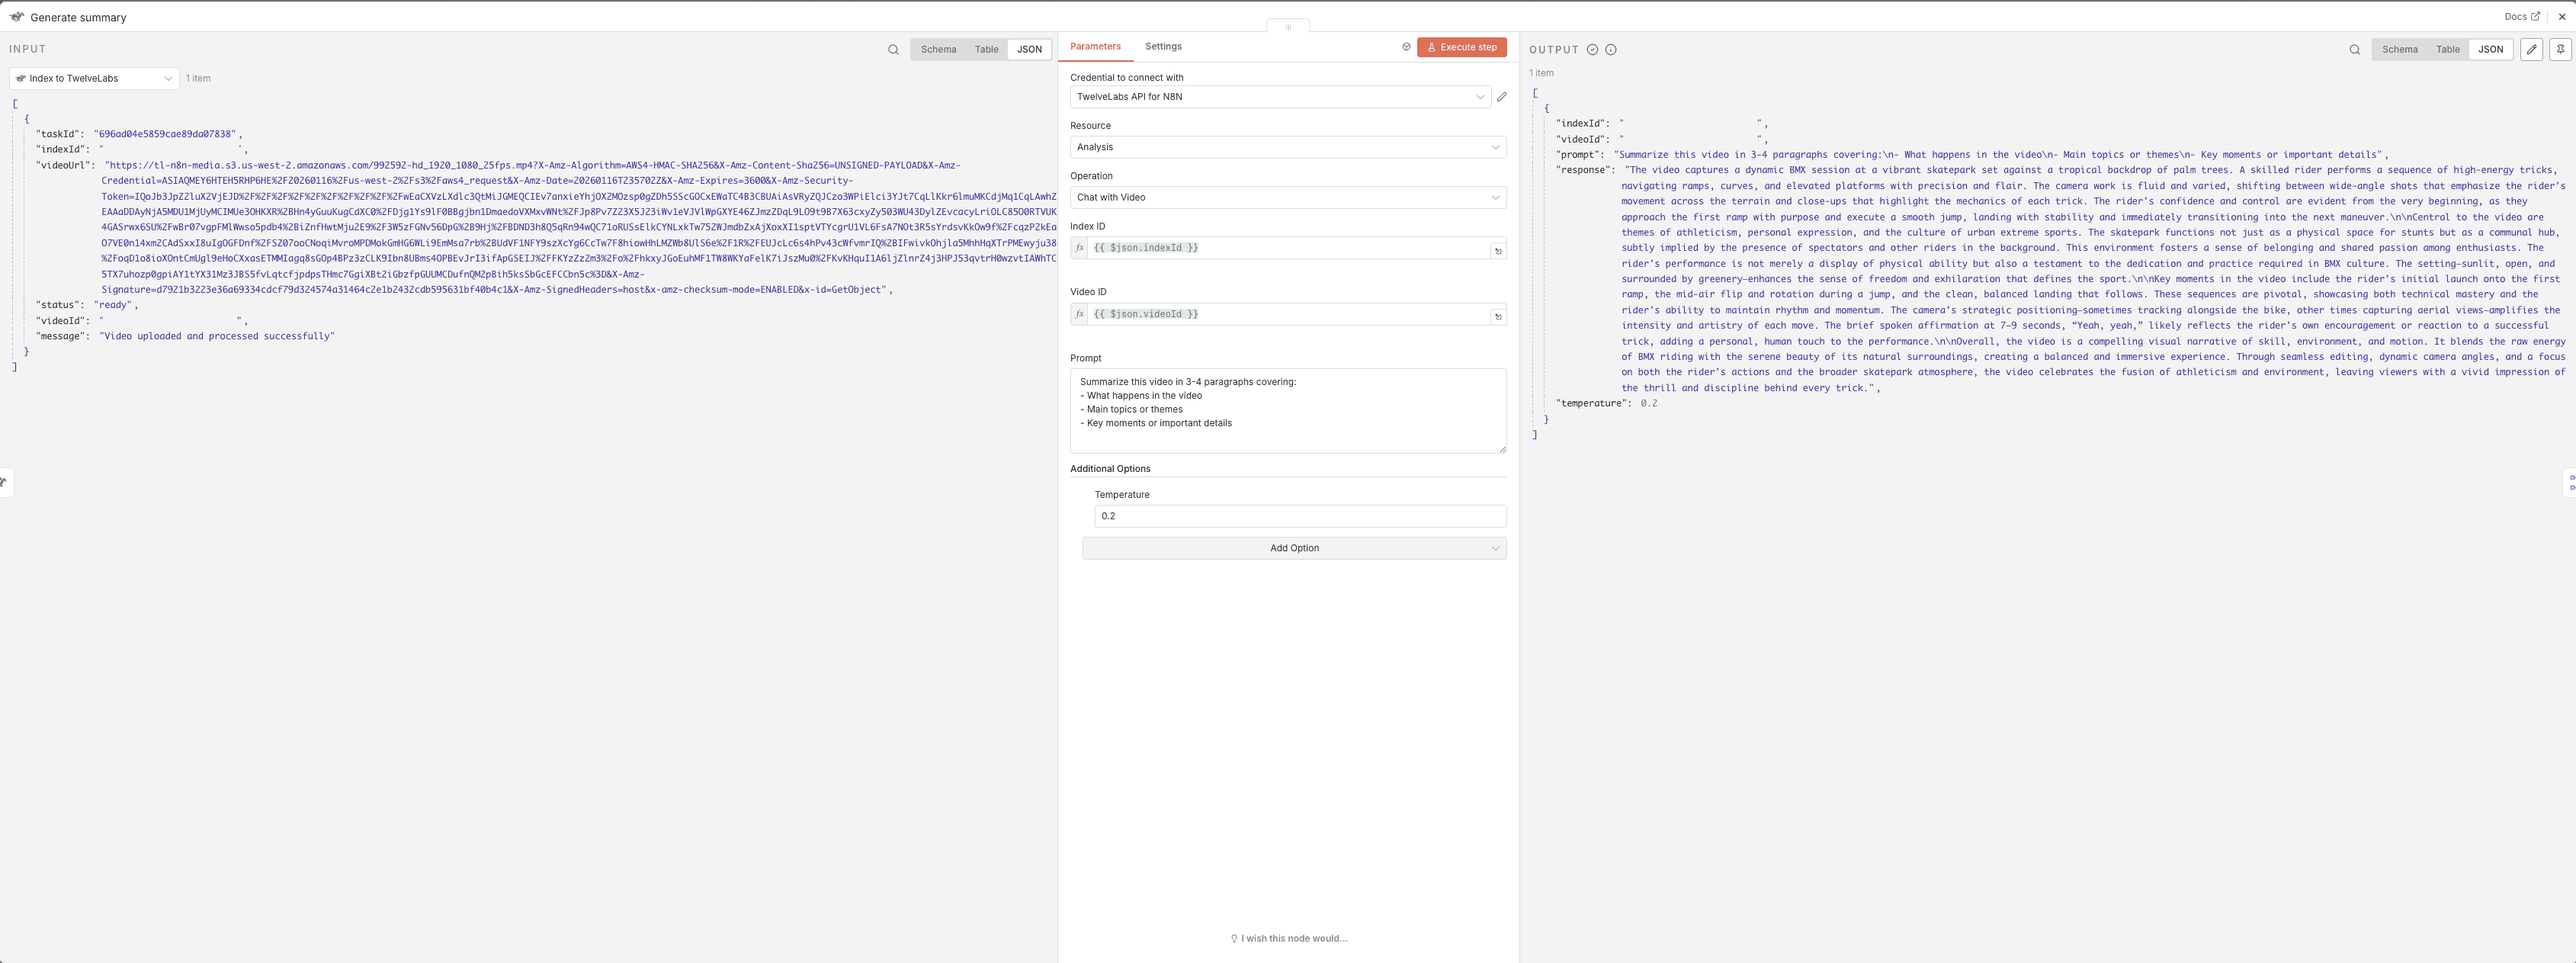
Summary Analysis Prompt:
3 - Chapters Analysis
Purpose: Generate timestamped segments
Output Format: Chapter titles with timestamps and descriptions
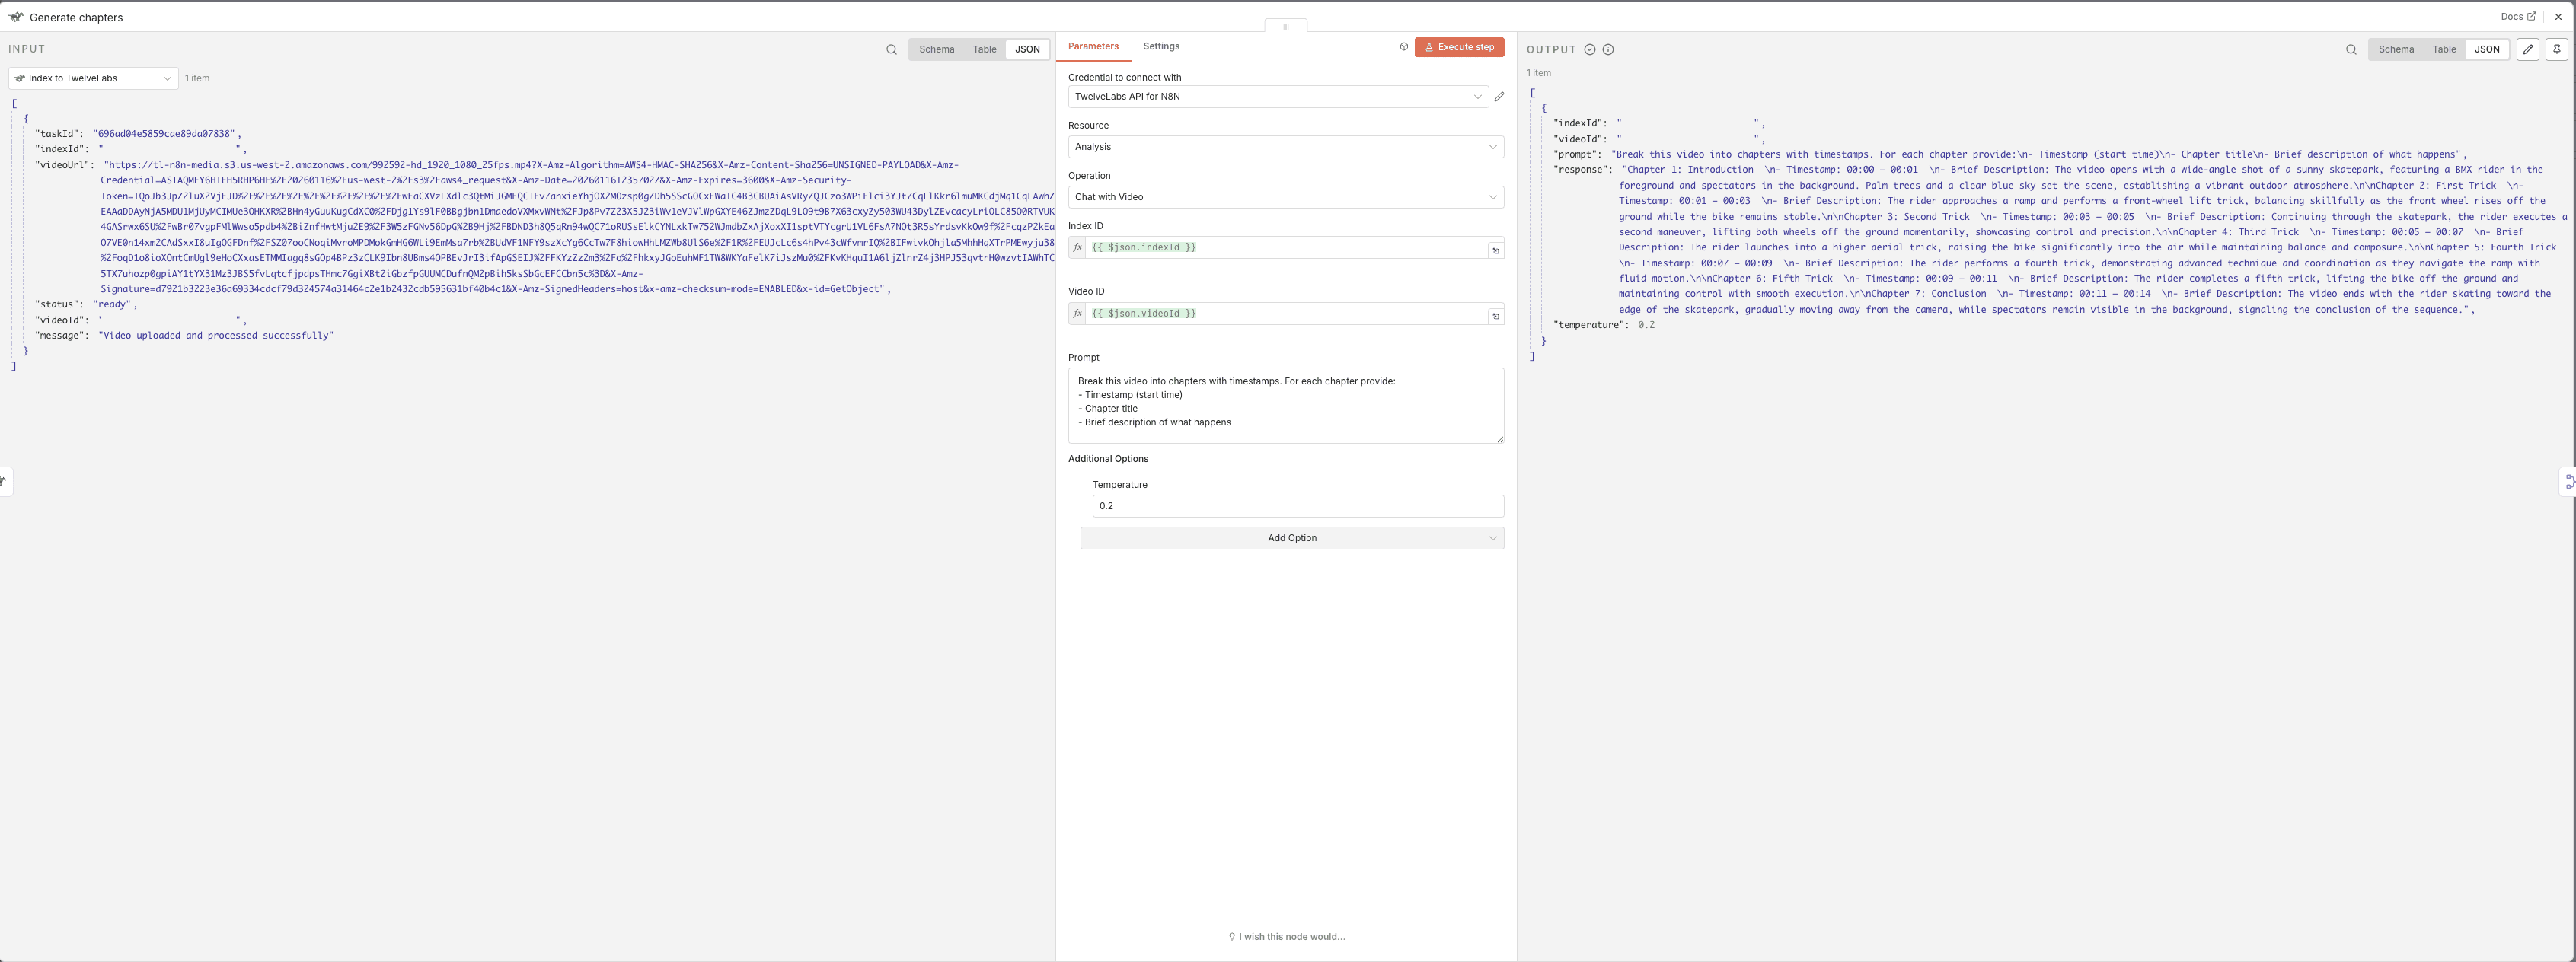
Chapters Analysis Prompt:
4 - Highlights Analysis
Purpose: Extract notable moments
Output Format: Key scenes with timestamps and reasons
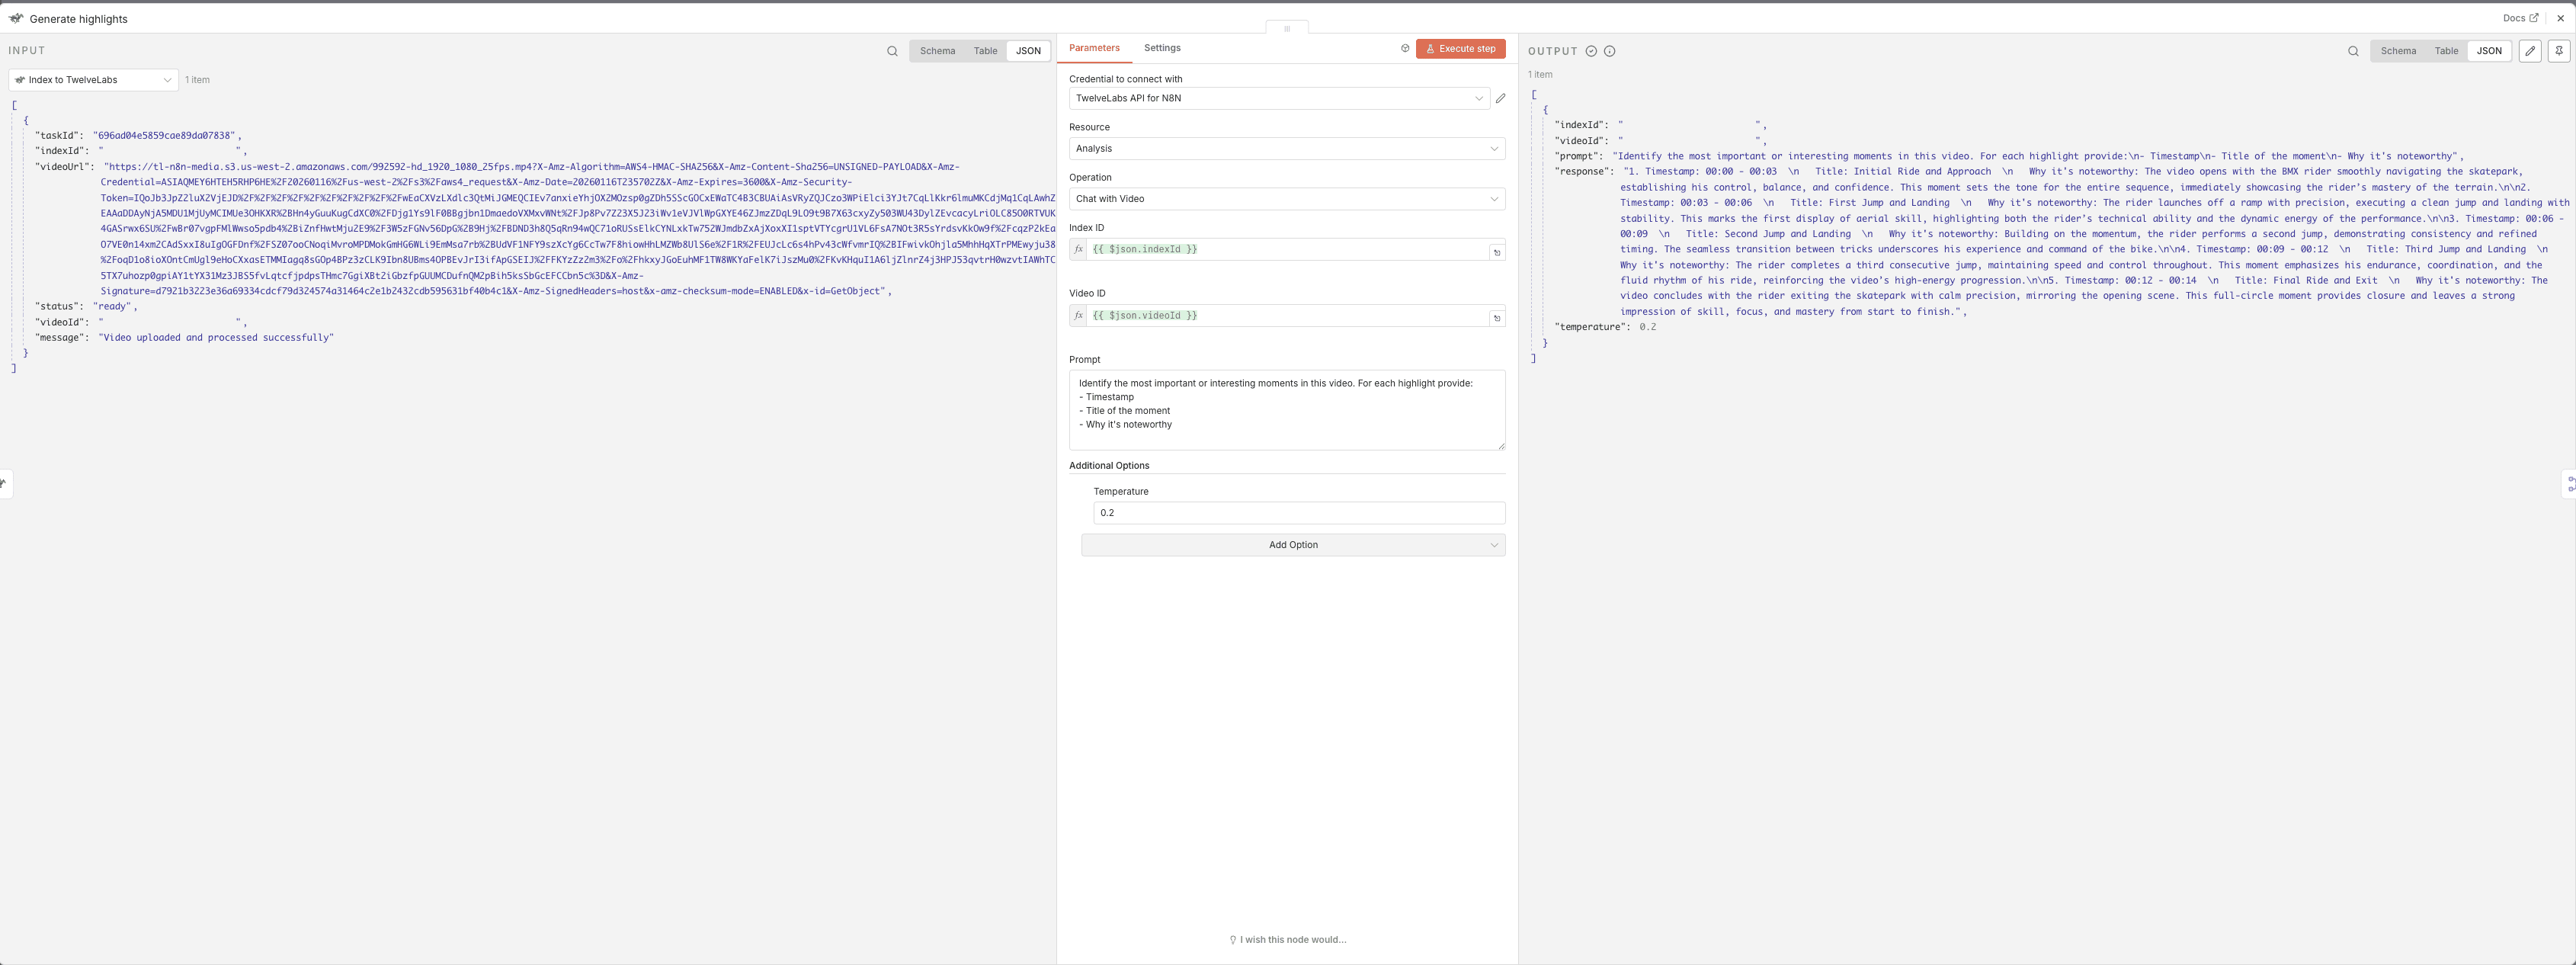
Highlights Analysis Prompt:
Shared Node Configuration
For each of the four analysis nodes, use this base configuration:
Operation: Select "Generate" or "Analysis"
Index ID:
{{ $json.indexId }}Video ID:
{{ $json.videoId }}Temperature: Set to
0.2(lower = more consistent results)
3.5 - Merge and Structure Results
Merge Parallel Results
Click "+" and search for "Merge"
Configure the node:
Number of Inputs: Set to
4
Connect each of your four analysis nodes to this Merge node:
Compliance → Input 1
Summary → Input 2
Chapters → Input 3
Highlights → Input 4
The Merge node acts as a checkpoint, waiting until ALL four analysis nodes complete before proceeding. This prevents saving incomplete data.
Structure the Data
Click "+" on your Merge node and add a Code node
Paste this code:
// Extract and organize all analysis results
const allItems = $input.all();
const videoId = allItems[0]?.json?.videoId || '';
const complianceResponse = allItems[0]?.json?.response || '';

// Parse compliance status from AI response
let complianceStatus = 'NEEDS REVIEW'; // Default

if (complianceResponse.includes('Overall Status: Suitable')) {
  complianceStatus = 'PASS';
} else if (complianceResponse.includes('Overall Status: Not Suitable')) {
  complianceStatus = 'FAILED';
} else if (complianceResponse.includes('Overall Status: Needs Review')) {
  complianceStatus = 'NEEDS REVIEW';
}

// Create structured output
const result = {
  videoID: videoId,
  'Compliance Status': complianceStatus,
  'Compliance report': complianceResponse,
  'Summary': allItems[1]?.json?.response || '',
  'Chapters': allItems[2]?.json?.response || '',
  'Highlights': allItems[3]?.json?.response || ''
};

return [{ json: result }];
This code:
Extracts the video ID for tracking
Parses compliance status by looking for specific phrases in the AI's response
Normalizes status to exactly one of three values (PASS/FAILED/NEEDS REVIEW) for Airtable's Select field
Organizes all four analysis results into a single, flat object
3.6 - Save Results to Airtable
Set Up Your Airtable Base
Create a new Airtable base
Create a table with these fields:
videoID(Single line text)Compliance(Single select with options: PASS, FAILED, NEEDS REVIEW)Compliance report(Long text)Summary(Long text)Chapters(Long text)Highlights(Long text)
Configure the Airtable Node
Click "+" on your Code node and search for "Airtable"
Configure the node:
Operation: Select "Upsert" (this creates OR updates records)
Base: Select your Airtable base
Table: Select your table
Map your fields:
videoID→{{ $json.videoID }}Compliance→{{ $json["Compliance Status"] }}Compliance report→{{ $json["Compliance report"] }}Summary→{{ $json.Summary }}Chapters→{{ $json.Chapters }}Highlights→{{ $json.Highlights }}
Set Matching Column to
videoID
The upsert operation is smart:
If the
videoIDdoesn't exist → Creates a new recordIf the
videoIDalready exists → Updates the existing record
This means you can re-run the workflow on the same videos without creating duplicates!
3.7 - Testing the Workflow
Pre-Flight Checklist
Before testing, verify:
[ ] All nodes are connected in sequence
[ ] TwelveLabs and AWS credentials are configured
[ ] Index ID matches your TwelveLabs dashboard
[ ] Videos have been indexed in TwelveLabs
[ ] Airtable base and table are set up
[ ] Workflow is saved
Execute the Test
Click the "Inactive" toggle in the top-right corner to activate your workflow
Click "Execute Workflow" button
Watch the execution flow through each node
Check for green checkmarks on all nodes (indicates success)
Expected Results
✅ S3 node: Returns list of video files with metadata
✅ Lambda node: Returns pre-signed URLs for each file
✅ Code node: Returns deduplicated file list
✅ TwelveLabs Index node: Returns videoId for each upload
✅ Four analysis nodes: Return analysis responses
✅ Merge node: Combines all four analysis results
✅ Code node: Returns structured data object
✅ Airtable node: Confirms record creation/update
Verify in Airtable
Open your Airtable base
You should see new records with:
Video IDs
Compliance status (PASS/FAILED/NEEDS REVIEW)
Full analysis results in respective fields
Troubleshooting
Issue | Possible Cause | Solution |
|---|---|---|
S3 node fails | Missing permissions | Check IAM policy includes |
Lambda returns error | Function not found or wrong ARN | Verify Lambda ARN in AWS console |
TwelveLabs indexing fails | Invalid Index ID | Double-check Index ID in TwelveLabs dashboard |
No analysis results | Videos not fully indexed | Wait for indexing to complete (check TwelveLabs) |
Airtable fails | Field mapping mismatch | Ensure field names match exactly (case-sensitive) |
Compliance status shows as text | Select options not configured | Add PASS, FAILED, NEEDS REVIEW as select options |
Debug with Execution History
If something fails:
Go to "Executions" in the left sidebar
Find your recent test execution
Click to expand and examine:
Data flowing through each node
Error messages with stack traces
Execution time for each step
💡Pro tip: Add temporary "Set" or "Code" nodes between steps with
console.log(JSON.stringify($input.all(), null, 2))to inspect data at any point in the workflow.
This completes the S3 to Metadata workflow. Your videos are now automatically indexed, analyzed across four dimensions (compliance, summary, chapters, highlights), and stored in Airtable for easy access and management.
4 - Video Semantic Search Interface with n8n and TwelveLabs

4.1 - Workflow Overview
This workflow creates a branded web interface for semantic video search using TwelveLabs' multimodal AI.
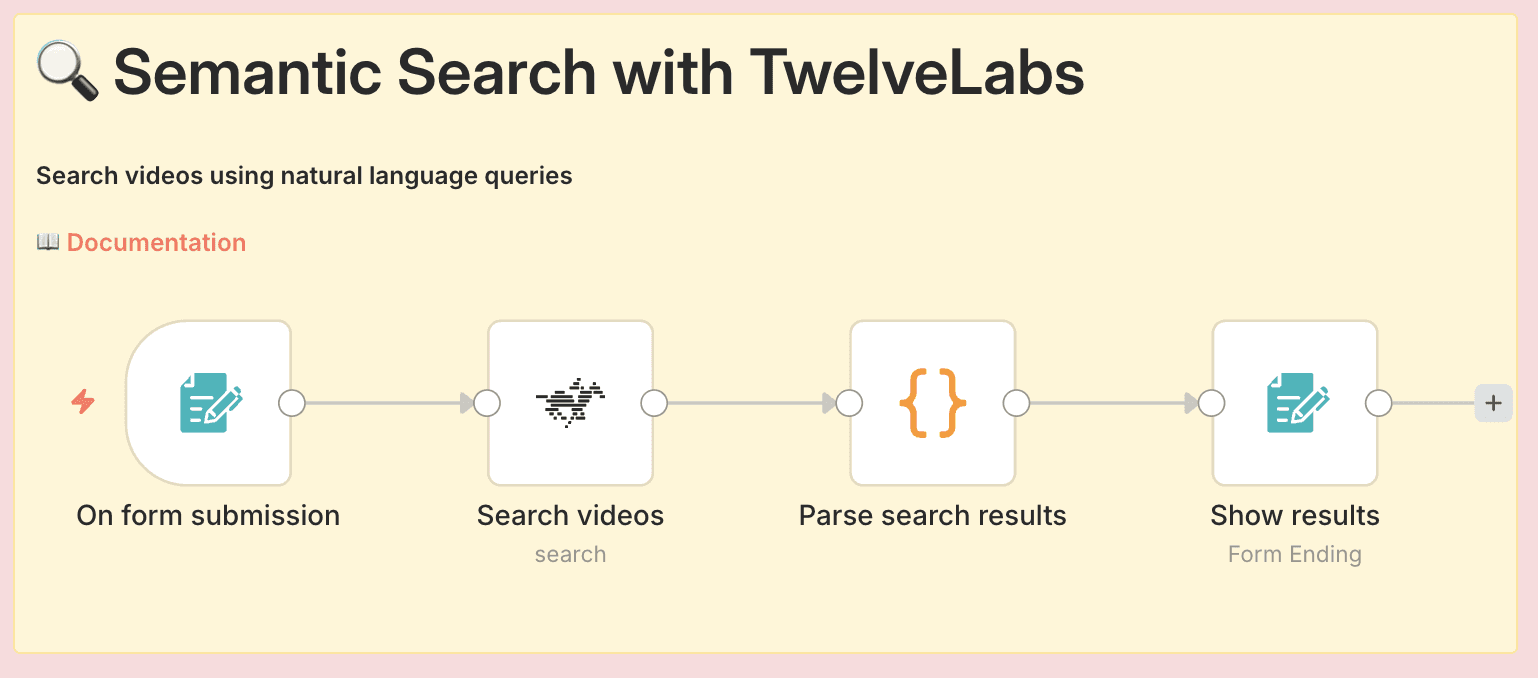
Pipeline Architecture
The complete workflow consists of four nodes:
Form Trigger - Displays search form to users
TwelveLabs Search - Performs semantic search across indexed videos
Code - Transforms JSON results into visual HTML grid
Form Completion - Displays formatted results to users
What Gets Built
A public web form where users enter natural language search queries
Semantic search across visual content, audio transcription, and on-screen text
A branded results page showing top 10 matches with thumbnails, timestamps, and transcriptions
Fully customizable CSS styling to match your brand
Prerequisites
Before you begin, ensure you have:
An n8n account (cloud or self-hosted)
A TwelveLabs account with API key
At least one index with videos already indexed
Videos successfully processed (check TwelveLabs dashboard for status)
4.2 - Create the Search Form
Now you want to create the form interface and apply custom branding.
Configure Form Trigger
Create a new workflow in n8n
Click "+" to add your first node
Search for "Form Trigger" and select it
Configure basic settings:
Form Title: "Semantic Search with TwelveLabs" (or your preferred title)
Form Description: Optional instructions for users
Add a form field:
Click "Add Field"
Field Label: "Search Query"
Field Type: Text
Required: Toggle ON
Apply Custom Styling
In the Form Trigger node, scroll to "Options"
Click "Add Option" → "Custom CSS"
Paste this CSS (customized for dark theme with purple accents):
:root {
    /* Colors - Change these to match your brand */
    --color-background: #0A0B0D;
    --color-card-bg: #141518;
    --color-accent: #8B5CF6;
    --color-text: #FFFFFF;
    --color-text-secondary: #9CA3AF;

    /* Apply colors to form elements */
    --color-header: var(--color-text);
    --color-label: #E5E7EB;
    --color-submit-btn-bg: var(--color-accent);
    --color-submit-btn-text: var(--color-text);
    --color-focus-border: var(--color-accent);

    /* Styling */
    --font-family: 'Inter', 'Open Sans', sans-serif;
    --border-radius-card: 12px;
    --border-radius-input: 8px;
    --container-width: 520px;
}

body {
    background: linear-gradient(135deg, #0A0B0D 0%, #1A1B1F 100%);
    min-height: 100vh;
}

button[type="submit"]:hover {
    background: #7C3AED;
    transform: translateY(-1px);
    box-shadow: 0 4px 12px rgba(139, 92, 246, 0.4);
    transition: all 0.2s ease;
}

input:focus, textarea:focus {
    box-shadow: 0 0 0 3px rgba(139, 92, 246, 0.2);
    transition: box-shadow 0.2s ease;
}
The Form Trigger creates a unique URL that displays your search form. After saving and activating the workflow, find the URL in the node settings (Test URL for testing, Production URL for sharing).
🎨 Customize it: Change the hex color values to match your brand. For example, replace #8B5CF6 (purple) with your brand color.
4.3 - Configure Search and Results
Connect TwelveLabs Search
Click "+" on your Form Trigger node
Search for "TwelveLabs" and select it
Configure the node:
Operation: Select "Search"
Index ID: Enter your TwelveLabs index ID (find this in your TwelveLabs dashboard)
Query Text: Click "Add Expression" and enter:
{{ $json["Search Query"] }}
Add your TwelveLabs API credentials if you haven't already
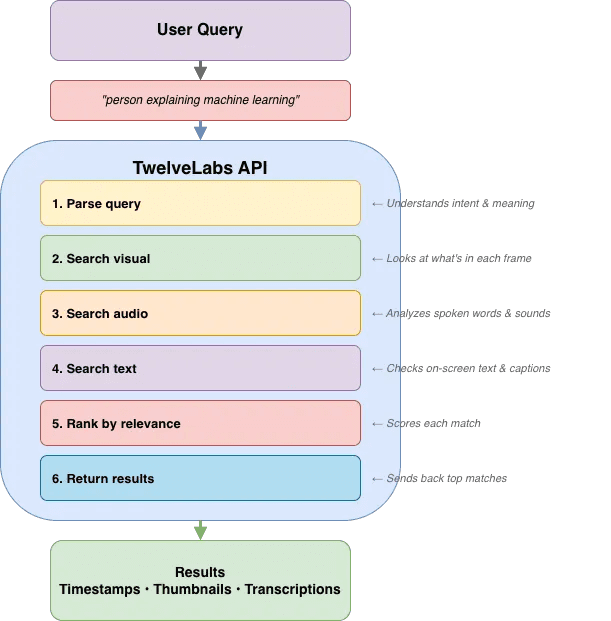
How TwelveLabs Search Works
TwelveLabs performs semantic search across three modalities simultaneously:
Visual Search - Objects, people, actions, scenes, colors, on-screen text (OCR)
Audio Search - Spoken dialogue, narration, music, sound effects, emotional tone
Conversational Search - Semantic understanding that combines visual + audio context
Results return as ranked clips with:
video_id- Source video identifierstart/end- Timestamp range in secondsrank- Relevance ranking (1 = best match)confidence- AI confidence level (high/medium/low)thumbnail_url- Preview image URLtranscription- Spoken words during clip (if available)
TwelveLabs returns an array of results. Here's a sample response:
{
  "data": [
    {
      "video_id": "6579a2c1d4b5e8f9a0123456",
      "start": 45.2,
      "end": 52.8,
      "rank": 1,
      "confidence": "high",
      "thumbnail_url": "https://thumbnails.twelvelabs.io/...",
      "transcription": "So let me explain how machine learning works..."
    },
    {
      "video_id": "6579a2c1d4b5e8f9a0789012",
      "start": 120.5,
      "end": 135.0,
      "rank": 2,
      "confidence": "medium",
      "thumbnail_url": "https://thumbnails.twelvelabs.io/...",
      "transcription": "Neural networks are inspired by the human brain..."
    }
  ]
}
Format Results as HTML
Click "+" on your TwelveLabs node
Search for "Code" and select it
Paste the code below in JavaScript
const searchData = $input.first().json.data;
const top10 = searchData.filter(result => result.rank <= 10);

let resultsHTML = `
<table style="width: 100%; border-collapse: separate; border-spacing: 20px; margin: 20px 0;">
  <tr>
    <td colspan="4" style="text-align: center; padding-bottom: 20px;">
      <h2 style="color: #8B5CF6; font-size: 28px; margin: 0;">
        Search Results (Top ${top10.length})
      </h2>
    </td>
  </tr>
`;

// Create 4-column grid
for (let i = 0; i < top10.length; i += 4) {
  resultsHTML += '<tr>';

  for (let j = 0; j < 4; j++) {
    if (i + j < top10.length) {
      const r = top10[i + j];
      resultsHTML += `
        <td style="width: 25%; vertical-align: top;">
          <div style="background: #141518;
                      border: 1px solid #2A2B30;
                      border-radius: 12px;
                      padding: 16px;
                      box-shadow: 0px 4px 12px rgba(139, 92, 246, 0.1);">

            <div style="position: relative; margin-bottom: 12px;">
              <span style="position: absolute;
                          top: 8px;
                          left: 8px;
                          background: #8B5CF6;
                          color: #FFFFFF;
                          padding: 6px 10px;
                          border-radius: 6px;
                          font-size: 14px;
                          font-weight: 600;
                          z-index: 10;">
                #${r.rank}
              </span>

              <img src="${r.thumbnail_url}"
                   alt="Result ${r.rank}"
                   style="width: 100%;
                          height: 140px;
                          object-fit: cover;
                          border-radius: 8px;
                          display: block;"/>
            </div>

            <div style="color: #FFFFFF; font-size: 13px; margin-bottom: 6px;">
              <strong style="color: #FFFFFF;">Video ID:</strong><br/>
              ${r.video_id.substring(0, 12)}...
            </div>

            <div style="color: #E5E7EB; font-size: 12px; margin-bottom: 6px;">
              <strong style="color: #FFFFFF;">Time:</strong>
              ${r.start}s - ${r.end}s
            </div>

            ${r.transcription ? `
              <div style="color: #D1D5DB;
                          font-size: 11px;
                          font-style: italic;
                          padding: 8px;
                          background: #1A1B1F;
                          border-radius: 6px;
                          margin-top: 8px;">
                "${r.transcription}"
              </div>
            ` : ''}

          </div>
        </td>
      `;
    } else {
      resultsHTML += '<td style="width: 25%;"></td>';
    }
  }

  resultsHTML += '</tr>';
}

resultsHTML += '</table>';
return [{ json: { html: resultsHTML } }];
This code filters to the top 10 results and builds a 4-column HTML table with thumbnails, rank badges, video IDs, timestamps, and transcriptions.
Display Results to the User
Click "+" on your Code node
Search for "Form" and select the regular Form node (not Form Trigger)
Configure the node:
Operation: Select "Completion"
Completion Title: "Search Results"
Completion Message: Click "Expression" and enter:
{{ $json.html }}
Style the Results Page
To make the results page match your form's branding, add the same custom CSS:
Scroll to "Options" in the node settings
Click "Add Option" → "Custom CSS"
Paste this CSS:
:root {
    /* Colors */
    --color-background: #0A0B0D;
    --color-card-bg: #141518;
    --color-accent: #8B5CF6;
    --color-text: #FFFFFF;
    --color-html-text: #FFFFFF;

    /* Make the container full-width for better results display */
    --container-width: 100% !important;

    /* Typography */
    --font-family: 'Inter', 'Open Sans', sans-serif;
    --font-size-header: 24px;

    /* Borders */
    --border-radius-card: 12px;
}

body {
    background: linear-gradient(135deg, #0A0B0D 0%, #1A1B1F 100%);
    min-height: 100vh;
    color: #FFFFFF;
}

/* Force container to full width for grid layout */
.container, .form-container, .completion-container {
    max-width: 100% !important;
    width: 100% !important;
}

/* Ensure all text is visible on dark background */
div, p, span, strong, h1, h2, h3 {
    color: inherit !important;
}
The Form Completion node displays the formatted HTML results page to users after search processing completes. The URL is the same as your form URL—n8n handles the redirect automatically.
4.4 - Testing and Troubleshooting
Pre-Flight Checklist
Before testing, verify these items:
[ ] All 4 nodes are connected in order: Form Trigger → TwelveLabs → Code (Format HTML) → Form (Completion)
[ ] TwelveLabs credentials are configured
[ ] Index ID is correct (matches your TwelveLabs dashboard)
[ ] Videos have been indexed (search won't find un-indexed videos)
[ ] Workflow is saved
Activate and Test
Click the "Inactive" toggle in the top-right corner to activate your workflow
Click on the Form Trigger node to view URLs:
Test URL - Use for testing
Production URL - Share with end users
Copy the Test URL and open in a new browser tab
Enter a search query related to your indexed videos (e.g., "person explaining concepts")
Click Submit and wait for results (typically 3-5 seconds)
Expected Behavior
✅ Form loads with your custom styling
✅ After submitting, you see a loading state briefly
✅ Results page appears with video thumbnails
✅ Each result shows rank, timestamp, and transcription (if available)
Common Issues and Solutions
Issue | Possible Cause | Solution |
|---|---|---|
Form doesn't load | Workflow not activated | Toggle the Active switch ON in top-right |
Form doesn't load | Browser cache | Try incognito/private window |
No results found | Wrong Index ID | Verify Index ID in TwelveLabs dashboard matches node configuration |
No results found | Videos not indexed | Check indexing status in TwelveLabs (videos must show "Ready") |
No results found | Query too specific | Try broader search terms that you know exist in your videos |
Results show raw JSON text | Expression toggle not enabled | Click "Expression" toggle in Form Completion Message field |
Results show literal | Expression toggle not enabled | Must use Expression mode, not plain text |
Styling broken | CSS not applied to both nodes | Add custom CSS to BOTH Form Trigger AND Form Completion nodes |
Results appear but thumbnails broken | Thumbnail URLs expired or invalid | Check TwelveLabs API response; thumbnails should be accessible |
Wrong search query processed | Incorrect expression | Verify TwelveLabs Query Text is exactly |
Debug with Execution History
If something fails:
Go to "Executions" in the left sidebar
Find your recent test execution (shows timestamp and status)
Click to expand and examine:
Input/output data at each node
Error messages with stack traces
Execution time per step
Look for red error indicators on specific nodes—this shows exactly where the workflow broke.
💡 Debug tip: Add a temporary Code node between TwelveLabs and the formatting Code node with
console.log(JSON.stringify($input.all(), null, 2)); return $input.all();to inspect the raw search response.
Testing with Sample Queries
Try these search patterns based on your video content:
If your videos contain... | Try searching for... | Why it works |
|---|---|---|
People talking | "person speaking to camera" | Visual + audio detection |
Product demos | "showing how to use" | Action recognition + speech |
Outdoor footage | "outdoor nature scene" | Scene classification |
Presentations | "slides with charts" | Visual detection + OCR |
Interviews | "two people conversation" | Person detection + dialogue |
Tutorials | "step by step tutorial" | Semantic understanding |
Branding | "logo on screen" | Visual object detection + OCR |
Complete Workflow Overview
Here's your complete semantic search pipeline:
This completes the semantic search interface workflow. Users can now search your video library using natural language queries, with results displayed in a branded, visual interface. The same form URL works for both submission and results—n8n handles the state transition automatically.
5 - Conclusion
You have built two production-ready video AI workflows without writing custom integration code. The first workflow automates video ingestion from S3, runs parallel AI analysis (compliance, summaries, chapters, highlights), and stores enriched metadata in Airtable. The second creates a public semantic search interface where users can find video clips using natural language queries. Both workflows demonstrate how n8n and TwelveLabs eliminate the infrastructure complexity that typically blocks video AI projects from reaching production.
The TwelveLabs n8n community node gives you immediate access to multimodal video understanding—visual analysis, audio transcription, on-screen text extraction, and semantic search—through a visual interface. No SDKs to learn, no authentication boilerplate, no retry logic to build. Connect your existing tools (S3, Airtable, databases, MAMs, webhooks) and ship working video AI in hours, not weeks. These workflows are starting points: swap Airtable for your database, add approval gates for compliance workflows, or integrate search results into your existing applications.
What's next: These patterns extend to other use cases—automated clip generation for social media, real-time content moderation, video library migration with metadata enrichment, or custom recommendation engines. The TwelveLabs documentation covers additional API capabilities (embedding extraction, custom prompts), and the n8n community forum has examples of advanced workflow patterns. For technical questions, join the TwelveLabs Discord community or reach out to jordan@twelvelabs.io and brice@twelvelabs.io.
1 - Overview Introduction
1.1 - Overview of n8n: Automation Built for Technical Teams
n8n is an open source workflow automation platform that connects applications, APIs, and services through a visual, node based interface. Unlike many traditional automation tools, n8n gives developers and technical teams full control over their data and logic, with the flexibility to self host or run it in the cloud.
The platform has gained strong traction in AI driven use cases because it bridges the gap between AI services and existing business systems. With more than 400 pre built integrations and support for custom code, n8n lets teams orchestrate complex AI workflows without having to build and maintain infrastructure from scratch.
For video AI in particular, n8n is well suited to handle the unglamorous but critical parts of the workflow: moving media between storage systems, triggering analysis jobs, handling retries and failures, parsing model outputs, and routing results back into operational tools like MAMs or databases.
What really makes n8n powerful for AI implementations is its ability to chain multiple steps together, manage error recovery, and transform data between different formats, all through a visual interface that technical teams can iterate on quickly and adapt as requirements evolve.
1.2 - Why TwelveLabs + n8n: Accelerating Video AI to Production
TwelveLabs delivers state-of-the-art multimodal video understanding through APIs, but calling an API is just the first step. Real video workflows are messy: content sits in MAMs, results need to land in databases, compliance teams have their own tools, and search needs to work inside your existing applications.
n8n solves this by orchestrating the connections between TwelveLabs and your systems. Instead of writing custom integration code for each platform, n8n gives you pre-built connectors and flexible logic to push video URLs to TwelveLabs, process what comes back, and route the results where they need to go.
This dramatically shortens time to production. TwelveLabs customers can connect video AI to their actual workflows in days rather than months—whether that means enriching a media library with metadata, automating compliance reviews, or adding semantic search to an internal app.
1.3 - Who This Is For
This tutorial is built for technical teams working with video at scale who need practical automation that integrates seamlessly with existing tools:
Media & Entertainment professionals (production, post-production, broadcast): Automate video analysis, content moderation, and metadata enrichment across large libraries.
Enterprise teams managing internal video (corporate communications, marketing, training): Add better search, organization, and compliance workflows.
Platform and engineering teams building video applications: Embed semantic search, recommendations, or automated analysis without managing AI infrastructure.
System integrators and solutions architects: Deliver video AI projects across different client environments efficiently.
API and workflow practitioners (visual or code-based): Connect production-ready video AI to your stack with the flexibility you need.
2 - Key Operations
The TwelveLabs n8n community node provides three core resource groups that handle the complete video AI workflow—from index creation and video upload to analysis and insights generation. Each resource contains specific operations that map to common tasks in production video workflows.
2.1 - Index Resource: Manage Searchable Video Indexes
The Index resource lets you create and manage the foundational containers where your videos are stored and processed.
Create Index – Set up a new searchable index with AI models. You choose which model powers your index (Pegasus Plus or Marengo Plus), configure model-specific options, and enable any addons you need for your use case.
List Indexes – Retrieve all indexes in your account so you can see what's already been created and manage multiple projects or environments.
Search Index by Name – Quickly locate a specific index by name, useful when you're building workflows that target particular video collections or projects.
2.2 - Video Resource: Upload and Manage Videos Within Indexes
The Video resource handles the practical work of getting your content into an index and tracking its status.
Upload Video – Add videos to an index with flexible input options. You can upload video files directly or provide video URLs (helpful when your content is already in cloud storage like S3). Videos are automatically processed and indexed once uploaded.
List Videos – Retrieve all videos stored in a specific index. This operation returns video metadata and processing status, so you know when videos are ready for analysis and can track ingestion progress.
2.3 - Analysis Resource: Generate AI-Powered Insights from Videos
The Analysis resource produces actionable intelligence from your indexed video content.
Generate Summary – Create concise summaries of video content with customizable summary types and adjustable prompt templates. Useful for quickly understanding long videos or creating digestible descriptions for metadata.
Generate Chapters – Automatically segment videos into chapters using smart chapter detection. Results include timestamped segments, making it easy to navigate long-form content or create structured outlines.
Generate Highlights – Extract key moments from videos by identifying important scenes. Use this to create highlight reels, clip compilations, or surface the most relevant portions of your video library.
3 - Basic Workflow Demo: S3 to Metadata
3.1 - Workflow Overview
This workflow demonstrates end-to-end video AI automation: ingest videos from S3, analyze them with TwelveLabs, and store enriched metadata in Airtable.
Prerequisites
Before you begin, make sure you have:
An n8n account (cloud or self-hosted)
An AWS account with S3 access
A TwelveLabs account and API key
An Airtable account
Pipeline Architecture
The workflow consists of three main stages:
1. Index to TwelveLabs
Pull video files from S3 bucket
Generate pre-signed URLs via Lambda
Remove duplicate URLs
Index videos in TwelveLabs
2. Analyze Video with TwelveLabs
Run 4 analyses in parallel:
Compliance: Flag content against platform policies (YouTube ABCD framework)
Summary: Extract key themes and overview
Chapters: Generate timestamped segments
Highlights: Pull out notable moments
Merge results and parse compliance status
Structure output for database storage
3. Store Results
Upsert to Airtable with tags and metadata
In production, results typically go to MAMs, SQL/NoSQL databases, or cloud data platforms
Key Technical Patterns
Pre-signed URLs - Securely share private S3 files with TwelveLabs without exposing AWS credentials
Parallel processing - Run 4 analysis tasks simultaneously, then merge results
Upsert logic - Intelligently create or update Airtable records (no duplicates on re-runs)
Status parsing - Extract structured compliance status from AI-generated text
3.2 - Setup: Trigger and S3 Connection
Step 1: Create the Manual Trigger
Open n8n and click "New Workflow"
Click the "+" button to add your first node
Search for "Manual Trigger" and select it
The Manual Trigger acts as a "Start" button for your workflow. When you click "Execute Workflow" in n8n, this node fires and kicks off everything downstream.
💡 Production tip: Once working, swap this for automated triggers like Schedule Trigger (run every hour/day), Webhook Trigger (run when another app sends a request), or S3 Trigger (run when new files upload).
Step 2: Fetch Your Videos from S3
Click the "+" button on your Manual Trigger node
Search for "AWS S3" and select it
Configure the node:
Operation: Select "Get Many"
Bucket Name: Enter your bucket name (e.g.,
my-video-bucket)Return All: Toggle this ON
Click "Credentials" and add your AWS credentials:
Enter your AWS Access Key ID
Enter your AWS Secret Access Key
Select your region
This retrieves metadata about every file in your S3 bucket—Key (file path/name), Size, and LastModified timestamp. It doesn't download actual videos (too slow and expensive), just the information needed to generate access links.
⚠️ Permissions check: Ensure your AWS credentials have s3:ListBucket and s3:GetObject permissions. If you get "Access Denied," check your IAM policy.
Step 3: Generate Secure Access Links
TwelveLabs needs to download your videos, but your S3 bucket is private. Pre-signed URLs solve this—they're temporary, secure links (valid for 1 hour) that work without AWS credentials.
Click the "+" button on your S3 node
Search for "AWS Lambda" and select it
Configure the node:
Function: Select or paste your Lambda function ARN
Payload: Click "Add Expression" and enter:
{{ JSON.stringify({
  bucketName: "your-bucket-name",
  files: $input.all().map(item => item.json),
  expiresIn: 3600
}) }}
Your Lambda function should loop through each file, generate a pre-signed URL using the AWS SDK, and return all URLs to n8n.
💡 Why use Lambda? n8n can't generate pre-signed URLs directly because it requires the AWS SDK running server-side. Lambda handles this for us.
Step 4: Parse and Clean the URL Data
Click the "+" button on your Lambda node
Search for "Code" and select it
Paste this code:
// Parse Lambda response and remove duplicates
const seenKeys = new Set();
const results = [];

for (const item of $input.all()) {
  const response = JSON.parse(item.json.result.body);

  for (const file of response.files) {
    if (!seenKeys.has(file.Key)) {
      seenKeys.add(file.Key);
      results.push({
        json: {
          Key: file.Key,
          presignedUrl: file.presignedUrl,
          Size: file.Size,
          LastModified: file.LastModified,
          expiresIn: file.expiresIn
        }
      });
    }
  }
}

return results;
This code parses the Lambda response (which returns a string), removes any duplicate files using a Set, and creates one clean n8n item per video file.
3.3 - Index Videos in TwelveLabs
Now we upload each video to TwelveLabs for AI processing.
Click the "+" button on your Code node
Search for "TwelveLabs" and select it
Configure the node:
Operation: Select "Upload URL"
Index ID: Enter your TwelveLabs index ID (find this in your TwelveLabs dashboard)
Video URL: Click "Add Expression" and enter
{{ $json.presignedUrl }}
Add your TwelveLabs API credentials
What Gets Indexed
TwelveLabs processes each video to:
Analyze visual content - Objects, people, actions, scenes, colors, compositions
Transcribe audio - Spoken words, dialogue, narration
Extract on-screen text - OCR for any text appearing in frames
Create embeddings - Vector representations for semantic search
The node returns a videoId that you'll use in subsequent analysis steps.
⏱️ Timing: Indexing takes time depending on video length (typically 1-3 minutes per minute of video). n8n waits for completion before proceeding.
3.4 - Configure Parallel Analysis
Instead of running analyses sequentially (slow), we'll run four different analyses simultaneously to save time.
Set Up Parallel Branches
From your TwelveLabs indexing node, create four separate connections to four different TwelveLabs Analysis nodes:
Click and drag from the output of "Index to TwelveLabs"
Create your first TwelveLabs Analysis node
Repeat three more times for a total of four analysis nodes
Analysis Types Comparison
Each analysis node uses the same basic configuration but different prompts:
1 - Compliance Analysis
Purpose: Flag content against YouTube ABCD framework
Output Format: Status (Pass/Needs Review/Failed) + flagged issues with timestamps
Compliance Analysis Prompt:
Analyze this video for content compliance using YouTube's ABCD framework:

**A - Adult Content:**
- Nudity or sexual content
- Sexually suggestive content
- Adult themes

**B - Brand Safety:**
- Inflammatory or demeaning content
- Hateful content targeting protected groups
- Harmful or dangerous acts
- Shocking or graphic content
- Profanity and crude language

**C - Copyright:**
- Copyrighted music, video, or images
- Unlicensed third-party content

**D - Dangerous/Harmful:**
- Violence or graphic content
- Drugs, dangerous products, or substances
- Firearms and weapons
- Misinformation (health, elections, etc.)

For each flagged issue, provide:
1. **Timestamp**: When it appears
2. **Category**: A, B, C, or D
3. **Issue**: Brief description
4. **Action**: Allow, Restrict (age-gate), Monetization off, or Remove

**Output:**
2 - Summary Analysis
Purpose: Extract key themes and overview
Output Format: 3-4 paragraph summary of video content
Summary Analysis Prompt:
3 - Chapters Analysis
Purpose: Generate timestamped segments
Output Format: Chapter titles with timestamps and descriptions
Chapters Analysis Prompt:
4 - Highlights Analysis
Purpose: Extract notable moments
Output Format: Key scenes with timestamps and reasons
Highlights Analysis Prompt:
Shared Node Configuration
For each of the four analysis nodes, use this base configuration:
Operation: Select "Generate" or "Analysis"
Index ID:
{{ $json.indexId }}Video ID:
{{ $json.videoId }}Temperature: Set to
0.2(lower = more consistent results)
3.5 - Merge and Structure Results
Merge Parallel Results
Click "+" and search for "Merge"
Configure the node:
Number of Inputs: Set to
4
Connect each of your four analysis nodes to this Merge node:
Compliance → Input 1
Summary → Input 2
Chapters → Input 3
Highlights → Input 4
The Merge node acts as a checkpoint, waiting until ALL four analysis nodes complete before proceeding. This prevents saving incomplete data.
Structure the Data
Click "+" on your Merge node and add a Code node
Paste this code:
// Extract and organize all analysis results
const allItems = $input.all();
const videoId = allItems[0]?.json?.videoId || '';
const complianceResponse = allItems[0]?.json?.response || '';

// Parse compliance status from AI response
let complianceStatus = 'NEEDS REVIEW'; // Default

if (complianceResponse.includes('Overall Status: Suitable')) {
  complianceStatus = 'PASS';
} else if (complianceResponse.includes('Overall Status: Not Suitable')) {
  complianceStatus = 'FAILED';
} else if (complianceResponse.includes('Overall Status: Needs Review')) {
  complianceStatus = 'NEEDS REVIEW';
}

// Create structured output
const result = {
  videoID: videoId,
  'Compliance Status': complianceStatus,
  'Compliance report': complianceResponse,
  'Summary': allItems[1]?.json?.response || '',
  'Chapters': allItems[2]?.json?.response || '',
  'Highlights': allItems[3]?.json?.response || ''
};

return [{ json: result }];
This code:
Extracts the video ID for tracking
Parses compliance status by looking for specific phrases in the AI's response
Normalizes status to exactly one of three values (PASS/FAILED/NEEDS REVIEW) for Airtable's Select field
Organizes all four analysis results into a single, flat object
3.6 - Save Results to Airtable
Set Up Your Airtable Base
Create a new Airtable base
Create a table with these fields:
videoID(Single line text)Compliance(Single select with options: PASS, FAILED, NEEDS REVIEW)Compliance report(Long text)Summary(Long text)Chapters(Long text)Highlights(Long text)
Configure the Airtable Node
Click "+" on your Code node and search for "Airtable"
Configure the node:
Operation: Select "Upsert" (this creates OR updates records)
Base: Select your Airtable base
Table: Select your table
Map your fields:
videoID→{{ $json.videoID }}Compliance→{{ $json["Compliance Status"] }}Compliance report→{{ $json["Compliance report"] }}Summary→{{ $json.Summary }}Chapters→{{ $json.Chapters }}Highlights→{{ $json.Highlights }}
Set Matching Column to
videoID
The upsert operation is smart:
If the
videoIDdoesn't exist → Creates a new recordIf the
videoIDalready exists → Updates the existing record
This means you can re-run the workflow on the same videos without creating duplicates!
3.7 - Testing the Workflow
Pre-Flight Checklist
Before testing, verify:
[ ] All nodes are connected in sequence
[ ] TwelveLabs and AWS credentials are configured
[ ] Index ID matches your TwelveLabs dashboard
[ ] Videos have been indexed in TwelveLabs
[ ] Airtable base and table are set up
[ ] Workflow is saved
Execute the Test
Click the "Inactive" toggle in the top-right corner to activate your workflow
Click "Execute Workflow" button
Watch the execution flow through each node
Check for green checkmarks on all nodes (indicates success)
Expected Results
✅ S3 node: Returns list of video files with metadata
✅ Lambda node: Returns pre-signed URLs for each file
✅ Code node: Returns deduplicated file list
✅ TwelveLabs Index node: Returns videoId for each upload
✅ Four analysis nodes: Return analysis responses
✅ Merge node: Combines all four analysis results
✅ Code node: Returns structured data object
✅ Airtable node: Confirms record creation/update
Verify in Airtable
Open your Airtable base
You should see new records with:
Video IDs
Compliance status (PASS/FAILED/NEEDS REVIEW)
Full analysis results in respective fields
Troubleshooting
Issue | Possible Cause | Solution |
|---|---|---|
S3 node fails | Missing permissions | Check IAM policy includes |
Lambda returns error | Function not found or wrong ARN | Verify Lambda ARN in AWS console |
TwelveLabs indexing fails | Invalid Index ID | Double-check Index ID in TwelveLabs dashboard |
No analysis results | Videos not fully indexed | Wait for indexing to complete (check TwelveLabs) |
Airtable fails | Field mapping mismatch | Ensure field names match exactly (case-sensitive) |
Compliance status shows as text | Select options not configured | Add PASS, FAILED, NEEDS REVIEW as select options |
Debug with Execution History
If something fails:
Go to "Executions" in the left sidebar
Find your recent test execution
Click to expand and examine:
Data flowing through each node
Error messages with stack traces
Execution time for each step
💡Pro tip: Add temporary "Set" or "Code" nodes between steps with
console.log(JSON.stringify($input.all(), null, 2))to inspect data at any point in the workflow.
This completes the S3 to Metadata workflow. Your videos are now automatically indexed, analyzed across four dimensions (compliance, summary, chapters, highlights), and stored in Airtable for easy access and management.
4 - Video Semantic Search Interface with n8n and TwelveLabs
4.1 - Workflow Overview
This workflow creates a branded web interface for semantic video search using TwelveLabs' multimodal AI.
Pipeline Architecture
The complete workflow consists of four nodes:
Form Trigger - Displays search form to users
TwelveLabs Search - Performs semantic search across indexed videos
Code - Transforms JSON results into visual HTML grid
Form Completion - Displays formatted results to users
What Gets Built
A public web form where users enter natural language search queries
Semantic search across visual content, audio transcription, and on-screen text
A branded results page showing top 10 matches with thumbnails, timestamps, and transcriptions
Fully customizable CSS styling to match your brand
Prerequisites
Before you begin, ensure you have:
An n8n account (cloud or self-hosted)
A TwelveLabs account with API key
At least one index with videos already indexed
Videos successfully processed (check TwelveLabs dashboard for status)
4.2 - Create the Search Form
Now you want to create the form interface and apply custom branding.
Configure Form Trigger
Create a new workflow in n8n
Click "+" to add your first node
Search for "Form Trigger" and select it
Configure basic settings:
Form Title: "Semantic Search with TwelveLabs" (or your preferred title)
Form Description: Optional instructions for users
Add a form field:
Click "Add Field"
Field Label: "Search Query"
Field Type: Text
Required: Toggle ON
Apply Custom Styling
In the Form Trigger node, scroll to "Options"
Click "Add Option" → "Custom CSS"
Paste this CSS (customized for dark theme with purple accents):
:root {
    /* Colors - Change these to match your brand */
    --color-background: #0A0B0D;
    --color-card-bg: #141518;
    --color-accent: #8B5CF6;
    --color-text: #FFFFFF;
    --color-text-secondary: #9CA3AF;

    /* Apply colors to form elements */
    --color-header: var(--color-text);
    --color-label: #E5E7EB;
    --color-submit-btn-bg: var(--color-accent);
    --color-submit-btn-text: var(--color-text);
    --color-focus-border: var(--color-accent);

    /* Styling */
    --font-family: 'Inter', 'Open Sans', sans-serif;
    --border-radius-card: 12px;
    --border-radius-input: 8px;
    --container-width: 520px;
}

body {
    background: linear-gradient(135deg, #0A0B0D 0%, #1A1B1F 100%);
    min-height: 100vh;
}

button[type="submit"]:hover {
    background: #7C3AED;
    transform: translateY(-1px);
    box-shadow: 0 4px 12px rgba(139, 92, 246, 0.4);
    transition: all 0.2s ease;
}

input:focus, textarea:focus {
    box-shadow: 0 0 0 3px rgba(139, 92, 246, 0.2);
    transition: box-shadow 0.2s ease;
}
The Form Trigger creates a unique URL that displays your search form. After saving and activating the workflow, find the URL in the node settings (Test URL for testing, Production URL for sharing).
🎨 Customize it: Change the hex color values to match your brand. For example, replace #8B5CF6 (purple) with your brand color.
4.3 - Configure Search and Results
Connect TwelveLabs Search
Click "+" on your Form Trigger node
Search for "TwelveLabs" and select it
Configure the node:
Operation: Select "Search"
Index ID: Enter your TwelveLabs index ID (find this in your TwelveLabs dashboard)
Query Text: Click "Add Expression" and enter:
{{ $json["Search Query"] }}
Add your TwelveLabs API credentials if you haven't already
How TwelveLabs Search Works
TwelveLabs performs semantic search across three modalities simultaneously:
Visual Search - Objects, people, actions, scenes, colors, on-screen text (OCR)
Audio Search - Spoken dialogue, narration, music, sound effects, emotional tone
Conversational Search - Semantic understanding that combines visual + audio context
Results return as ranked clips with:
video_id- Source video identifierstart/end- Timestamp range in secondsrank- Relevance ranking (1 = best match)confidence- AI confidence level (high/medium/low)thumbnail_url- Preview image URLtranscription- Spoken words during clip (if available)
TwelveLabs returns an array of results. Here's a sample response:
{
  "data": [
    {
      "video_id": "6579a2c1d4b5e8f9a0123456",
      "start": 45.2,
      "end": 52.8,
      "rank": 1,
      "confidence": "high",
      "thumbnail_url": "https://thumbnails.twelvelabs.io/...",
      "transcription": "So let me explain how machine learning works..."
    },
    {
      "video_id": "6579a2c1d4b5e8f9a0789012",
      "start": 120.5,
      "end": 135.0,
      "rank": 2,
      "confidence": "medium",
      "thumbnail_url": "https://thumbnails.twelvelabs.io/...",
      "transcription": "Neural networks are inspired by the human brain..."
    }
  ]
}
Format Results as HTML
Click "+" on your TwelveLabs node
Search for "Code" and select it
Paste the code below in JavaScript
const searchData = $input.first().json.data;
const top10 = searchData.filter(result => result.rank <= 10);

let resultsHTML = `
<table style="width: 100%; border-collapse: separate; border-spacing: 20px; margin: 20px 0;">
  <tr>
    <td colspan="4" style="text-align: center; padding-bottom: 20px;">
      <h2 style="color: #8B5CF6; font-size: 28px; margin: 0;">
        Search Results (Top ${top10.length})
      </h2>
    </td>
  </tr>
`;

// Create 4-column grid
for (let i = 0; i < top10.length; i += 4) {
  resultsHTML += '<tr>';

  for (let j = 0; j < 4; j++) {
    if (i + j < top10.length) {
      const r = top10[i + j];
      resultsHTML += `
        <td style="width: 25%; vertical-align: top;">
          <div style="background: #141518;
                      border: 1px solid #2A2B30;
                      border-radius: 12px;
                      padding: 16px;
                      box-shadow: 0px 4px 12px rgba(139, 92, 246, 0.1);">

            <div style="position: relative; margin-bottom: 12px;">
              <span style="position: absolute;
                          top: 8px;
                          left: 8px;
                          background: #8B5CF6;
                          color: #FFFFFF;
                          padding: 6px 10px;
                          border-radius: 6px;
                          font-size: 14px;
                          font-weight: 600;
                          z-index: 10;">
                #${r.rank}
              </span>

              <img src="${r.thumbnail_url}"
                   alt="Result ${r.rank}"
                   style="width: 100%;
                          height: 140px;
                          object-fit: cover;
                          border-radius: 8px;
                          display: block;"/>
            </div>

            <div style="color: #FFFFFF; font-size: 13px; margin-bottom: 6px;">
              <strong style="color: #FFFFFF;">Video ID:</strong><br/>
              ${r.video_id.substring(0, 12)}...
            </div>

            <div style="color: #E5E7EB; font-size: 12px; margin-bottom: 6px;">
              <strong style="color: #FFFFFF;">Time:</strong>
              ${r.start}s - ${r.end}s
            </div>

            ${r.transcription ? `
              <div style="color: #D1D5DB;
                          font-size: 11px;
                          font-style: italic;
                          padding: 8px;
                          background: #1A1B1F;
                          border-radius: 6px;
                          margin-top: 8px;">
                "${r.transcription}"
              </div>
            ` : ''}

          </div>
        </td>
      `;
    } else {
      resultsHTML += '<td style="width: 25%;"></td>';
    }
  }

  resultsHTML += '</tr>';
}

resultsHTML += '</table>';
return [{ json: { html: resultsHTML } }];
This code filters to the top 10 results and builds a 4-column HTML table with thumbnails, rank badges, video IDs, timestamps, and transcriptions.
Display Results to the User
Click "+" on your Code node
Search for "Form" and select the regular Form node (not Form Trigger)
Configure the node:
Operation: Select "Completion"
Completion Title: "Search Results"
Completion Message: Click "Expression" and enter:
{{ $json.html }}
Style the Results Page
To make the results page match your form's branding, add the same custom CSS:
Scroll to "Options" in the node settings
Click "Add Option" → "Custom CSS"
Paste this CSS:
:root {
    /* Colors */
    --color-background: #0A0B0D;
    --color-card-bg: #141518;
    --color-accent: #8B5CF6;
    --color-text: #FFFFFF;
    --color-html-text: #FFFFFF;

    /* Make the container full-width for better results display */
    --container-width: 100% !important;

    /* Typography */
    --font-family: 'Inter', 'Open Sans', sans-serif;
    --font-size-header: 24px;

    /* Borders */
    --border-radius-card: 12px;
}

body {
    background: linear-gradient(135deg, #0A0B0D 0%, #1A1B1F 100%);
    min-height: 100vh;
    color: #FFFFFF;
}

/* Force container to full width for grid layout */
.container, .form-container, .completion-container {
    max-width: 100% !important;
    width: 100% !important;
}

/* Ensure all text is visible on dark background */
div, p, span, strong, h1, h2, h3 {
    color: inherit !important;
}
The Form Completion node displays the formatted HTML results page to users after search processing completes. The URL is the same as your form URL—n8n handles the redirect automatically.
4.4 - Testing and Troubleshooting
Pre-Flight Checklist
Before testing, verify these items:
[ ] All 4 nodes are connected in order: Form Trigger → TwelveLabs → Code (Format HTML) → Form (Completion)
[ ] TwelveLabs credentials are configured
[ ] Index ID is correct (matches your TwelveLabs dashboard)
[ ] Videos have been indexed (search won't find un-indexed videos)
[ ] Workflow is saved
Activate and Test
Click the "Inactive" toggle in the top-right corner to activate your workflow
Click on the Form Trigger node to view URLs:
Test URL - Use for testing
Production URL - Share with end users
Copy the Test URL and open in a new browser tab
Enter a search query related to your indexed videos (e.g., "person explaining concepts")
Click Submit and wait for results (typically 3-5 seconds)
Expected Behavior
✅ Form loads with your custom styling
✅ After submitting, you see a loading state briefly
✅ Results page appears with video thumbnails
✅ Each result shows rank, timestamp, and transcription (if available)
Common Issues and Solutions
Issue | Possible Cause | Solution |
|---|---|---|
Form doesn't load | Workflow not activated | Toggle the Active switch ON in top-right |
Form doesn't load | Browser cache | Try incognito/private window |
No results found | Wrong Index ID | Verify Index ID in TwelveLabs dashboard matches node configuration |
No results found | Videos not indexed | Check indexing status in TwelveLabs (videos must show "Ready") |
No results found | Query too specific | Try broader search terms that you know exist in your videos |
Results show raw JSON text | Expression toggle not enabled | Click "Expression" toggle in Form Completion Message field |
Results show literal | Expression toggle not enabled | Must use Expression mode, not plain text |
Styling broken | CSS not applied to both nodes | Add custom CSS to BOTH Form Trigger AND Form Completion nodes |
Results appear but thumbnails broken | Thumbnail URLs expired or invalid | Check TwelveLabs API response; thumbnails should be accessible |
Wrong search query processed | Incorrect expression | Verify TwelveLabs Query Text is exactly |
Debug with Execution History
If something fails:
Go to "Executions" in the left sidebar
Find your recent test execution (shows timestamp and status)
Click to expand and examine:
Input/output data at each node
Error messages with stack traces
Execution time per step
Look for red error indicators on specific nodes—this shows exactly where the workflow broke.
💡 Debug tip: Add a temporary Code node between TwelveLabs and the formatting Code node with
console.log(JSON.stringify($input.all(), null, 2)); return $input.all();to inspect the raw search response.
Testing with Sample Queries
Try these search patterns based on your video content:
If your videos contain... | Try searching for... | Why it works |
|---|---|---|
People talking | "person speaking to camera" | Visual + audio detection |
Product demos | "showing how to use" | Action recognition + speech |
Outdoor footage | "outdoor nature scene" | Scene classification |
Presentations | "slides with charts" | Visual detection + OCR |
Interviews | "two people conversation" | Person detection + dialogue |
Tutorials | "step by step tutorial" | Semantic understanding |
Branding | "logo on screen" | Visual object detection + OCR |
Complete Workflow Overview
Here's your complete semantic search pipeline:
This completes the semantic search interface workflow. Users can now search your video library using natural language queries, with results displayed in a branded, visual interface. The same form URL works for both submission and results—n8n handles the state transition automatically.
5 - Conclusion
You have built two production-ready video AI workflows without writing custom integration code. The first workflow automates video ingestion from S3, runs parallel AI analysis (compliance, summaries, chapters, highlights), and stores enriched metadata in Airtable. The second creates a public semantic search interface where users can find video clips using natural language queries. Both workflows demonstrate how n8n and TwelveLabs eliminate the infrastructure complexity that typically blocks video AI projects from reaching production.
The TwelveLabs n8n community node gives you immediate access to multimodal video understanding—visual analysis, audio transcription, on-screen text extraction, and semantic search—through a visual interface. No SDKs to learn, no authentication boilerplate, no retry logic to build. Connect your existing tools (S3, Airtable, databases, MAMs, webhooks) and ship working video AI in hours, not weeks. These workflows are starting points: swap Airtable for your database, add approval gates for compliance workflows, or integrate search results into your existing applications.
What's next: These patterns extend to other use cases—automated clip generation for social media, real-time content moderation, video library migration with metadata enrichment, or custom recommendation engines. The TwelveLabs documentation covers additional API capabilities (embedding extraction, custom prompts), and the n8n community forum has examples of advanced workflow patterns. For technical questions, join the TwelveLabs Discord community or reach out to jordan@twelvelabs.io and brice@twelvelabs.io.


Platform
Enterprise
©
2026
TwelveLabs, Inc. All Rights Reserved

Platform
Enterprise
©
2026
TwelveLabs, Inc. All Rights Reserved

Platform
Enterprise
©
2026
TwelveLabs, Inc. All Rights Reserved